How to Use AirPods: Pairing, Controls, Settings and Function
Unlock the full potential of your AirPods with this ultimate guide, perfect for any AirPods model. Learn easy pairing, setup, mastering controls, customizing settings, and tips for finding or resetting lost AirPods. Everything you need for optimal use is right here!
Pair AirPods with your Apple devices
Always ensure your devices are updated to the latest version of their respective operating systems for the best compatibility and experience.
After initial setup with one Apple device, your AirPods will connect automatically to any of your other Apple devices logged in with the same Apple ID.
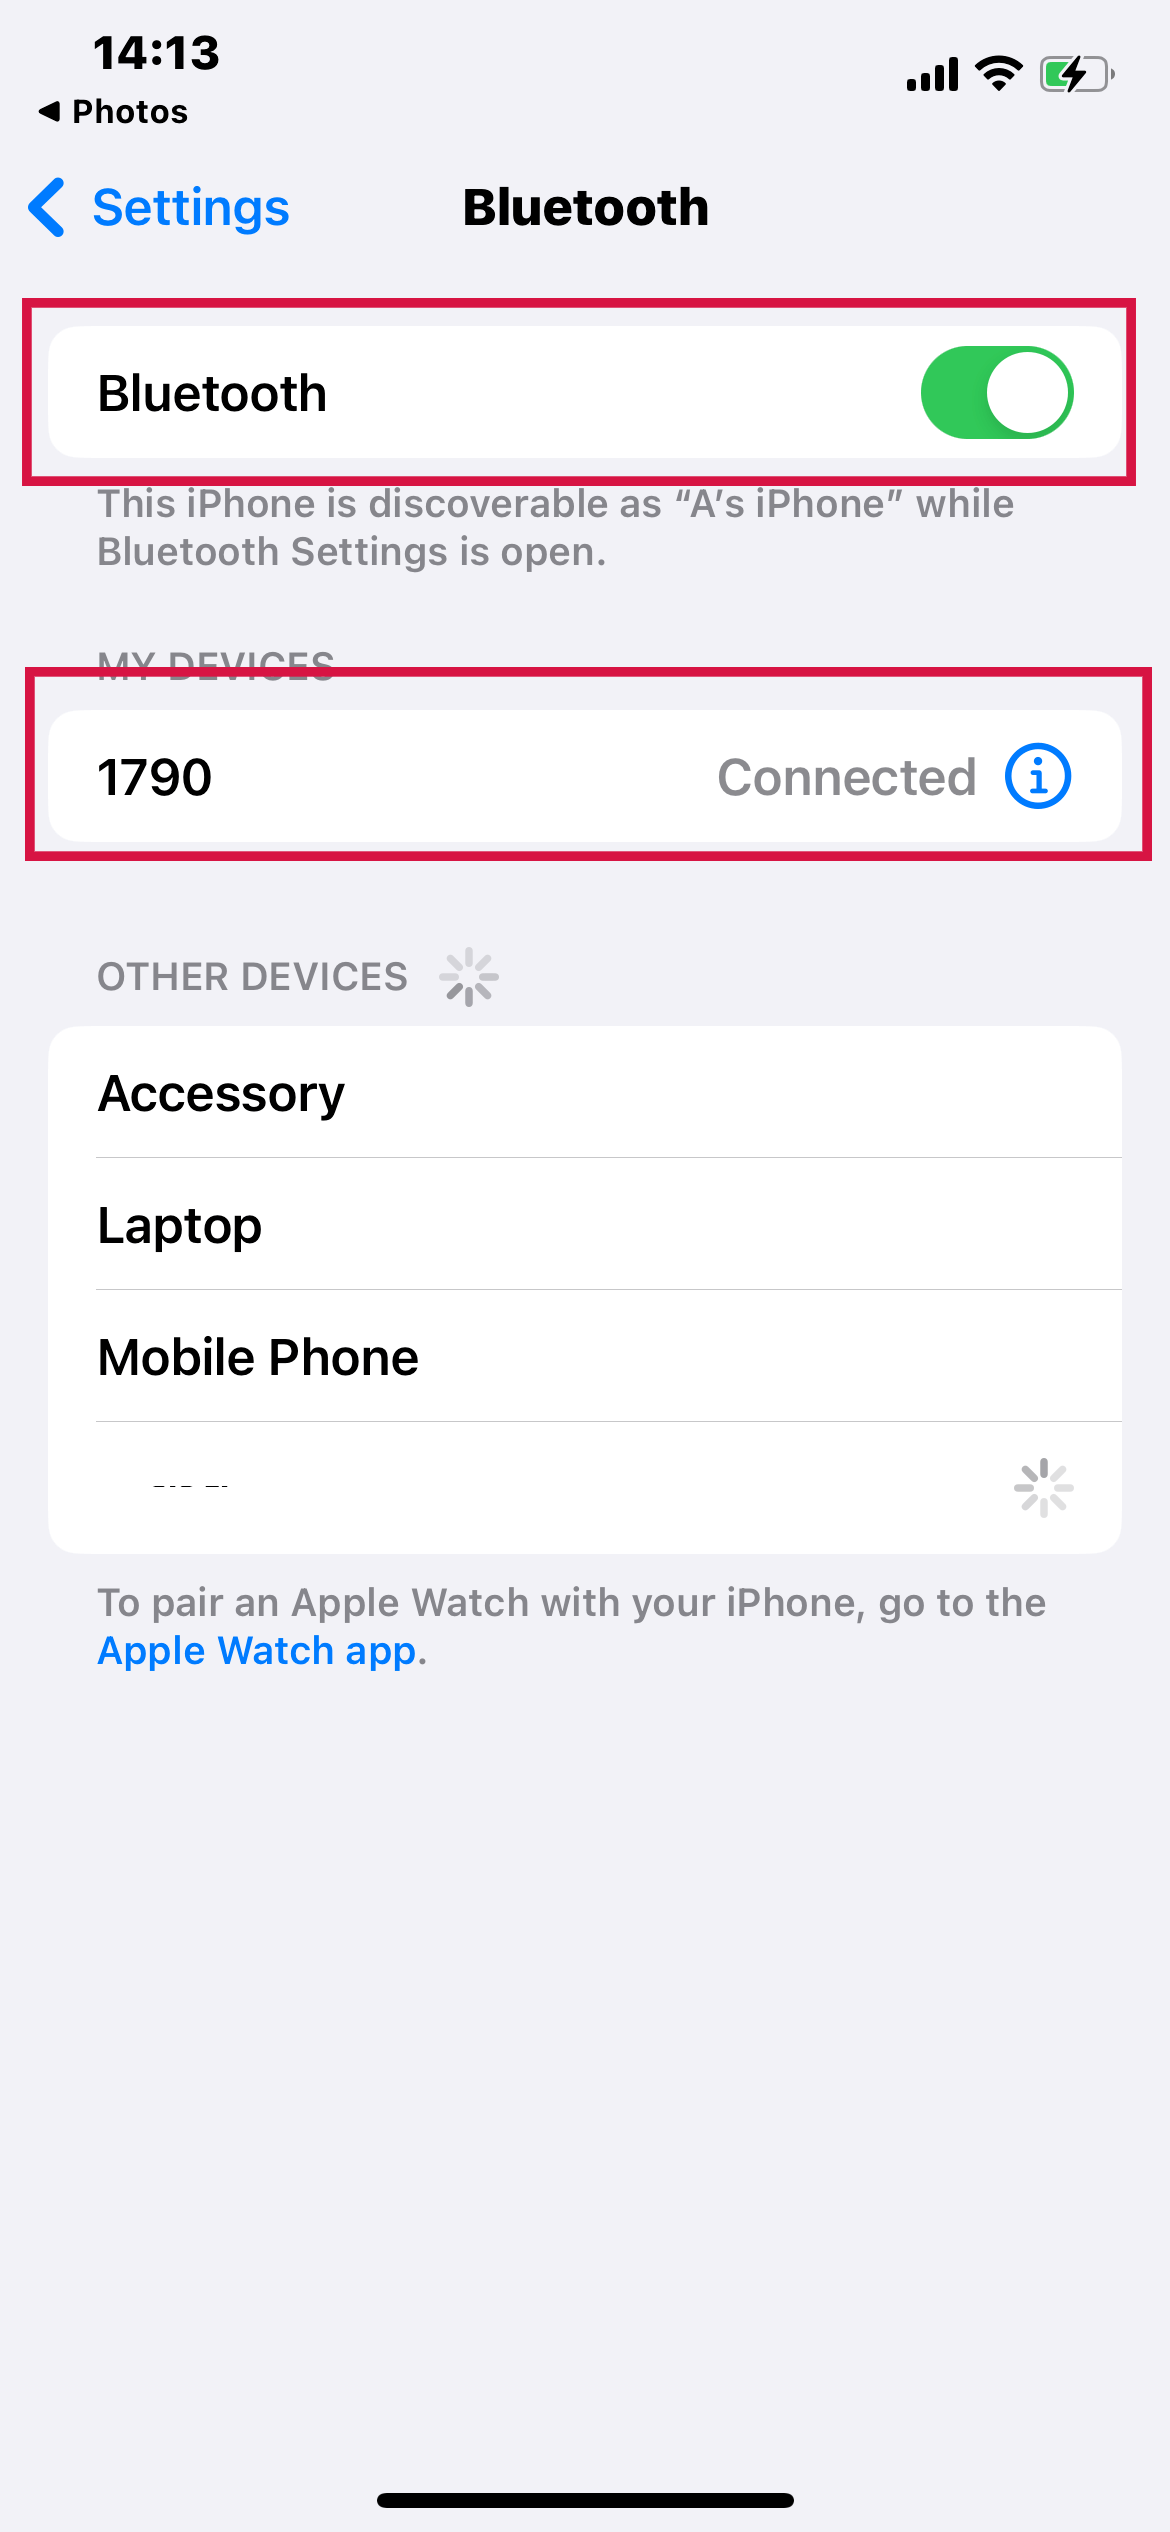
Pair AirPods with iPhone, iPad, or iPod touch
On your device, go to Settings > Bluetooth, then turn on Bluetooth.
With your AirPods inside, open the case near your device.
A setup animation appears on your device. Tap "Connect" and finalize the setup.
If you have AirPods Pro or AirPods (3rd generation), follow the on-screen instructions to set up Siri.
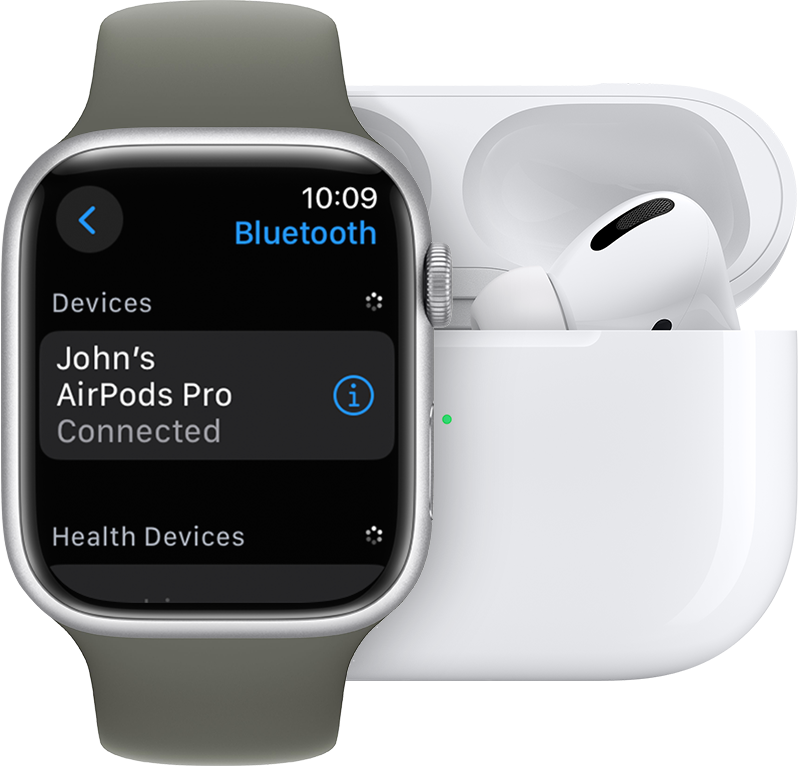
Pair AirPods with Apple Watch
On your Apple Watch, open the Settings app.
Tap on "Bluetooth" in the Settings menu.
Tap AirPods on the Bluetooth screen to connect.
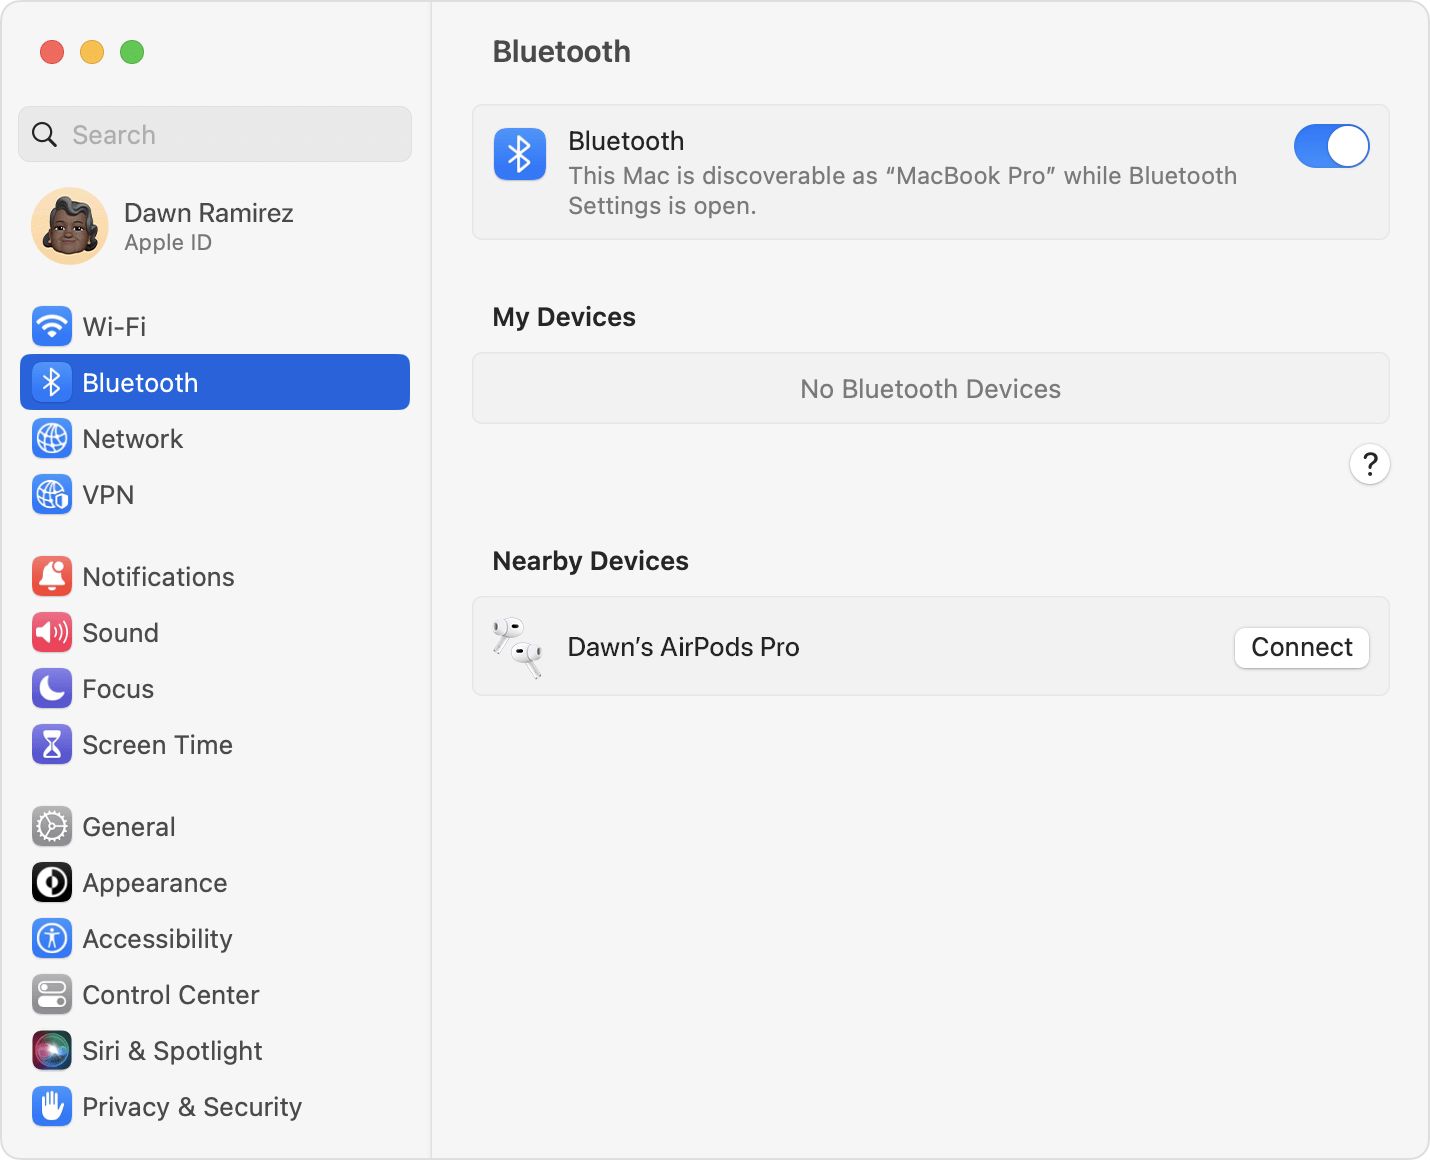
Pair AirPods with Mac
With your AirPods inside, open the case near your Mac.
Hold down the setup button located on the back of the AirPods case for approximately five seconds, until you see the status light begin to flash white.
On your Mac, go to the Bluetooth menu in System Preferences or the menu bar and ensure Bluetooth is on.
Your AirPods should appear in the devices list. Click "Connect."
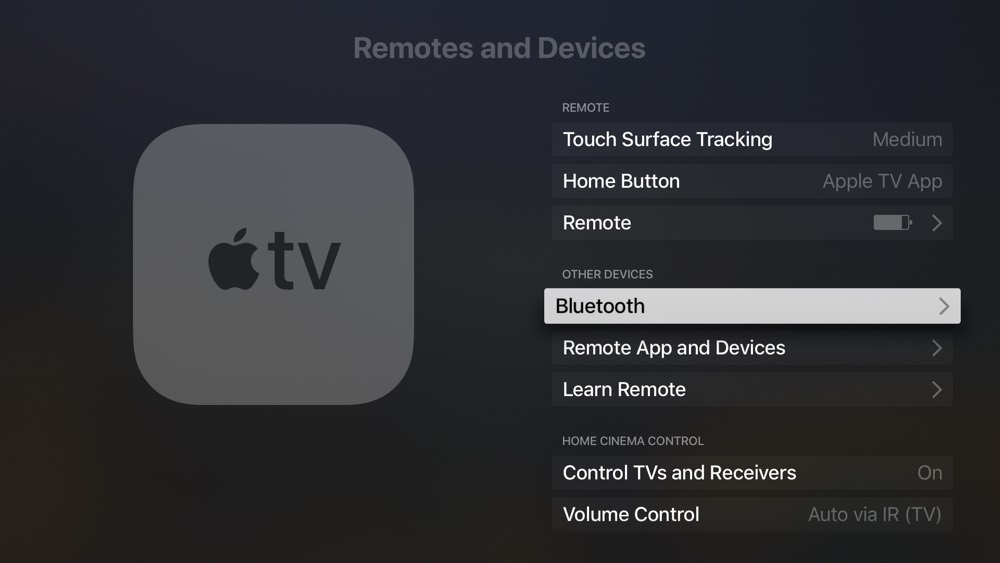
Pair AirPods with Apple TV
On your Apple TV, go to Settings > Remotes and Devices > Bluetooth.
With your AirPods inside, open the case near your Apple TV. Then press and hold the setup button on the back of the case for about five seconds, or until the status light flashes white.
Your AirPods should appear under "Other Devices." Select them to pair.
AirPods Controls
Besides managing audio through the apps you use, your AirPods offer built-in controls for various functions like pausing, resuming playback, skipping tracks, answering calls, and using Siri.
AirPods (1st or 2nd generation) controls

You can control your AirPods with a double tap at the top of the stem. You can also set each of your AirPods to do one of the following with a double tap:
Answer an incoming call.
Play and pause audio content.
Play the next track.
Go back to the previous track.
Activate Siri.
AirPods (3rd generation) controls
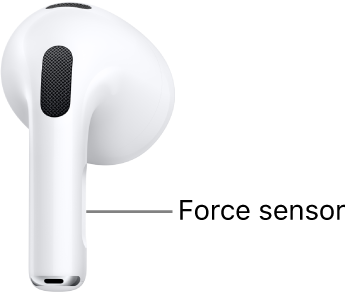
With the force sensor on the stem of both AirPods (3rd generation), you can do any of the following:
Play and pause audio: Press the force sensor. To resume playback, press it again.
Play the next track: Double-press the force sensor.
Play the previous track: Triple-press the force sensor.
Answer a call: When you receive a call, press the force sensor.
Activate Siri: Press and hold the force sensor, then ask questions, control apps, and more.
The AirPods (3rd generation) do not support volume control directly through the force sensor on the stem.
To adjust the volume, you can use the following ways:
Drag the volume slider in the app that you're listening to
Ask Siri to change the volume
Use the volume controls on the device you're listening from.
Open Now Playing on your Apple Watch and turn the Digital Crown to make your AirPods Pro or AirPods (3rd generation) louder or quieter.
AirPods Pro (1st generation) controls
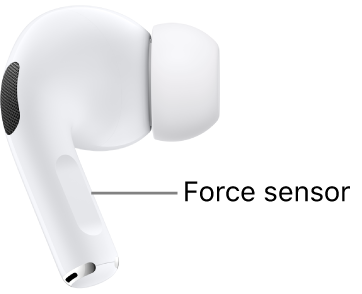
With the force sensor on the stem of both AirPods Pro (1st generation), you can do any of the following:
Play and pause audio: Press the force sensor. To resume playback, press it again.
Play the next track: Double-press the force sensor.
Play the previous track: Triple-press the force sensor.
Answer a call: When you receive a call, press the force sensor.
Switch between Noise Cancellation and Transparency mode: You can set either of your AirPods to perform this action when you press and hold the force sensor.
You can select which modes the press-and-hold action switches between:
With your AirPods in your ears and connected to your iPhone or iPad, go to Settings > Bluetooth. Alternatively, you can go to Settings > [your AirPods].
Tap the More Info button next to your AirPods in the list of devices.
Tap Noise Cancellation, Transparency, Adaptive, or Off.
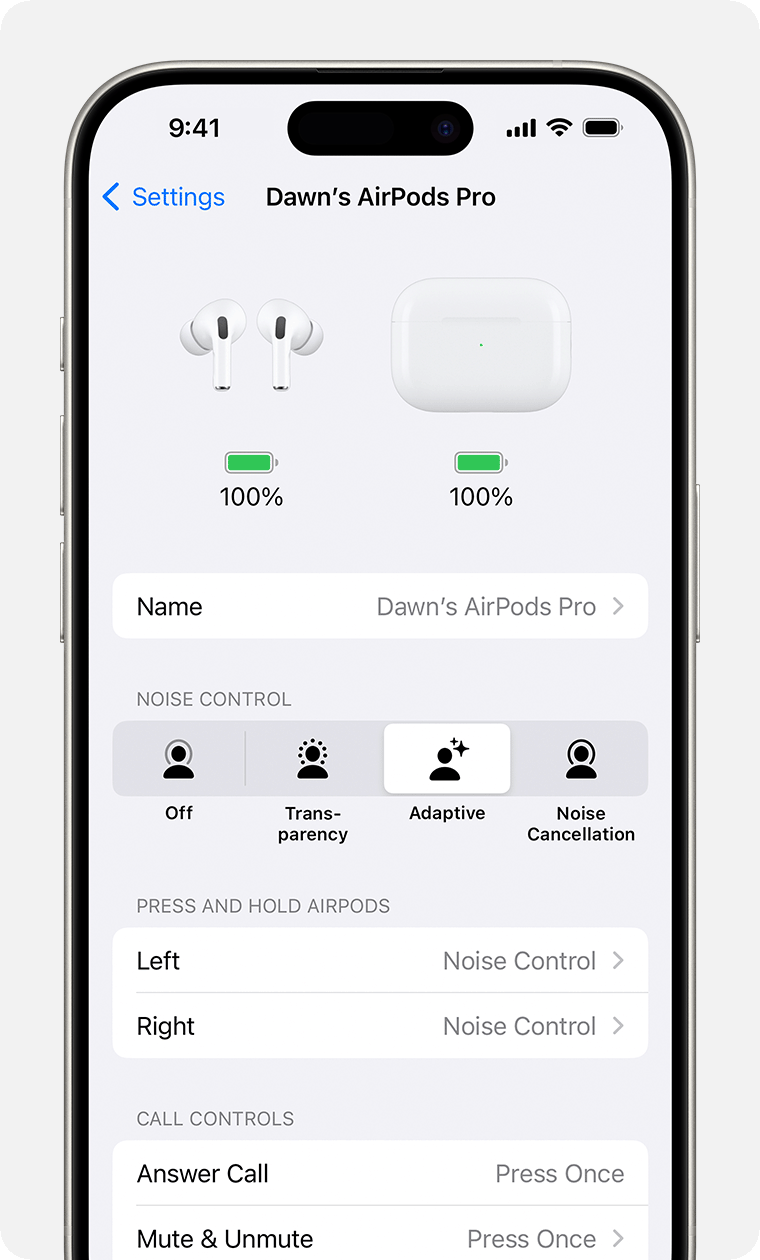
Activate Siri: You can set either of your AirPods to use Siri when you press and hold the force sensor.
AirPods Pro (2nd generation) controls
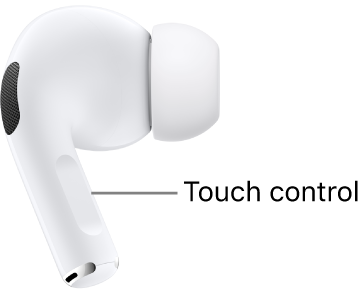
The Touch control on the stem of both AirPods Pro (2nd generation) offers various functionalities:
Play/Pause Audio: Press the Touch control on the stem of an AirPod. To resume playback, press it again.
Mute During Calls: Press the Touch control.
Play the next track: Double-press the Touch control.
Play the previous track: Triple-press the Touch control.
Answer a call: When you receive a call, press the Touch control.
Adjust volume: Place your thumb on the stem of either AirPod and use your finger to swipe up or down on the Touch control.
You can also turn on Personalized Volume to automatically adjust the volume based on listening preferences and your environment.
Switch between Noise Cancellation, Transparency, and Adaptive Audio noise control modes: You can set either of your AirPods to perform this action when you press and hold the Touch control.
You can select which modes the press-and-hold action switches between:
With your AirPods in your ears and connected to your iPhone or iPad, go to Settings > Bluetooth. Alternatively, you can go to Settings > [your AirPods].
Tap the More Info button next to your AirPods in the list of devices.
Tap Noise Cancellation, Transparency, Adaptive, or Off.
Activate Siri: To set an AirPod Pro to use Siri, press and hold the Touch control.
AirPods Max controls
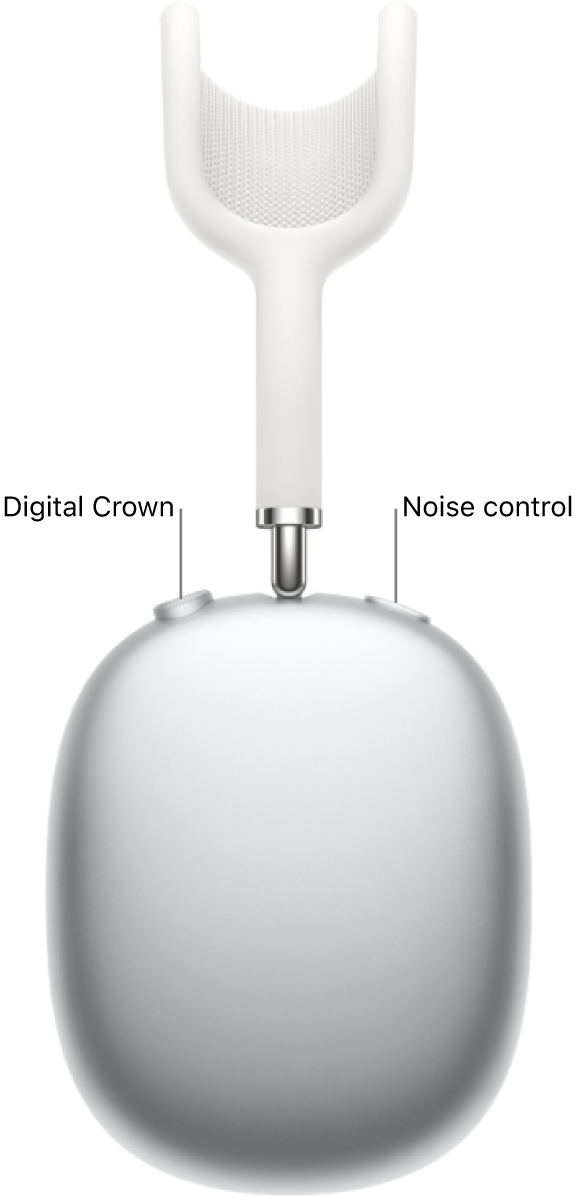
You can use the Digital Crown and the noise control button—located on the right headphone—to control audio, phone calls, FaceTime calls, and to activate Siri.
Control audio content
You can use the Digital Crown and noise control button to do any of the following:
Play and pause audio content: Press the Digital Crown. To resume playback, press it again.
Play the next track: Double-click the Digital Crown.
Play the previous track: Triple-click the Digital Crown.
Adjust the volume: Turn the Digital Crown.
Switch between Noise Cancellation and Transparency mode: Press the noise control button.
Control phone and FaceTime calls
When you receive a call, use the Digital Crown to do any of the following:
Answer a call: Press the Digital Crown.
Decline an incoming call: Double-click the Digital Crown.
Answer a second incoming call and put the first call on hold: Press the Digital Crown.
Switch between two active calls: Double-click the Digital Crown to end the current call and switch to the other call.
Decline a second incoming call: Press and hold the Digital Crown.
Send the call to your phone: Double-click the Digital Crown.
Activate Siri
Activate Siri: Press and hold the Digital Crown, wait for a chime, then ask questions, control apps, and more.
Change the settings of your AirPods and AirPods Pro
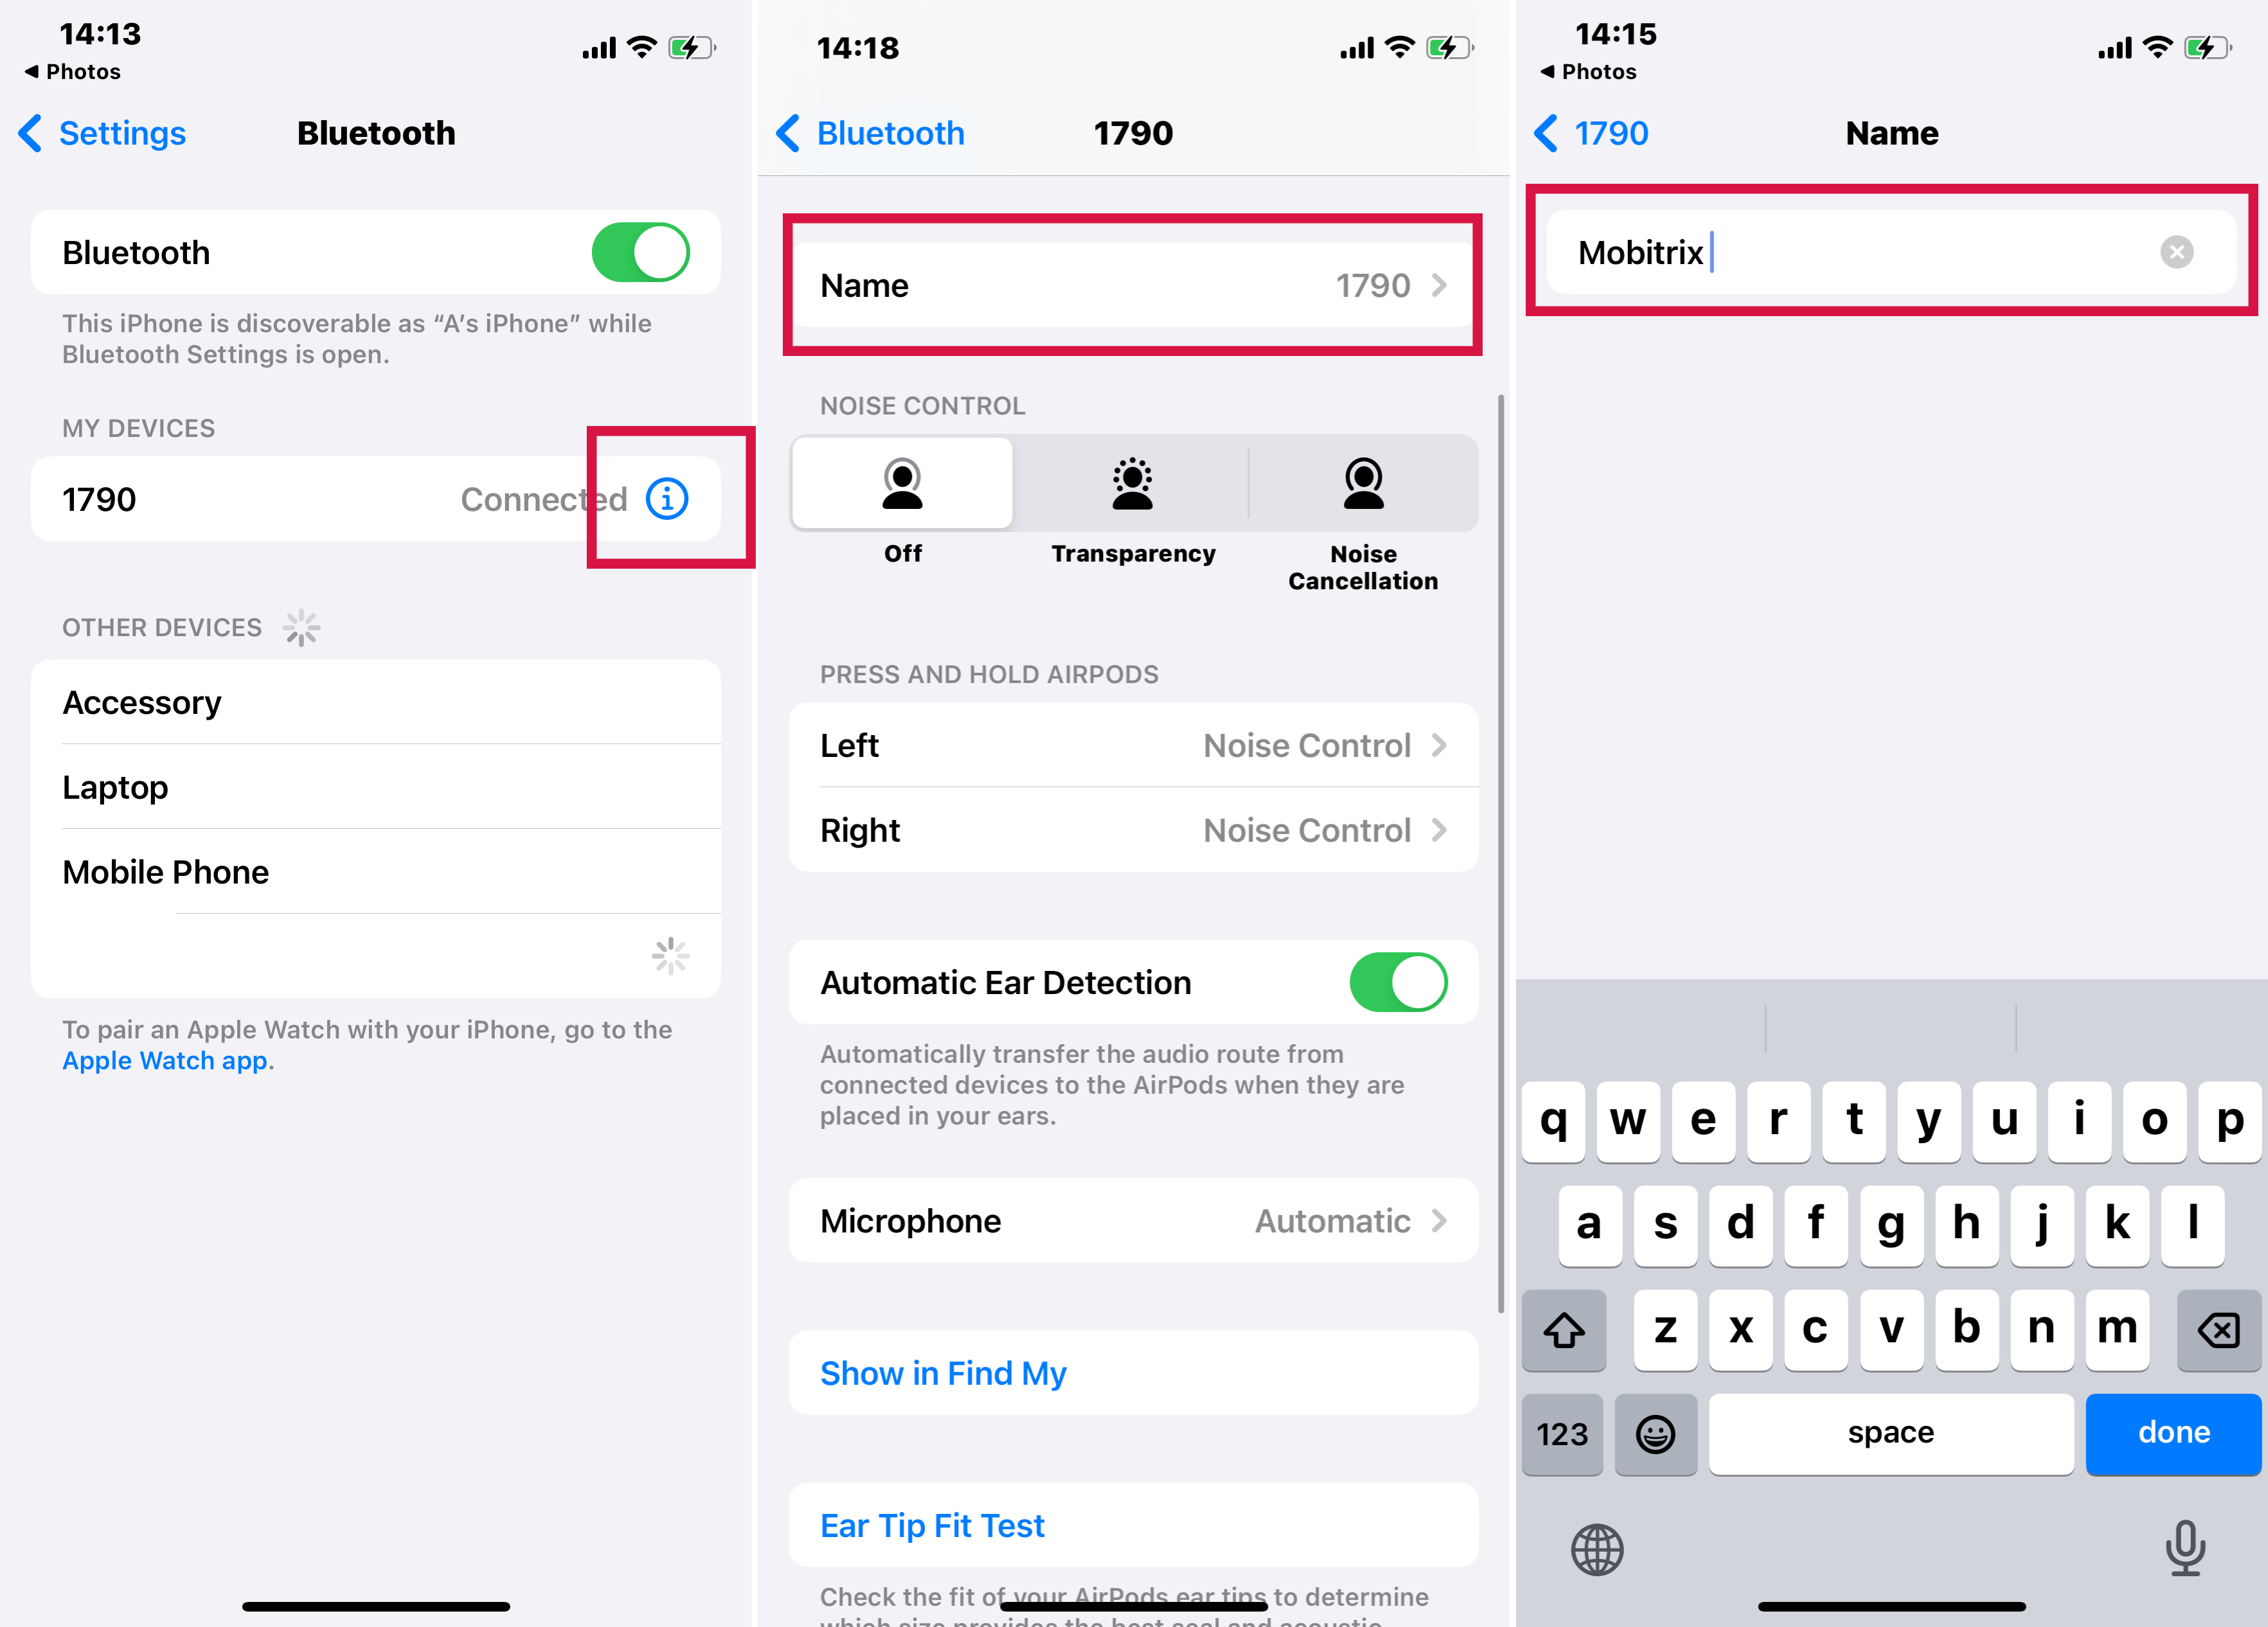
Name your AirPods
Open the AirPods charging case.
Put your AirPods in your ears and connect them to your iPhone or iPad.
Go to Settings > Bluetooth on your device. Alternatively, you can go to Settings > [your AirPods].
Tap the "More Info" button (represented by an "i" inside a circle) next to your AirPods in the list.
Tap the current name of your AirPods.
Enter a new name for your AirPods.
Tap "Done" to confirm the new name.
Change the press-and-hold action on AirPods Pro
AirPods Pro come with three noise control modes: Active Noise Cancellation, Transparency mode, and Off. The AirPods Pro (2nd generation) also have Adaptive Audio, adjusting noise control based on your surroundings. You can switch between noise control modes in Control Center or Settings.
By default, pressing and holding the force sensor on either AirPod switches between Active Noise Cancellation and Transparency mode. You can change which noise control modes the press-and-hold action uses:
Put your AirPods Pro in your ears and connect them to your iPhone or iPad.
Go to Settings > Bluetooth. Alternatively, go to Settings > [your AirPods].
Tap the "More Info" button next to your AirPods in the list.
Under "Press and Hold AirPods," tap on either Left or Right. Ensure "Noise Control" is selected.
Choose the noise control mode you want to use for the press-and-hold action. Changes made to one AirPod apply to both if both are set for noise control.
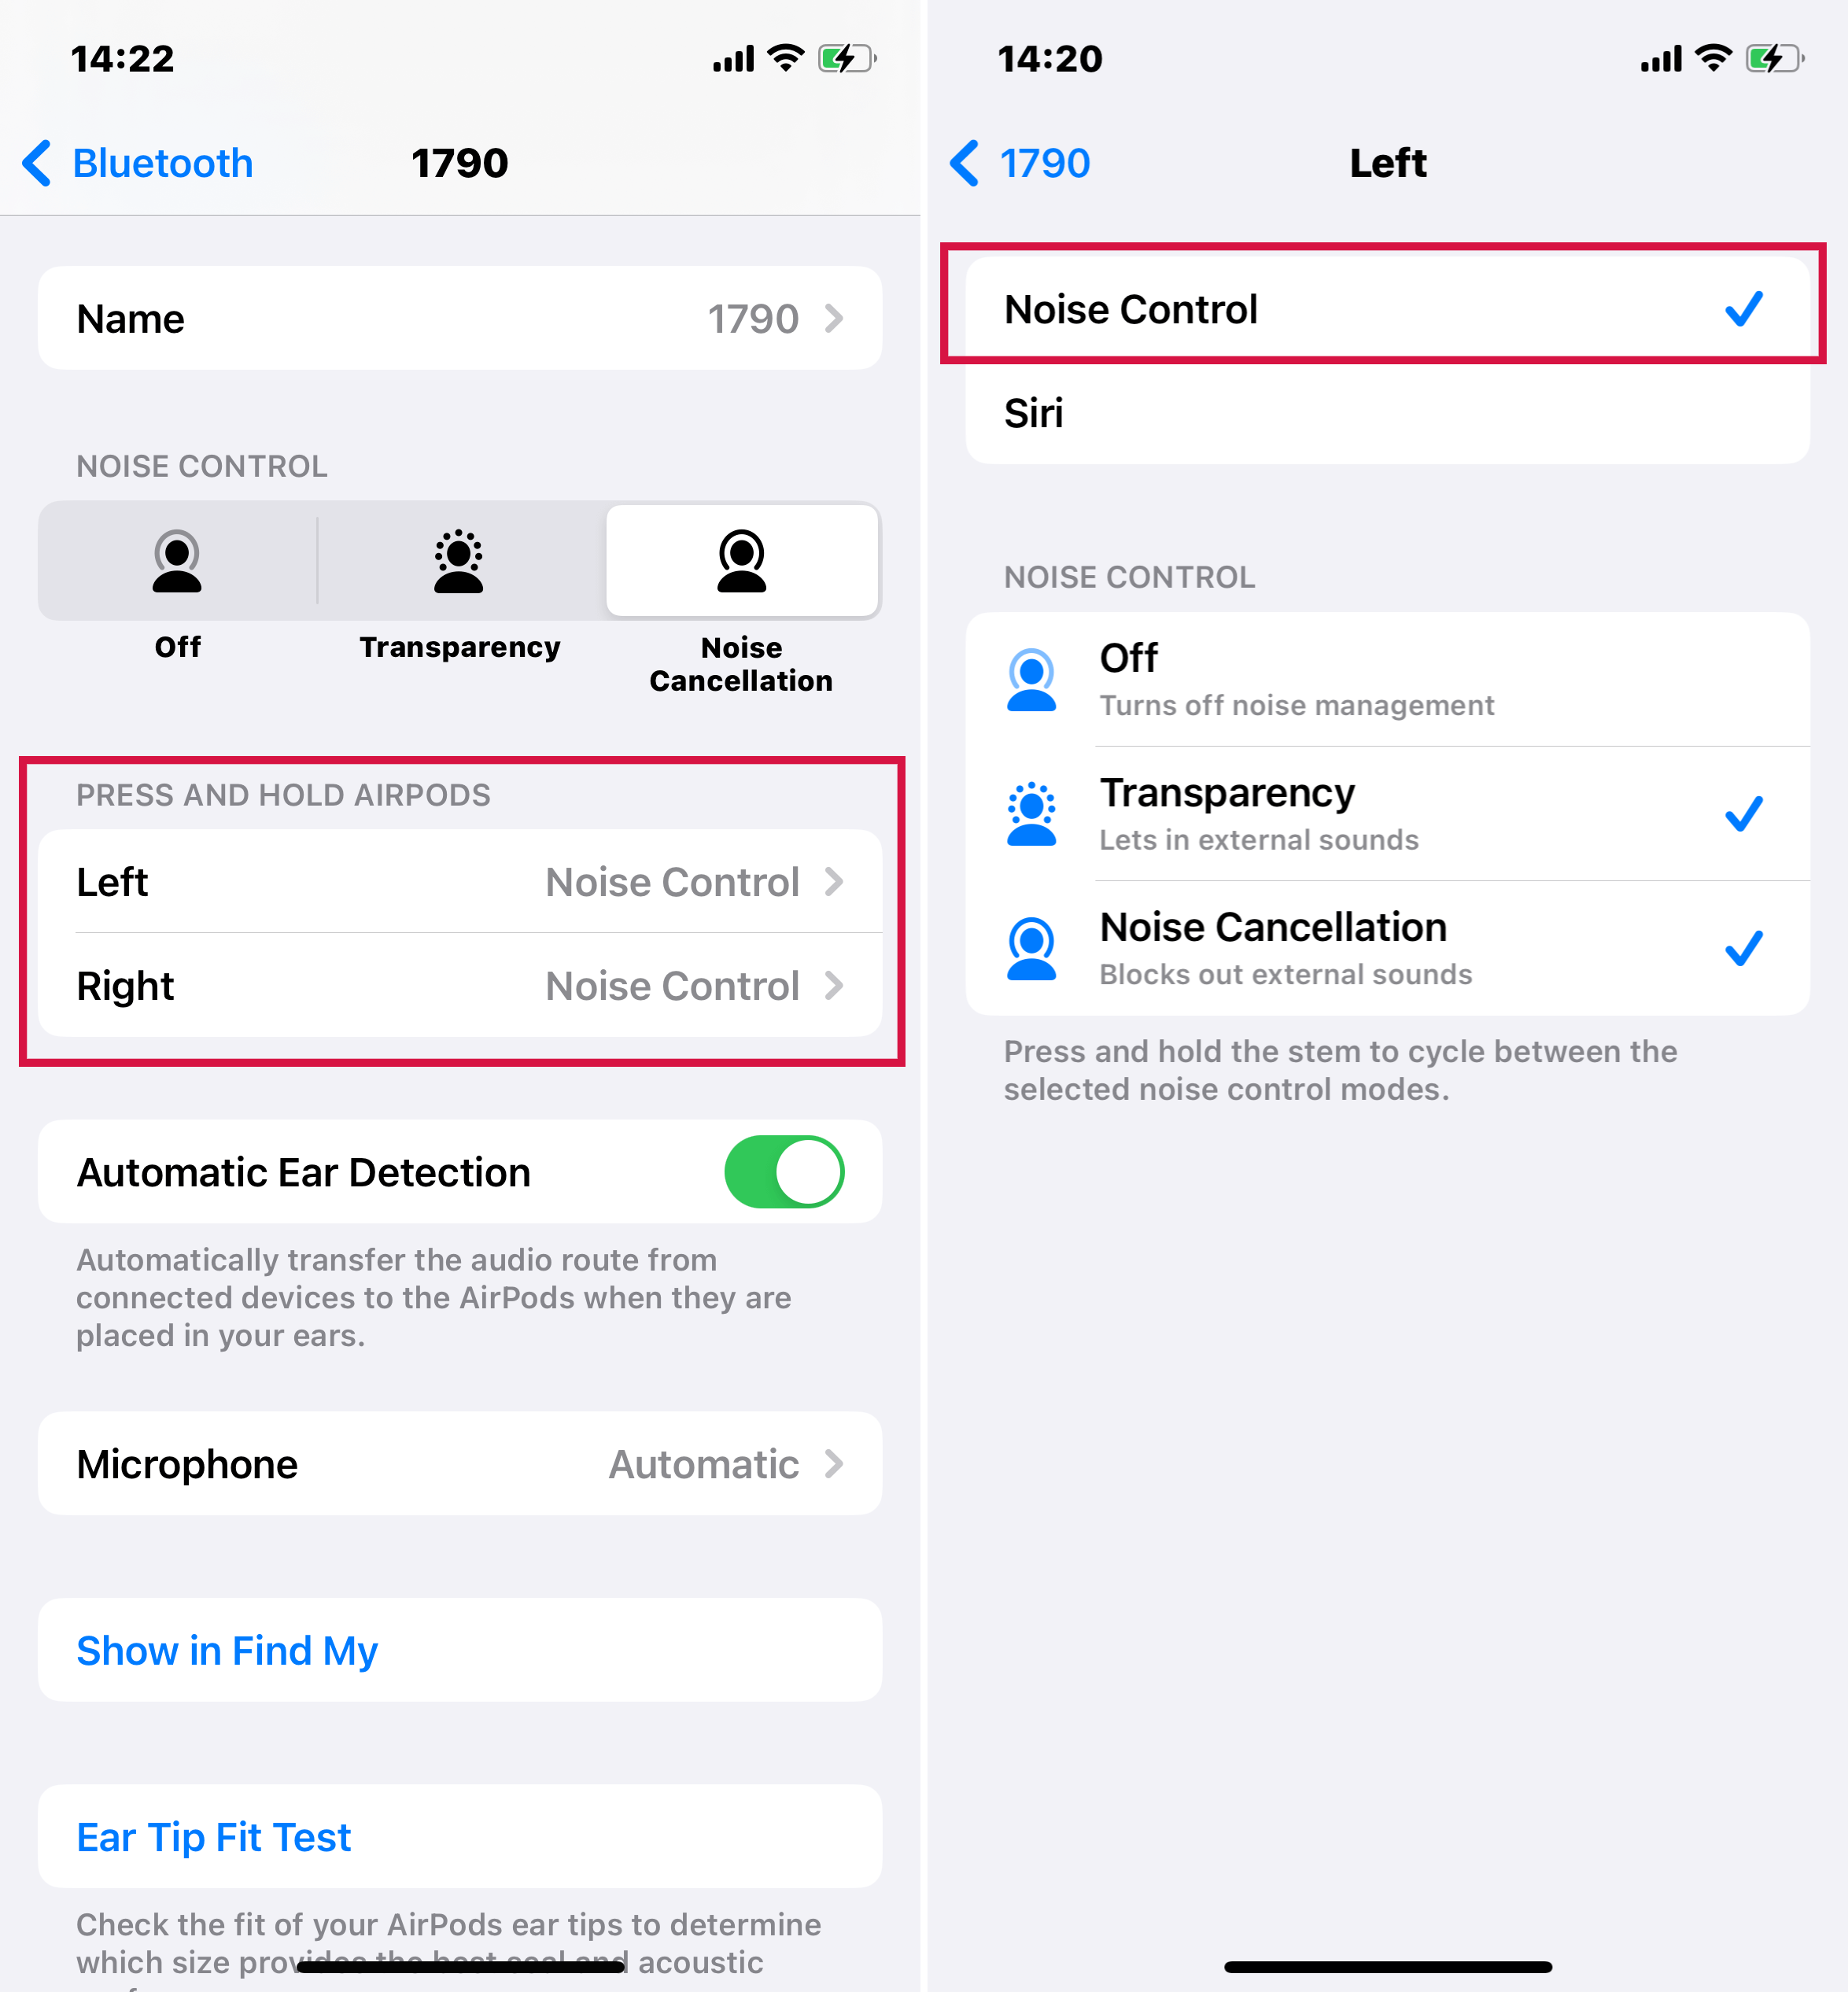
To use Siri with the press-and-hold action, in the same settings, tap Left or Right, then select Siri. You can have different settings for each AirPod, like one for Siri and the other for noise control.
Change the double-tap action on AirPods (1st and 2nd generation)
You can choose what you want to happen when you double-tap one of your AirPods (1st and 2nd generation):
Open your charging case.
Ensure your AirPods are in your ears and connected to your iPhone or iPad.
Navigate to 'Settings', then select 'Bluetooth'. You can also access this directly by going to 'Settings' and then choosing '[your AirPods]'.
Tap the More Info button next to your AirPods.
Select the left or right AirPod to choose which AirPod you'd like to double-tap for Siri, playing or pausing audio content, or skipping between tracks.

Turn Automatic Ear Detection on or off
AirPods can detect when they're in your ears and play audio from your device. If you remove one AirPod, the audio pauses; remove both, and it stops.
With Automatic Ear Detection on, audio plays through your device's speakers when you're not wearing the AirPods.
Turn off this feature to have audio play through your AirPods all the time, regardless of whether you're wearing them or not.
Set Microphone to left, right, or automatic
Each AirPod has a built-in microphone, allowing for phone calls and Siri use. The default setting is Automatic, letting either AirPod function as the microphone. If you're using just one AirPod, it automatically becomes the mic.
For a more consistent experience, you can set the Microphone to Always Left or Always Right. This ensures that your chosen AirPod remains the microphone, even if you take it out of your ear or place it in the case.
Go 3D With Personalized Spatial Audio
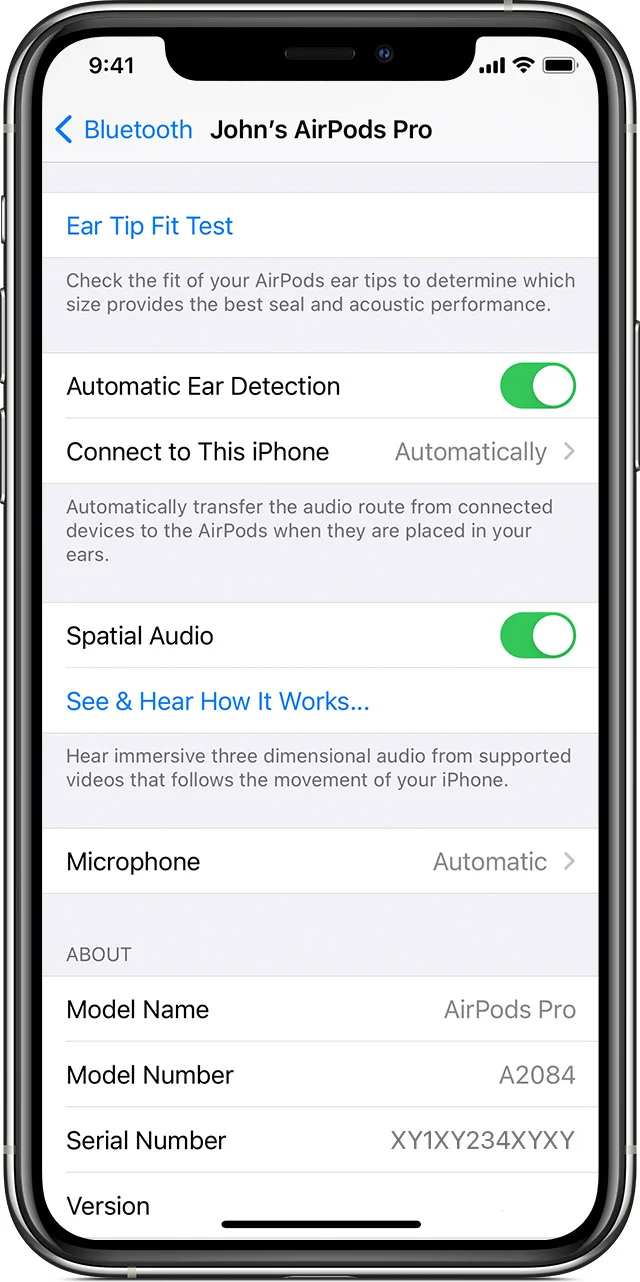
Personalized Spatial Audio provides a more immersive listening experience. Ensure your AirPods support this feature, which is typically available on newer models with AirPods Pro (1st and 2nd gen) and AirPods Max. To set it up:
Open the 'Settings' app on your iPhone or iPad.
Connect your AirPods to your device.
Go to 'Bluetooth' settings and find your AirPods in the list of devices.
Tap the info icon (i) next to your AirPods.
Scroll to the "Spatial Audio" option and turn it on.
You should see an option for 'Personalized Spatial Audio' or 'Head Tracking'. Follow the on-screen instructions to set it up. This may involve moving your head and device in certain ways so the system can tailor the audio experience to your head and ear shape.
Share Audio With Apple's AirPods
Sharing audio with Apple's AirPods allows you to enjoy the same audio stream with someone else using AirPods or other compatible wireless headphones. Here's how you can do it:
Ensure Compatibility and Connectivity:
Your iPhone or iPad should be running iOS 13.2 or later.
Connect your AirPods or compatible Beats headphones to your iOS device.
Start Playing Audio:
Play music, a podcast, or a video on your device.
Share Audio:
Bring the second pair of AirPods or compatible Beats headphones close to your iOS device.
Open the case lid if you're using another set of AirPods.
A prompt should appear on your device's screen asking if you want to share audio.
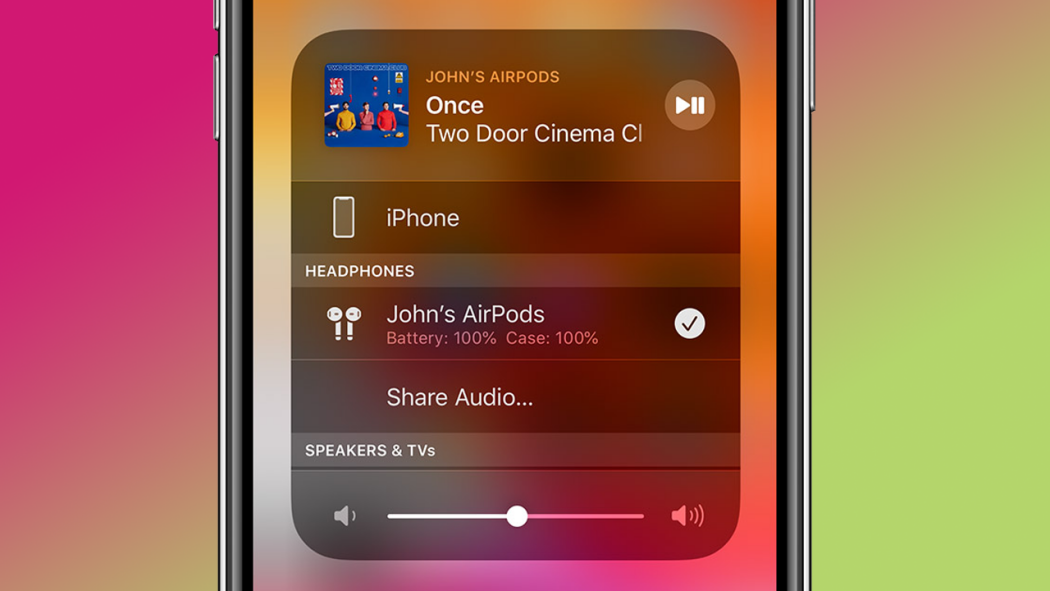
Connect the Second Pair of Headphones:
Follow the on-screen instructions to connect the second pair of headphones.
Once connected, both sets of headphones will receive the same audio stream.
Control Volume Individually:
Each listener can control their own volume level without affecting the other.
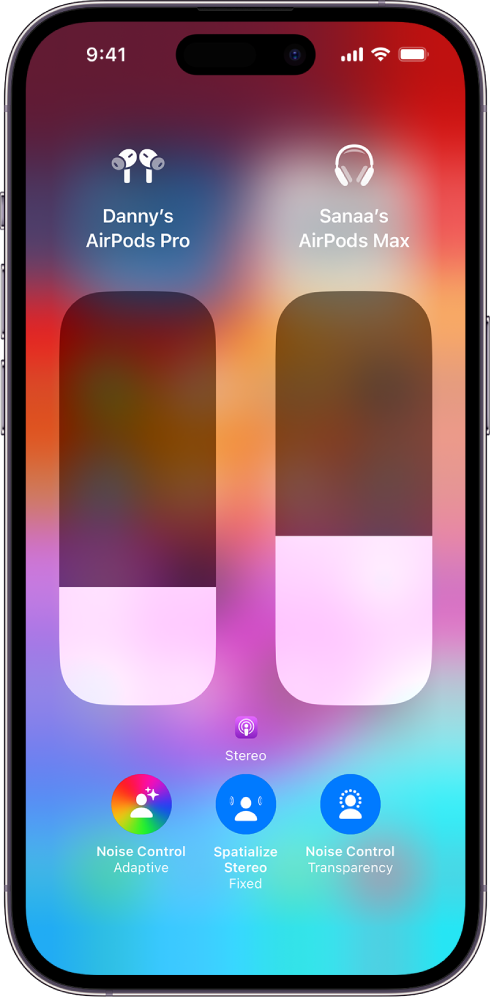
Stop Sharing:
To stop sharing audio, either disconnect one pair of headphones via Bluetooth settings or simply turn off one set of headphones.
Improve Sound With Headphone Accommodation
Headphone Accommodations is a powerful tool for tailoring your listening experience to your personal hearing needs or preferences, making audio clearer and more enjoyable. Here's how you can set it up:
Check Compatibility:
Ensure your device (iPhone, iPad, or iPod touch) is updated to at least iOS 14 or iPadOS 14.
Make sure your AirPods are compatible with this feature.
Connect your AirPods to your Apple device.
Access Headphone Accommodations Settings:
Go to the 'Settings' app on your device.
Tap 'Accessibility'.
Select 'Audio/Visual'.
Find and turn on 'Headphone Accommodations'.
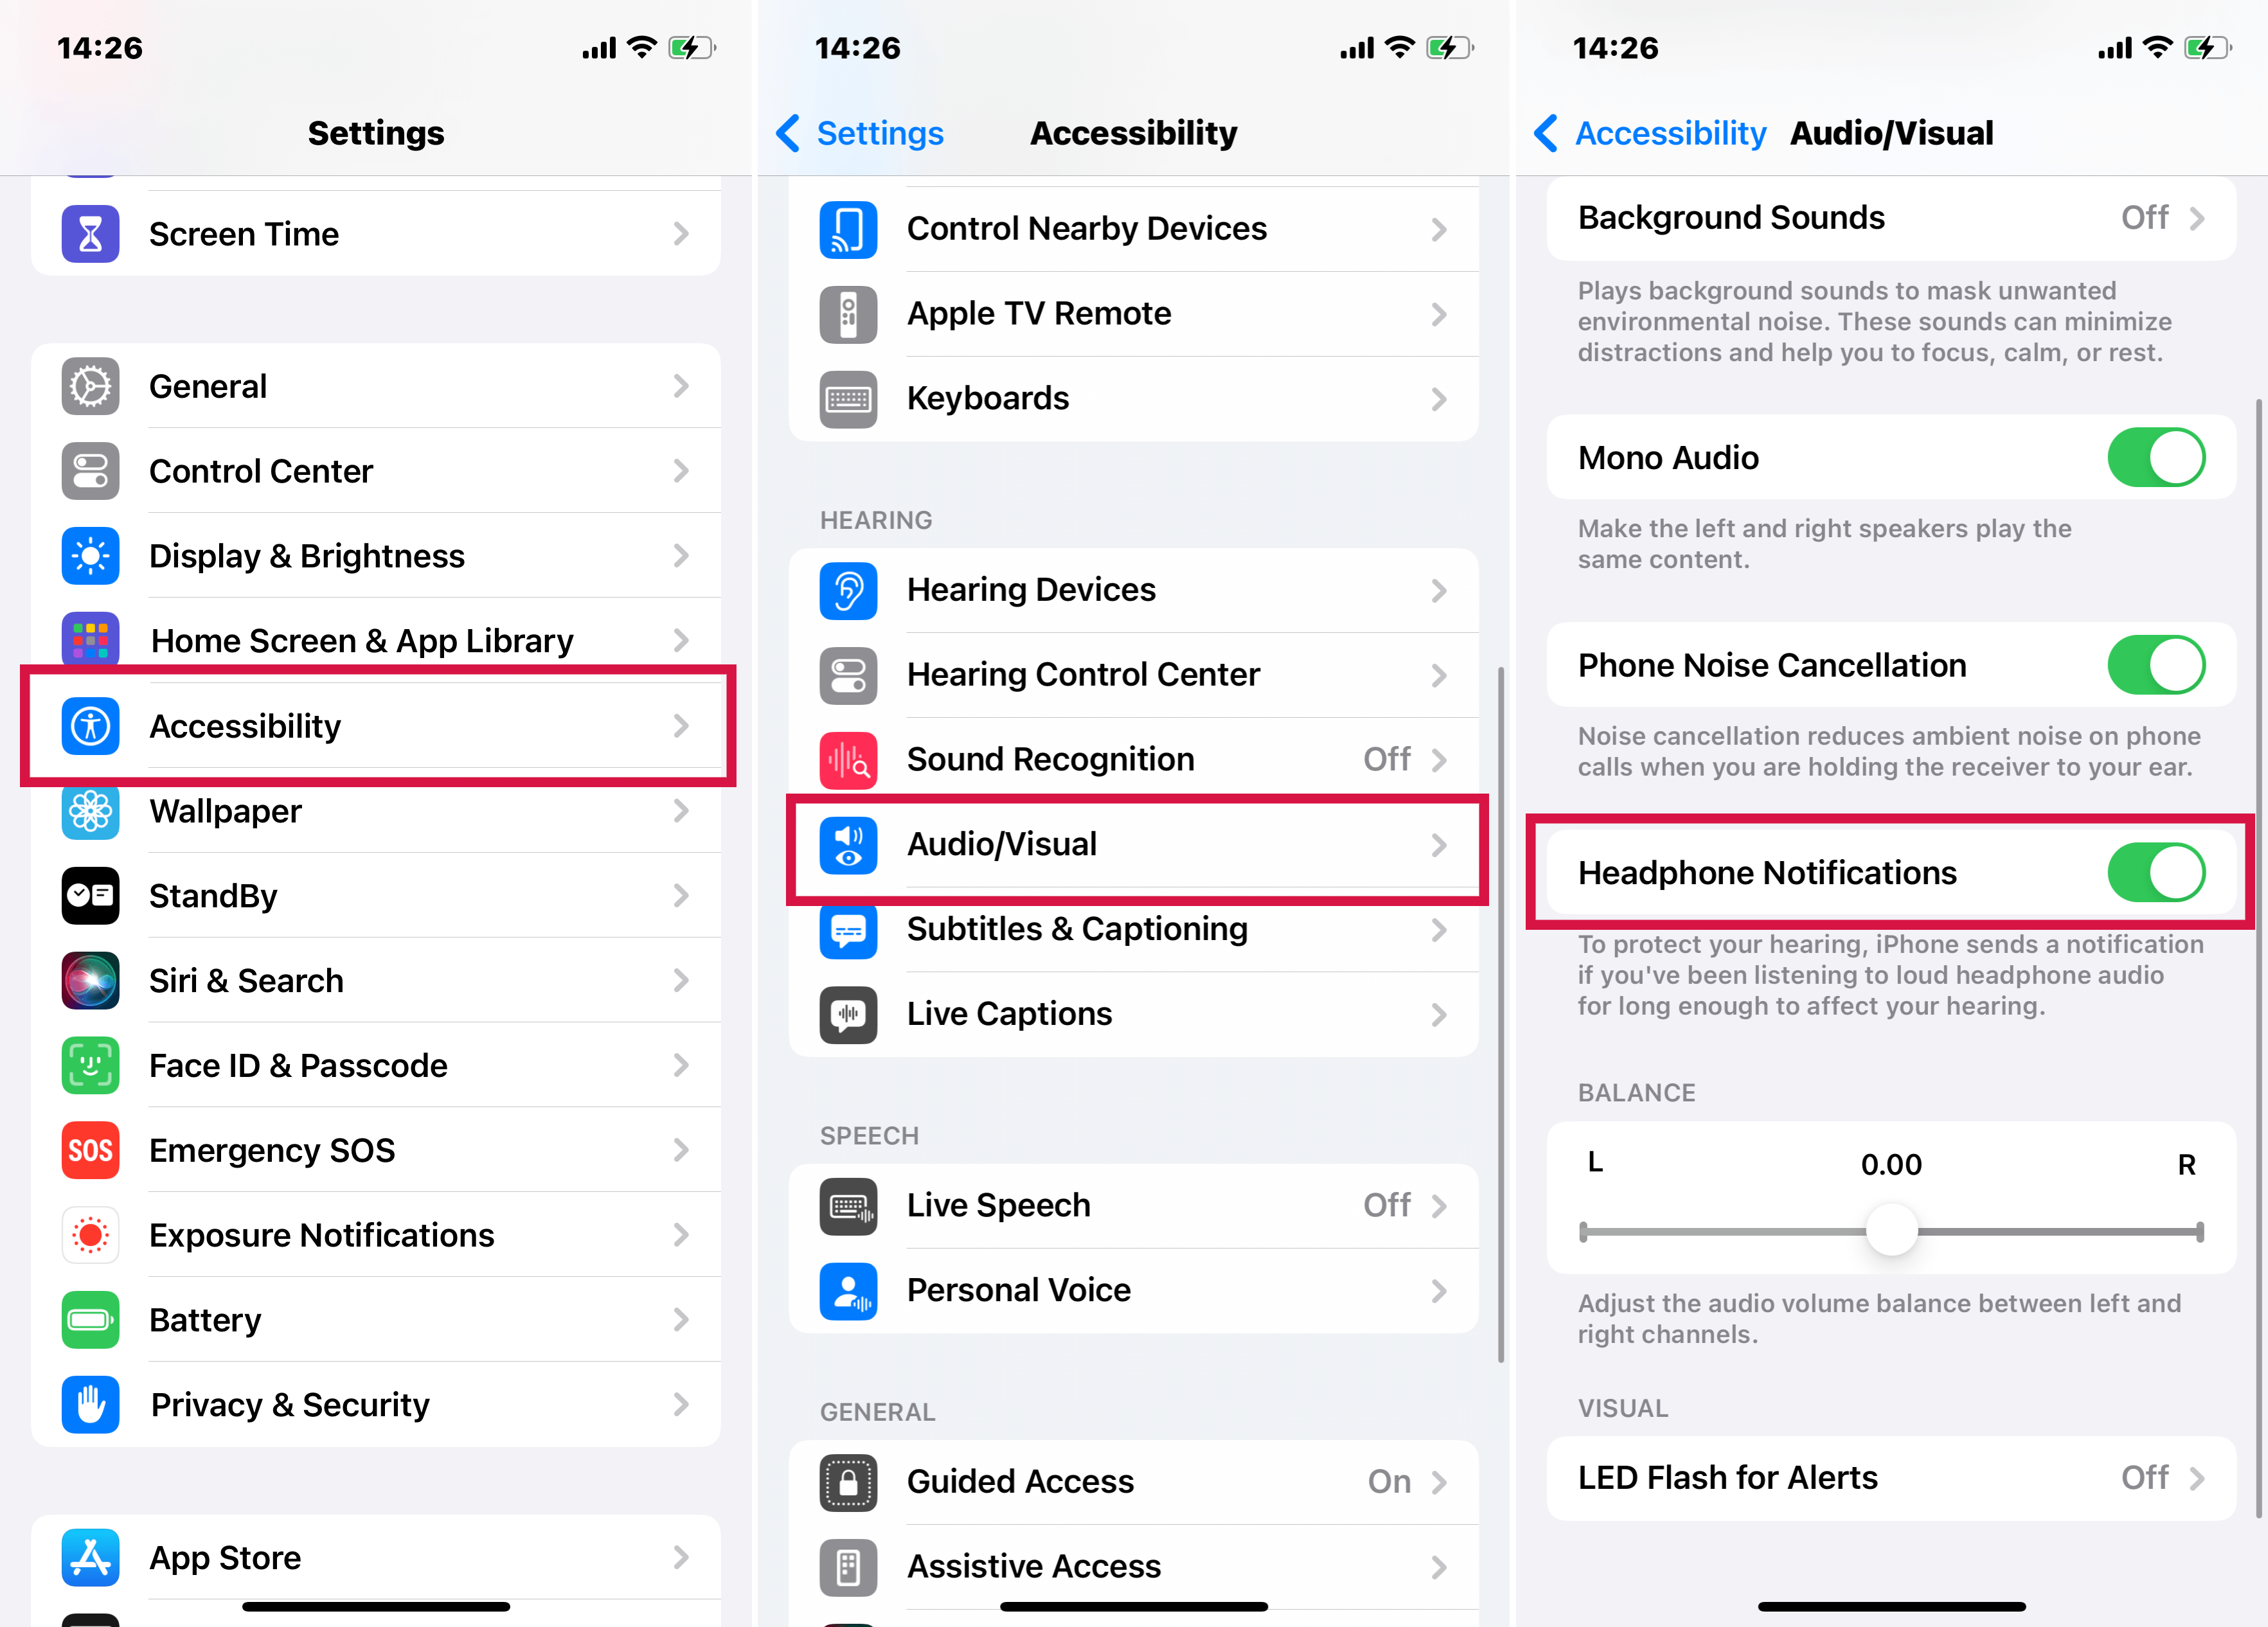
Customize Your Audio:
Customize Audio Setup: Follow the prompts to listen to different audio samples and choose which ones sound better to you.
Tune for Certain Frequencies: Adjust the balance for softer or louder sounds and frequencies. This is useful if you have difficulty hearing certain sound ranges.
Choose a Listening Profile: Select from Balanced Tone, Vocal Range, or Brightness to enhance different aspects of the audio.
Apply to Phone Calls and Media: You can choose to apply these settings not only to your media but also to phone calls.
Find your AirPods
To find your AirPods using Apple's Find My service, follow these steps:
Open Find My App: On your iPhone, iPad, or iPod touch, open the 'Find My' app. You can also use the iCloud website on a computer by going to iCloud.com and logging in with your Apple ID.
Select Devices: In the Find My app, tap on the 'Devices' tab.
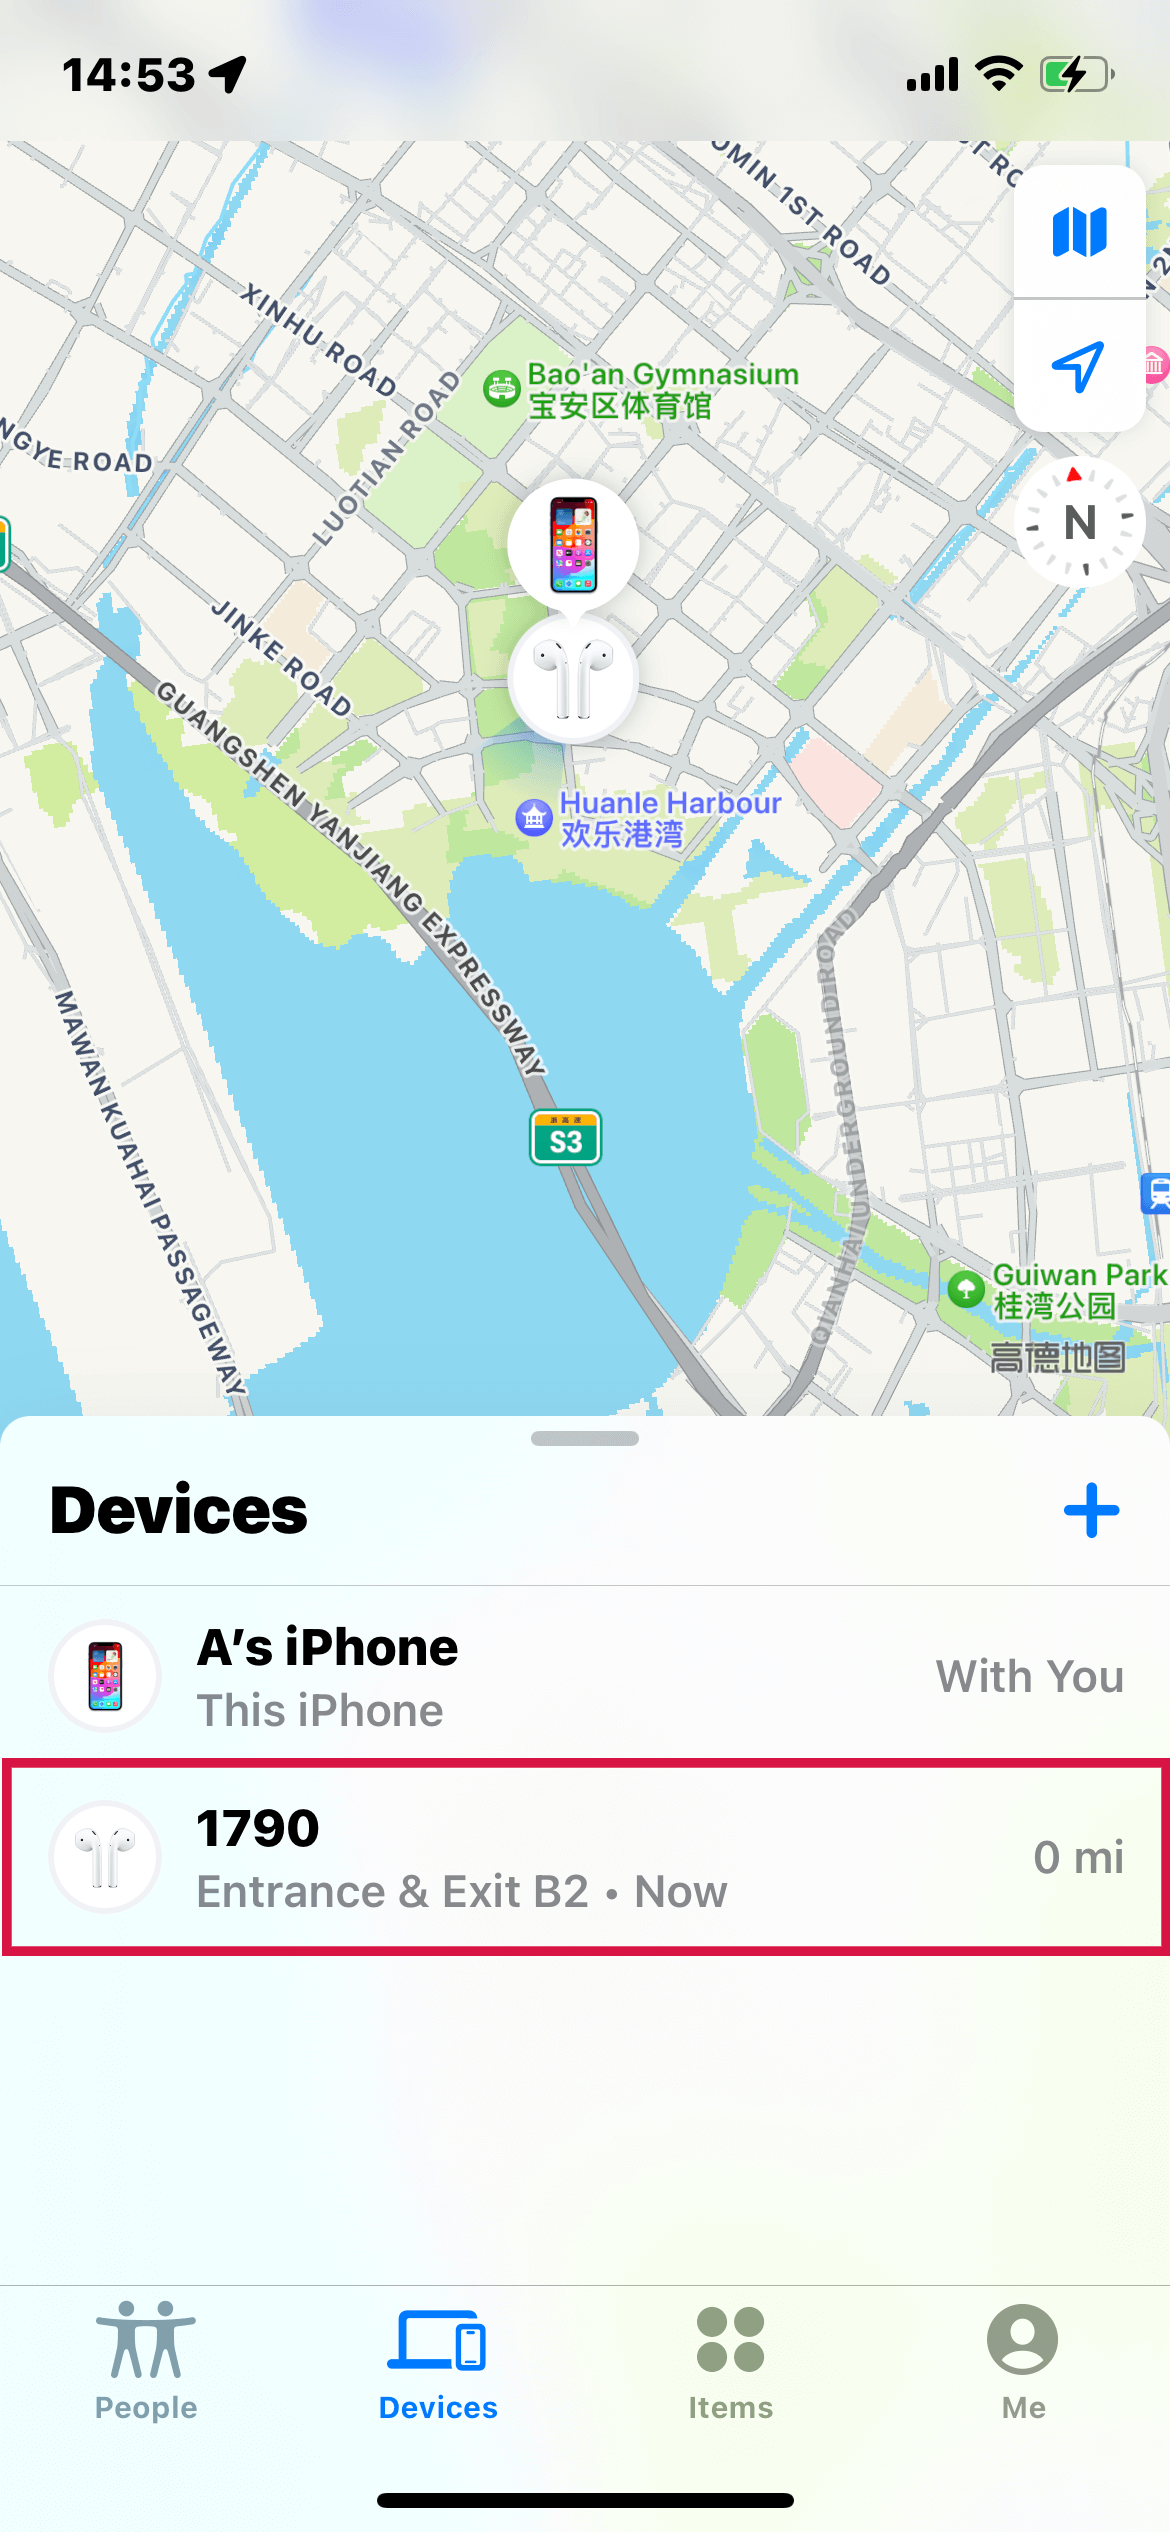
Choose Your AirPods: From the list of devices, select your AirPods. The app will display the location on a map.
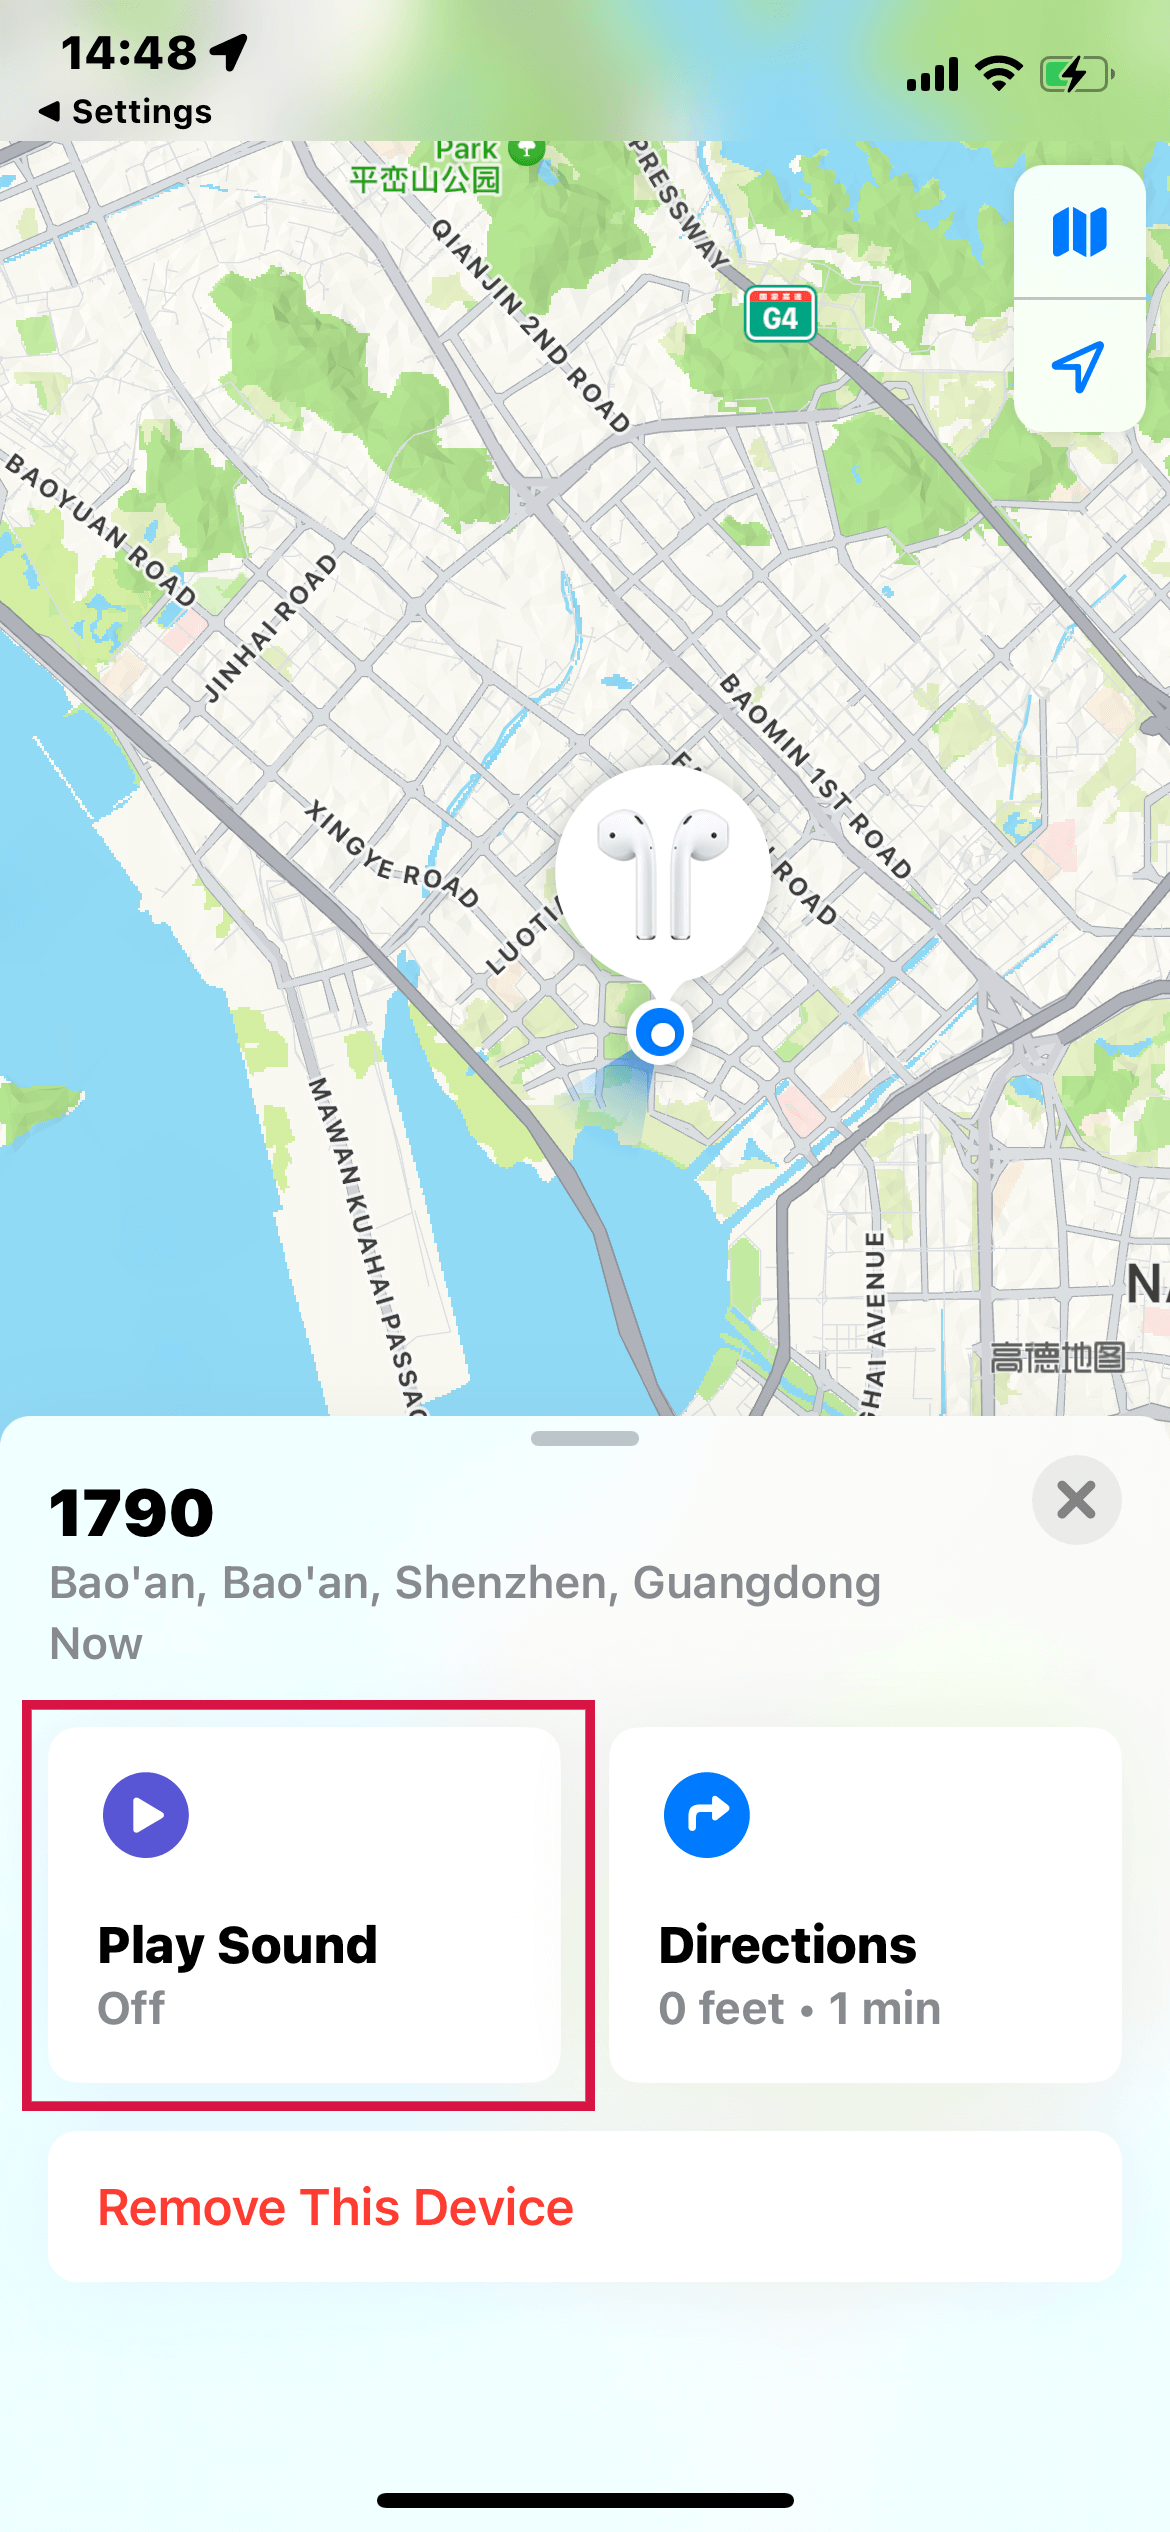
Play a Sound (If Nearby): If the AirPods are within Bluetooth range of any of your Apple devices and connected to your Apple ID, you can play a sound to help locate them. Simply tap 'Play Sound.'
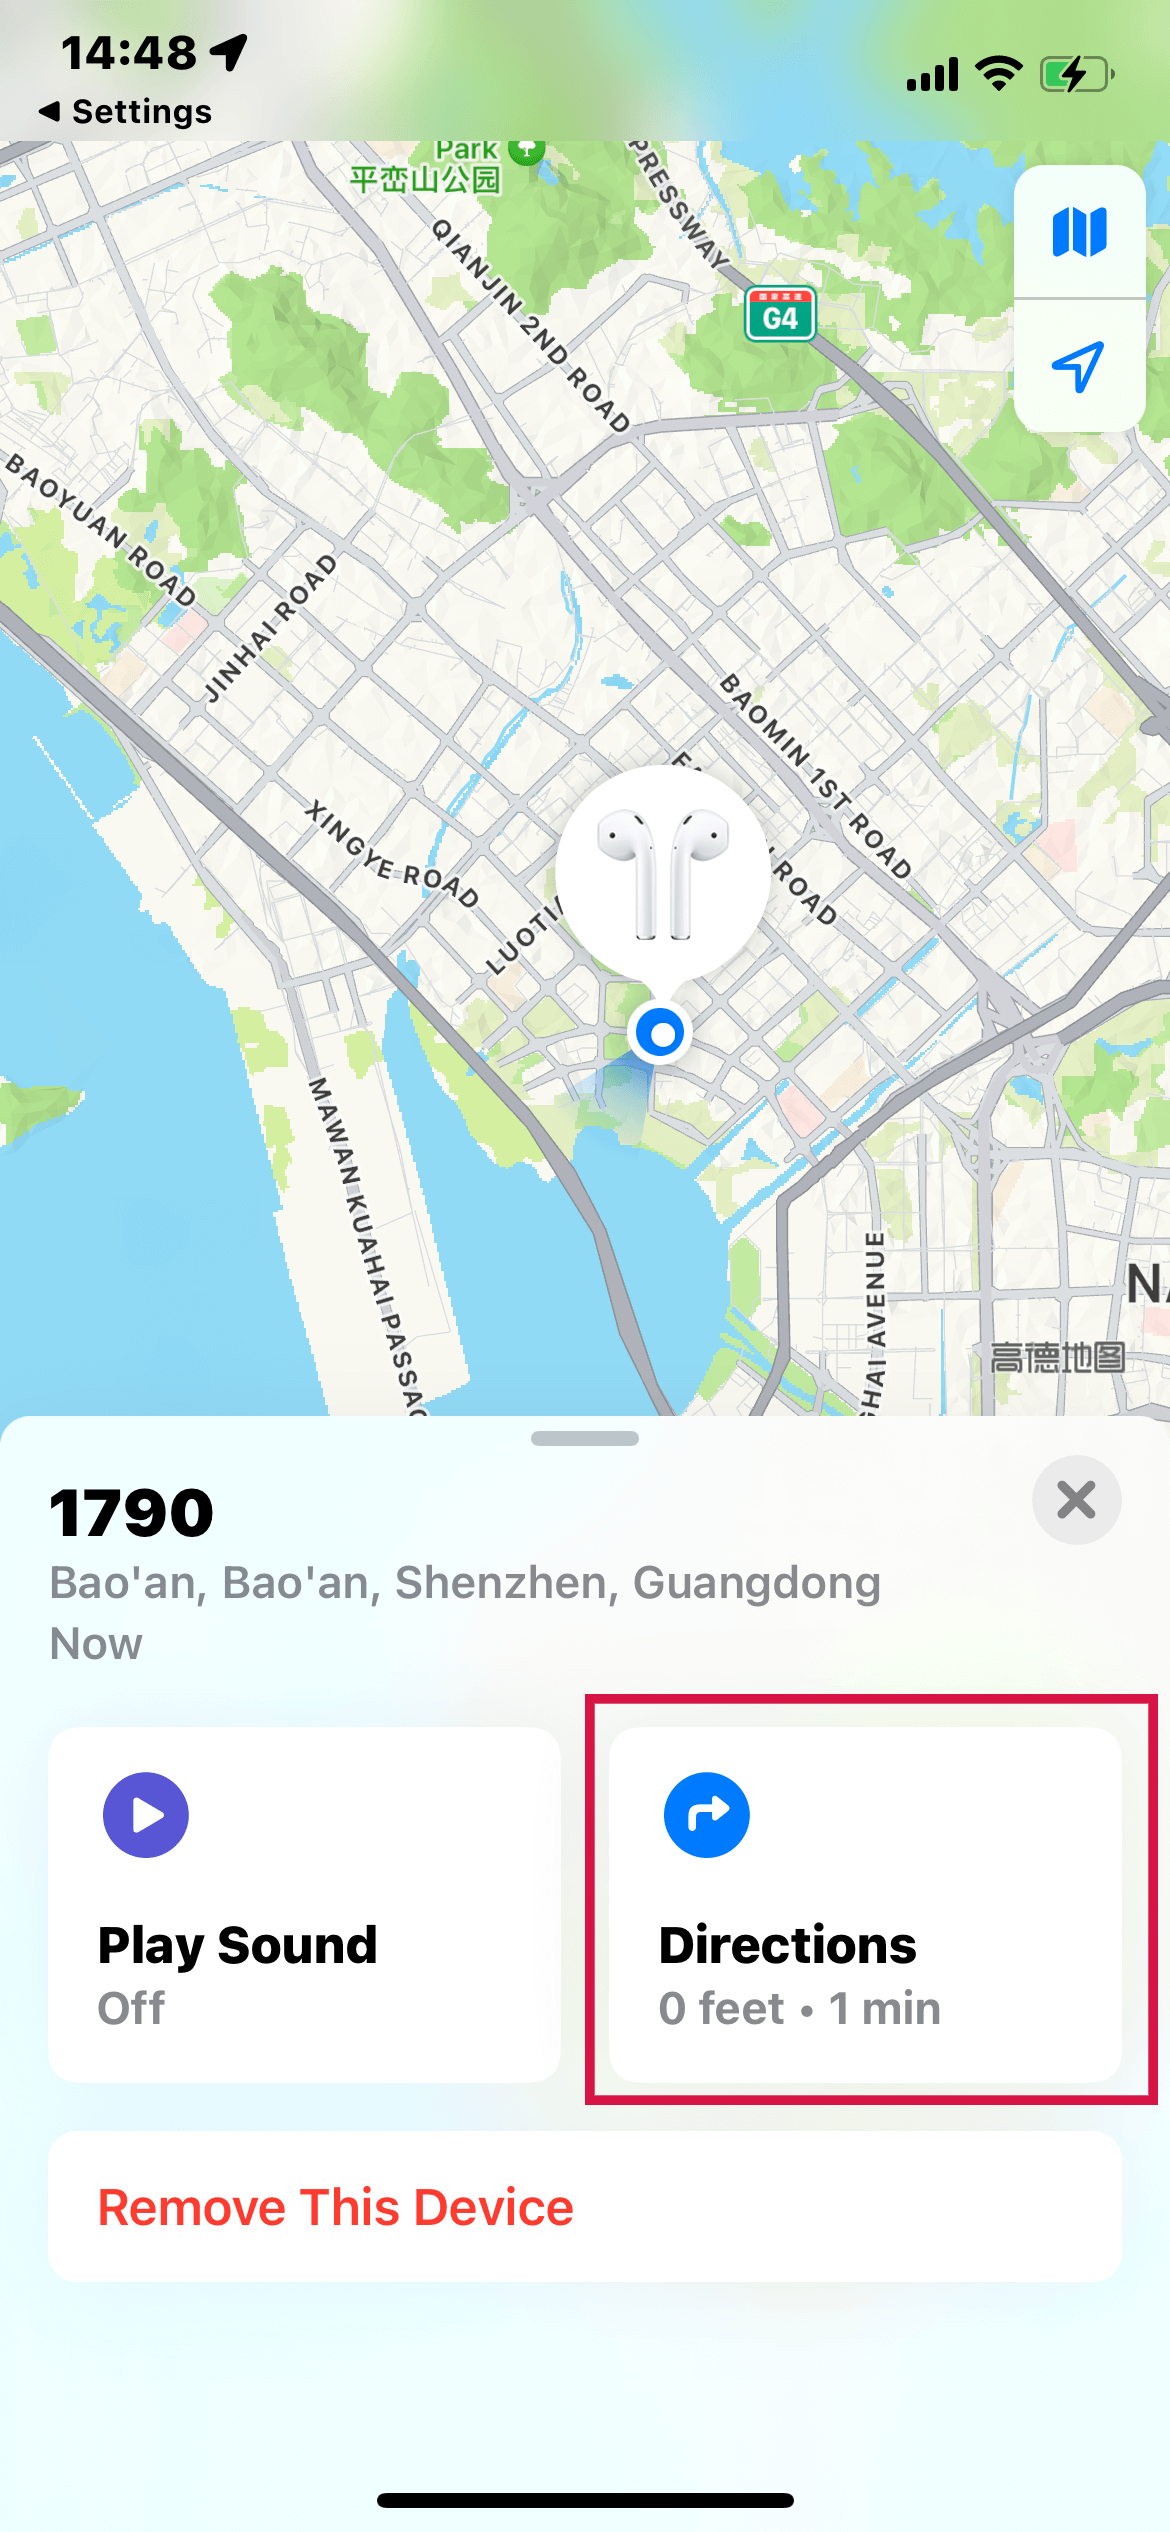
Directions: If your AirPods are not nearby, you can tap on 'Directions' to get the route to their last known location.
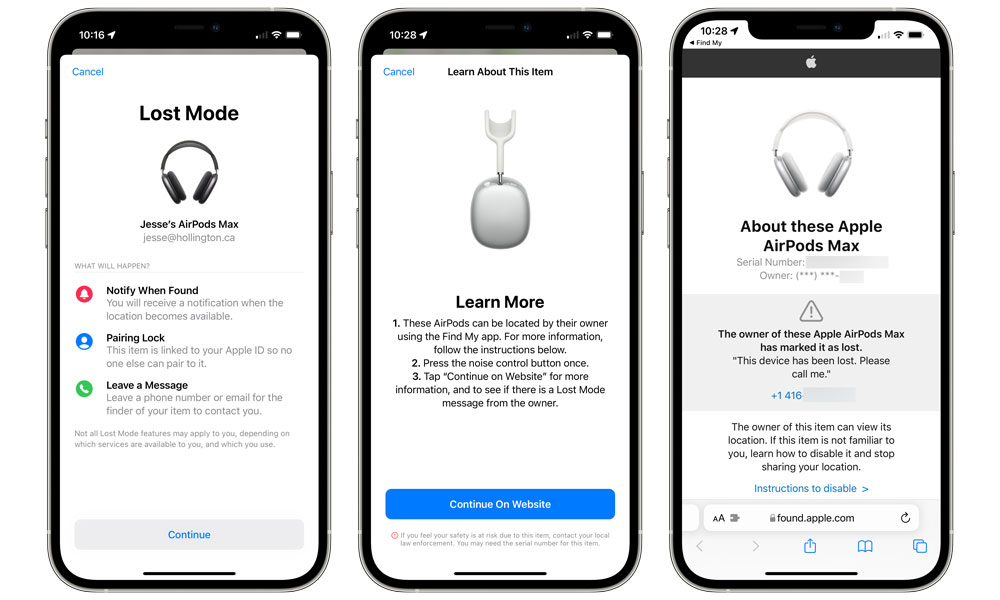
Lost Mode: If your AirPods are lost, you can turn on 'Lost Mode' in the Find My app. This will lock your AirPods and send you a notification if they are found.
Note: The accuracy of the location depends on whether your AirPods are outside of the case and have a battery charge. If they're inside the case or out of battery, Find My will show their last known location when they were last connected to one of your devices.
Charge AirPods
Discover all you need to know about charging your AirPods by reading this ultimate guide.
Reset AirPods
Resetting your AirPods can often resolve issues like connectivity problems, poor sound quality, or if they're not working as expected. Here's how to reset your AirPods:
For AirPods and AirPods Pro
Place AirPods in Case: Put both AirPods in their charging case and close the lid. Wait about 30 seconds.
Open the Lid: After the wait, open the lid of your AirPods case.
Forget the AirPods on Your Device:
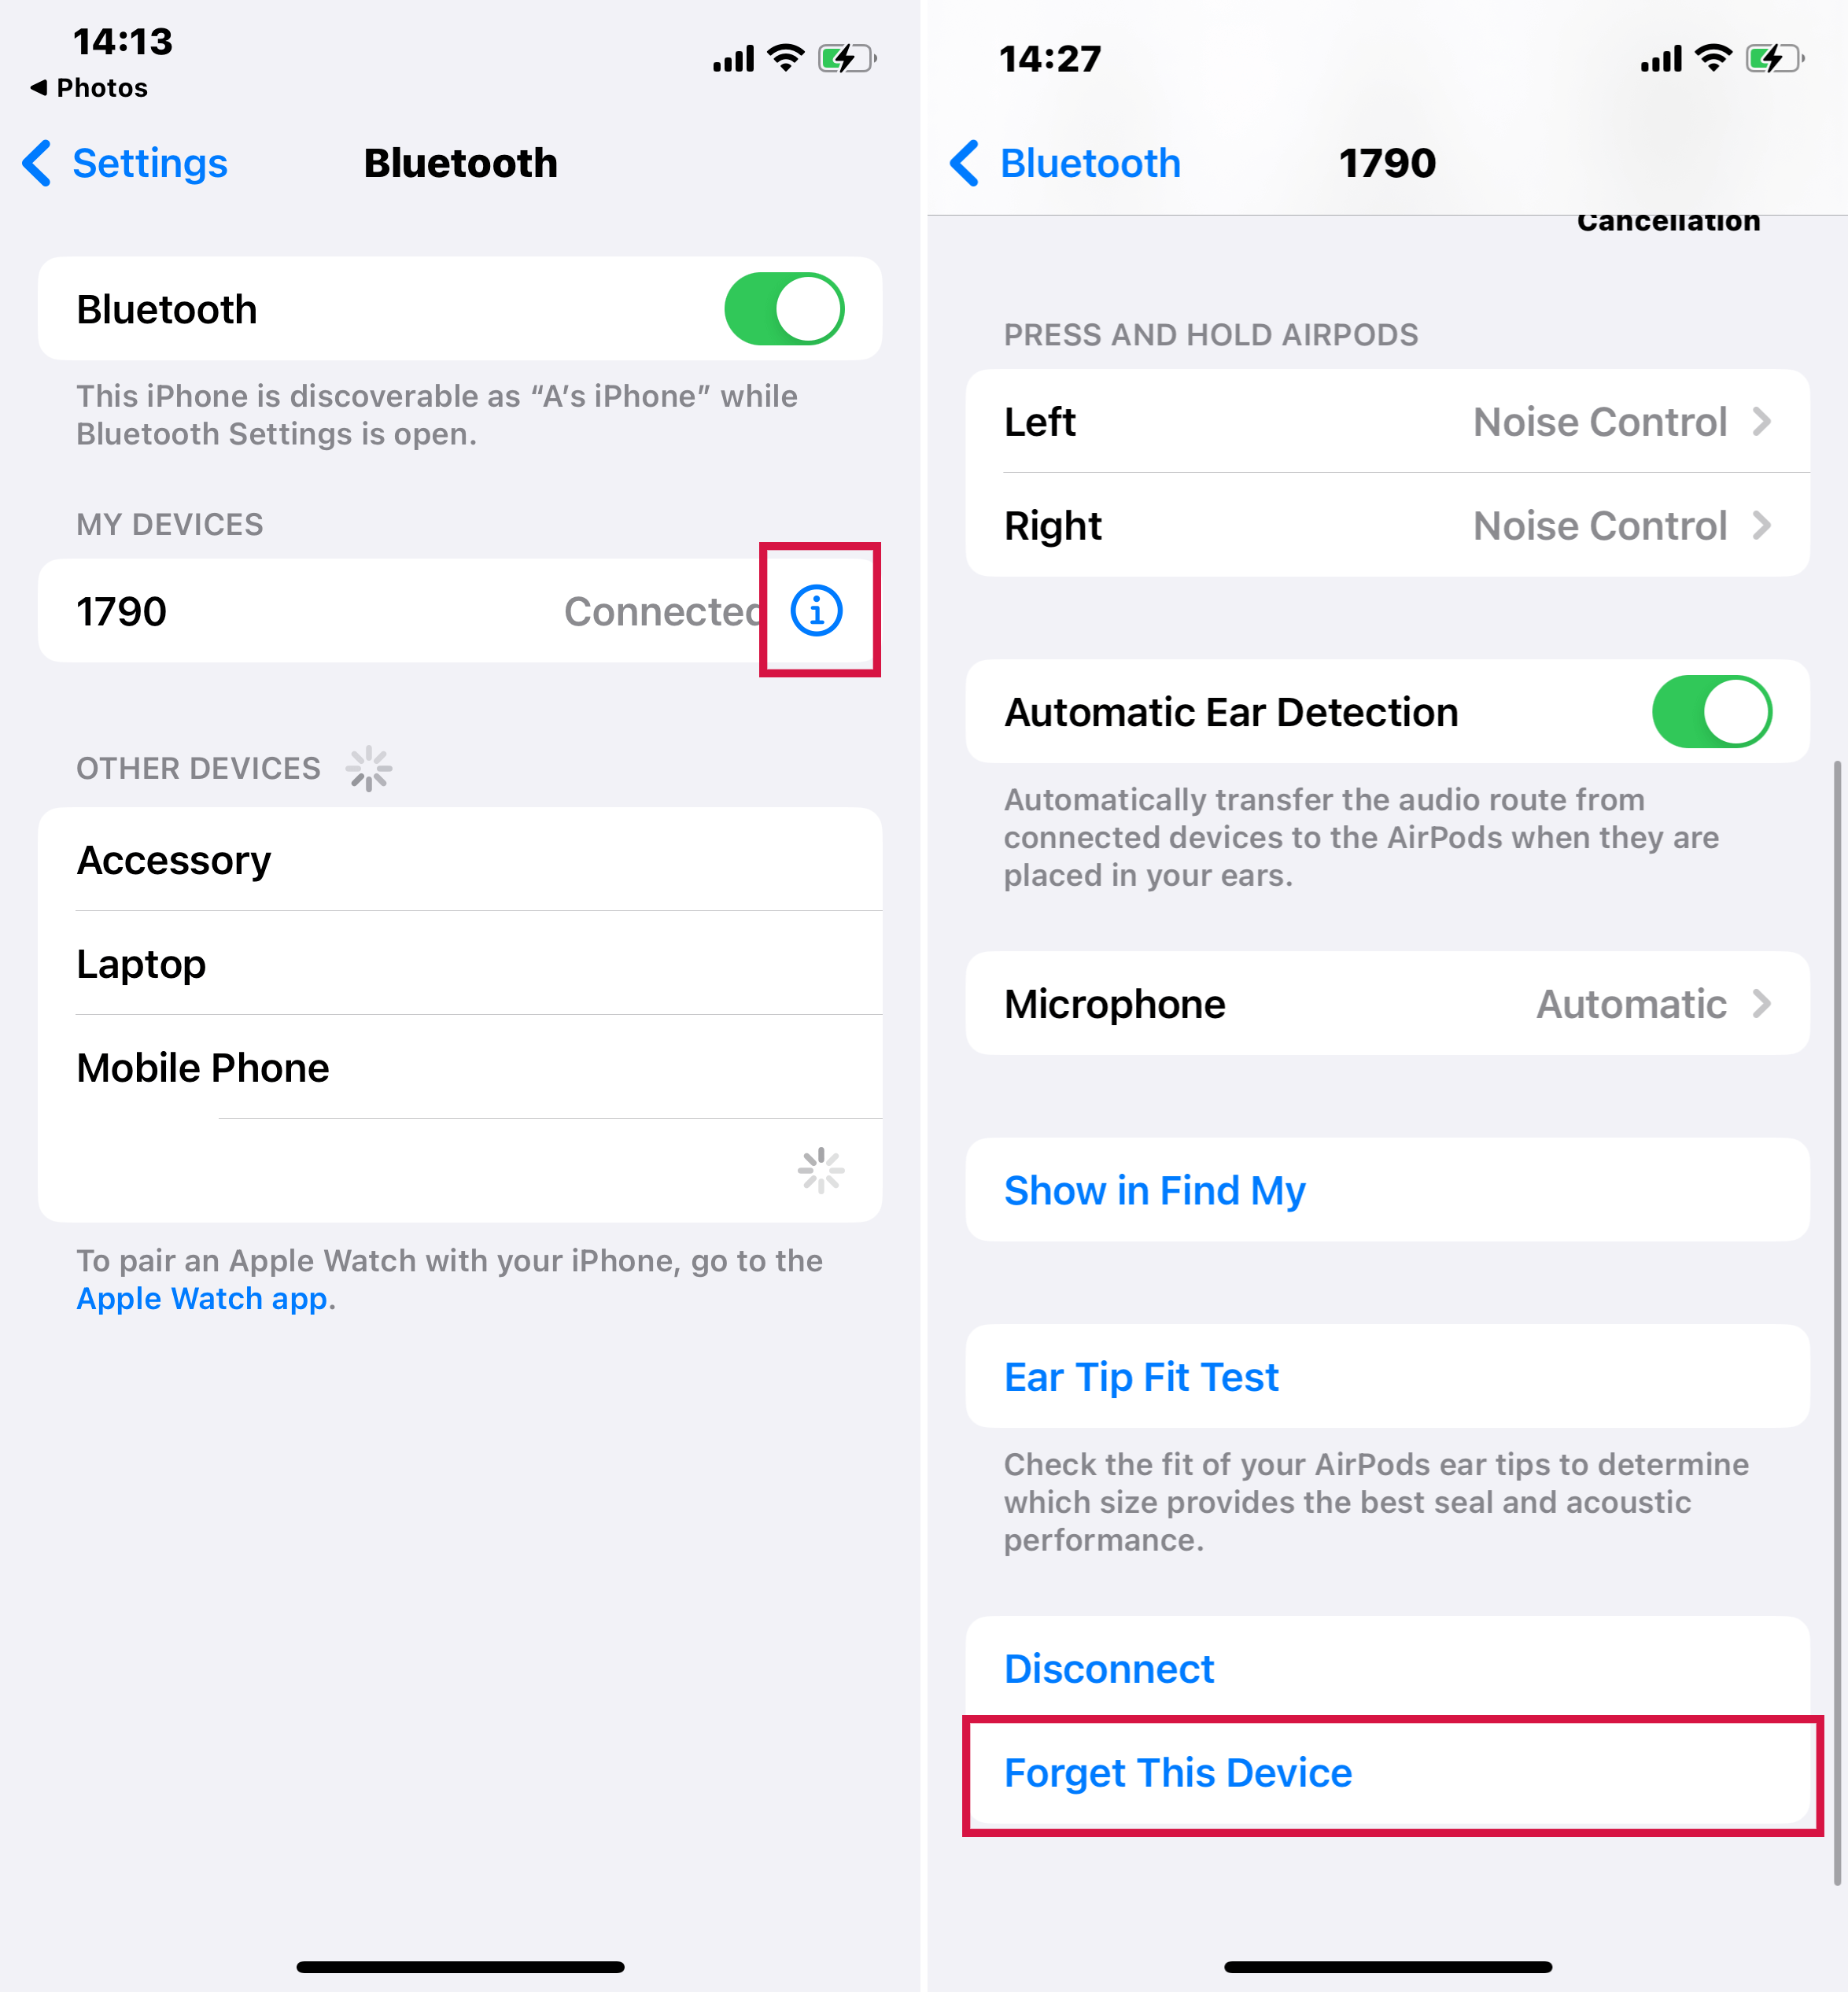
On your iOS device, go to Settings > Bluetooth.
Find your AirPods in the list and tap the "i" icon next to them.
Then choose "Forget This Device" and confirm.
Reset the AirPods: With the case lid open, press and hold the setup button on the back of the case for about 15 seconds or until you see the status light flashing amber, then white, indicating that your AirPods have been reset.
Reconnect AirPods: Bring the AirPods close to your device and follow the on-screen steps to reconnect.
For AirPods Max
Charge AirPods Max: Ensure your AirPods Max have sufficient charge.
Press and Hold Buttons: Press and hold the noise control button and the Digital Crown simultaneously until the LED indicator flashes amber.
Forget the AirPods Max on Your Device:
On your connected iOS device, go to 'Settings' > 'Bluetooth'.
Tap the "i" icon next to your AirPods Max.
Choose 'Forget This Device' and confirm.
Reconnect the AirPods Max: After the reset, pair your AirPods Max with your device again.
Resetting your AirPods will erase all settings, returning them to their factory defaults. You'll need to set them up again as if they were new.
Ensure your iOS device is nearby and has Bluetooth enabled during the reconnection process.
Summary
In this article, we've explored the essentials of using AirPods, from the initial setup and pairing process to mastering their intuitive controls. We've also covered how to customize AirPod settings to suit your preferences and provided practical tips for finding and resetting your AirPods if they're lost.
This guide offers a comprehensive overview, ensuring you make the most of your AirPods experience, regardless of the model you own.

