[7 Proven Ways] Easily Unlock Your iPhone Without a Passcode
Can't remember your iPhone passcode, leaving your iPhone unavailable? This article explores 5 proven ways to help you unlock your disabled iPhone without a passcode!
Plus, if you're looking to unlock your iPhone without manually entering the passcode, we'll also show you how to do it using voice control and an Apple Watch.
Keep reading to solve your issue!
Method 1: Via Mobitrix LockAway [Most Time and Effort-Saving]
Mobitrix LockAway is a professional unlocking software that lets you get access to your locked iPhone without a passcode.
It does not need iTunes to work, which allows you to unlock your disabled iPhone with a few simple clicks in just 20 minutes.
FREE DOWNLOADFREE DOWNLOADFREE DOWNLOAD
Steps:
Download and Install Mobitrix LockAway.
Click on “Unlock Screen Passcode” in the main menu.
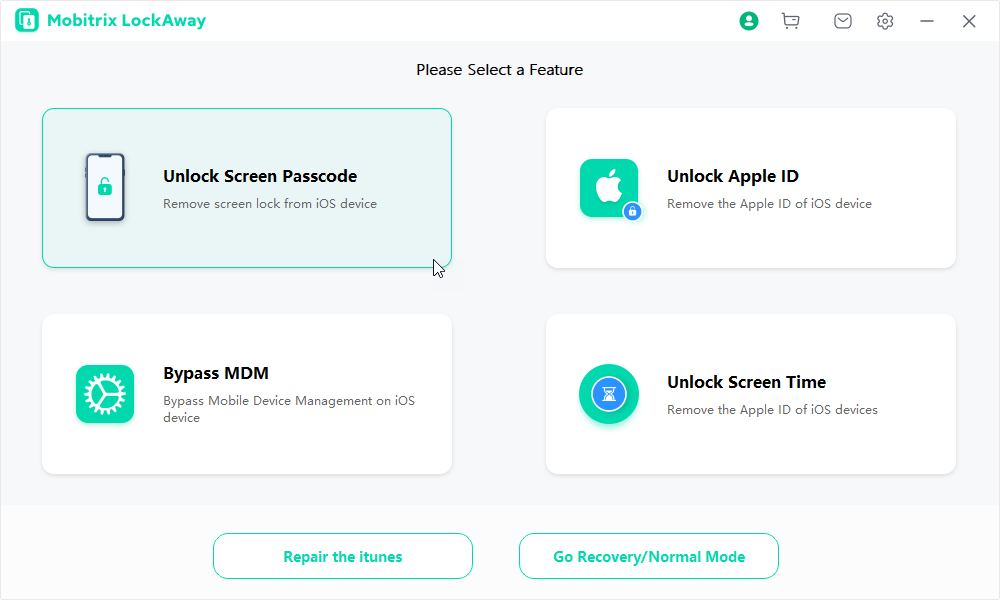
Click “Start” to remove the iPhone passcode.
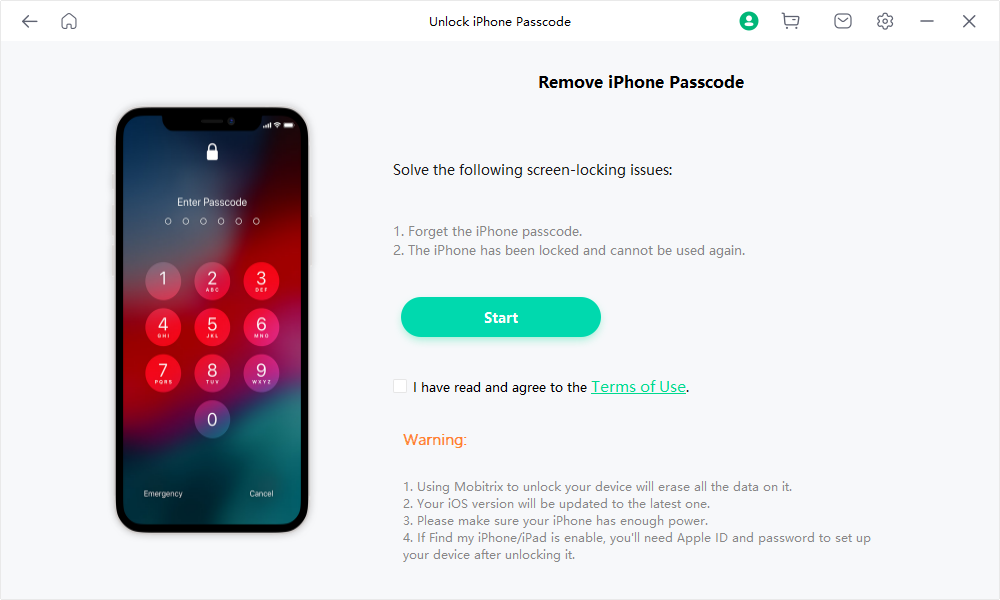
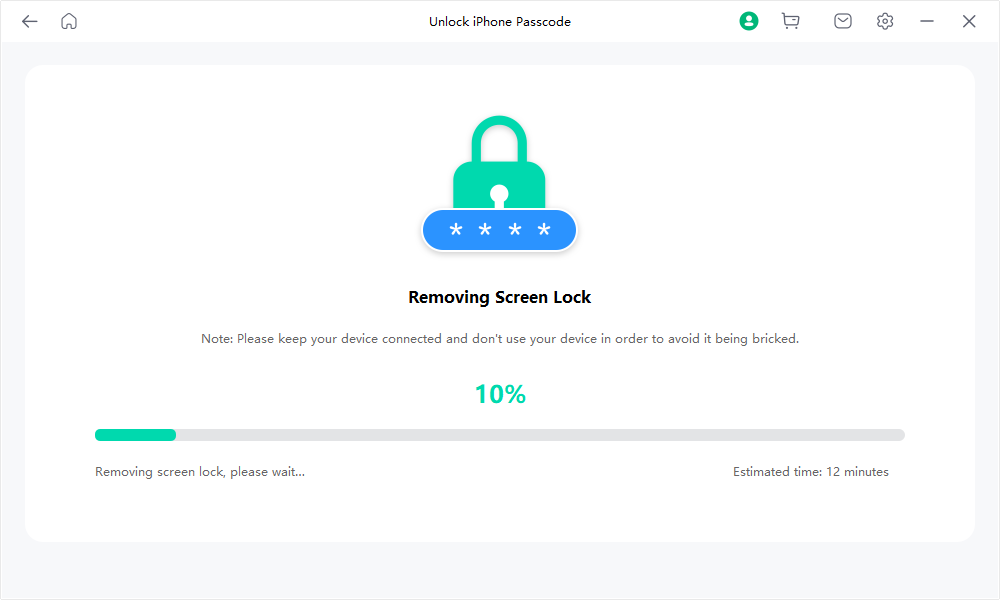
It starts removing the screen lock.
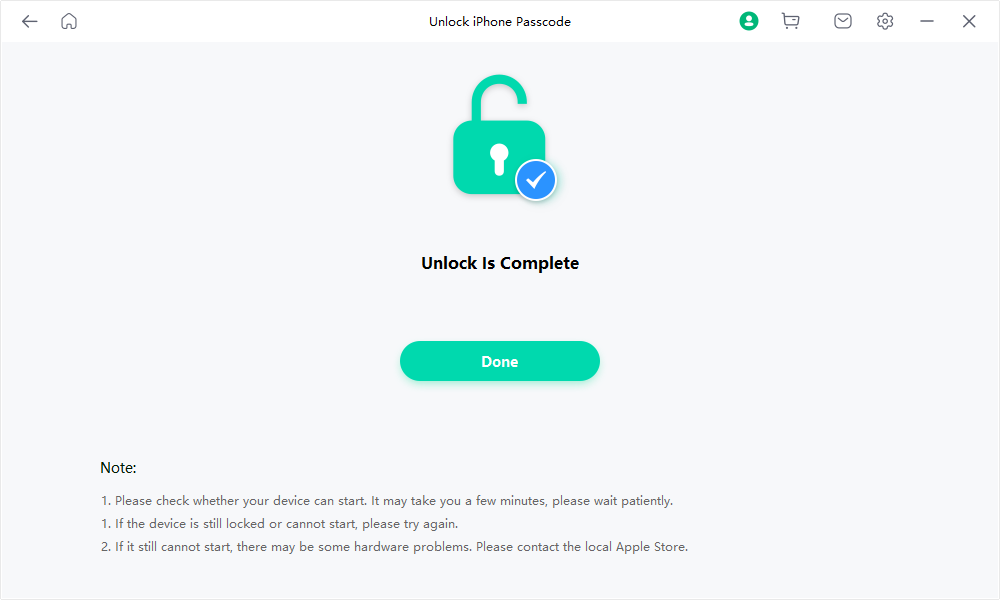
Your iPhone has been unlocked successfully!
Advantages:
The unlocking procedure is simple and just needs a few simple steps.
It does not need iTunes to work.
It fully supports iPhone 5s to iPhone 16 and iOS 18 and earlier versions.
It is 100% safe to use and protects your data privacy.
Four Main Functions:
Unlock the disabled iPhone without the passcode.
Remove an Apple ID when you've forgotten the Apple ID or password.
Bypass the Screen Time Passcode without losing any data.
Method 2: Via Forgot Passcode Option [No Computer Needed]
If you've entered your screen passcode incorrectly multiple times and are now facing an 'Unavailable’ message or a 'Security Lockout' screen, you can use your Apple ID and password to erase and reset your device without a computer.
Requirements:
Your device should be running iOS 15.2, iPadOS 15.2, or a later version.
Your device must be connected to either a cellular or Wi-Fi network.
You should know your Apple ID and password that were initially used to set up your device.
Steps:
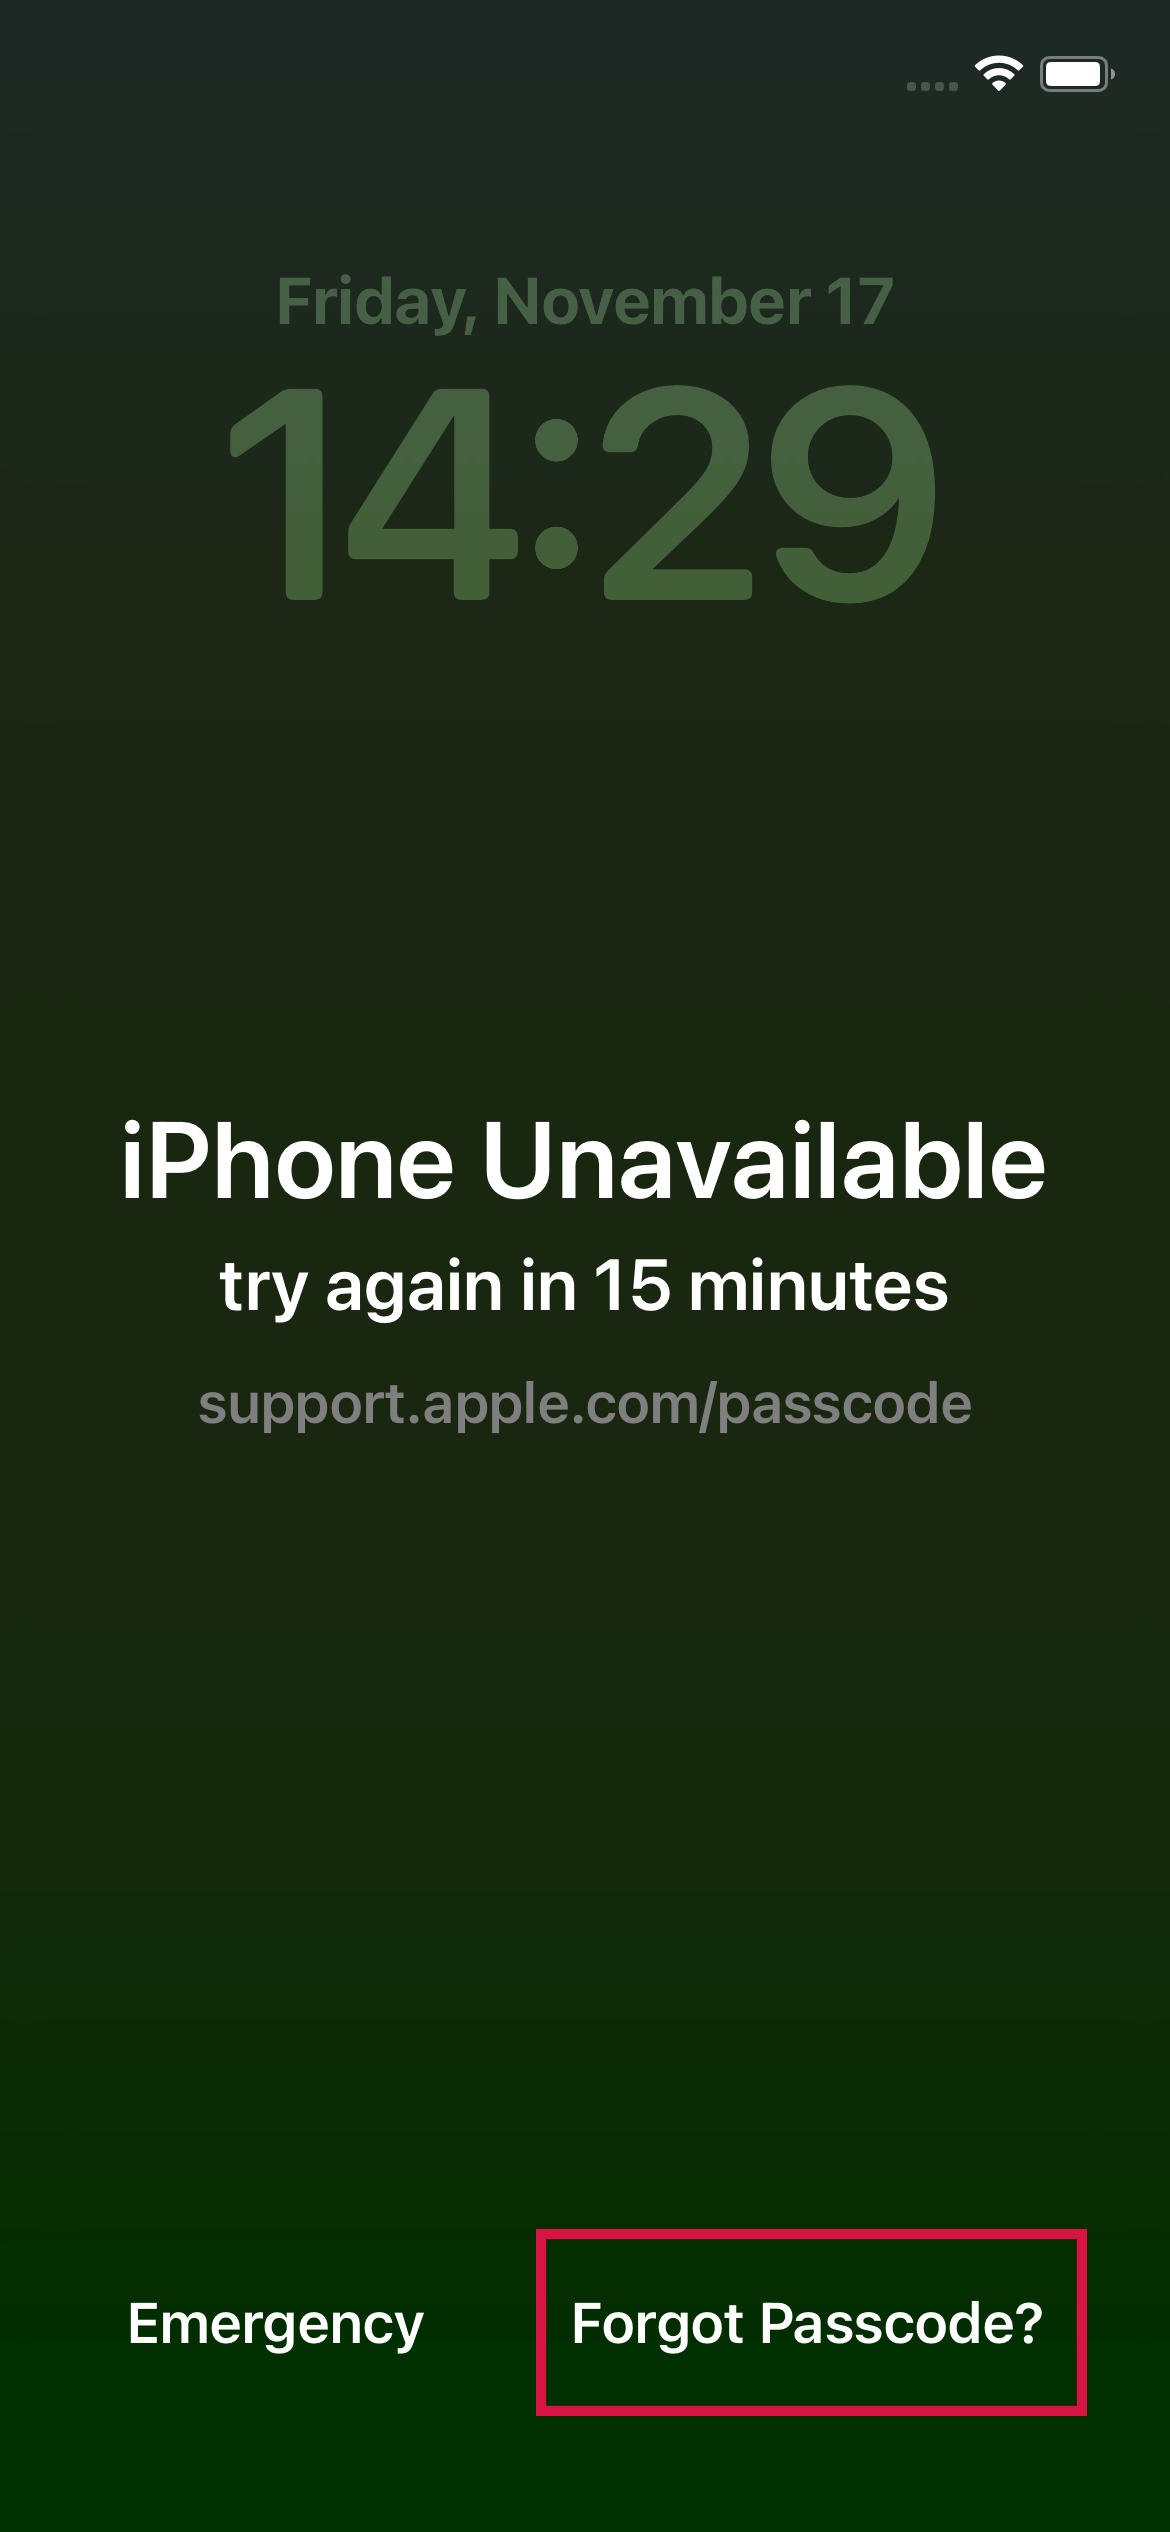
On your iPhone's Lock Screen, continue to enter an incorrect passcode until the "iPhone Unavailable" message is displayed, prompting you to try again later.
Select the 'Forgot Passcode?' option located in the bottom corner of the screen.
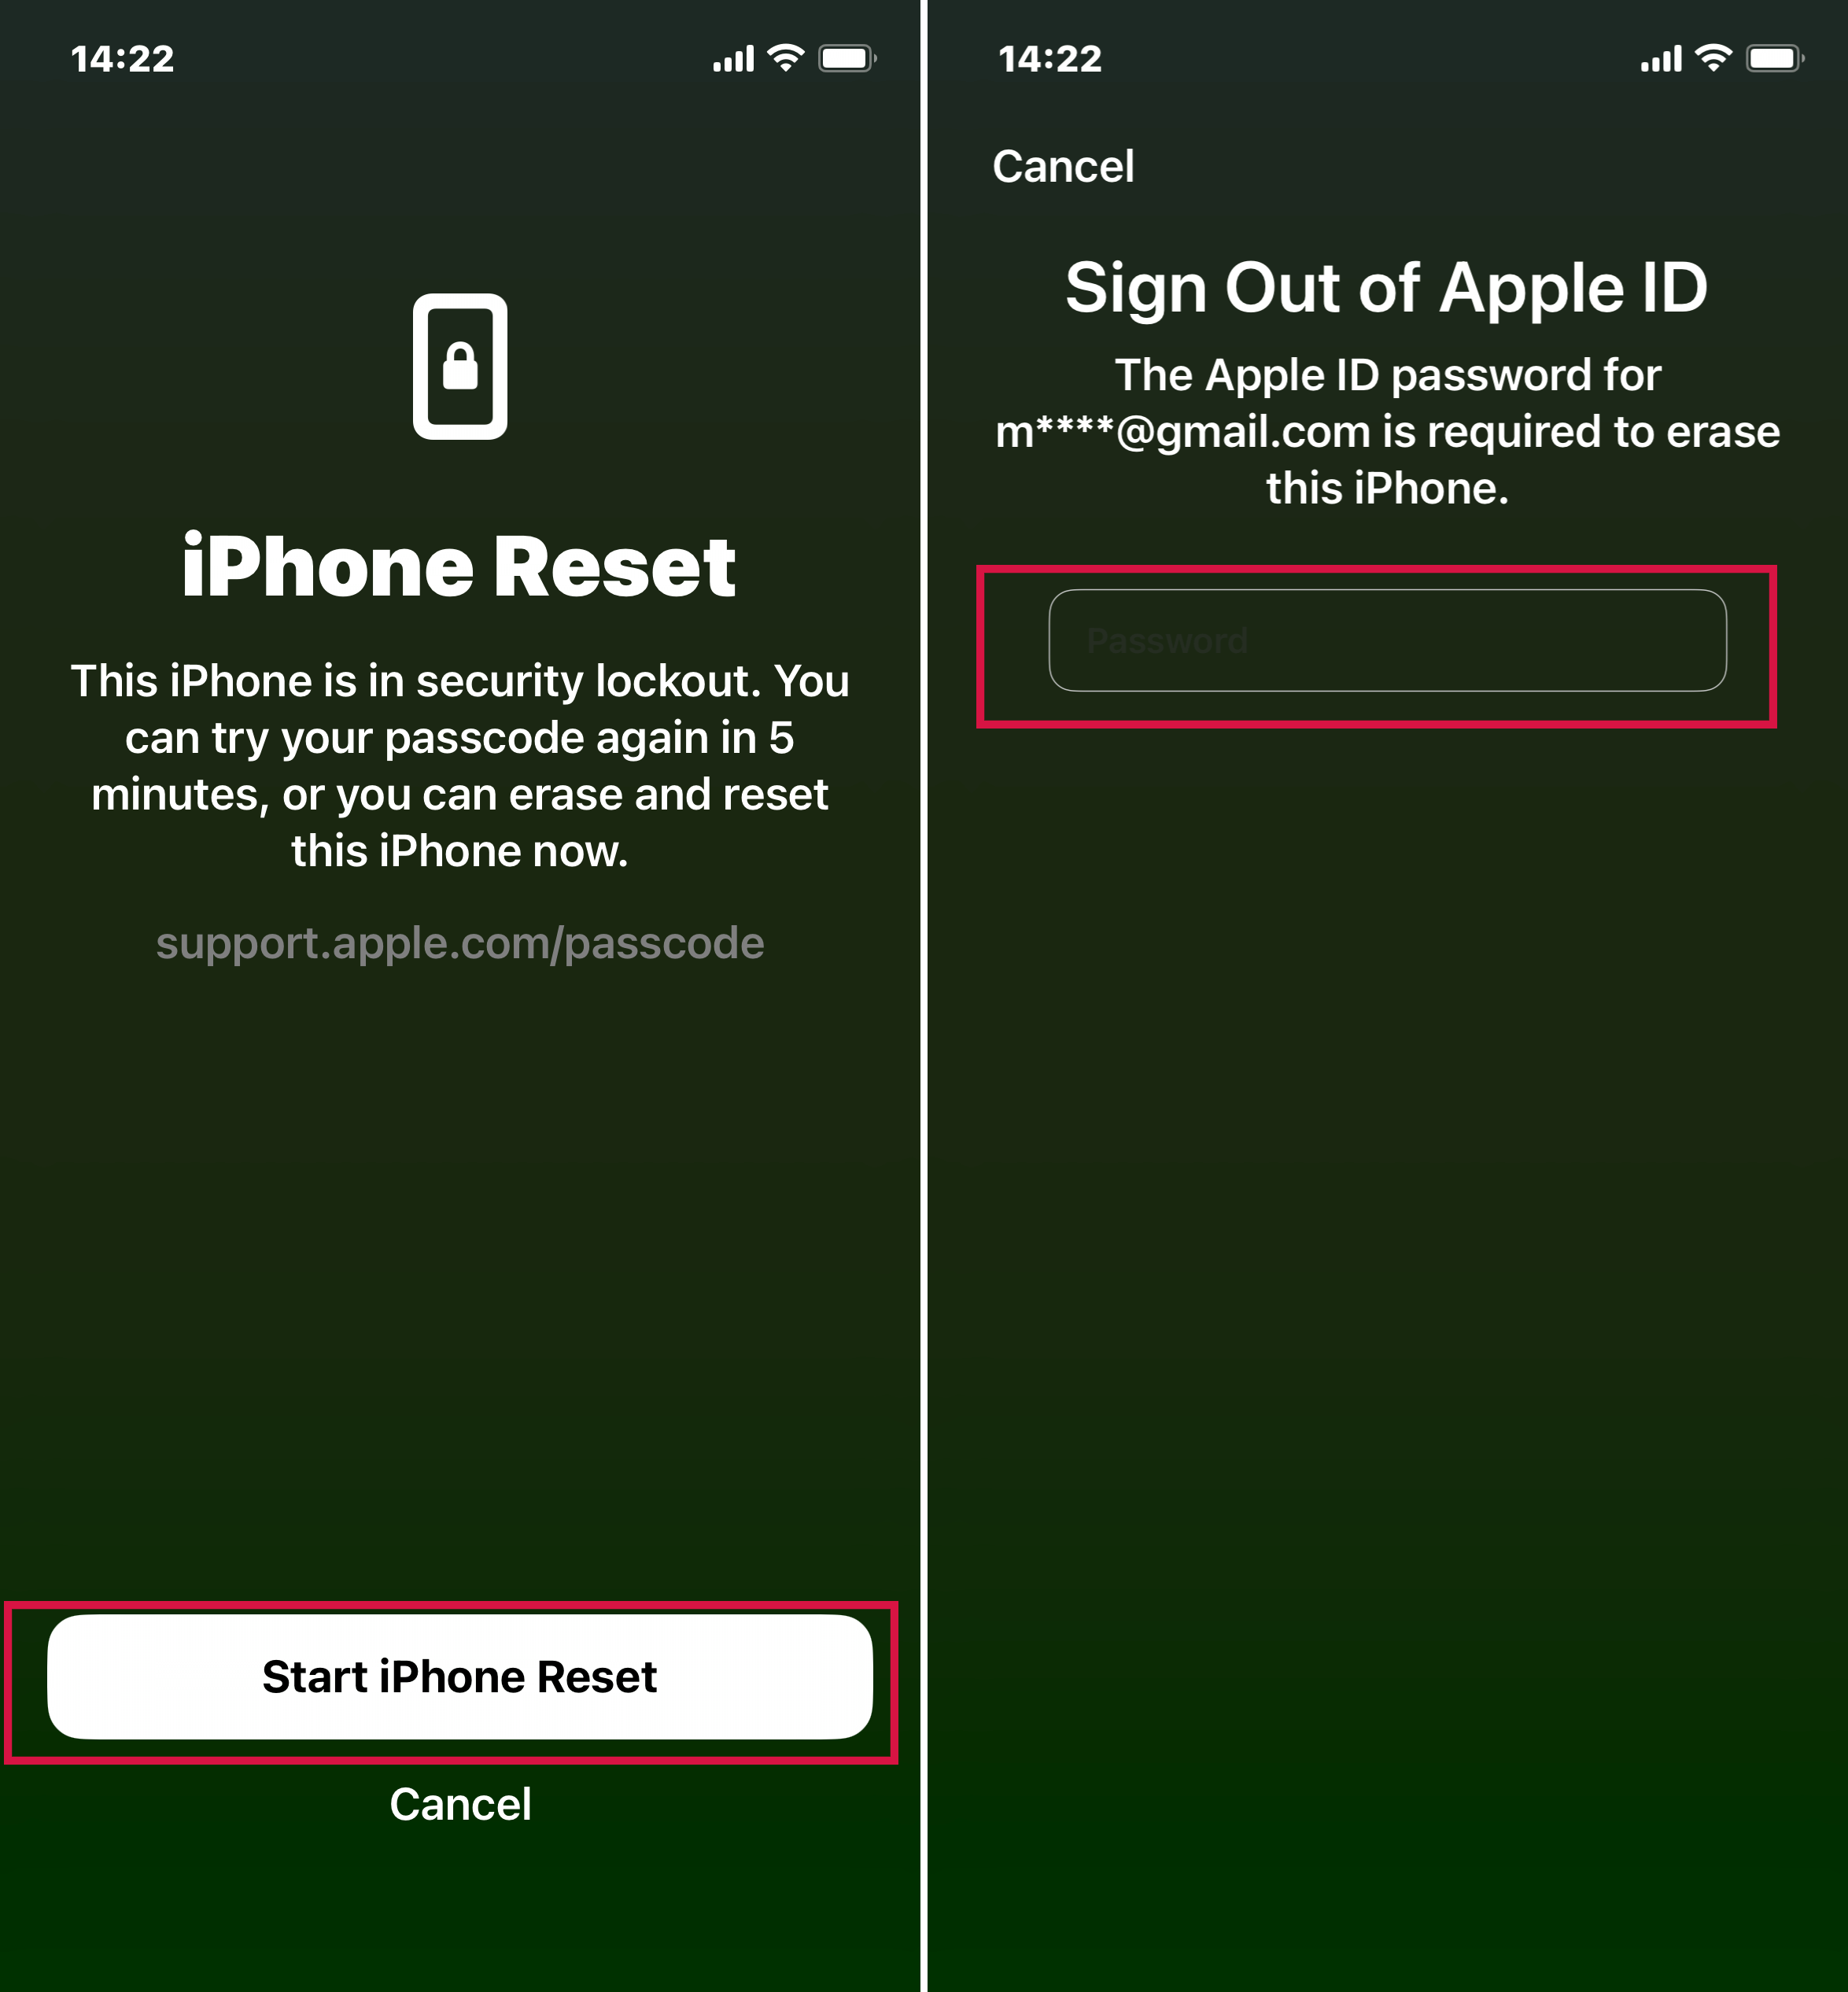
Choose 'Start iPhone Reset' and then enter your Apple ID password to sign out of your Apple ID on the iPhone.
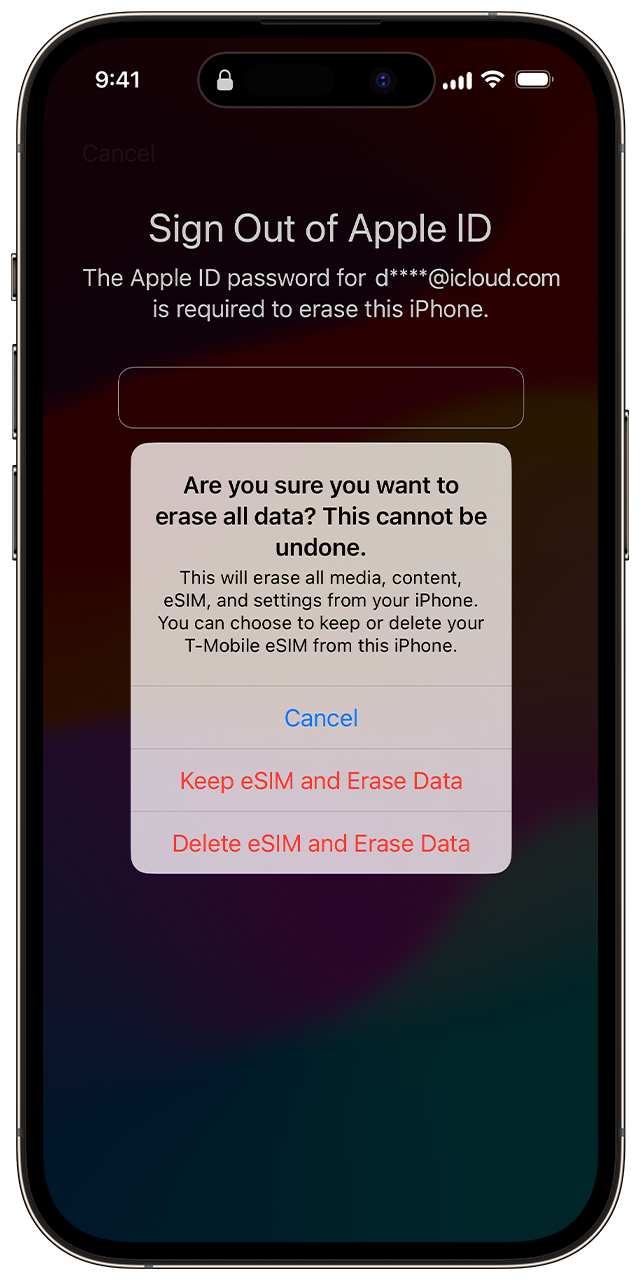
Note: For users with iOS 18 or later using an eSIM, you have the option to either retain your eSIM and erase your data, or delete your eSIM along with the data.
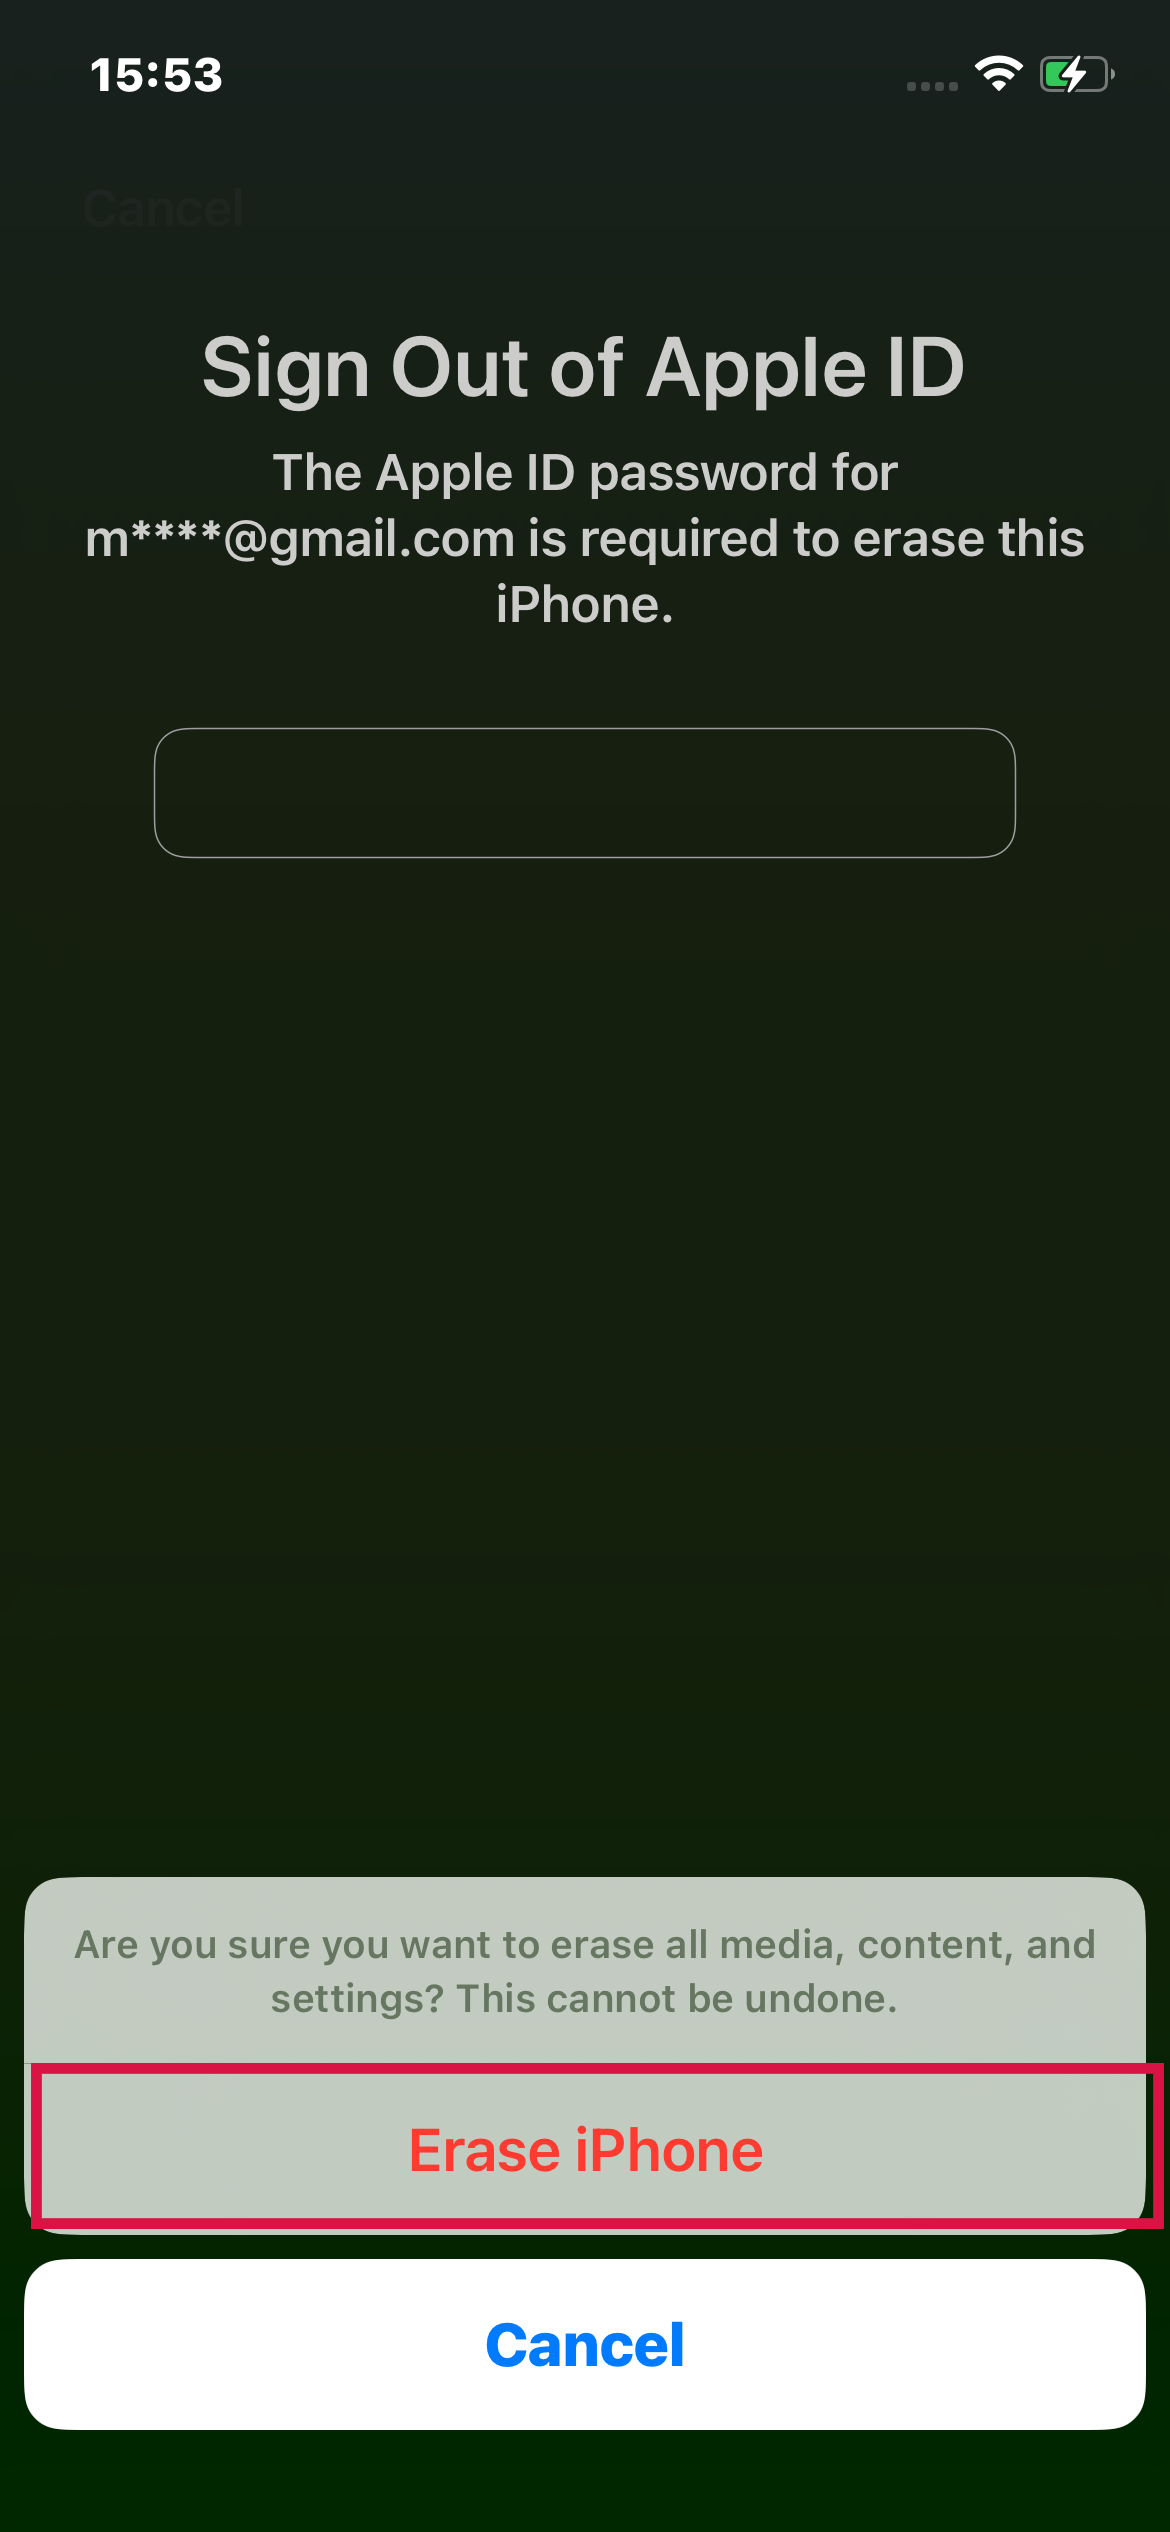
Select 'Erase iPhone' to permanently erase all data and settings.
The reset process will initiate, indicated by the white Apple logo and progress bar on your locked iPhone's screen. Your iPhone will automatically restart upon completion.
After your iPhone restarts, follow the onscreen steps to set up your iPhone, restore your data and settings from a backup, and create a new passcode.
The 'Security Lockout' screen only appears when your device has a cellular or Wi-Fi connection and has the 'Find My' feature previously activated.
If you try your screen passcode wrong ten times, what happens next depends on your device's settings. It might either erase its data itself automatically or show the 'Security Lockout' screen with a 'Forgot Passcode?' option, and there won't be a timer.
Temporarily Sign In with Your Old Passcode After a Recent Change
If you've recently updated your passcode in iOS 18 and later, you have a 72-hour window where you can still use your old passcode to access your phone.
This temporary access is part of the Passcode Reset feature. Remember, once you use your old passcode to get into your iPhone, you need to set a new passcode right away.
To use Passcode Reset:
On your device's Lock Screen, keep entering the incorrect passcode until you see the '[Device] Unavailable' message, asking you to try again later.
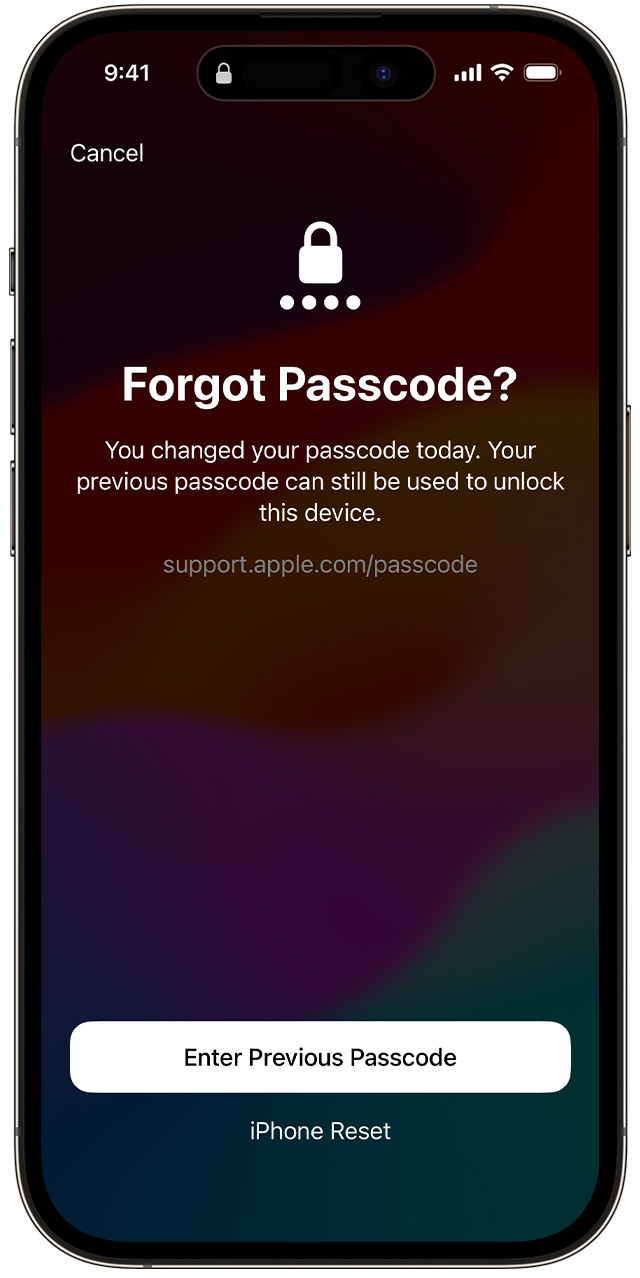
Tap the Forgot Passcode? option in the bottom corner of the screen.

Choose 'Enter Previous Passcode', and then follow the on-screen instructions to create a new passcode.
Method 3: Via Find My [Remote Unlocking]
Find My helps you find lost devices and see where your family members are. It also has a feature to erase your device, which deletes all data, including your forgotten iPhone screen passcode.
Once the screen passcode is removed, you can easily access your iPhone without any trouble.
Requirements:
The Find My feature must have been enabled on your locked iPhone.
Your locked iPhone must have your iCloud account signed in.
You need to know the Apple ID and password linked to your locked iPhone.
Your locked iPhone must have an active network connection (wifi or cellular data).
Steps:
Visit iCloud.com on any available device (PC, Mac, iPad, iPhone).
Sign in to iCloud via your Apple ID credentials linked to the locked iPhone.
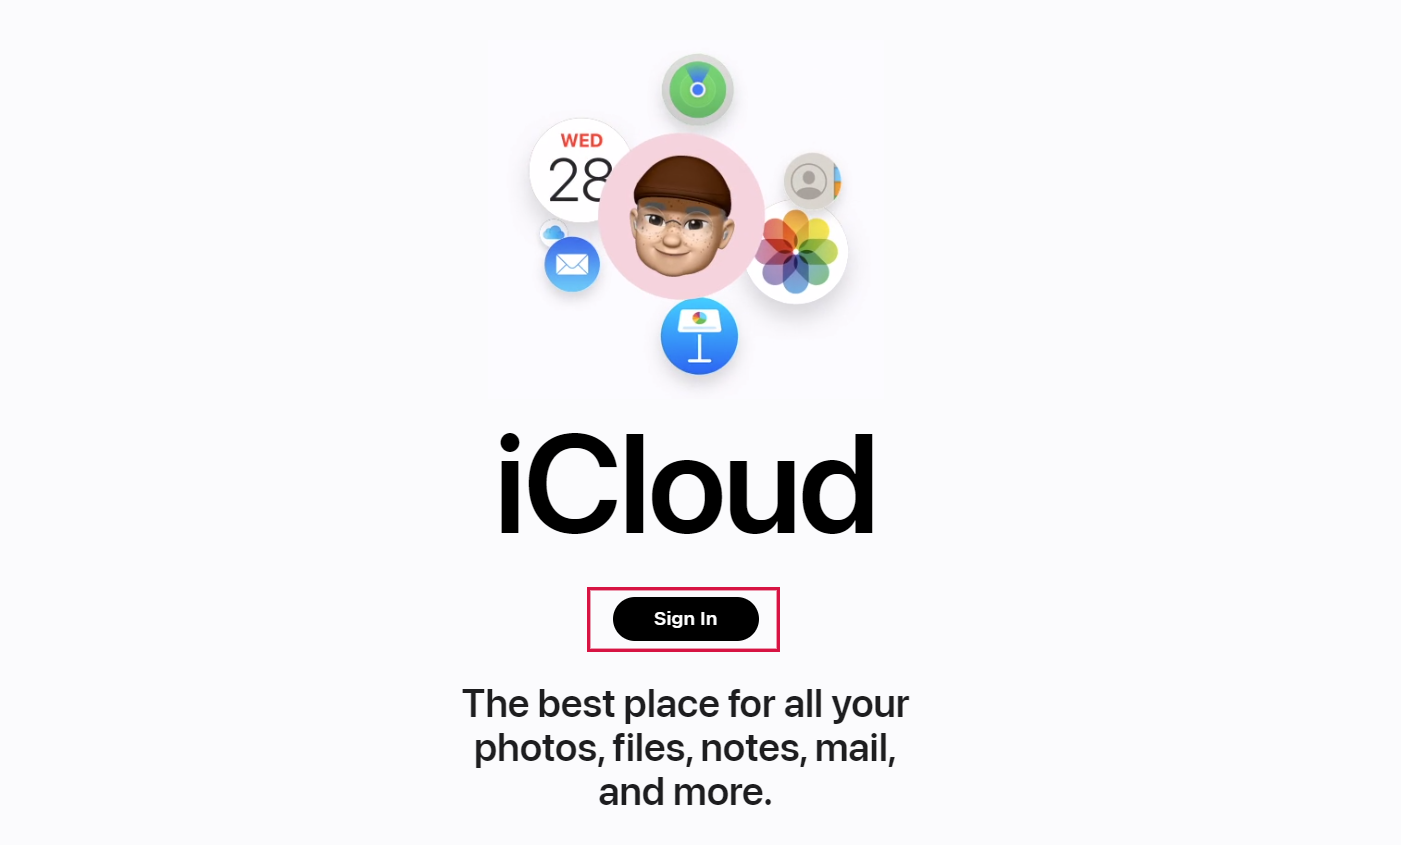
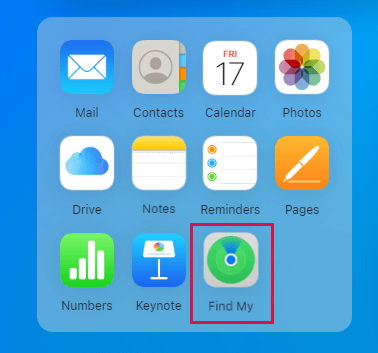
Tap the Find My option in the menu and reconfirm your sign-in.
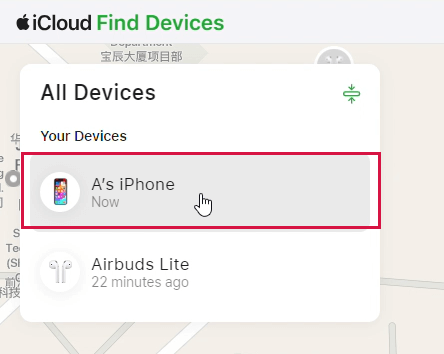
Click All Devices and select your disabled iPhone.
Tap Erase This Device and enter your Apple ID password to verify it.
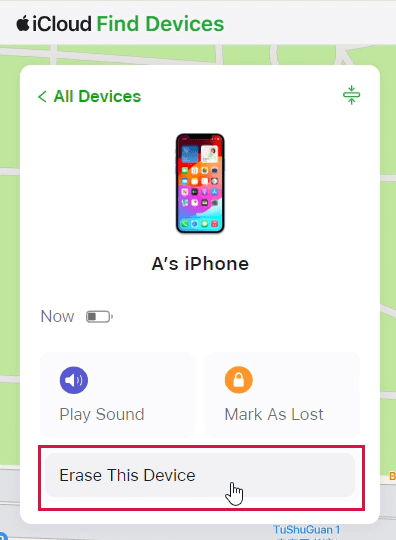
After the erase process completes, your iPhone will restart. You then have the option to restore your iPhone from a backup using iCloud or iTunes, if you have one available
Method 4: Via iTunes/Finder [Complex and Time-Consuming]
iTunes offers a 'Restore' feature that essentially performs a factory reset on your iPhone. This process erases all data and settings, including the passcode, allowing you to set up your iPhone anew.
Recovery Mode is an iOS feature designed for troubleshooting. In this mode, you can connect your iPhone to a computer and use an app – iTunes or Finder – to diagnose and resolve issues.
Because your iPhone is disabled, iTunes won't recognize it automatically. Therefore, you need to first put your locked iPhone into Recovery Mode.
Requirements:
You need a PC or a Mac
On a PC:
Ensure the installation of Windows 8 or later and the latest version of iTunes.
On a Mac:
macOS Catalina or newer, launch the Finder.
macOS Mojave or older, install and open the latest version of iTunes.
You need a compatible USB cable
Steps: (For Windows)
Step 1: Turn off your iPhone
Unplug your iPhone from the computer if it’s connected.
Turn off your iPhone using the method for your iPhone model:
iPhone with Face ID: Simultaneously press and hold the side button and either volume button until the sliders appear, then drag the Power Off slider.
iPhone with the Home button: Press and hold the side button, then drag the slider.
Step 2: Put your iPhone in recovery mode
Press and continuously hold the appropriate button for your iPhone model while you connect your iPhone to the computer. Do not release the button.
For iPhone 8 and newer models, including iPhone SE (2nd and 3rd generation), use the side button.
For iPhone 7 and iPhone 7 Plus, use the Volume Down button.
For iPhone SE (1st generation), iPhone 6s, and earlier models, use the Home button.
Keep holding the button until the recovery mode screen appears on your iPhone, and then you can release it.
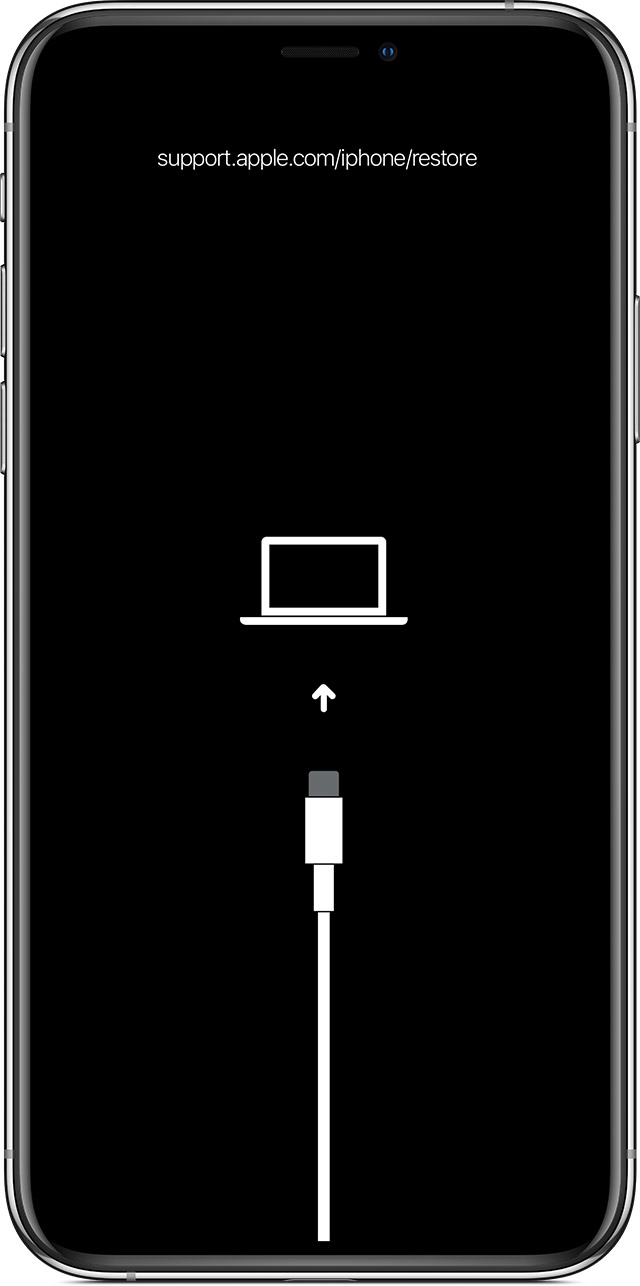
Step 3: Restore your iPhone
Open iTunes and iTunes will show "There is a problem with the iPhone that requires it to be updated or restored". Click Restore.
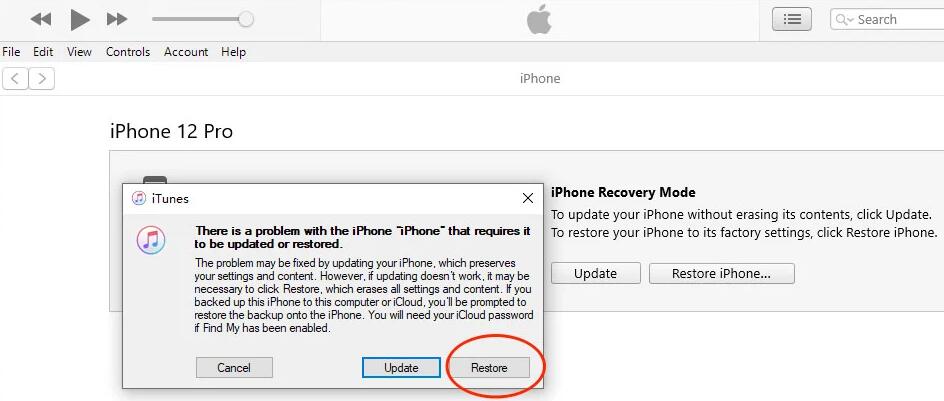
Click Restore again to confirm.
Your iPhone screen will display a white Apple logo and a progress bar to indicate the ongoing restoration process.
Once the restoration process is complete, your iPhone will restart. You can set up your iPhone from scratch and create a new passcode.
Steps: (For Mac running Catalina or later versions)
Use a USB cable to connect your disabled iPhone to your Mac.
Put your disabled iPhone into recovery mode.
Once your iPhone is in recovery mode, open Finder on your Mac.
Select your iPhone from the sidebar in Finder.
Choose 'Restore iPhone' when prompted. This will erase your iPhone, including the passcode, and install the latest iOS version.
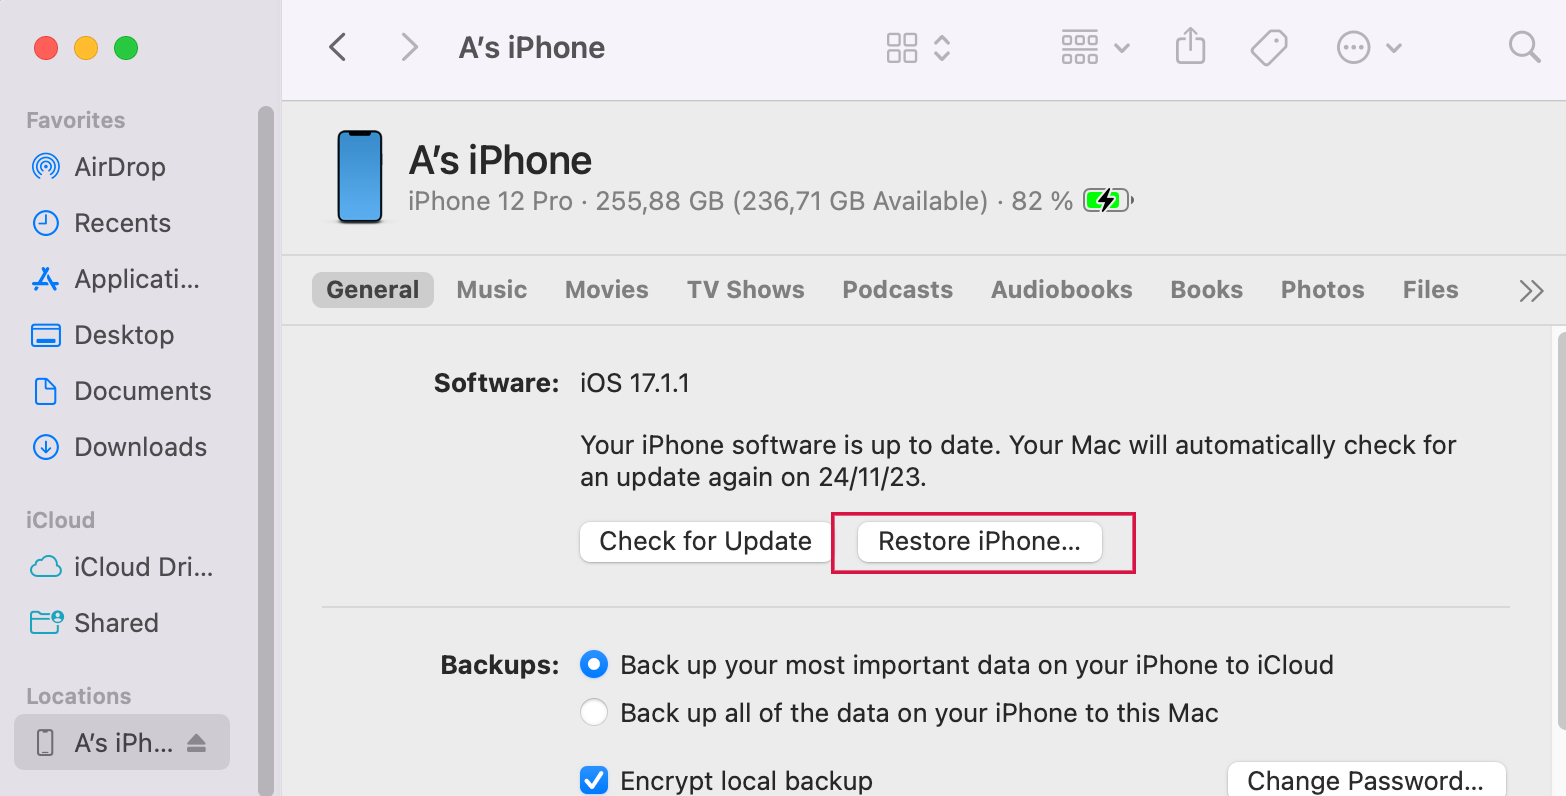
If you're unable to get your iPhone into Recovery Mode, or if Recovery Mode isn't resolving the issue, you might consider trying to put your iPhone into DFU Mode instead.
DFU (Device Firmware Update) mode is a deeper type of restoration for iOS devices, enabling more comprehensive troubleshooting and system changes.
Remember, using DFU mode to restore will completely erase your iPhone, so make sure to back up any important data beforehand if possible.
Steps:
Step 1: Connect Your iPhone to a Computer
Use a USB cable to connect your iPhone to a computer with iTunes installed.
Step2: Put your iPhone into DFU Mode
For iPhone 8 or later:
Quickly press and release the Volume Up button, then the Volume Down button.
Press and hold the Side button until the screen turns black, then hold both the Side button and Volume Down button.
After 5 seconds, release the Side button while continuing to hold the Volume Down button until iTunes detects a device in recovery mode.
For iPhone 7 and 7 Plus:
Press and hold the Side and Volume Down buttons together until the recovery mode screen appears.
For iPhone 6s and earlier:
Press and hold the Home and the Top (or Side) buttons together until the recovery mode screen appears.
Step 3: Restore Your iPhone
Once in DFU mode, iTunes will alert you that it has detected an iPhone.
Follow the prompts in iTunes to restore your iPhone.
Both Recovery and DFU modes can help remove the passcode from a locked iPhone, but they require access to a computer with the most recent iTunes version. However, one of the main challenges is successfully entering Recovery or DFU mode, which can be tricky.
Method 5: Via iPhonePass [No Data Loss]
iPhonePass is a free unlocking tool launched by Mobitrix, which supports users to unlock iPhone passcode without data loss.
The existing weakness in the iOS system allows iPhones from the 5s to the X models to be jailbroken. This means you can gain advanced control over your iPhone. So, you could change or remove your screen passcode, even if you forgot what it was.
Advantages:
Completely free.
The unlocking process won’t cause data loss.
Disadvantages:
Models newer than the iPhone X are not supported.
Not available for Windows.
You might take the risk of turning the jailbreak status on and off.
Needs good computer skills and know-how.
Preparations before you start:
A MacBook
Download a lock deletion tool – iPhonePass and jailbreak tool checkra1n.
Checkra1n is an easy and perfect jailbreaking tool. But it only works on macOS. If you are using a Windows system, this method may not work for you.
Steps:
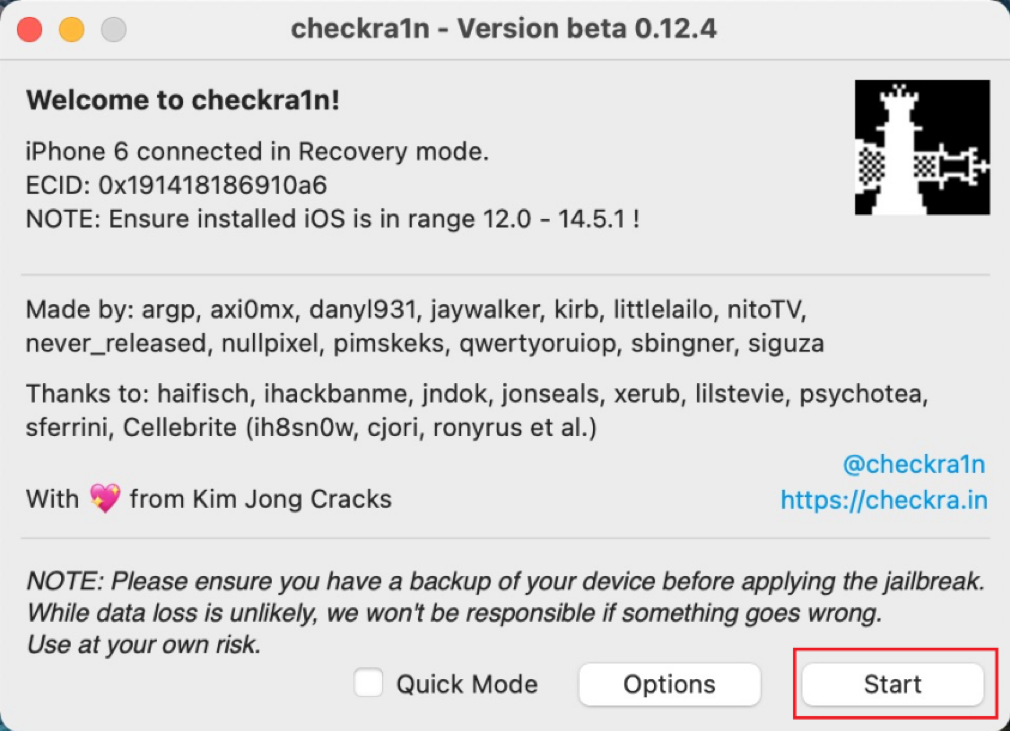
Launch Checkra1n and click Start to Jailbreak your iPhone.
Install the jailbreak and make sure not to disconnect your iPhone until the installation is complete.
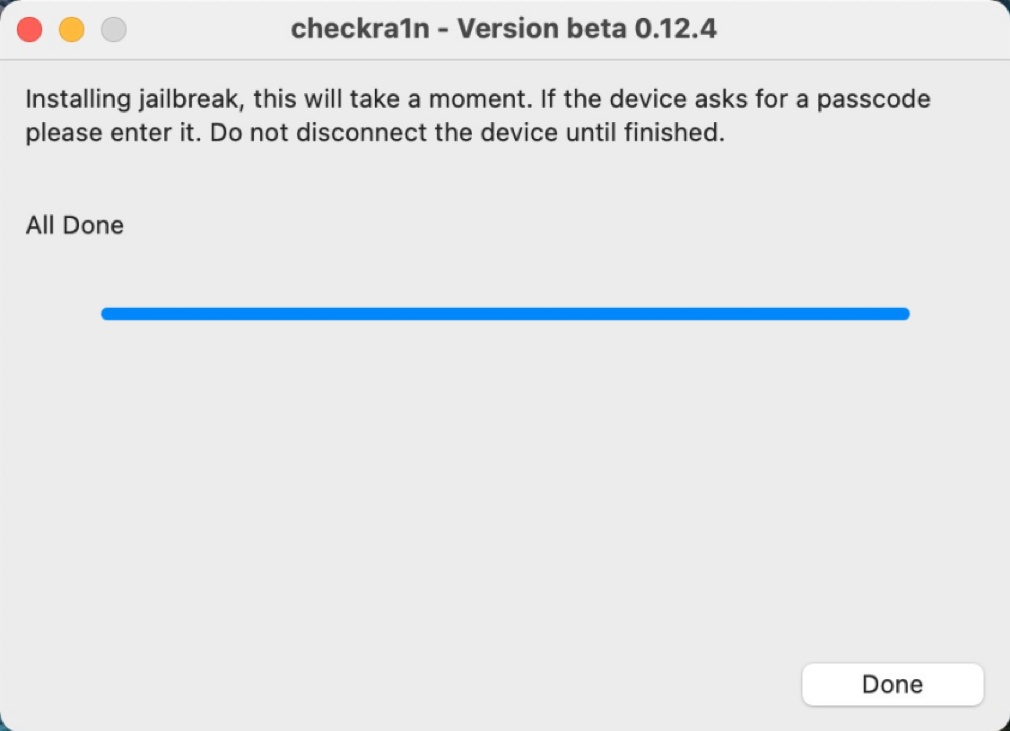
After jailbreaking, don’t set up your iPhone right away.
Connect your iPhone to your MacBook.
Set up an internet network for your iPhone and Mac. Launch your Terminal in your MacBook and enter the command “iproxy 22 44”.

Use the iPhonePass tool to remove the screen passcode. Delete the “deliphonepass.sh” file.

Now your iPhone screen passcode has been removed, you can access your iPhone normally without any data loss.
Jailbreaking can make your iPhone less secure, it's advised to turn off the jailbreak on your iPhone after removing the screen passcode.
You can resolve this by using an iOS repair tool named Mobitrix Perfix. Its Standard Repair Mode safely removes the jailbreak status without any data loss.
If you know your screen passcode but prefer not to enter it manually, you can unlock your iPhone using voice control and the Apple Watch feature. Keep reading to learn more about these convenient options!
Method 6: Via Voice Control
Apple introduced the voice control feature in iOS 13. It is an accessibility feature that allows you to operate iPhone/iPad hands-free.
You can just use your voice to give commands such as taking a screenshot, launching an app, setting up alarms, unlocking your iPhone without typing a passcode and many more.
It is a lifesaver for people with limited mobility.
Steps to unlock iPhone via Voice Control
Go to Settings and locate the Accessibility tab.
Enable Voice Control option.
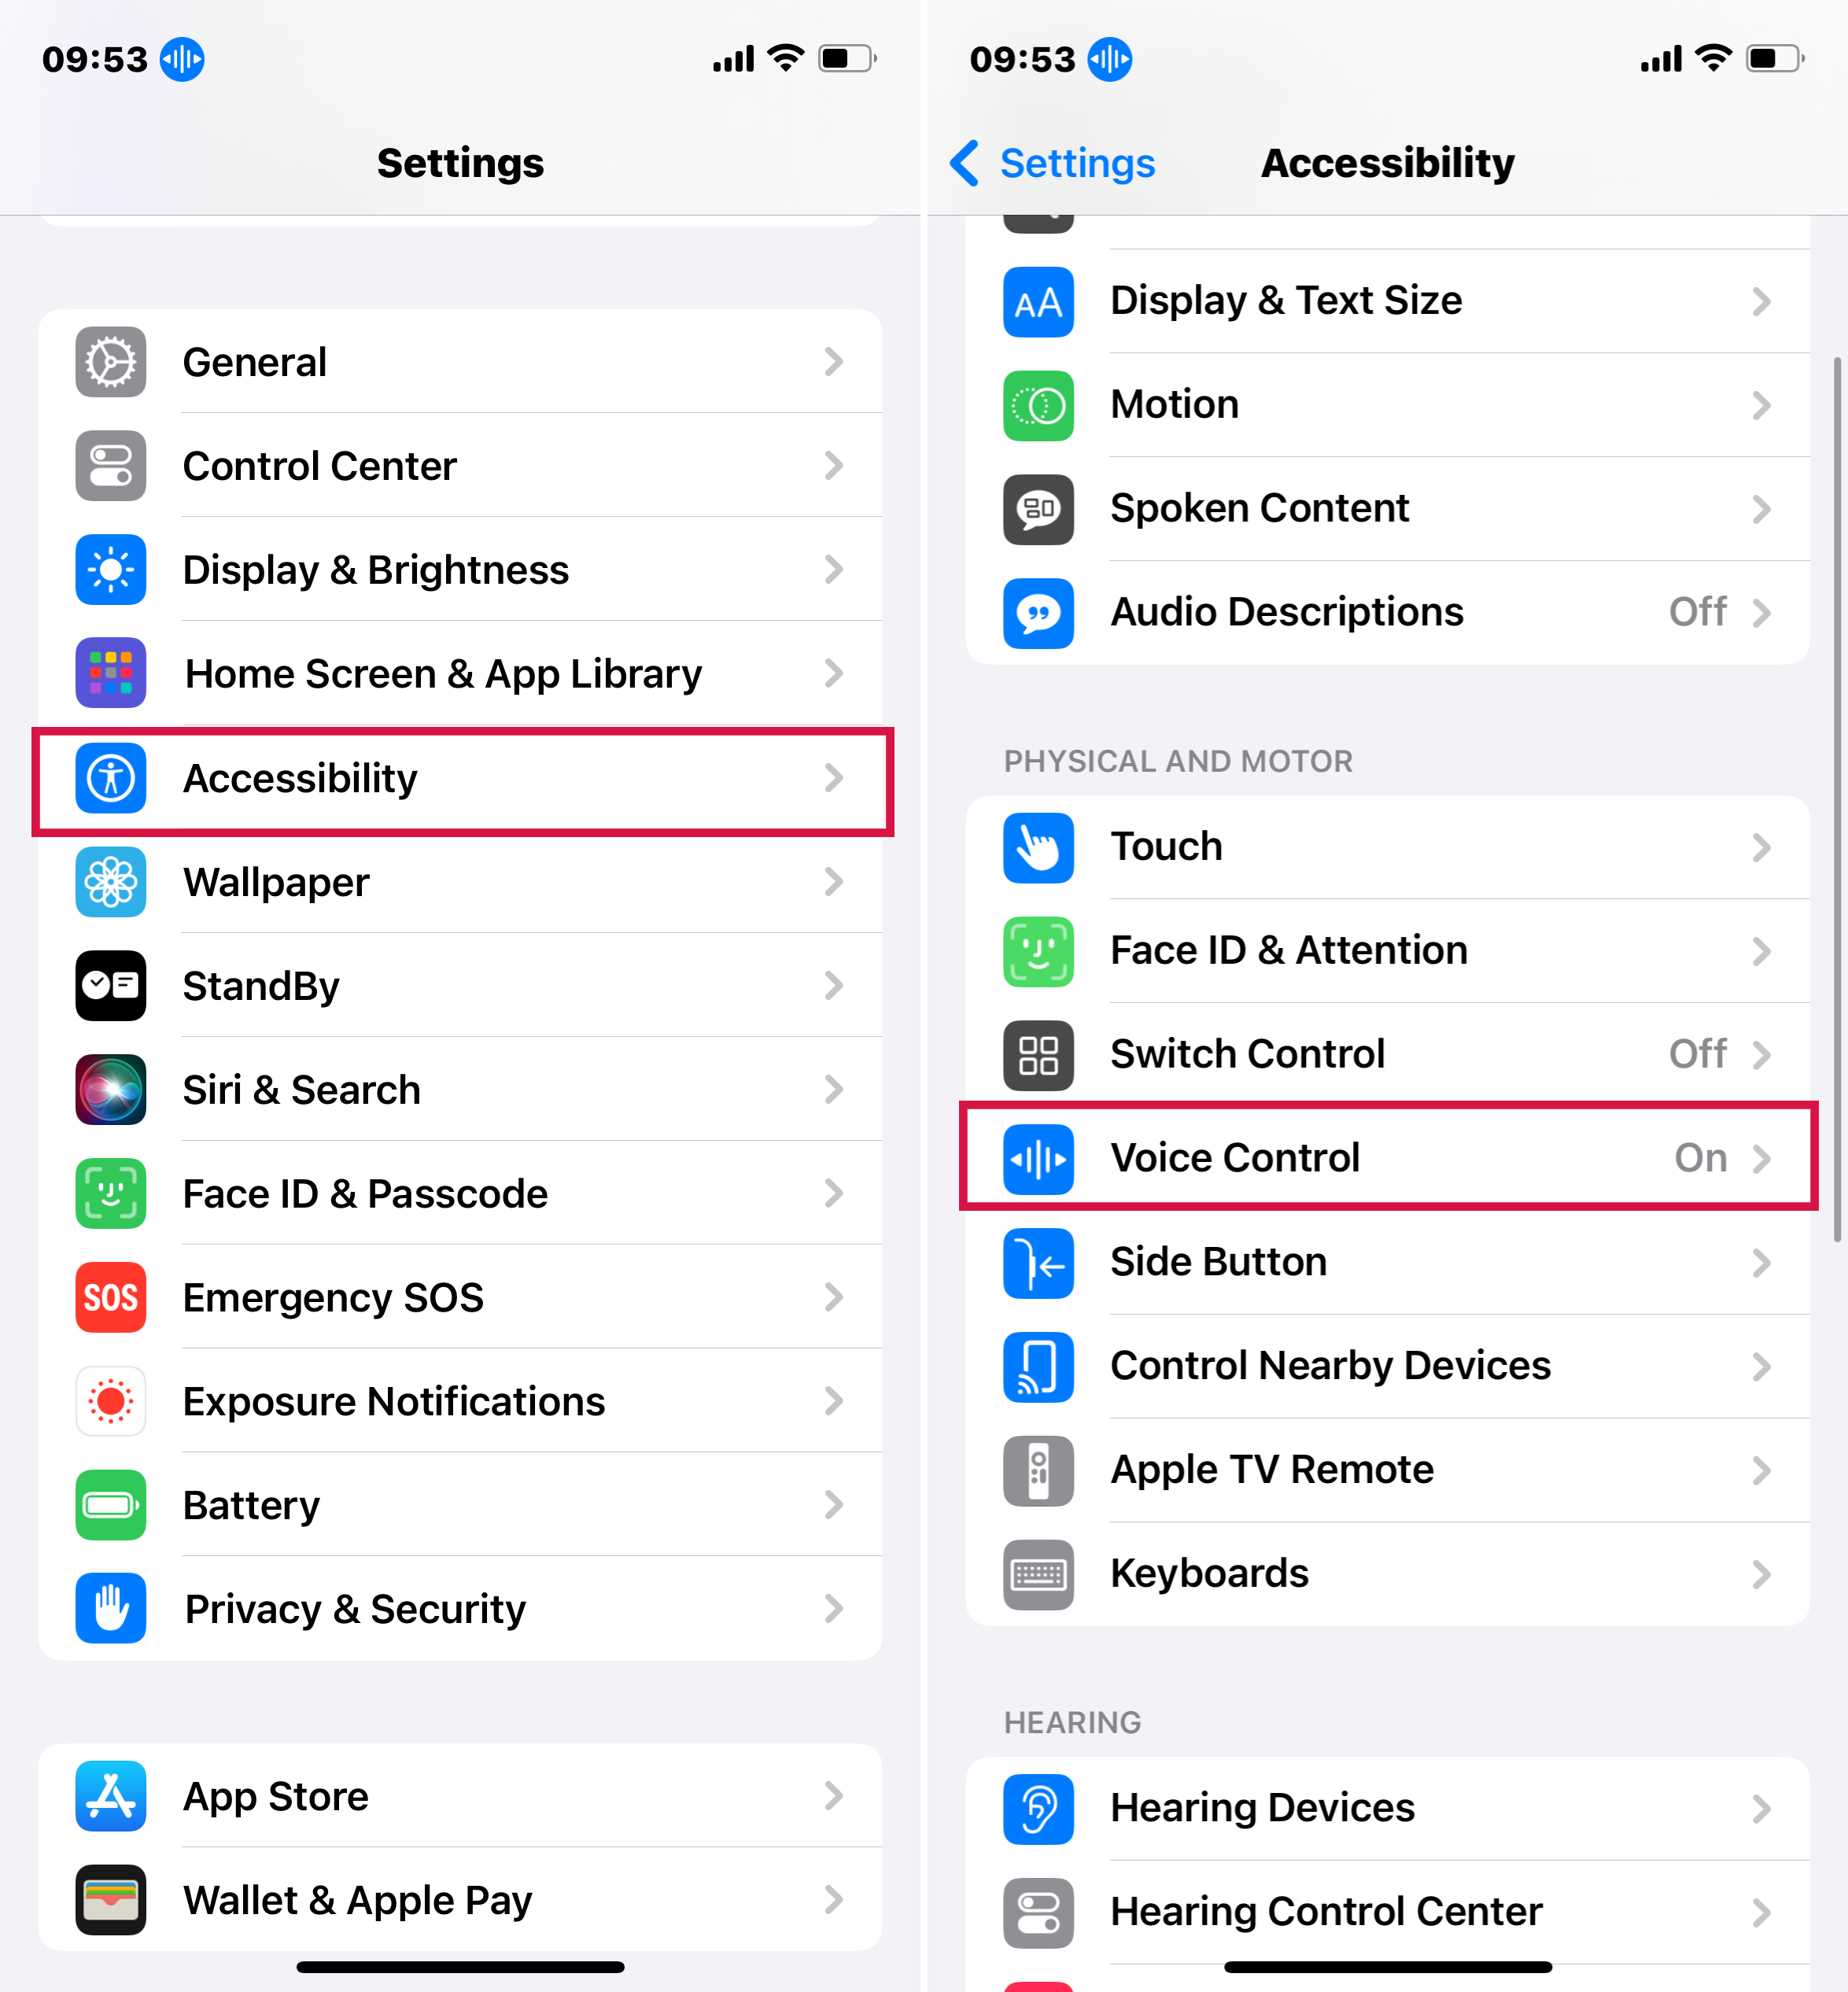
Wait for the file to finish downloading if you are setting voice control for the first time.
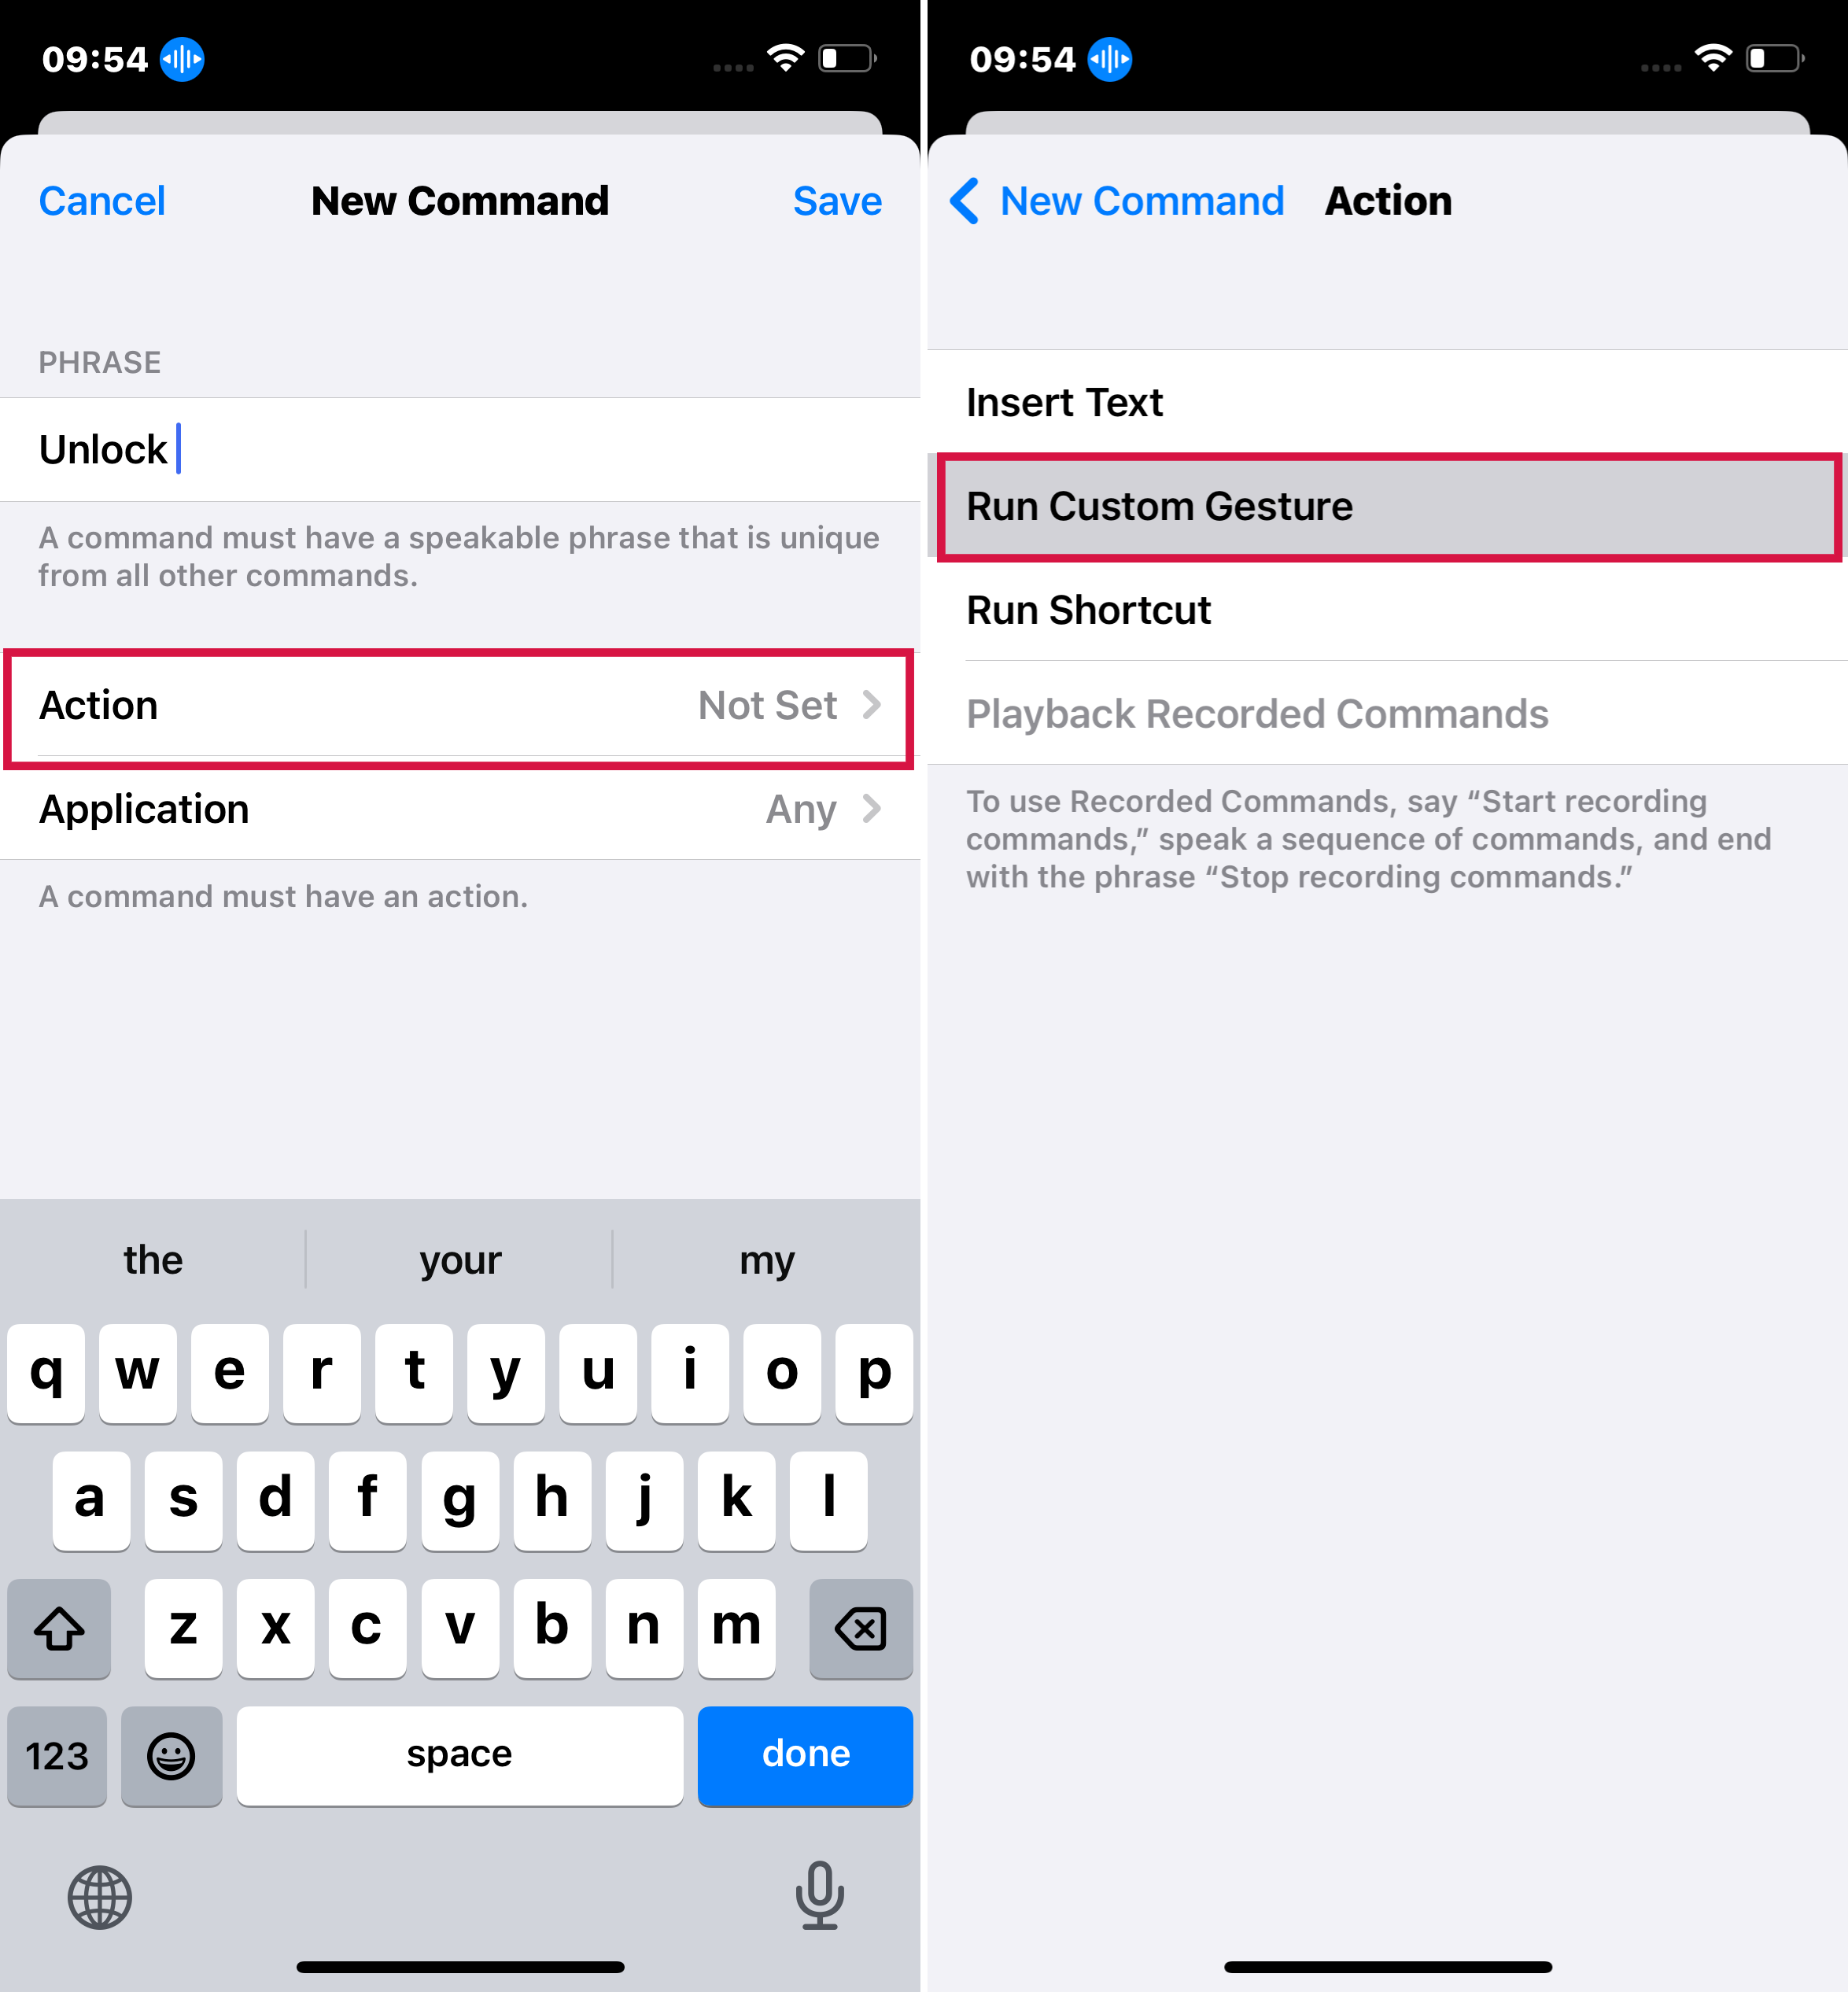
Click on Commands and select Create New Command.
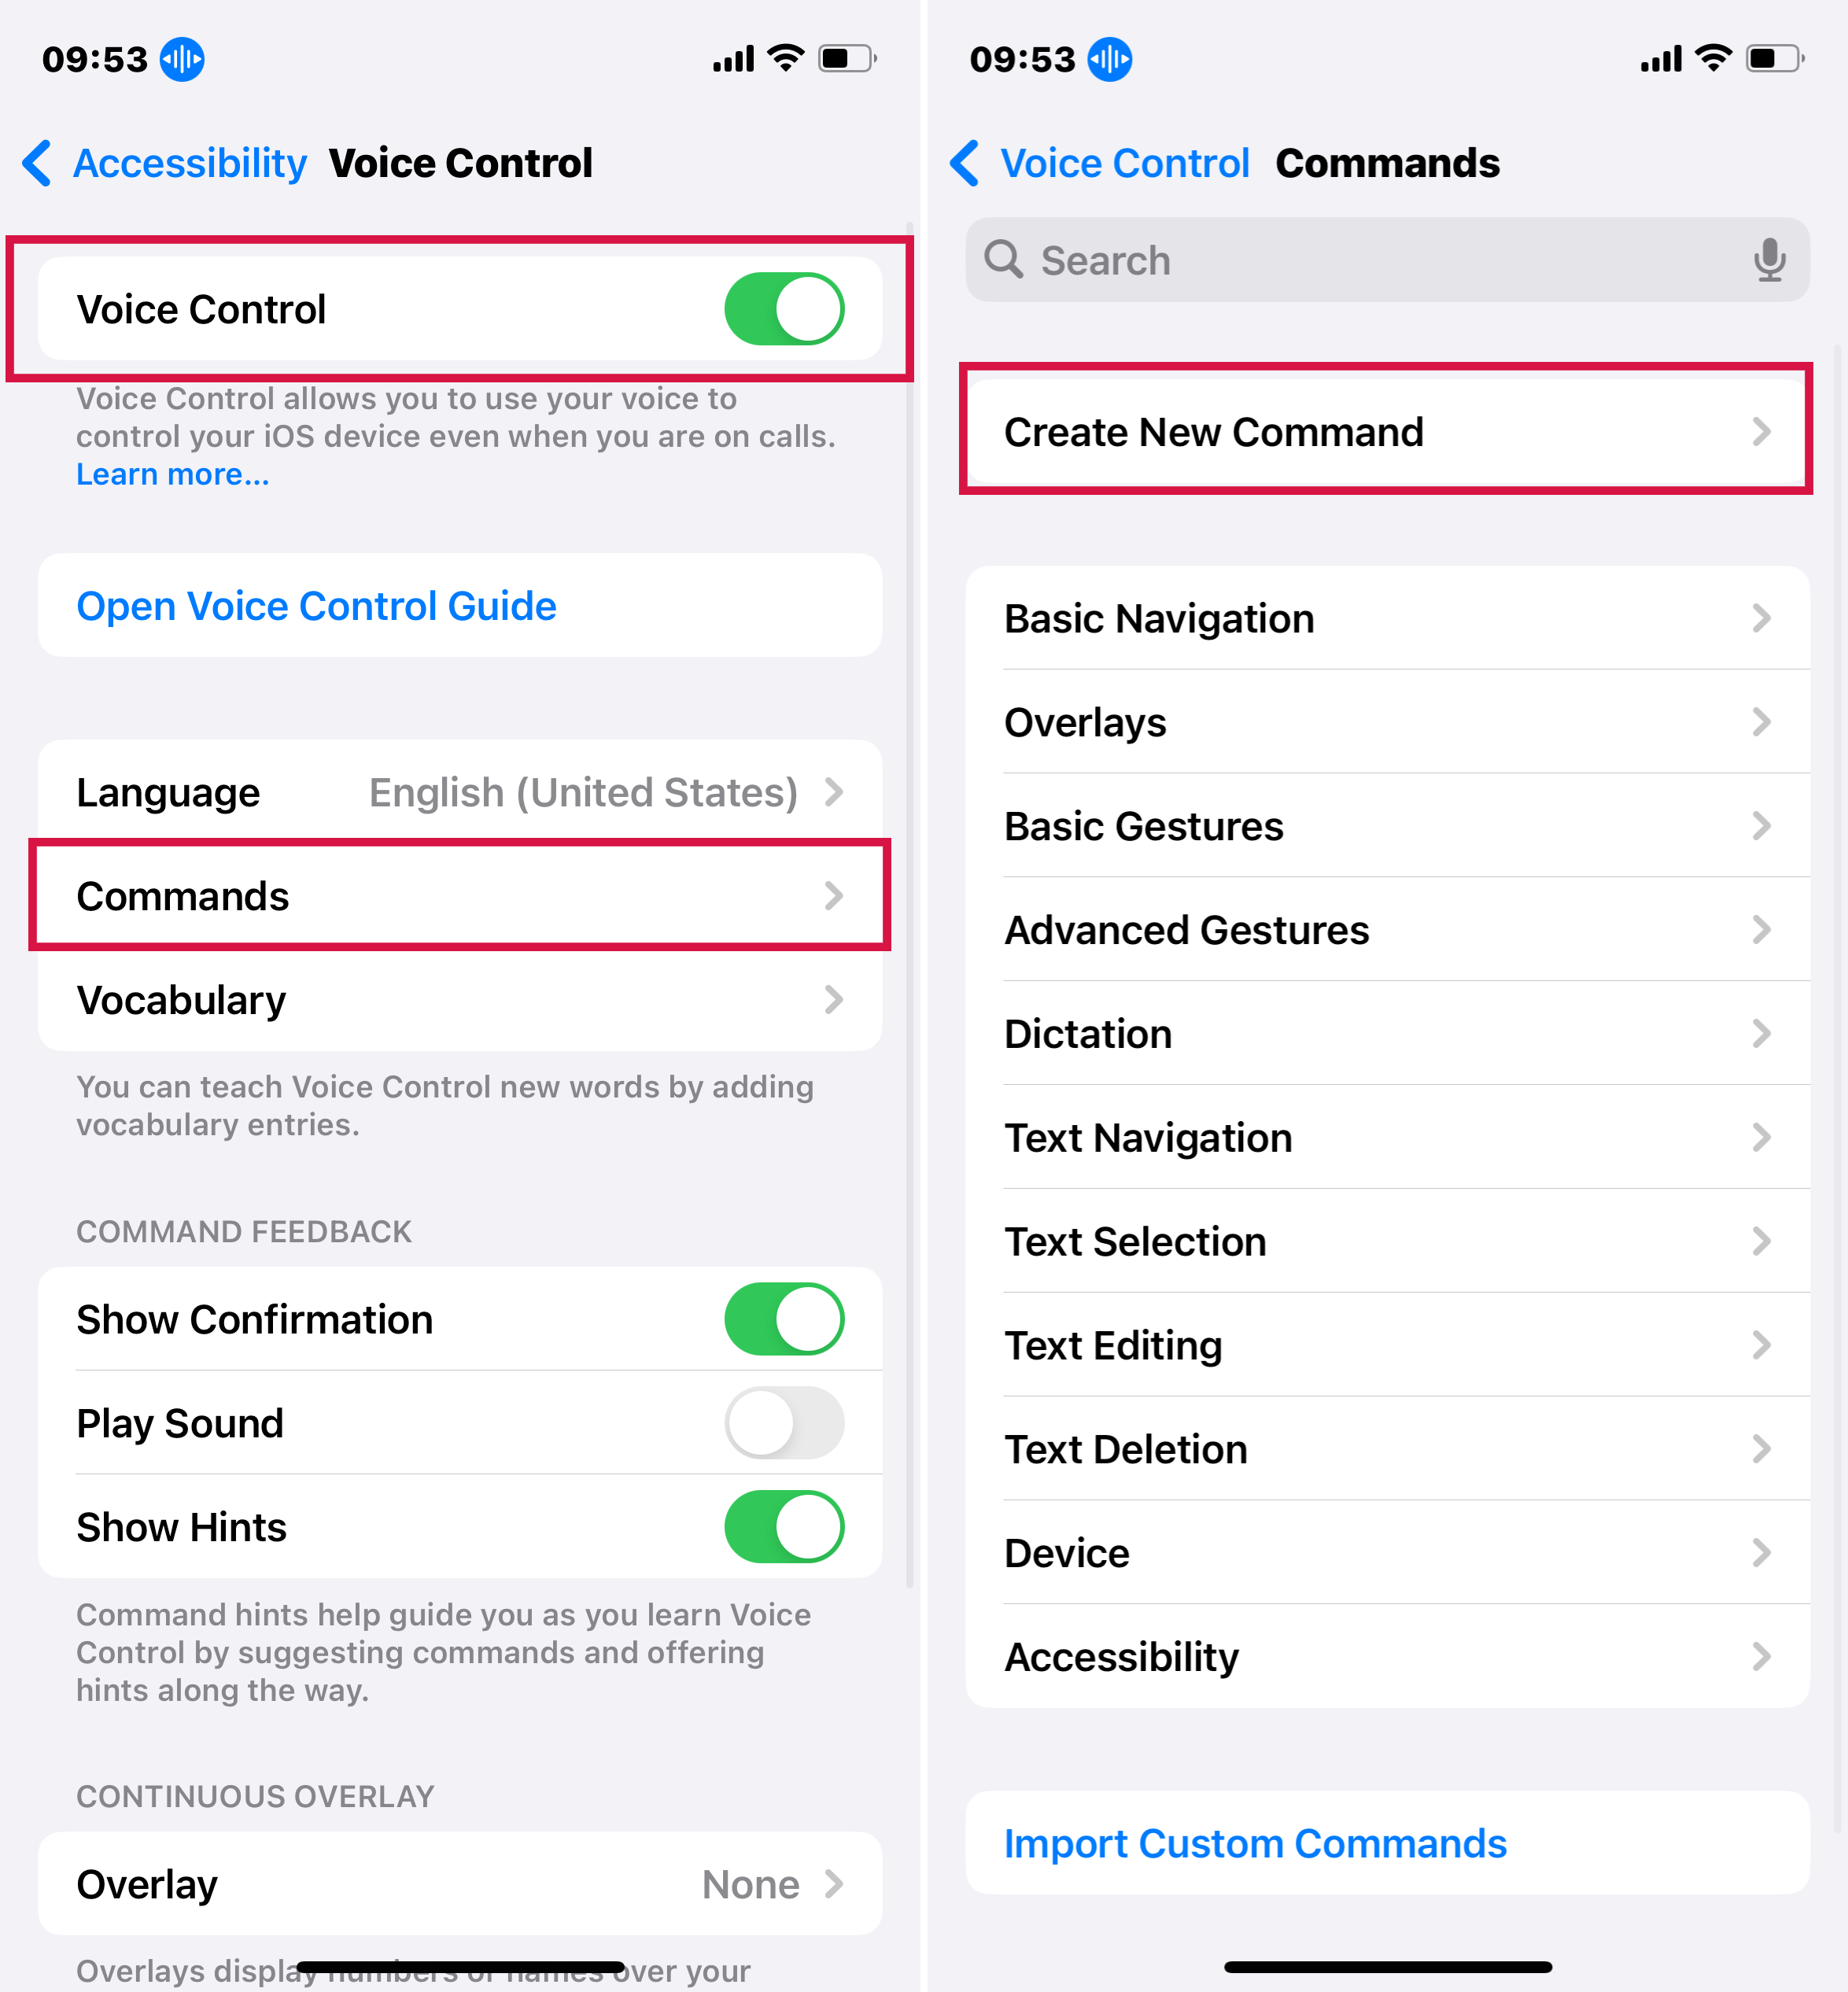
Enter the command you want to set to unlock your iPhone, such as “Unlock”
Select Action and then click Run Custom Gesture.
Click Hide Controls at the bottom of the screen.
To create a customized gesture of unlocking, swipe up on the next screen and tap in places of your passcode digits.
After you are done, click Save in the upper right corner.
Go back and Save again.
Disable your face ID.
Check if voice control is activated by giving the voice command you set.
Requirements:
To enable and use voice control on your iPhone or iPad, you must have iOS 13 or later installed.
Before activating voice control, you should turn off Face ID.
You'll need an internet connection for the first-time setup of voice control, as it involves downloading a setup file from Apple. After the initial setup, you don't need an internet connection to use voice control on your device.
Method 7: via Apple Watch
To unlock your iPhone without a passcode using an Apple Watch, you need to have previously set up this feature. Here is a detailed step-by-step guide:
Prerequisites:
Your iPhone and Apple Watch need to be paired.
Both devices should have Wi-Fi and Bluetooth turned on.
The Apple Watch should be on your wrist, unlocked, and protected by a passcode.
The 'Wrist Detection' feature should be enabled on your Apple Watch.
Steps to Unlock iPhone with Apple Watch:
Enable Unlock with Apple Watch:
On your iPhone, go to 'Settings'.
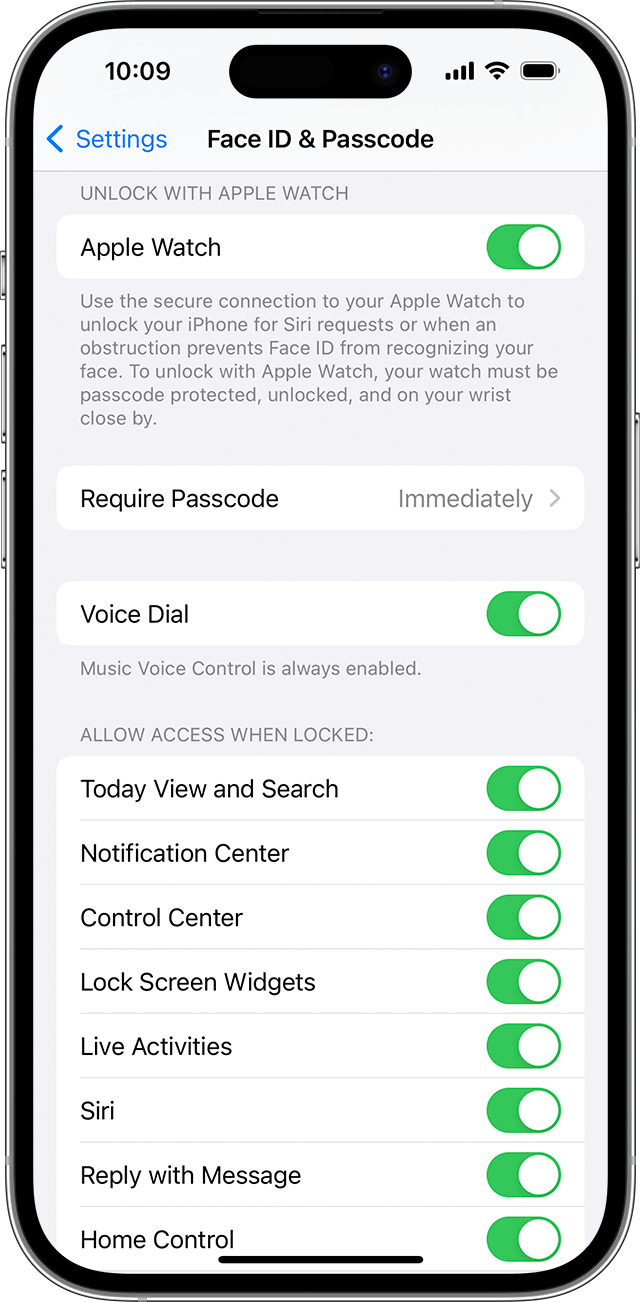
Scroll down and tap 'Face ID & Passcode' or 'Touch ID & Passcode'.
Enter your iPhone passcode.
Scroll down to find the 'Unlock with Apple Watch' section.
Toggle on the option for your Apple Watch
Lock Your iPhone:
Make sure your iPhone is locked. You can simply press the side button to lock it.
Wear Your Apple Watch:
Put on your Apple Watch and unlock it. Make sure it's close to your iPhone.
Attempt to Unlock iPhone:
Try to use your iPhone by waking the screen. You can do this by raising to wake or pressing the side button.
Automatic Unlock:
Your iPhone will detect the presence of your unlocked Apple Watch and automatically unlock itself.
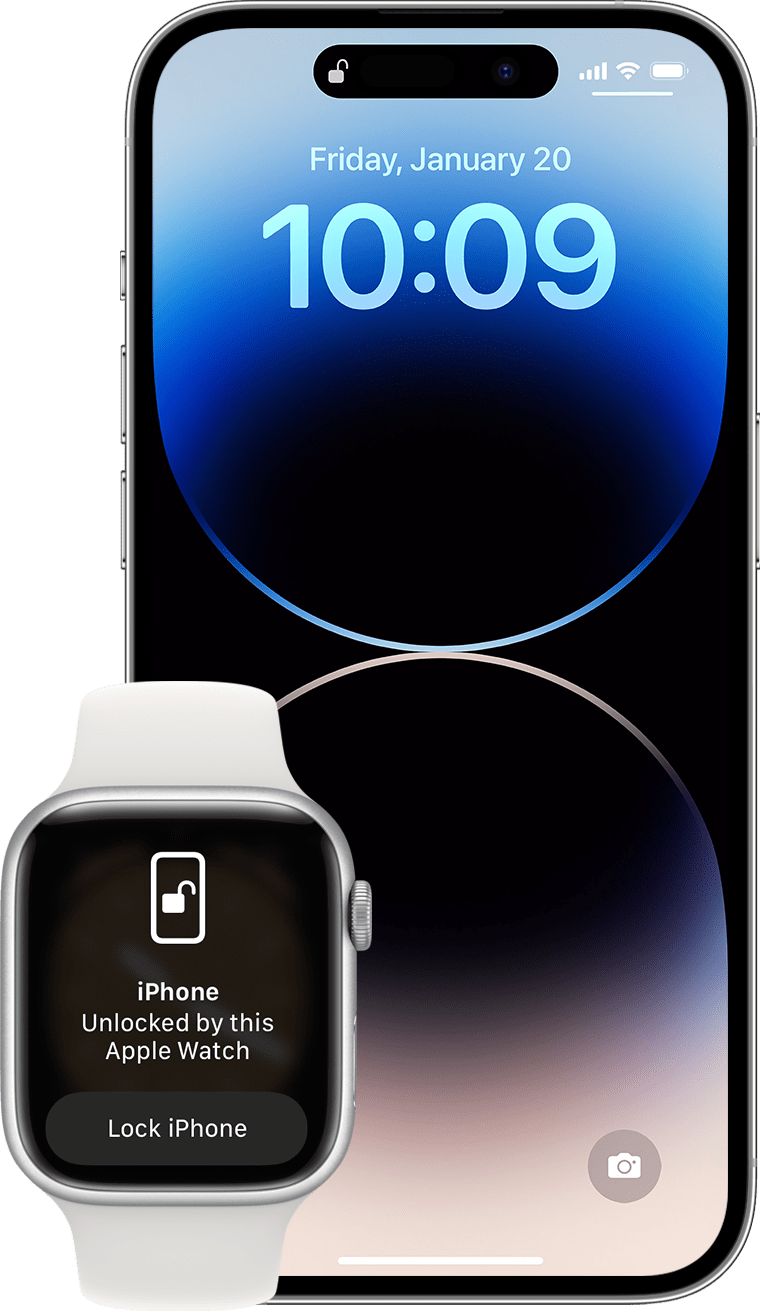
You’ll receive a haptic feedback on your Apple Watch, and a notification will appear, indicating that your iPhone has been unlocked.
Manual Lock (if needed):
If you want to lock your iPhone again, you can do so manually by tapping the 'Lock iPhone' button on the notification you received on your Apple Watch.
Summary
We've covered 7 highly effective ways to unlock your iPhone without a passcode. Notably, Mobitrix LockAway stands out as the most efficient solution. Its ease of use, requiring just a few simple clicks, and its speed – unlocking your iPhone in as little as 20 minutes – make it an excellent choice.
If you value quick and hassle-free solutions, Mobitrix LockAway is a reliable option that won't disappoint.

