Forgot iPhone Passcode? Here are 5 Incredibly Useful Ways!
Forgot your iPhone passcode? You're in luck! As an avid tech enthusiast and devoted Apple fan, I'm here to present 5 practical solutions to unlock your iPhone without restoring it. Whether you're tech-savvy or not, I'll provide step-by-step guidance to clear any confusion. So, let's stop wrestling with your iPhone and dive in!
Essential Facts Before Unlocking iPhone Passcode
If you've forgotten your iPhone passcode, avoid making random guesses; repeated wrong entries will only lock you out for longer.
Apple prioritizes your device's security with iOS's military-grade encryption, ensuring no unauthorized access. Therefore, if you're locked out, resetting is the only option. However, if you've backed up your data, you can restore it afterward.
Now, if anyone claims to unlock your iPhone passcode without restore or data loss, remember it’s just plain impossible!
But if your iPhone model is within 5s-X and you have a Mac available, that is another story. You can unlock your iPhone without losing any data via iPhonePass
Method 1 Quick Solution: Unlock iPhone Passcode with Mobitrix LockAway
If you want to unlock your iPhone screen as fast as possible without restore, Mobitrix LockAway is your best solution. It can help you remove your iPhone screen lock in just a few simple clicks within 20 mins.
Steps:
Download and Install Mobitrix LockAway
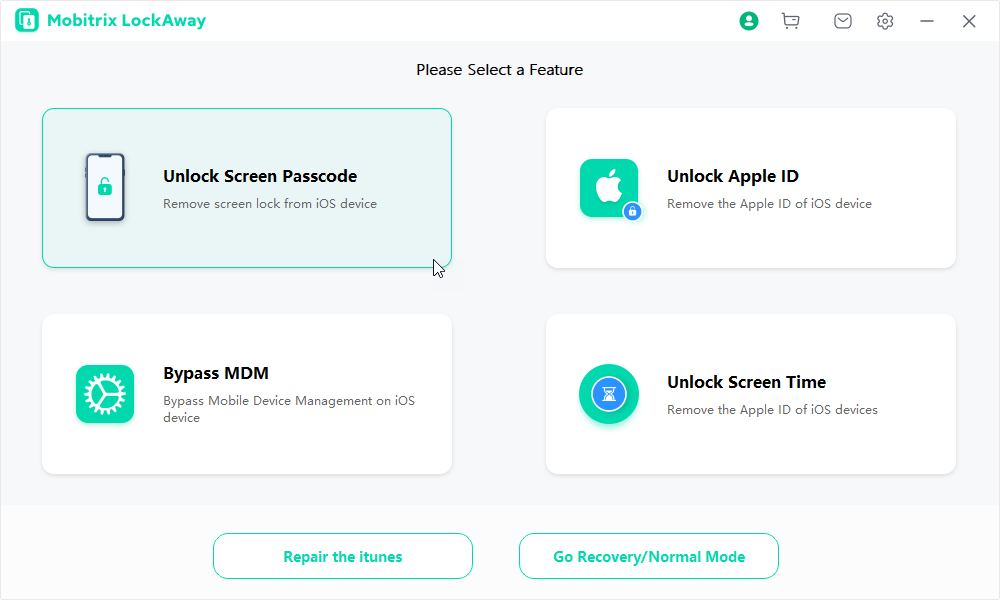
Click on Unlock Screen Passcode in the main menu
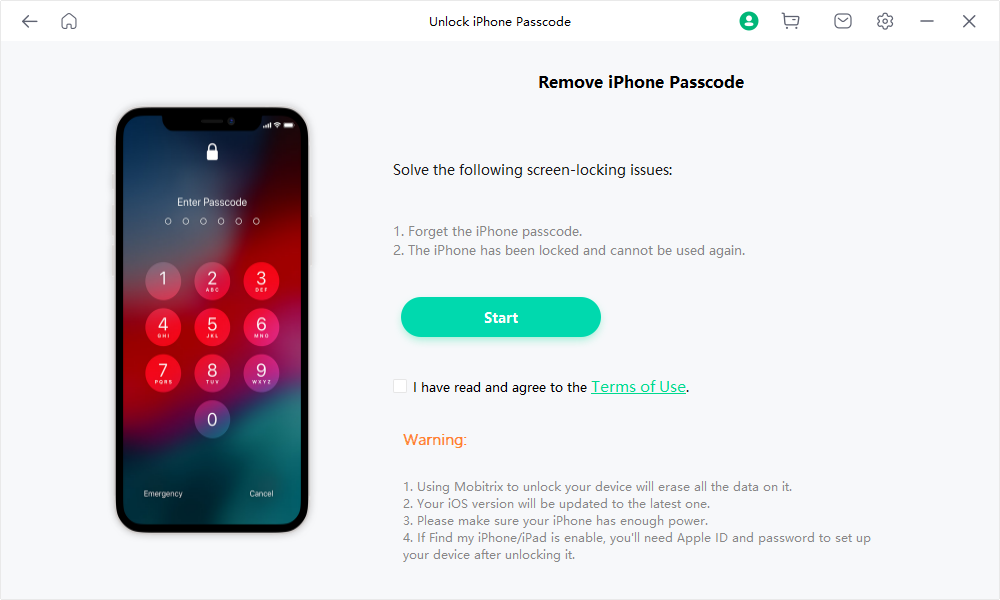
Click Start to remove the iPhone passcode.
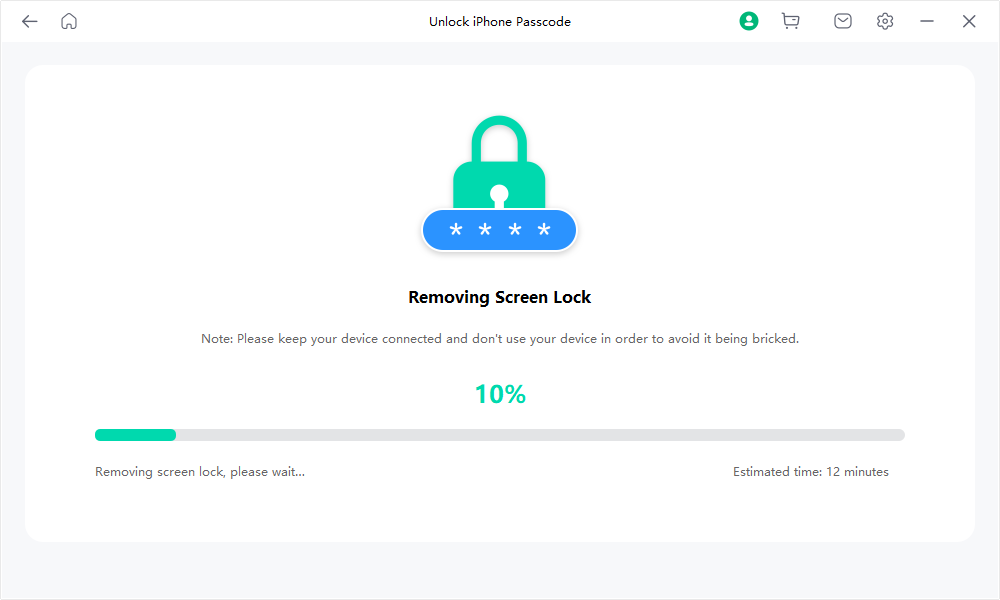
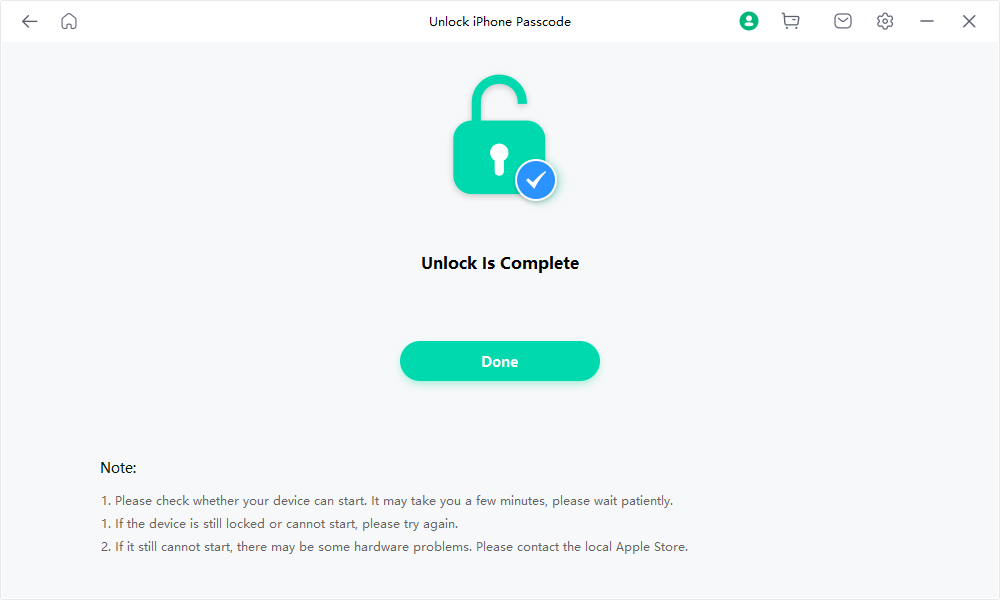
Remove the forgotten passcode successfully
Introduction of Mobitrix LockAway:
Mobitrix LockAway is a professional unlocking tool that removes the screen lock for iPhone/iPad permanently. It enjoys 10+ years of R&D experience in iOS, and iPadOS lock cracking. It can help you solve the following situations you encounter:
You forgot the iPhone passcode
You bought a second-hand iPhone
iPhone is disabled/unavailable due to too many incorrect attempts
Your Face/Touch ID was not working normally
Your iPhone screen is cracked
Once your iPhone screen passcode is removed, your iPhone will restart automatically, and then you can reset your iPhone from scratch. You can restore your data from iCloud or iTunes if you’ve backed up previously at this step.
Need to meet some requirements?
Not at all! Just give away all your troubles to Mobitrix LockAway and see the magic.
Unlock Your iPhone without Passcode within 20 mins.
FREE DOWNLOADFREE DOWNLOADFREE DOWNLOAD
Advantages :
It unlocks your disabled iPhone without iTunes.
It is easy to use with a few simple clicks without any tech hassle.
It has a 99% success rate.
This tool is fast and takes about 20 minutes to remove your iPhone passcode. You can then create a new one.
100% Privacy Protection is guaranteed.
It fully supports iPhone 5s to iPhone 16 and iOS 18 and earlier versions.
Trust me, if you are in some urgent situations, Mobitrix LockAway is definitely the best choice. It is well-known as time-saving and effort-saving.
But if you are not in a hurry and are interested in some official ways, I have summarized the most comprehensive guide covering 5 ways below. But these ways are either time-consuming with a low success rate or need to meet some strict requirements to follow them. Read further!
Method 2 Fix "Forgot iPhone Passcode" Problem via “Erase iPhone” option without a computer
Some versions of iOS 15.2 and later now have an “Erase iPhone” option on the Unavailable or Security Lockout screens.
This option can be seen at the bottom-right of your screen, and it can completely erase all the data including the passcode on your iPhone without a PC or a Mac. And then you can reset your iPhone as a new device from scratch.
Requirements:
Only iOS and iPadOS 15.2 and later support this feature.
In order to perform a reset, your device must be connected to a cellular or Wi-Fi network.
Your locked iPhone has enabled Find My and hasn't signed out of Apple ID.
You need to know your Apple ID and password.
Steps:
You first need to input the incorrect passcode seven times. After the seventh time, you'll be redirected to the “Security Lockout try again in 15 minutes” interface. Here, you can see the "Erase iPhone" option on the lower-right part of the interface.
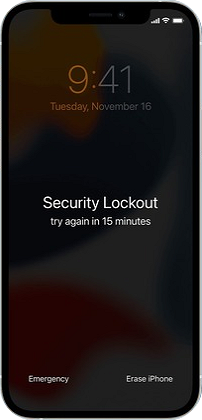
Tap the Erase iPhone option
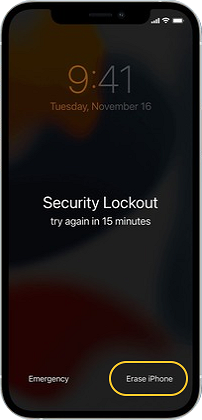
Now, tap Erase iPhone option again to be redirected to the "Sign out of Apple ID" interface. Here you need to input your Apple ID password to erase your iPhone.
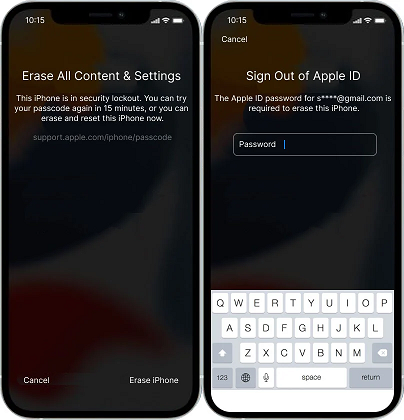
You'll be able to see the progress of the erase on your iPhone.
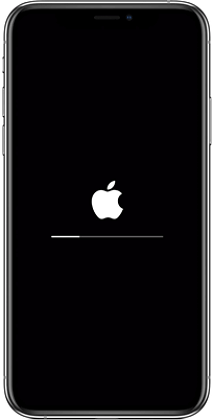
Your iPhone will automatically restart as the erasing process ends.
Pros:
Your locked iPhone can be erased and reset without a computer.
Your data cannot be erased by strangers using this feature as your Apple ID and password is required to complete the process.
Limitations:
You may not always find the "Erase iPhone" option. Some models have it while others don’t. For example, this option is not available on iPhone 12, whereas it can be seen on iPhone 13 or 11. The exact reason behind this remains unclear. Till now, Apple has not formally announced the reason behind the absence of this option in some iPhone models.
After my own several tests, I have found that the "Erase iPhone" button can stop working periodically. It is very likely that you cannot tap this option due to some unknown tech bugs.
Tip:
If you can't find Erase option on your iPhone Unavailable or Security Lockout screen, don’t hesitate to try Method 1 to save your valuable time.
Method 3 Remove Forgotten iPhone Passcode via Find My iPhone
Find My locates lost devices and keeps track of family members. It can also erase your device and delete all personal data, including your iPhone screen passcode, except for location-related functions. Check the following requirements before trying it:
What Do You Need?
Your locked iPhone should have enabled the Find My feature.
The locked iPhone should have your iCloud account logged in.
You need to know the Apple ID and password that are linked to the locked device.
The locked iPhone should have an active and stable cellular or Wi-Fi network.
How to Use Find My to Remove Forgotten iPhone Passcode
Steps:
Navigate to iCloud.com on either a phone or web browser.
Next, enter your Apple ID and password.
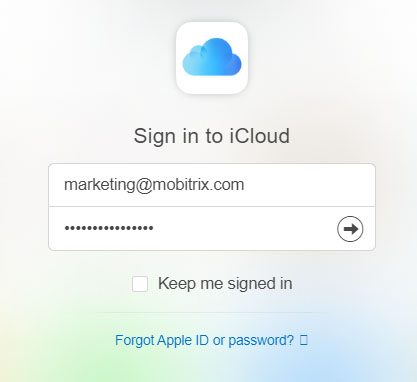
After logging in successfully, tap Find iPhone, input your Apple ID password again, and tap Sign in.
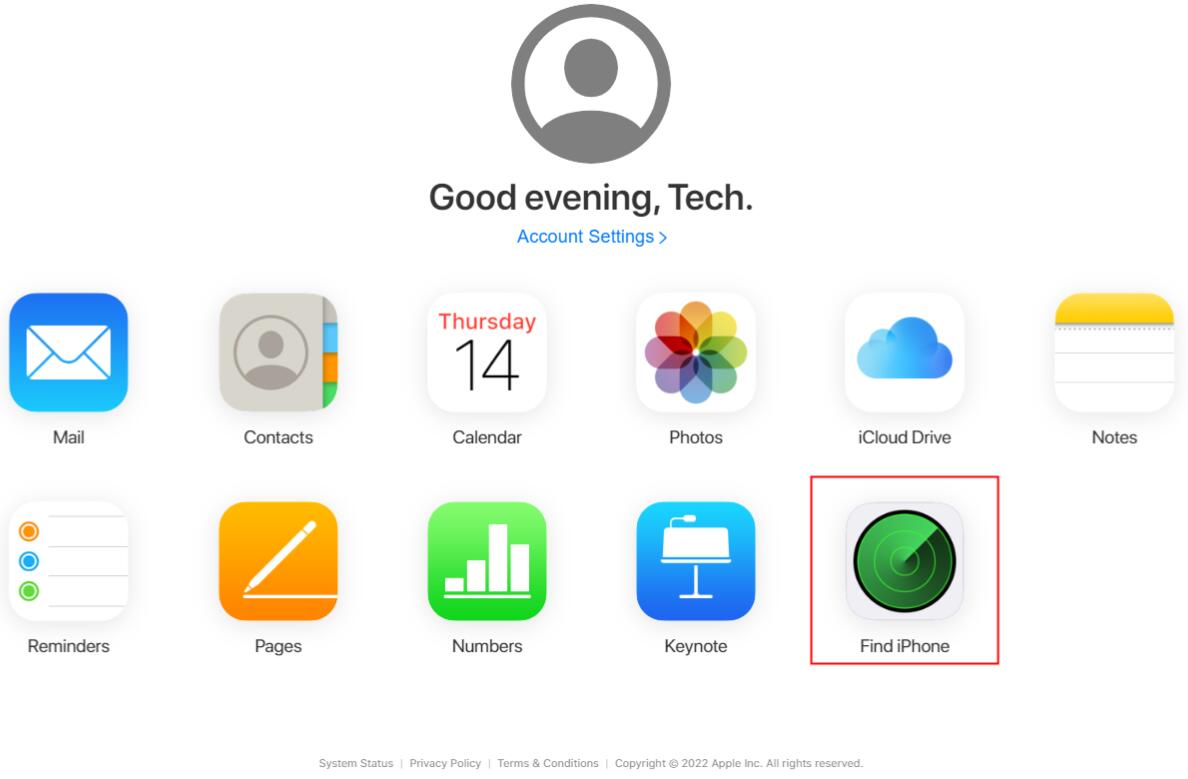
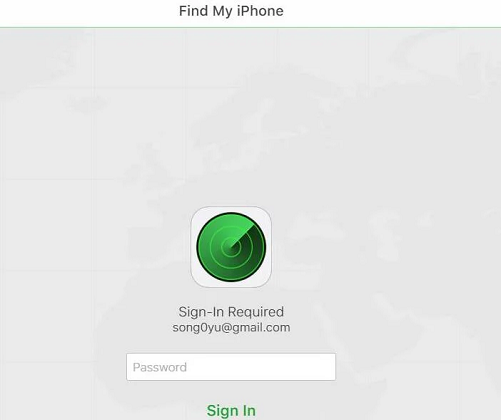
Now click All Devices and select yours.

Click Erase iPhone . You will notice a prompt saying, Erase this iPhone?Click Erase.
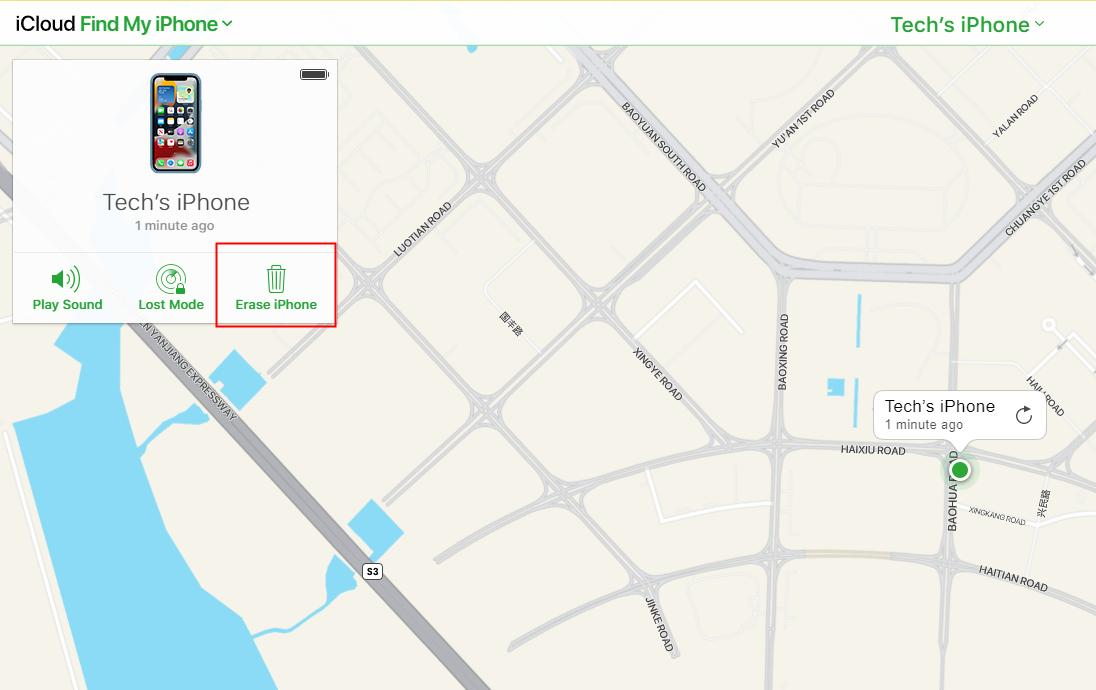
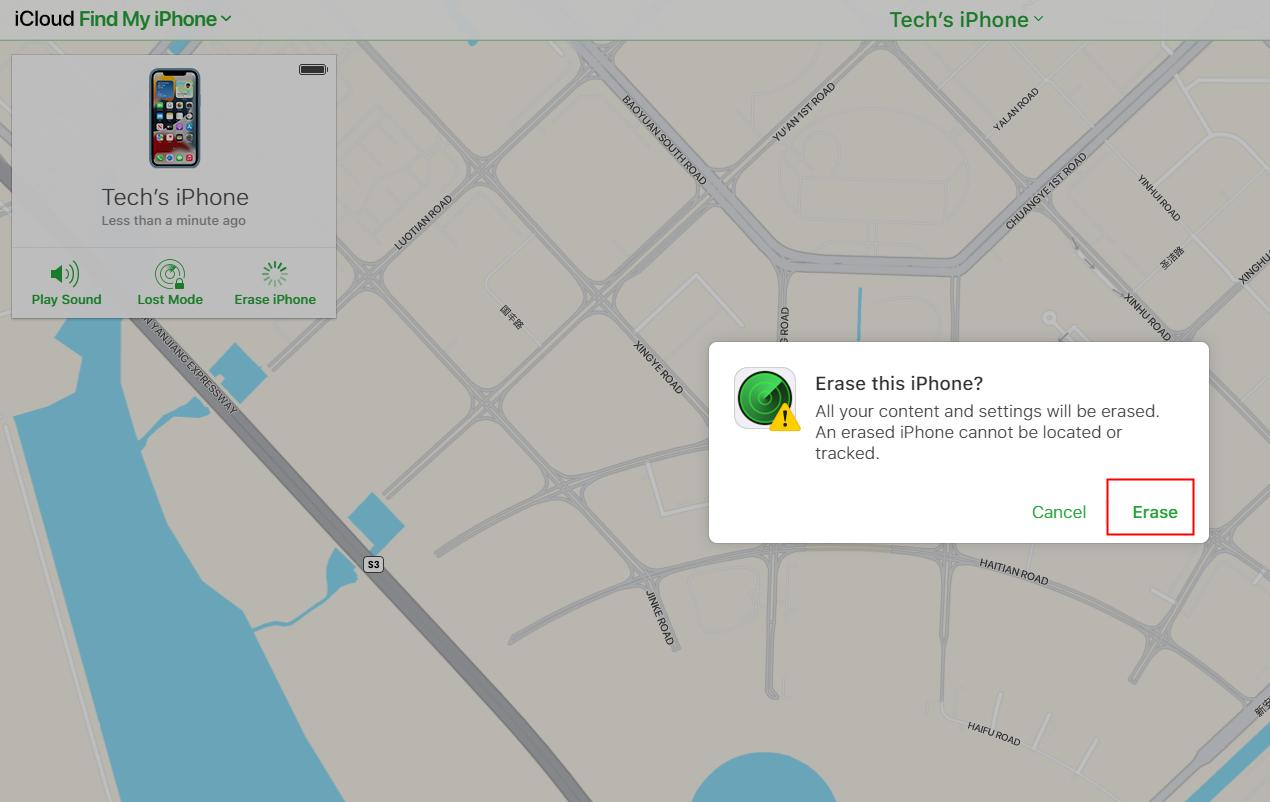
Now enter your Apple ID password to proceed.
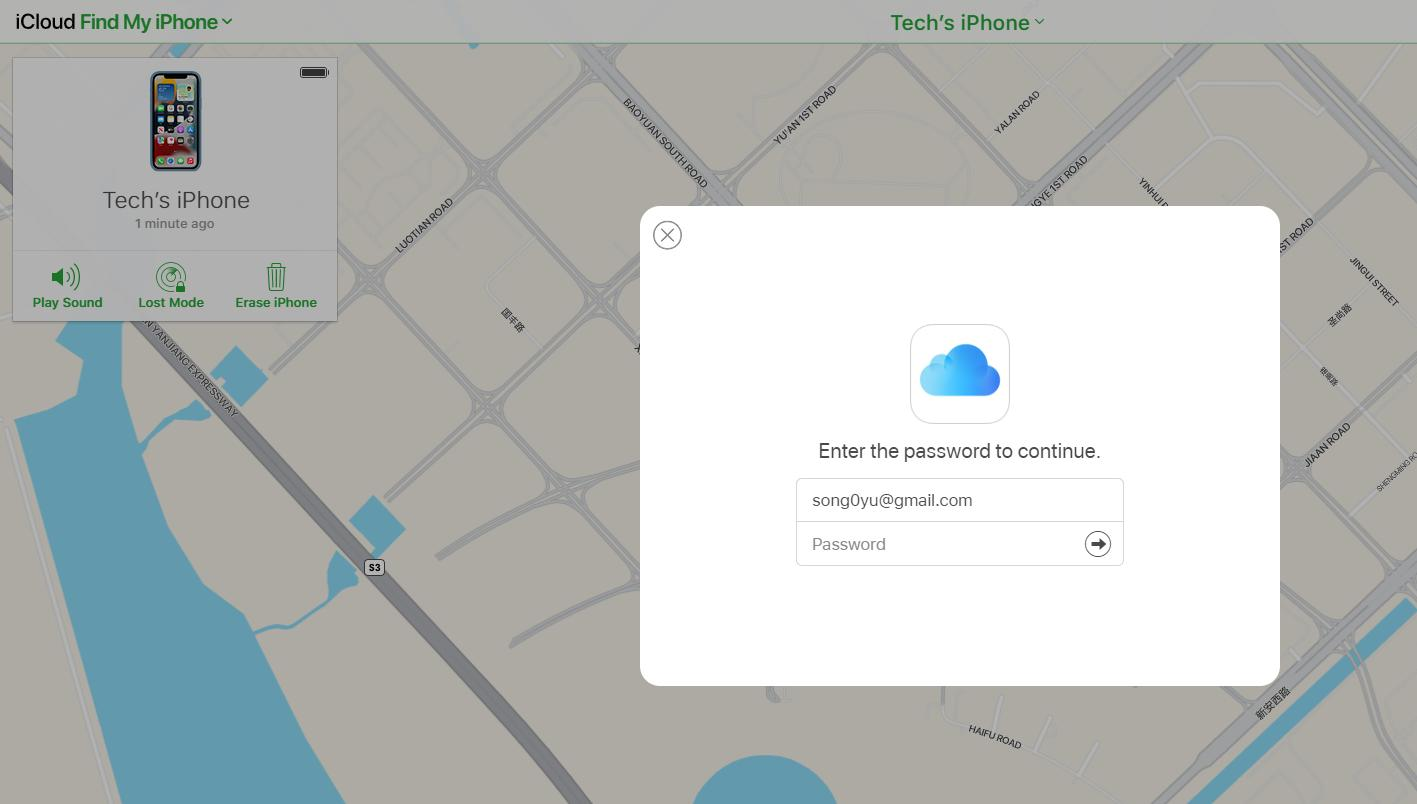
A message with a verification code will arrive on your trusted device. Enter the verification code to continue.
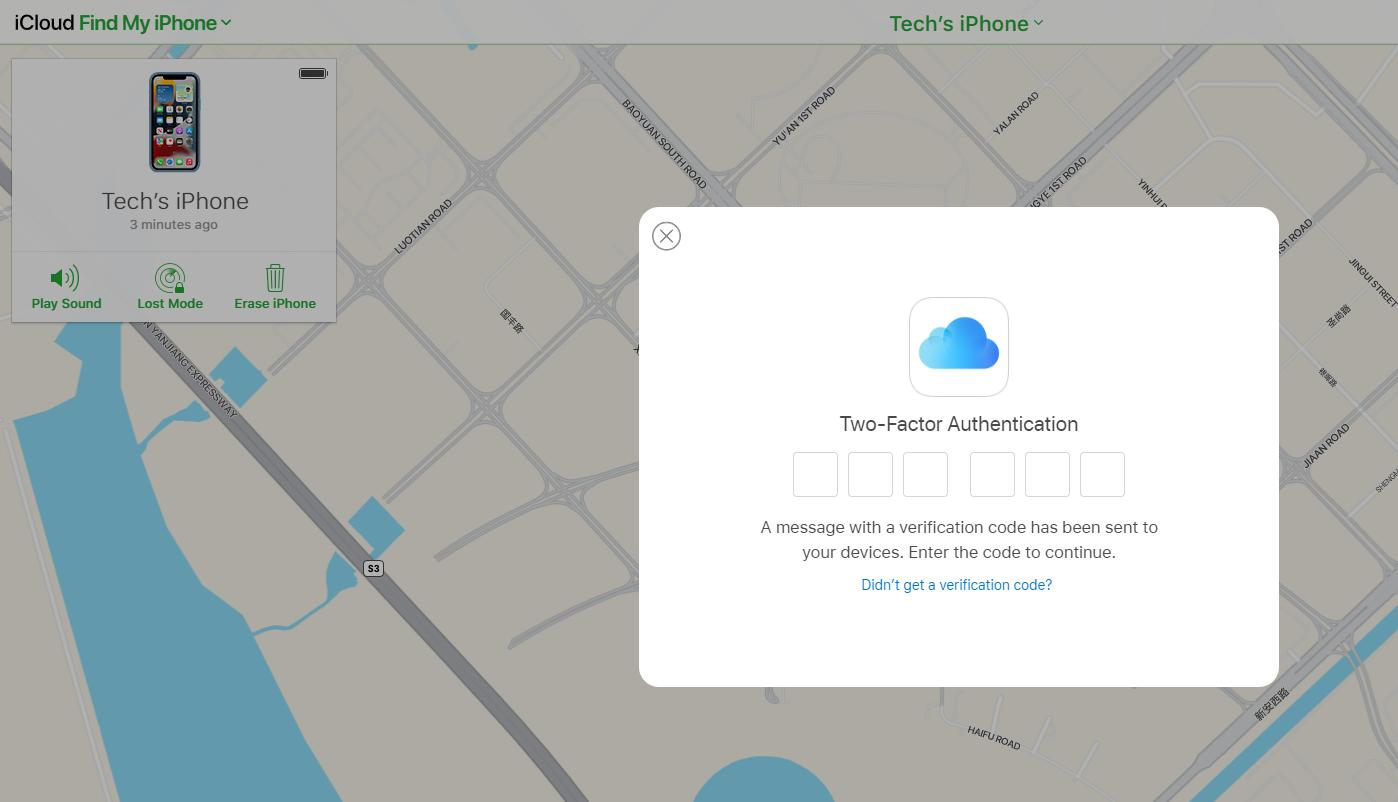
Suppose you engage with other activities during this period and then return to this process later. In that case, you will be asked to re-enter your Apple ID password.You'll also receive another verification code. You need to re-enter it to proceed. To avoid carrying out the steps repeatedly, it's best to complete this process in one go.
Now you need to input your phone number and click "Next".
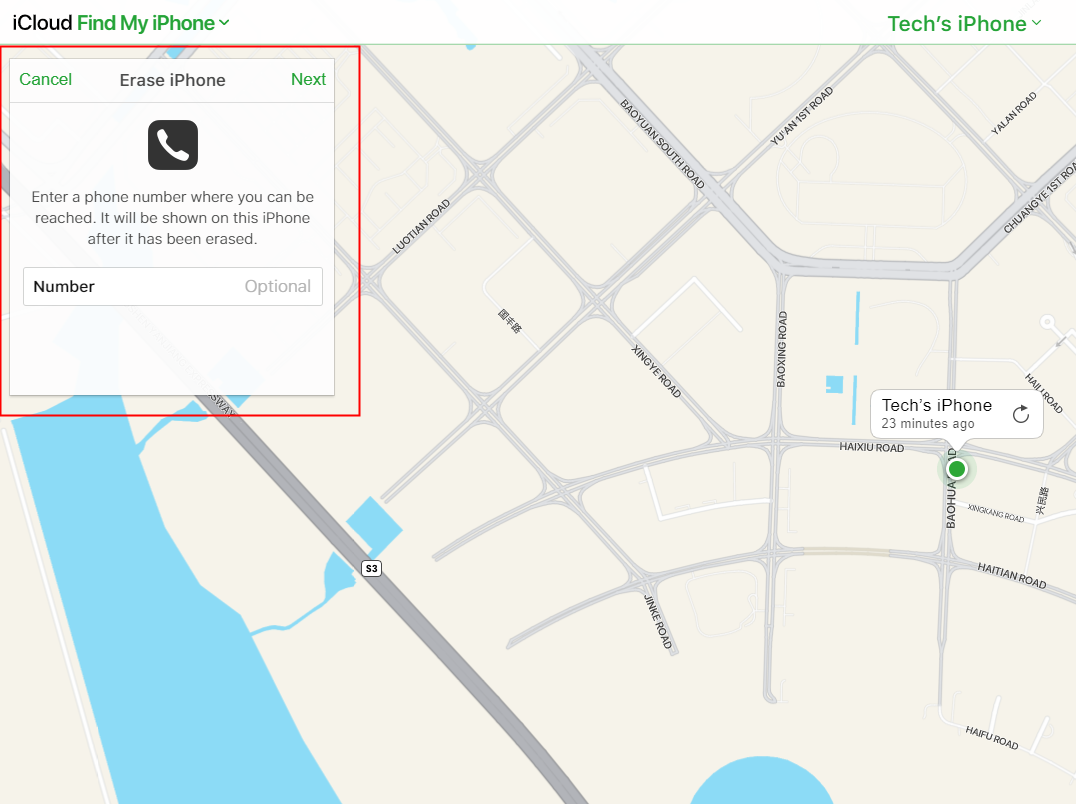
You will notice on the iCloud website showing “Erase Started.” In the meantime, you will see a white Apple logo on your iPhone screen showing the process of erase
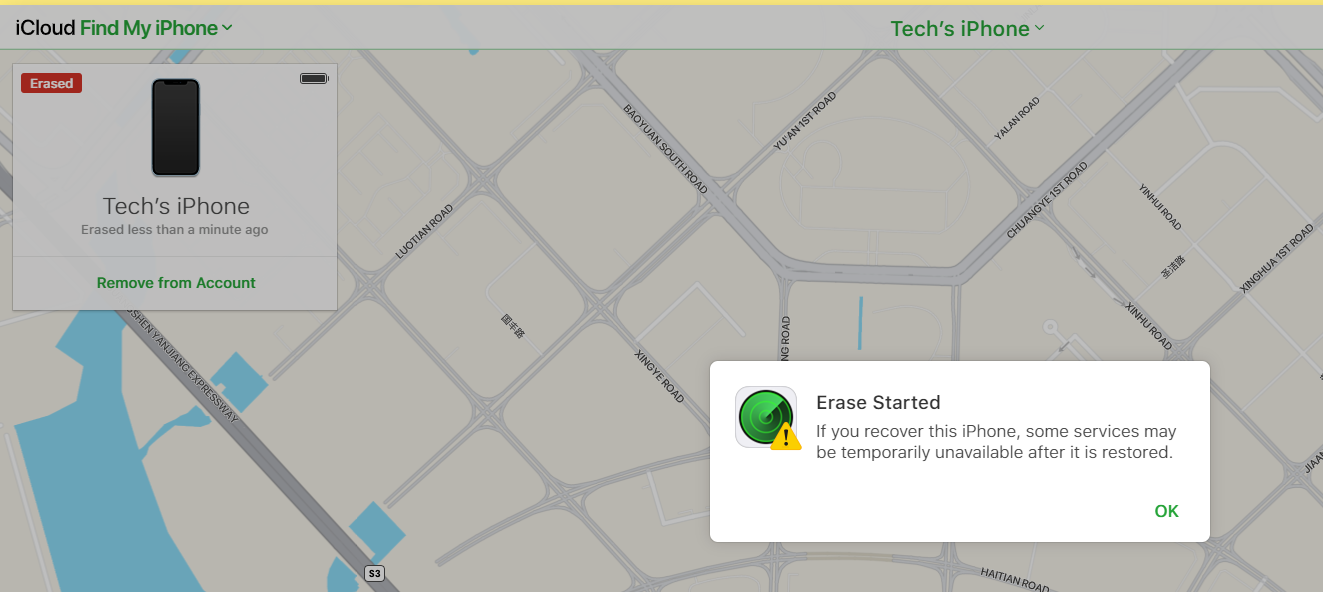

When the process finishes, your iPhone will restart. Swipe up to arrive at the interface for resetting your iPhone. You will find your iPhone displaying "iPhone Locked To Owner". When you see this message, enter your Apple ID and password. Click Next, then you can create a new passcode.
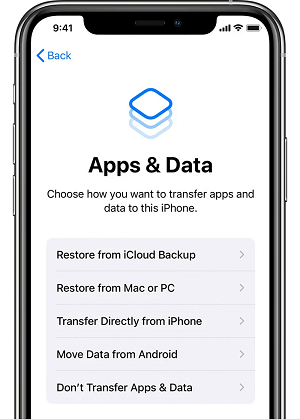
On the "Apps and Data" interface, you can choose "Restore from iCloud Backup" or "Restore from iTunes Backup". Depending on whether you made a backup before your iPhone was locked, you could click a suitable option based on your reality.
You can redownload virtually anything you've purchased from the iTunes, App Store, and Apple Books Store, even if you don't have a backup.
Method 4 Forgot iPhone Passcode? Reset It via iTunes Backup
If you’ve previously synced your iPhone with iTunes, you can restore all your data from your recent backup. So you won’t lose your data. Once the restore process completes, your passcode will be erased from your iPhone as well.
If your iPhone has synced with your Mac :
Connect your iPhone to your Mac using a USB cable.
Open Finder, in the sidebar under Locations, select your device.
From the bar on top, select General. Scroll down and select Restore Backup under Backups.
All your backups will be displayed, choose one to restore from
Enter your Mac password, and click restore. Your data will be restored. Your passcode will be also removed and then you can set a new one.
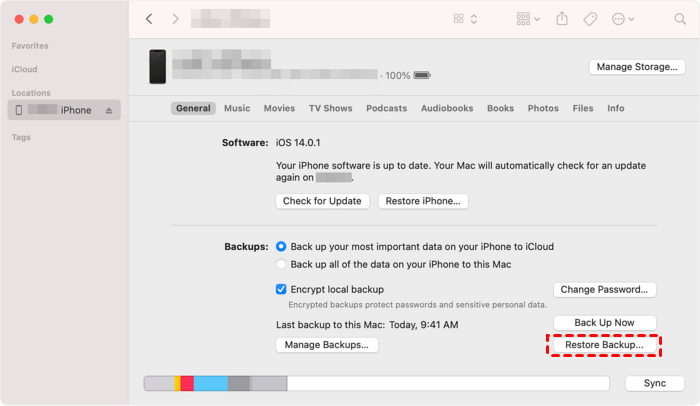
If using a Windows computer and you have synced your iPhone with iTunes:
Connect your iPhone to your PC using a USB cable.
Open iTunes, if it prompts for a passcode, try connecting to another computer, if not just wait for your iPhone to be synced by iTunes.
Once the sync completes, click on Restore iPhone and let the process complete.
Once completed, the iOS setup screen will pop up, click on Restore from iTunes Backup and select your latest backup to restore from.
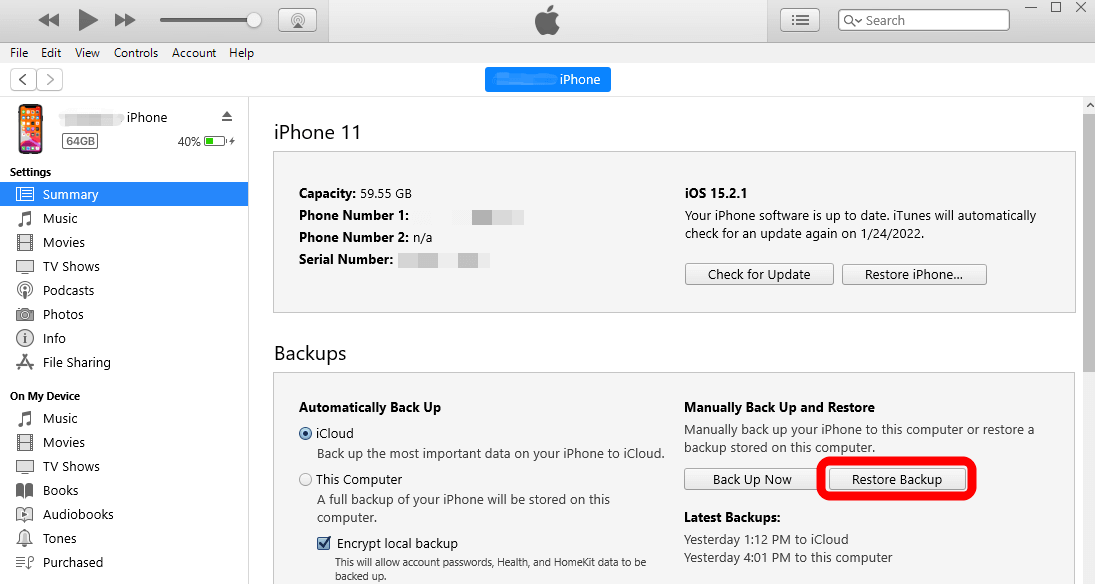
Limitation:
This method is only applicable if you had synced your iPhone with your computer and a backup of your data exists, otherwise it can’t work.
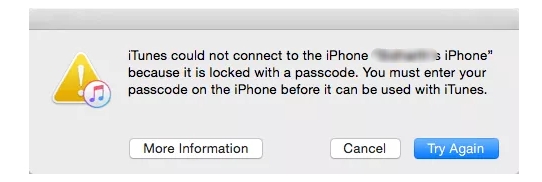
Also If you see the error showing "iTunes could not connect to the iPhone because it is locked with a passcode. You must enter your passcode on the iPhone before it can be used with iTunes". It means you need to unlock your disabled screen with iTunes Recovery mode.
Method 5 Use iTunes Recovery Mode to Restore iPhone if forgot passcode
Recovery Mode is a built-in iOS troubleshooting mode where you can use an app — either iTunes or Finder to diagnose and fix the problems of your iPhone when it is connected to the computer.
Since your iPhone is locked/disabled, iTunes can not detect it automatically. For this reason, you need to put your locked iPhone into recovery mode first. Recovery mode allows you to erase the iPhone, giving you access to configure your iPhone again.
Requirements:
You need a PC or a Mac
On a PC: Ensure the installation of Windows 8 or later and the latest version of iTunes.
On a Mac:
macOS Catalina or newer, launch the Finder.
macOS Mojave or older, install and open the latest version of iTunes.
You need a compatible USB cable
Steps: ( For Windows Users)
Turn off your iPhone
a. Unplug your iPhone from the computer if it’s connected.
b. Turn off your iPhone using the method for your iPhone model:
iPhone 8, iPhone 8 Plus, iPhone X, iPhone 11/12/13/14/15, including iPhone SE (2nd and 3rd generation): Press and hold both the side button and the Volume down button until the power off slider appears.
iPhone 7, iPhone 7 Plus, iPhone 6s, and iPhone 6: Press and hold the side button until the power off slider appears.
iPhone SE (1st generation), iPhone 5s, and earlier: Press and hold the top button until the power off slider appears.
c. Drag the slider to turn off your iPhone, then wait a minute to make sure that it turns off completely.
Put your iPhone in recovery mode
a. Get ready by finding the button on your iPhone that you'll need to hold in the next step:
iPhone 8, iPhone 8 Plus, iPhone X, and later, including iPhone SE (2nd and 3rd generation) use the side button.
iPhone 7 and iPhone 7 Plus use the Volume down button
iPhone SE (1st generation), and iPhone 6s and earlier use the Home button.
b. Press and hold the correct button for your iPhone while immediately connecting your iPhone to the computer. Don't let go of the button.
c. Keep holding the button until you see the recovery mode screen on your iPhone, then let go.
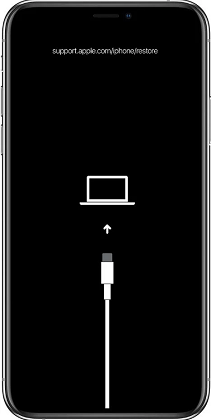
If you see the passcode screen, you need to repeat step 1 turn off your iPhone and step 2 put your iPhone in recovery mode again.
Restore your iPhone
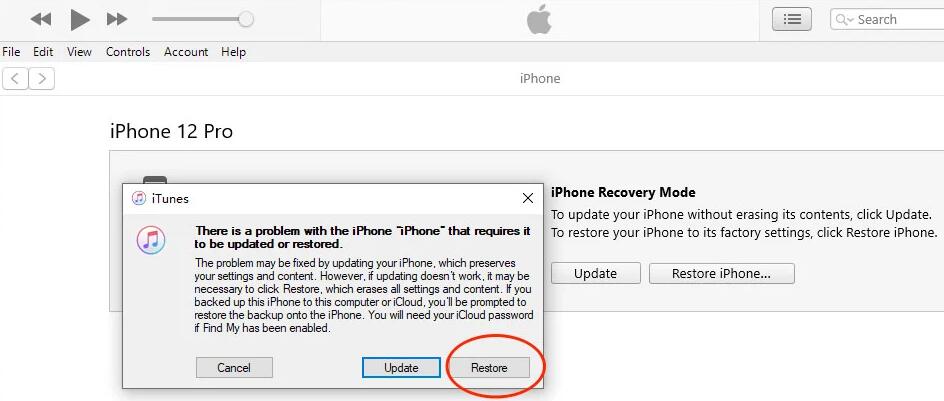
a. Open iTunes and iTunes will show "There is a problem with the iPhone that requires it to be updated or restored". Click Restore.
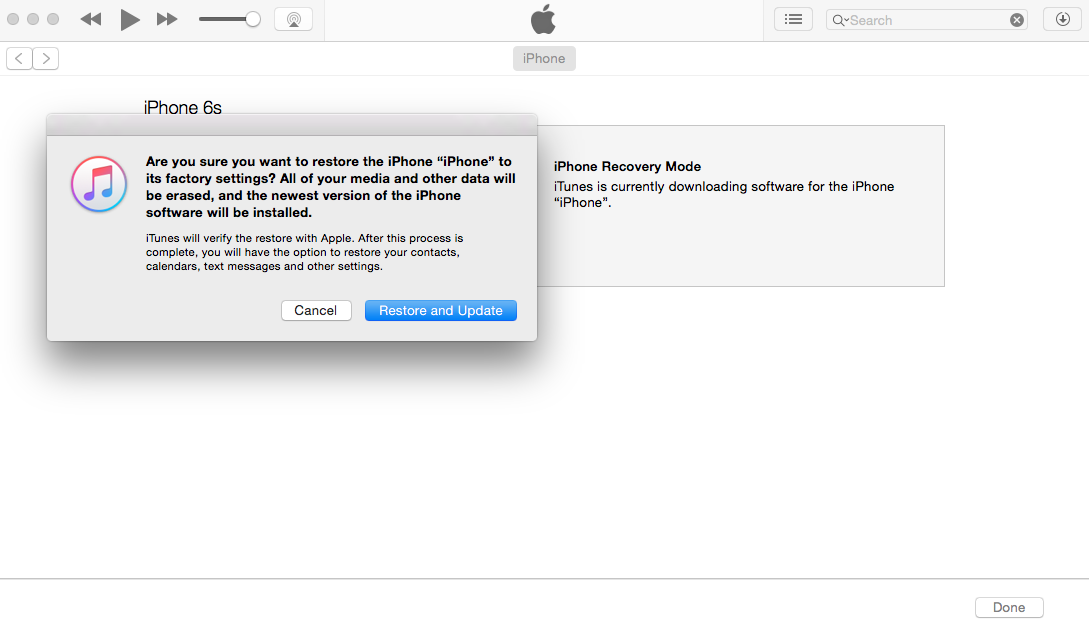
b. Then iTunes prompts "Are you sure you want to restore the iPhone to its factory settings? All of your media and other data will be erased". Click Restore and Update.
c. A window of iPhone Software Update will appear. Click Next and click Agree on the terms. iTunes will start downloading the software for your iPhone. It will restore your iPhone when the download process finishes.
d. Depending on your internet speed and download source, the download time will vary from 20 mins to 2h. Click this download icon in the top-right corner to check the download progress.

If the download takes more than 30 minutes or your device exits the recovery mode screen, you can then Repeat Step 1 turn off your iPhone, and step 2 Put your iPhone in recovery mode, and start again.
If an error message prompts “There was a problem downloading the software. The network connection timed out.”, you can manually download the “ iPhone software update”.
e. When the "iPhone software update" is downloaded, iTunes will pop up “iTunes will erase and restore your iPhone to iOS 15.4.1 and will verify the restore with Apple. ” Then click Restore
f. The above-middle bar will show “Extracting software…”. It means iOS 15.4.1 iTunes is preparing to restore the software on this iPhone.


g. Your iPhone will show the restoration progress with a white Apple logo. It takes between 20 minutes and 2 hours to restore your iPhone, depending on the amount of data. And when the restoration is complete, your iPhone will automatically restart. iTunes will display as follows:
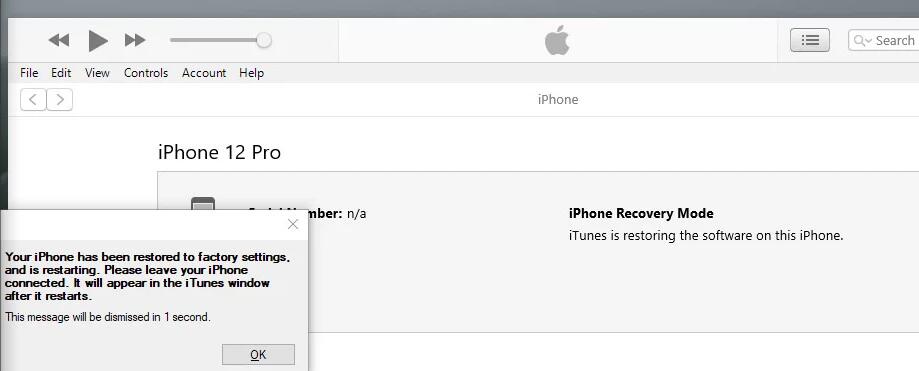
h. After your iPhone restarts, you can reset your iPhone from scratch. You can create a new passcode if you want.
When comes to the “ Apps & Data" interface, if you have not backed up your iPhone using iTunes, Finder, or iCloud before being locked, click “Don’t Transfer Apps & Data " directly.
On the other hand, if you have been proactive and have made backups before being locked out, you can select “Restore from iCloud Backup” or “Restore from Mac or PC”, depending on your personal backup strategy.

Disadvantages:
The whole process is complex and tricky, not friendly with newcomers.
Your iPhone may be stuck during the download or recovery mode process, which means you have to start from scratch.
It has a low success rate which may take you a few hours and may not succeed in the end.
Various unpredictable error codes may appear due to tech bugs. (Apple rarely updates iTunes) For example,
iTunes won’t download or update–Entry Not Found, iTunes Error 7
iTunes could not connect to this iPhone–iTunes Error Codes 13, 39, 2000, 2001.
iTunes Won't Restore iPhone—iTunes Error Codes 9, 4005, 4013, 4014.
Part 3 Avoid Using Siri to Save Your Valuable Time
While searching “I forgot my iPhone passcode” or “forgot iPhone passcode” your eyes might have rolled through “Unlock Forgotten iPhone Passcode via Siri”. Let me tell you beforehand this way is super limited. I suggest that if you wish to save your precious time, avoid trying Siri.
Disadvantages:
It only supports iOS versions under 10.1.
Inconveniently, this method is quite time-consuming and does not guarantee 100% success.
You can only use it when your iPhone is enabled. Turn on your iPhone and enter the passcode at least once after turning it on. In other words, if the iPhone is still encrypted (The passcode has not been entered after it has been turned on), Siri won't work.
Apple ID and password are required.
FAQs:

1. Is this tutorial available for all iPhone models?
Yes, this article is of great value for all iPhone models. Specifically, I prefer Mobitrix LockAway as it supports iPhone 5s through iPhone 13, iOS 12/13/14/15, and later. Erase iPhone option is available for some versions of iOS 15.2 and later, as stated above, while other methods are either not user-friendly or have strict limitations.
2. I entered the wrong passcode 10 times and my iPhone deleted all data automatically. Why did that happen?
If all your iPhone’s data is deleted automatically after 10 wrong passcode attempts, the reason is that you must have set your iPhone to delete all data after 10 consecutive wrong passcode attempts. Don’t worry. You can turn this feature off by following steps:
Go to Settings
a. On an iPhone with Face ID: Tap Face ID & Passcode.
b. On an iPhone with a Home button: Tap Touch ID & Passcode.Turn Off Erase Data.
3. How to back up your iPhone as a proactive approach to avoid data loss in case you forgot your iPhone passcode again?
How to back up with iCloud
a. Connect your iPhone to Wi-Fi.
b. Open your Settings and then click Apple ID.
c. Go to iCloud and toggle the iCloud Backup option.
d. Click "Back up now" and wait for the procedure to end.How to back up with your Mac (Finder)
a. Launch Finder on your Mac with macOS Catalina or later and connect your iPhone to the Mac.
b. Follow the instructions on the screen and enter your iPhone passcode or confirm "Trust this computer"
c. Select your iPhone from the list.
d. Select your iPhone in the sidebar and click "Back up now"How to back up with your PC
a. Launch iTunes on your PC and connect your iPhone to the PC.
b. Follow the prompt to enter your iPhone passcode or confirm "Trust this computer"
c. Select your iPhone in the iTunes list.
d. Go to the summary in iTunes and click "Back up now"
Summary:
Undoubtedly, A locked iPhone is a hard nut to crack, but I’ve made it as easy as possible with this article. With Mobitrix LockAway, it becomes easier, just like bread and butter with zero requirements, a 99% success rate, and easy steps to follow.
Now follow the expert advice given in this article, and boom, Problem solved!

