7 Minute Guide: Master iPhone Wi-Fi Settings Effortlessly
Are you confused about the iPhone WiFi connection? This guide has walked you through the steps to connect your iPhone to a Wi-Fi network. These instructions will ensure you stay connected effortlessly at home, at work, or out and about.
Beyond basic connectivity, it also explores advanced Wi-Fi settings, maximizing your device's wireless capabilities. Essential for both new and experienced Apple users. Let's dive in!
1. Understanding iPhone Wi-Fi Network Types
Let's explore the three most common Wi-Fi networks you will likely encounter.
Public or Open Networks
Definition: Public or open networks are widespread and often found in cafes, libraries, and public transport.
Key Features: The primary feature of these networks is their accessibility - they usually do not require the Wi-Fi password, making it effortless to join.
Considerations: While convenient, these networks might not be secure, so be cautious about the type of information you access or share when connected.
Private or Secured Networks
Definition: Private networks are commonly used in homes and workplaces.
Key Features: These networks are secured with a password to restrict access and protect the data transmitted.
Connecting: To join a private network, you will need the correct password, which you can enter when your device prompts you during the connection process.
![]()
Captive or Subscription Networks
Definition: Captive networks are frequently found in hotels, airports, and cafes.
Key Features: These networks often require additional authentication, such as entering room numbers or access codes, or they might necessitate payment for usage.
Connecting: The process of connecting to these networks is slightly different and is covered in the next section of this guide.
2. Connecting to a Wi-Fi Network on iPhone
Connecting your iPhone to a Wi-Fi network, whether it requires a password or not, is straightforward. Here's a step-by-step guide to help you access the internet via Wi-Fi.
Steps to Connect to Wi-Fi
Access Wi-Fi Settings: Open your iPhone's 'Settings' app and select 'Wi-Fi.' Alternatively, you can swipe down from the top of your iPhone screen to open the Control Center, then long-press the Wi-Fi icon to access Wi-Fi settings directly.
Enable Wi-Fi: Switch on the Wi-Fi to start scanning for available networks in your vicinity. Your iPhone will display a list of detected Wi-Fi networks.
Select a Network: Tap on the name of the Wi-Fi network you wish to join.
Secured Networks: If the network is secured (indicated by a lock icon next to the network name), you must enter the password to connect.
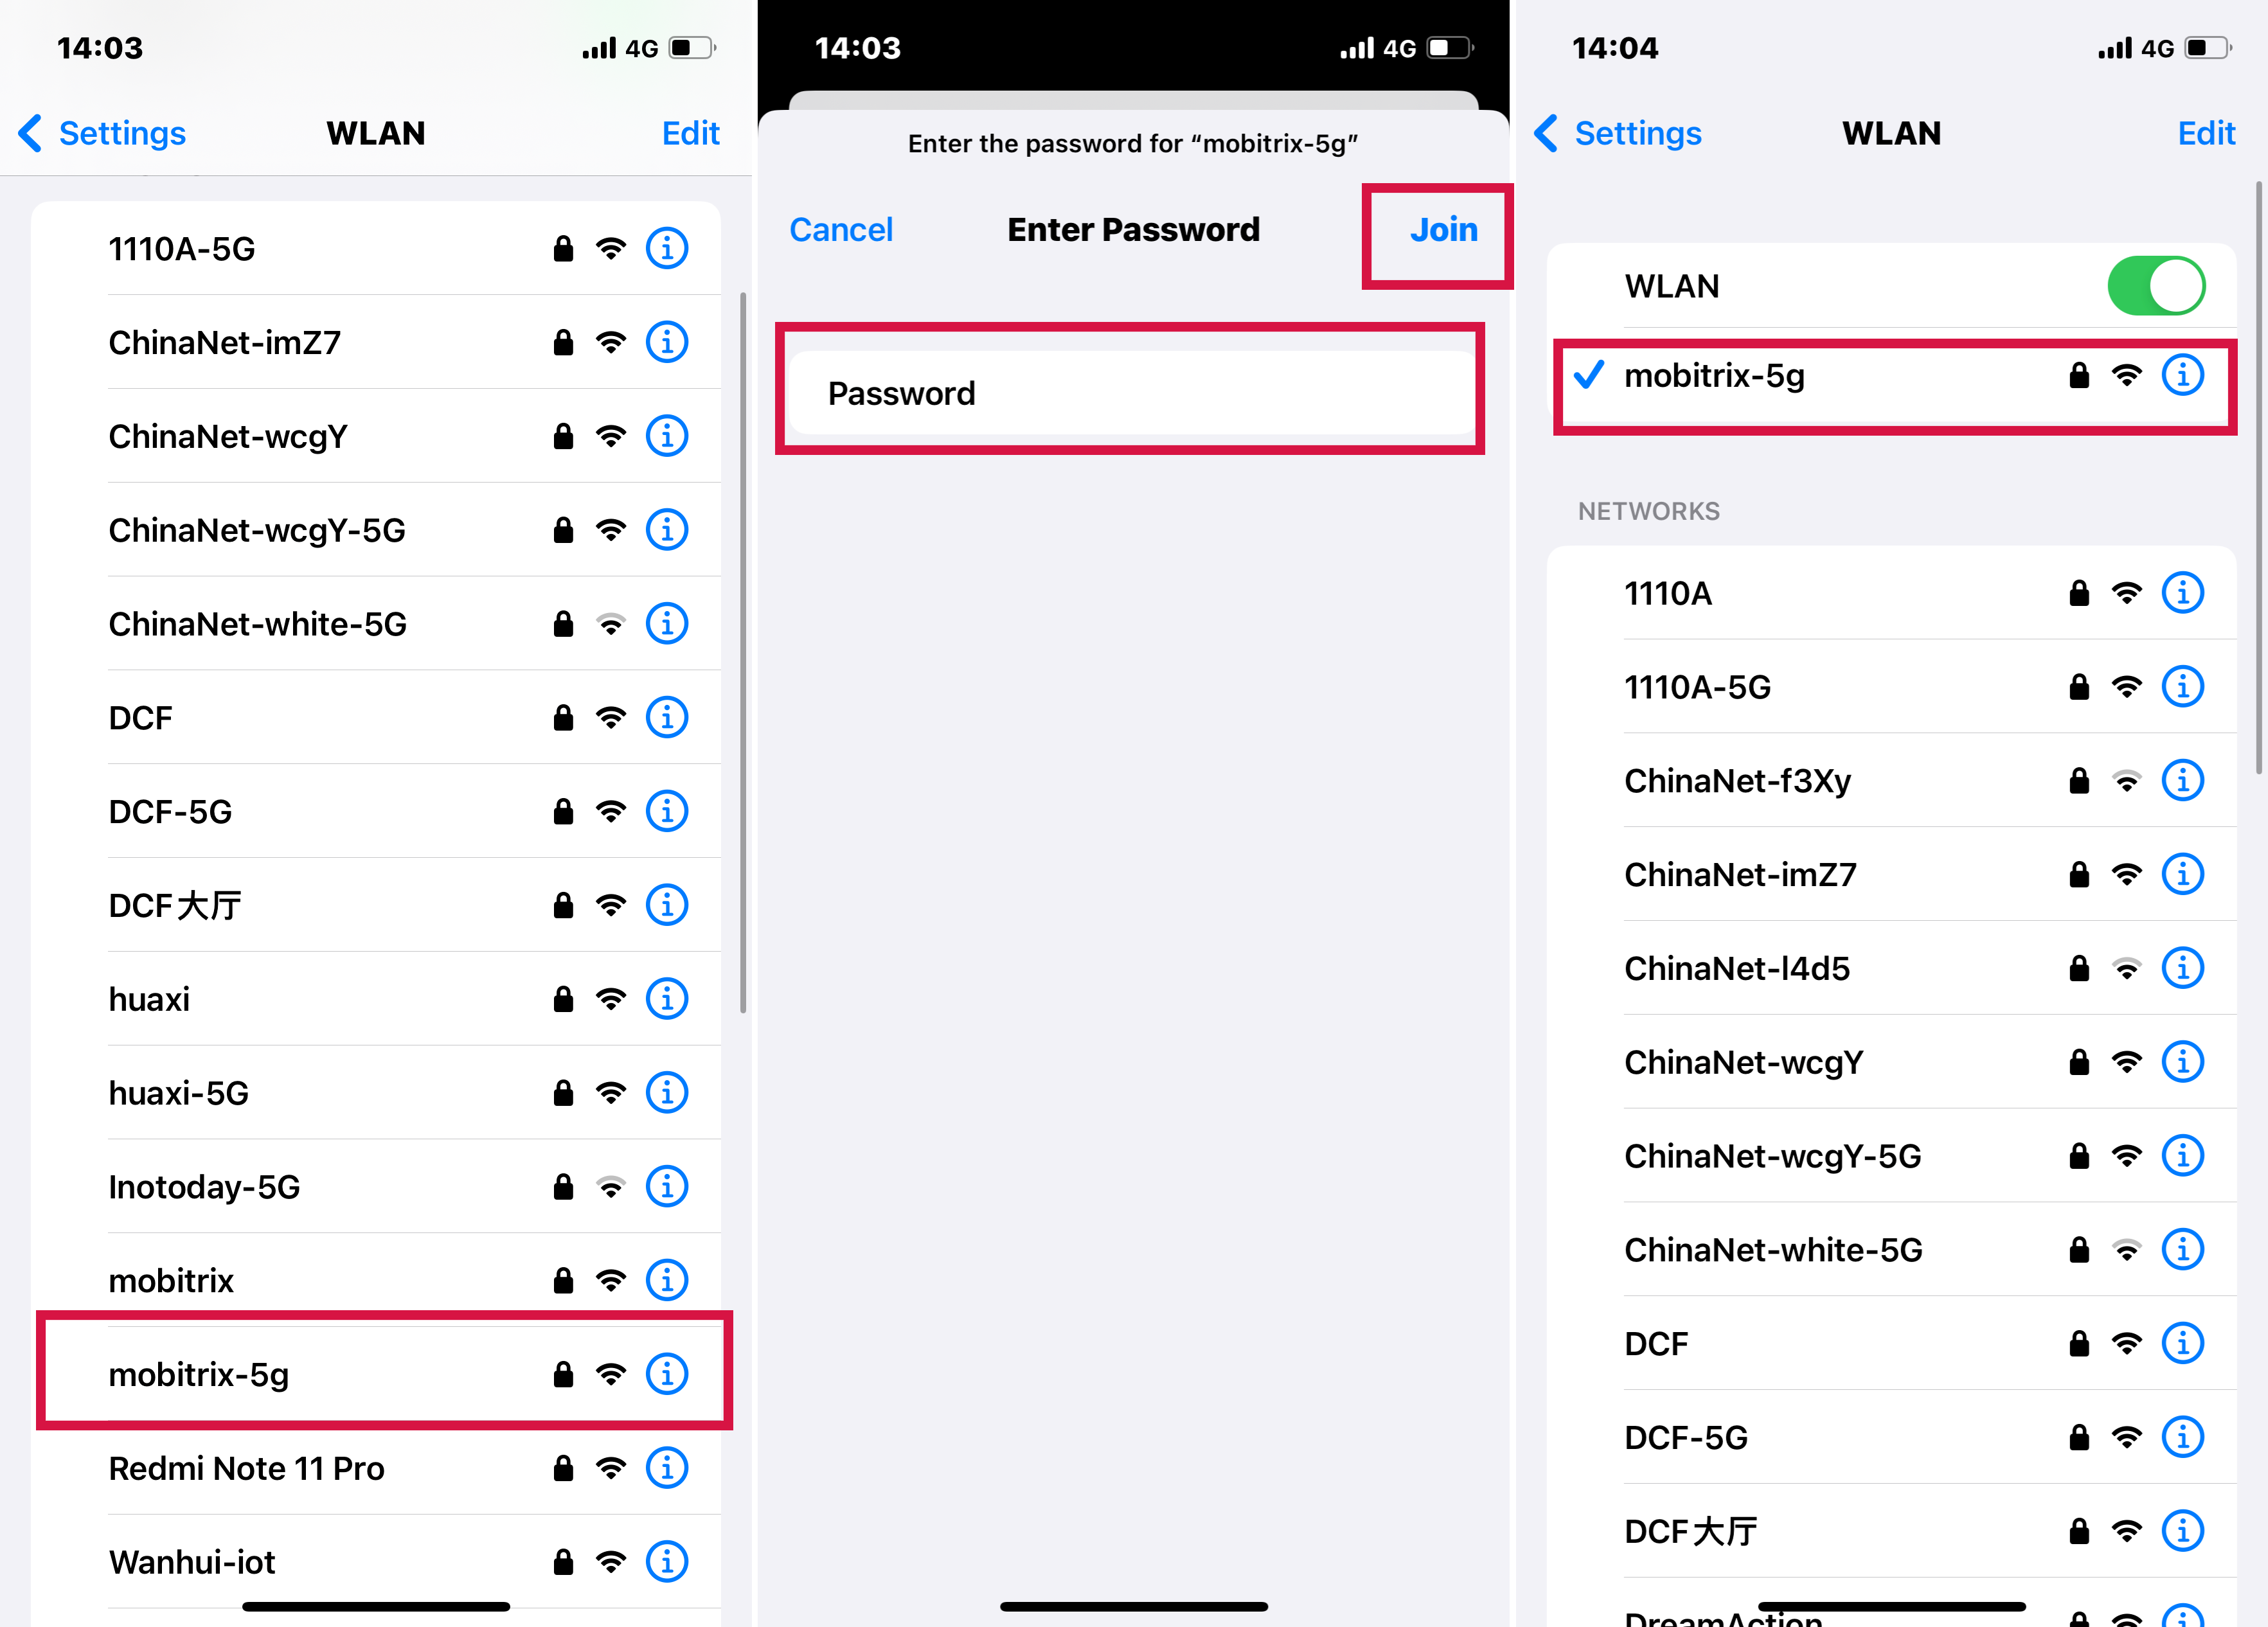
Open Networks: With no lock icon, it's an available network, and you can connect without a password.
For a Smooth Wi-Fi Experience:
Once connected, a Wi-Fi icon will appear in the top right corner of your iPhone's display, indicating a successful connection.
Network Password: If you require a password for a secured network and don't have it, contact the network administrator or the person in charge of the Wi-Fi.
Switching Networks: To change to a different Wi-Fi network, simply tap on another network's name from the list and connect as described above.
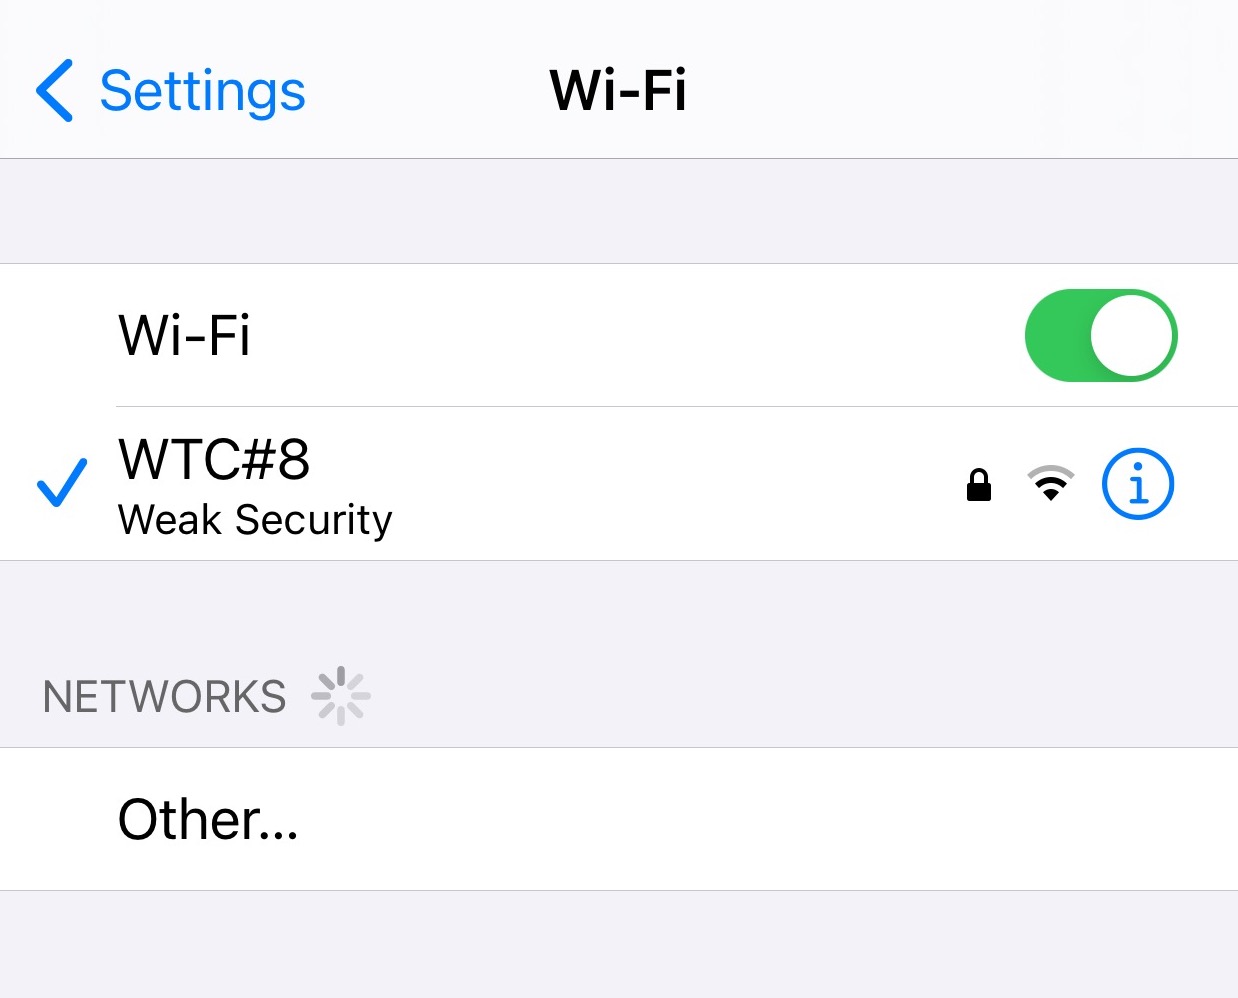
After connecting to a Wi-Fi network, if you see the Weak Security icon, it may indicate that the network is using specific protocols that are recognized as insecure.
3. How to Connect to a Hidden Network
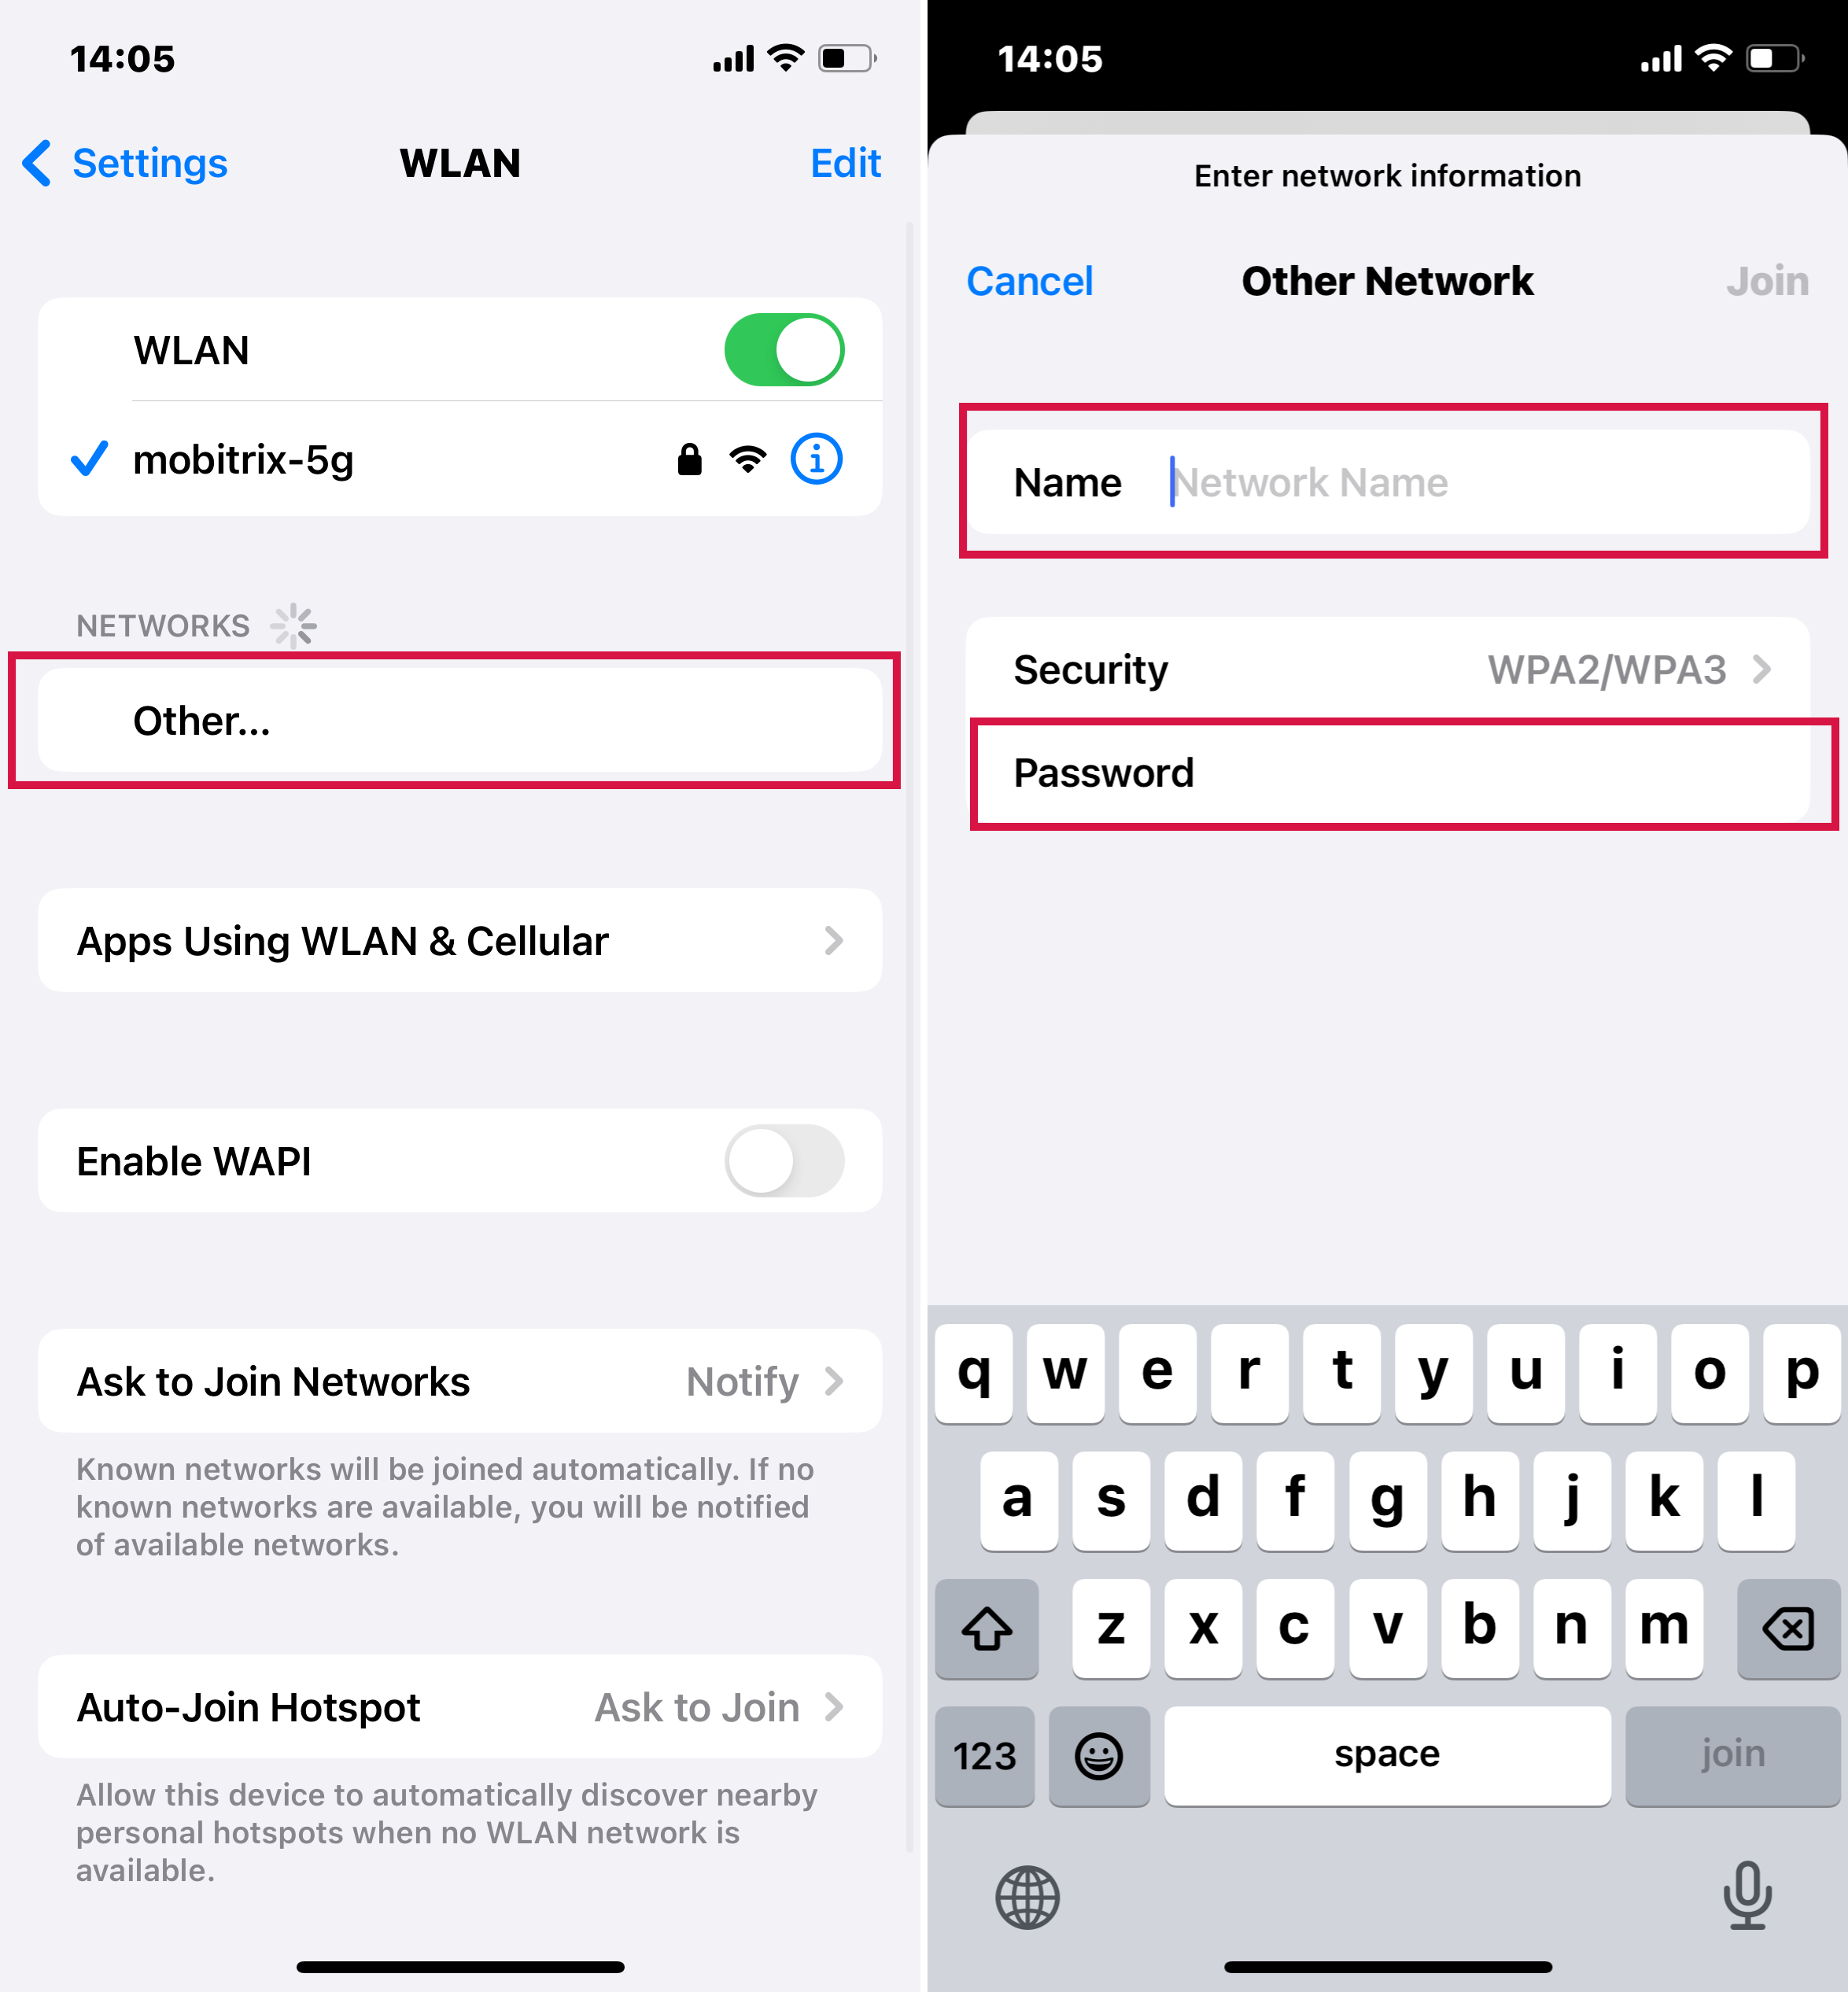
A hidden network will not display on the list of available networks when you are trying to discover networks. To connect to a hidden network, you need to connect to it using the steps below manually.
Steps:
Open Settings app> Wi-Fi.
At the bottom, click “Other.”
Type in the network name that you want to connect to.
4. Preventing Automatic Wi-Fi Connection on iPhone
Sometimes, you might prefer that your iPhone doesn't automatically connect to specific Wi-Fi networks, particularly in public spaces, for enhanced security and privacy. You have two options: using the "Forget this Network" feature or turning off the "Auto-Join" function. Here's how to use both methods effectively.
Using "Forget this Network"
Navigate to 'Settings' on your iPhone and select 'Wi-Fi.'
Locate the Network: Look for the network you're currently connected to or wish to forget. It will have a blue checkmark beside it. Tap the information icon (an "i" in a circle) next to the network's name.
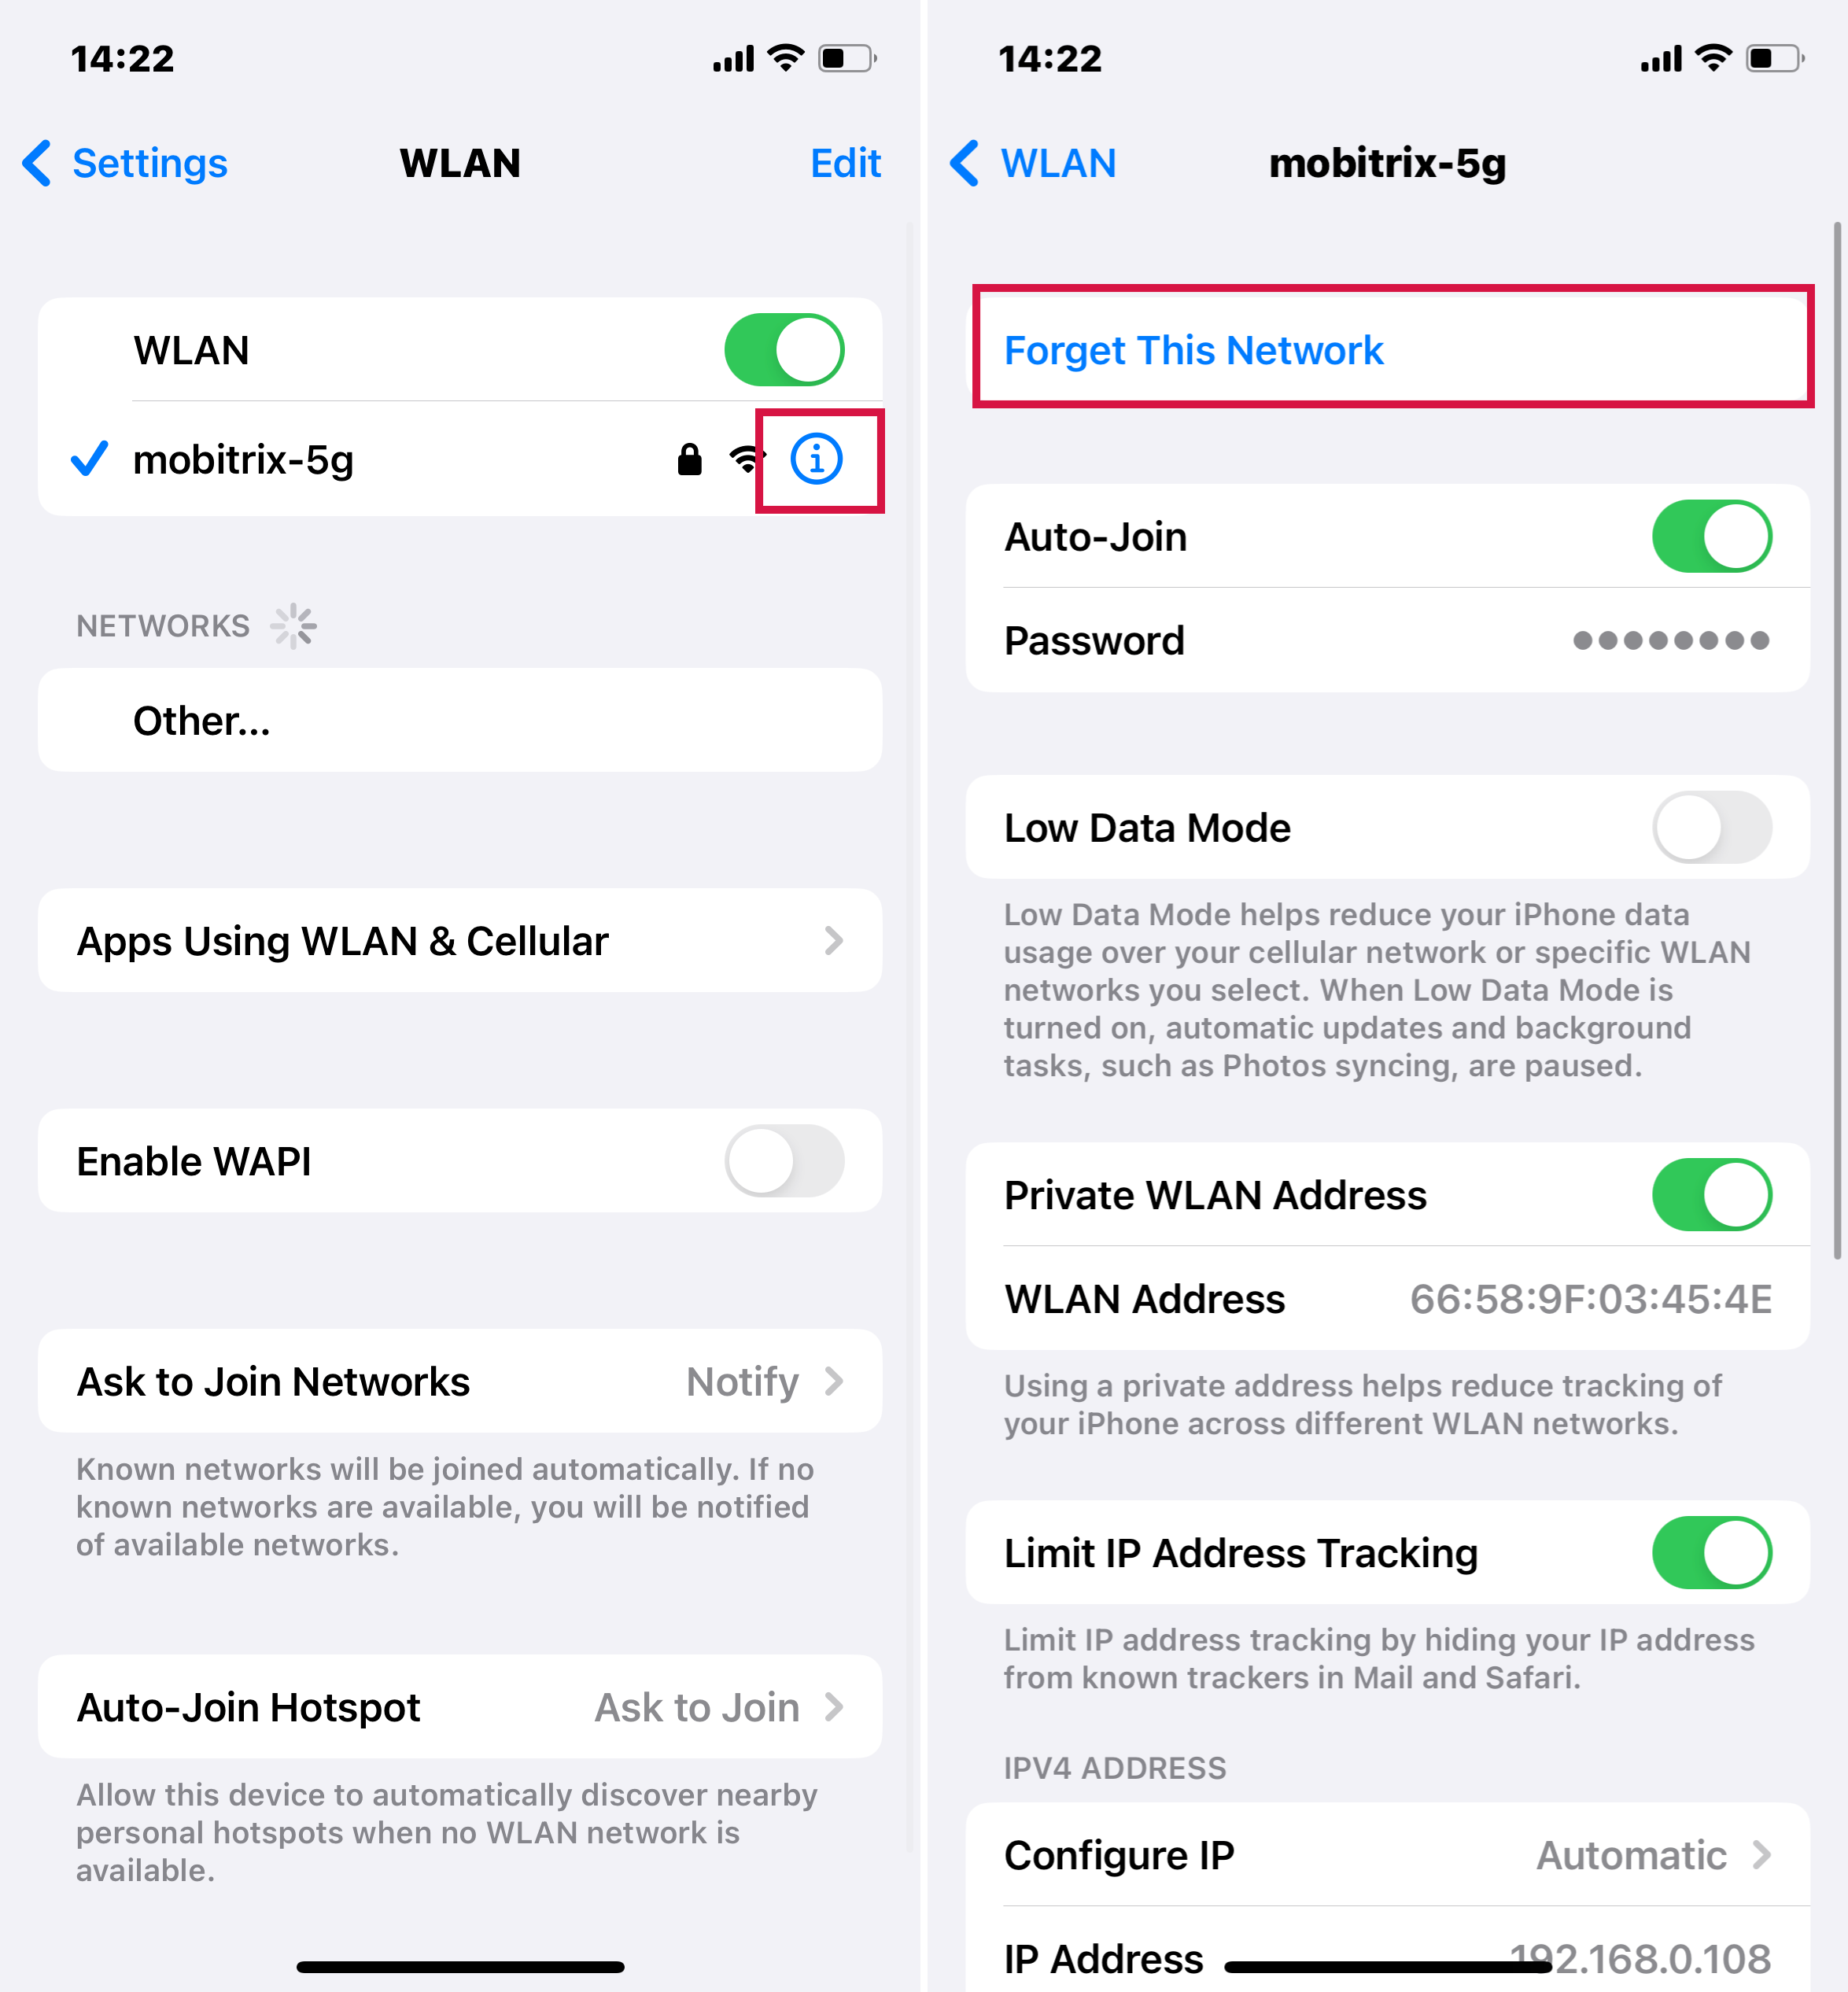
Choose "Forget This Network" to erase the network's details from your iPhone's memory.
If you forget a network, you must re-enter the password to reconnect in the future.
Disabling "Auto-Join"
Find the Network: In the Wi-Fi settings, identify the network you want to modify. Tap the information icon next to the network's name.
Toggle Auto-Join: Locate the "Auto-Join" option. Toggle it off (gray) to prevent your iPhone from automatically joining the network. When it's on, it appears green.
Remember: Disabling Auto-Join keeps the network details saved on your iPhone, but it won't connect automatically unless you do so manually.
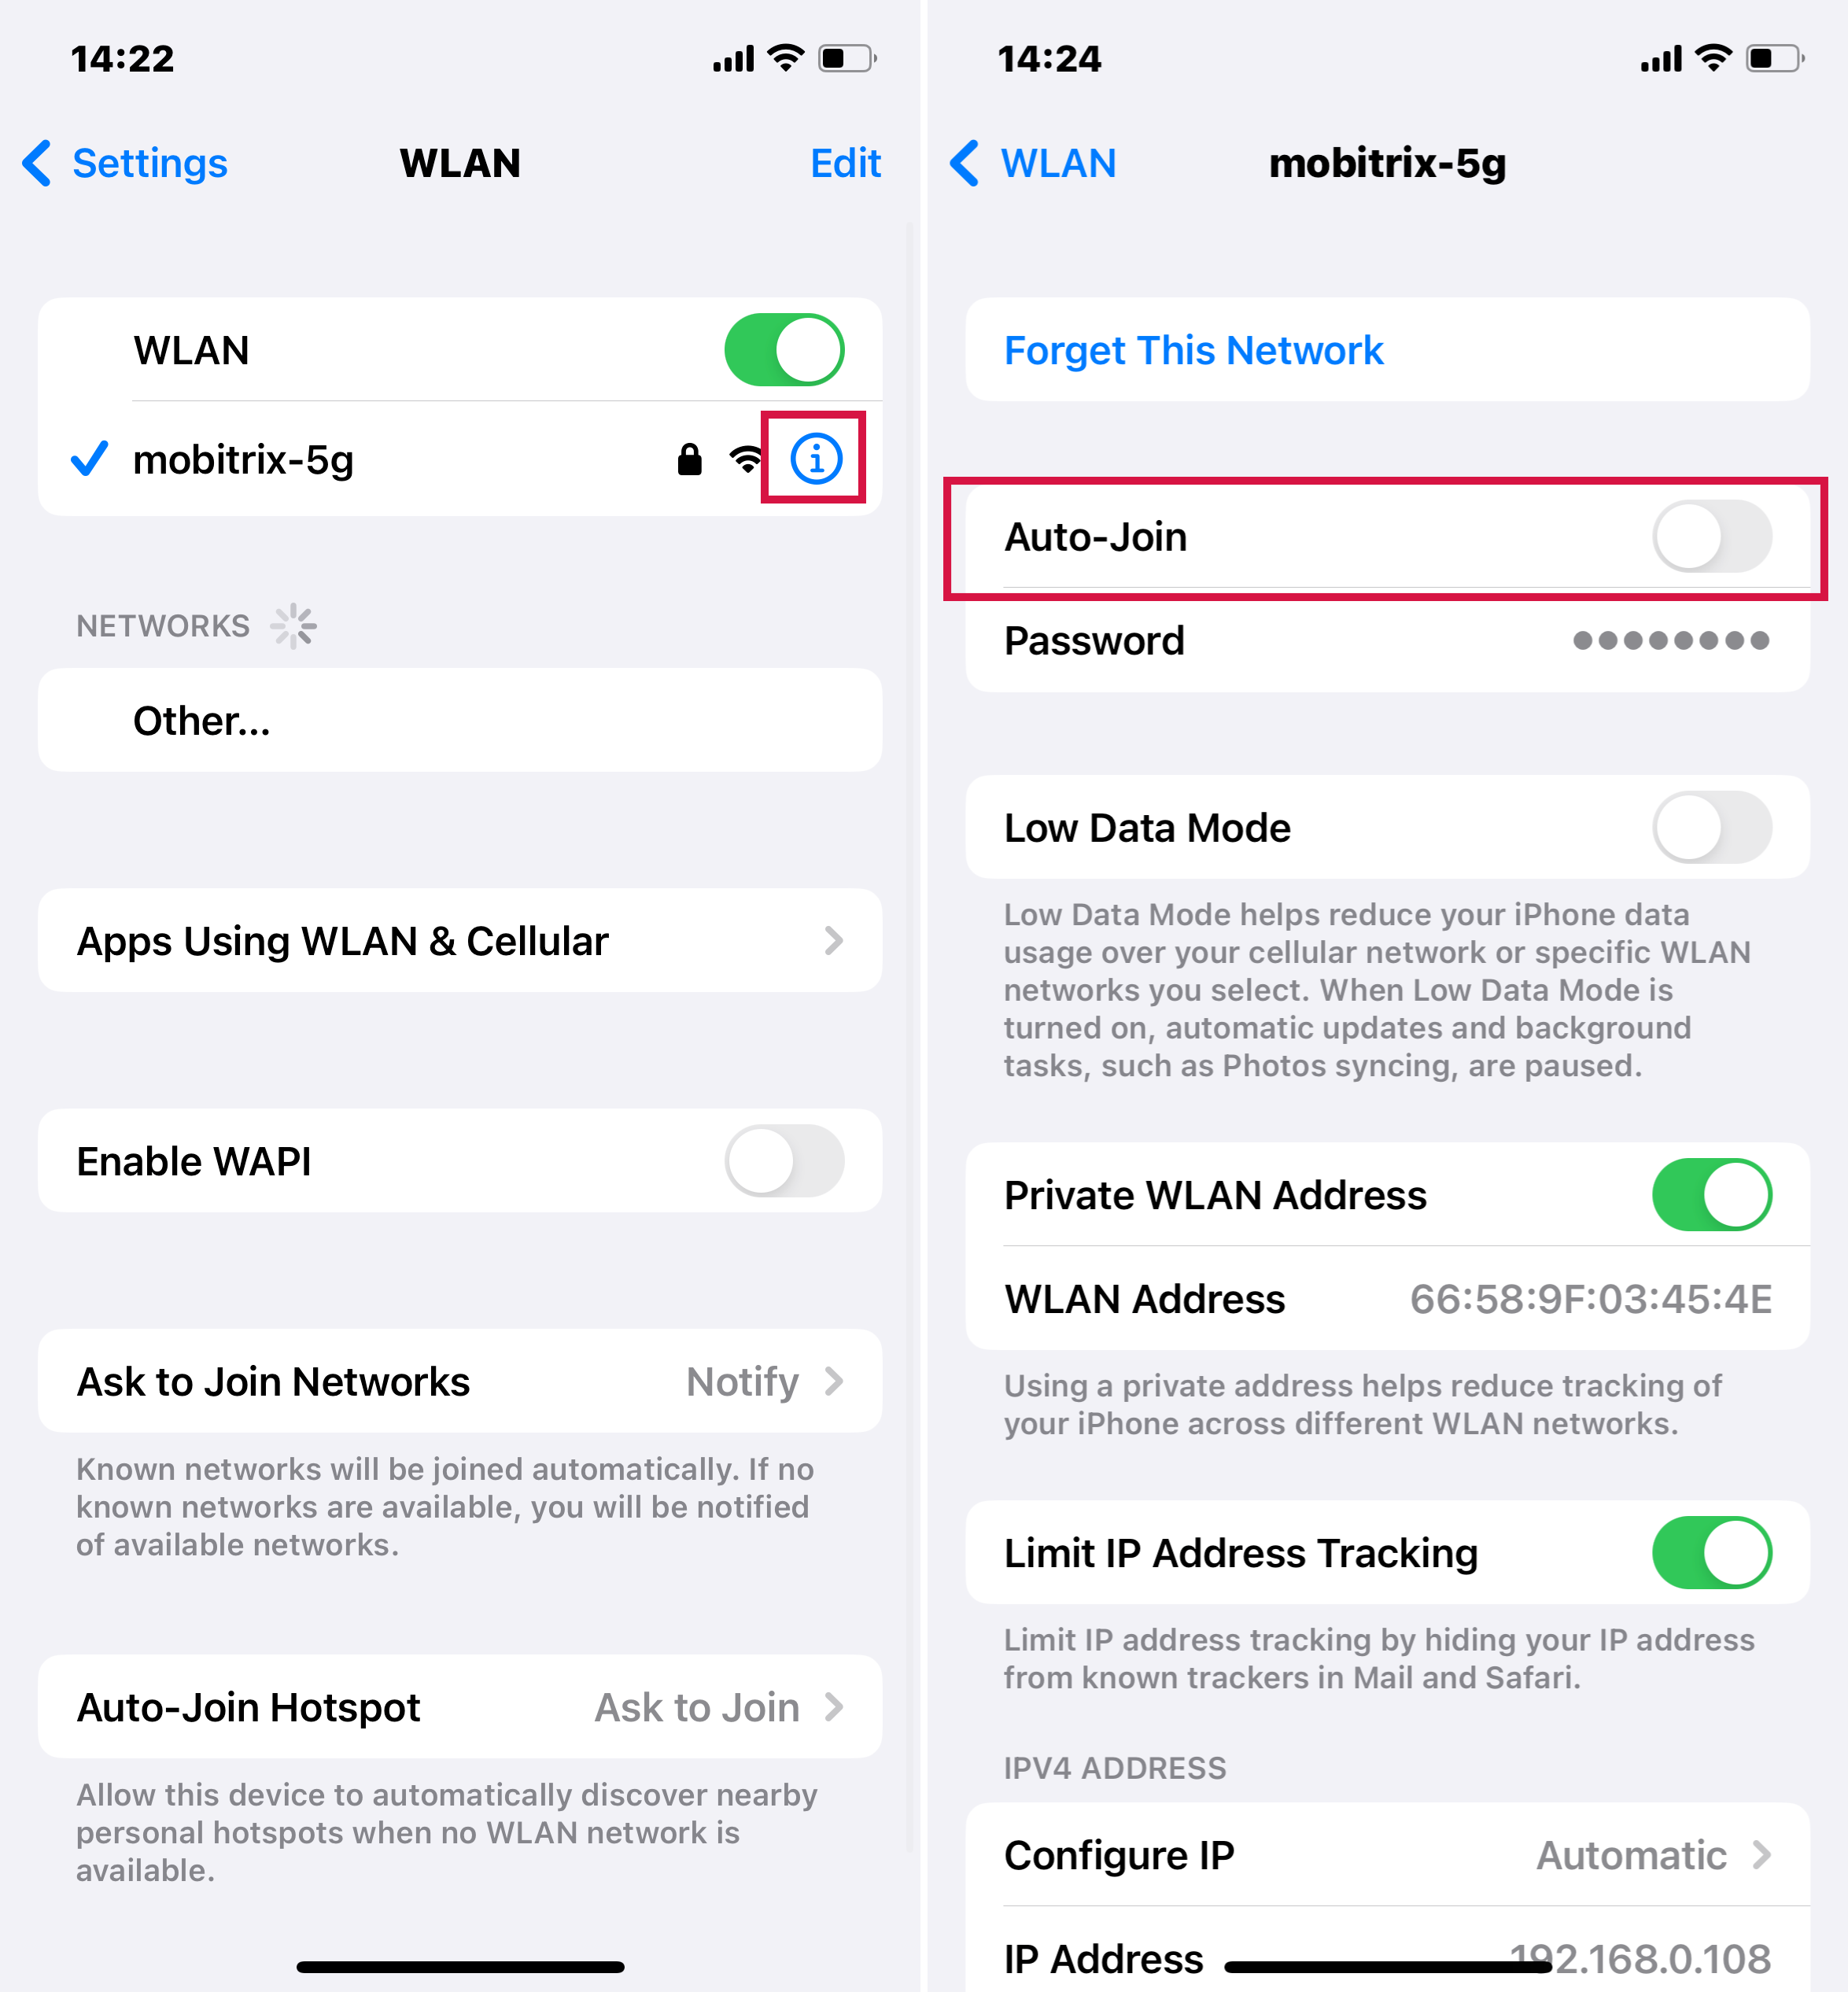
By understanding and utilizing these two features, you can better manage your Wi-Fi connections on your iPhone, ensuring that it connects only to networks you deem secure and necessary.
5. Device properties that can Hinder Wi-Fi connections
Not all devices have the same features. In some instances, how you set up your router or device to connect to the Wi-Fi network will depend on the type of device, as highlighted below.
i. Private Wi-Fi Address
If the device you want to connect to the Wi-Fi network is one of the following: iPadOS 14, iOS 14, or watchOS 7, you need to look up how to connect to a private Wi-Fi address. Their features differentiate them from other devices making the way you connect them to the network different.
ii. Auto-Join in the Case of Wireless Carrier Wi-Fi Networks
Your wireless carrier and their partners create public networks, wireless carrier Wi-Fi network, which your device assumes it was connected to previously. If a “Privacy Warning” appears under your carrier’s network name, that’s a malicious threat that you should avoid by preventing your device from joining to it by turning off Auto-join using the steps below.
Open Settings > Wi-Fi.
Click the info icon next to the carrier’s network.
Choose to turn off the Auto-Join option.

iii. Location Services
Different regions or countries have different regulations regarding Wi-Fi network channels and the allowed signal strengths. Due to this, you need to ensure that the Location Service feature is ever enabled on your device.
The primary importance of having Location Service enabled is that it will help your device connect to available nearby devices. When it does, it performs well in terms of speed, especially when using AirDrop or AirPlay, which rely on Wi-Fi.
To enable Location Service, you can either use your Mac or phone.
On your Mac:
Open Apple Menu.
Click System Preferences > Security and Privacy.
From the corner of your Mac’s window, click the lock and enter the administrator password.
Under the Privacy tab, enable the option for Location Service.
At the bottom of the apps list, click the Details button.
Choose Wi-Fi Networking and click Done.
On your iPod touch, iPhone, or iPad:
Open Settings.
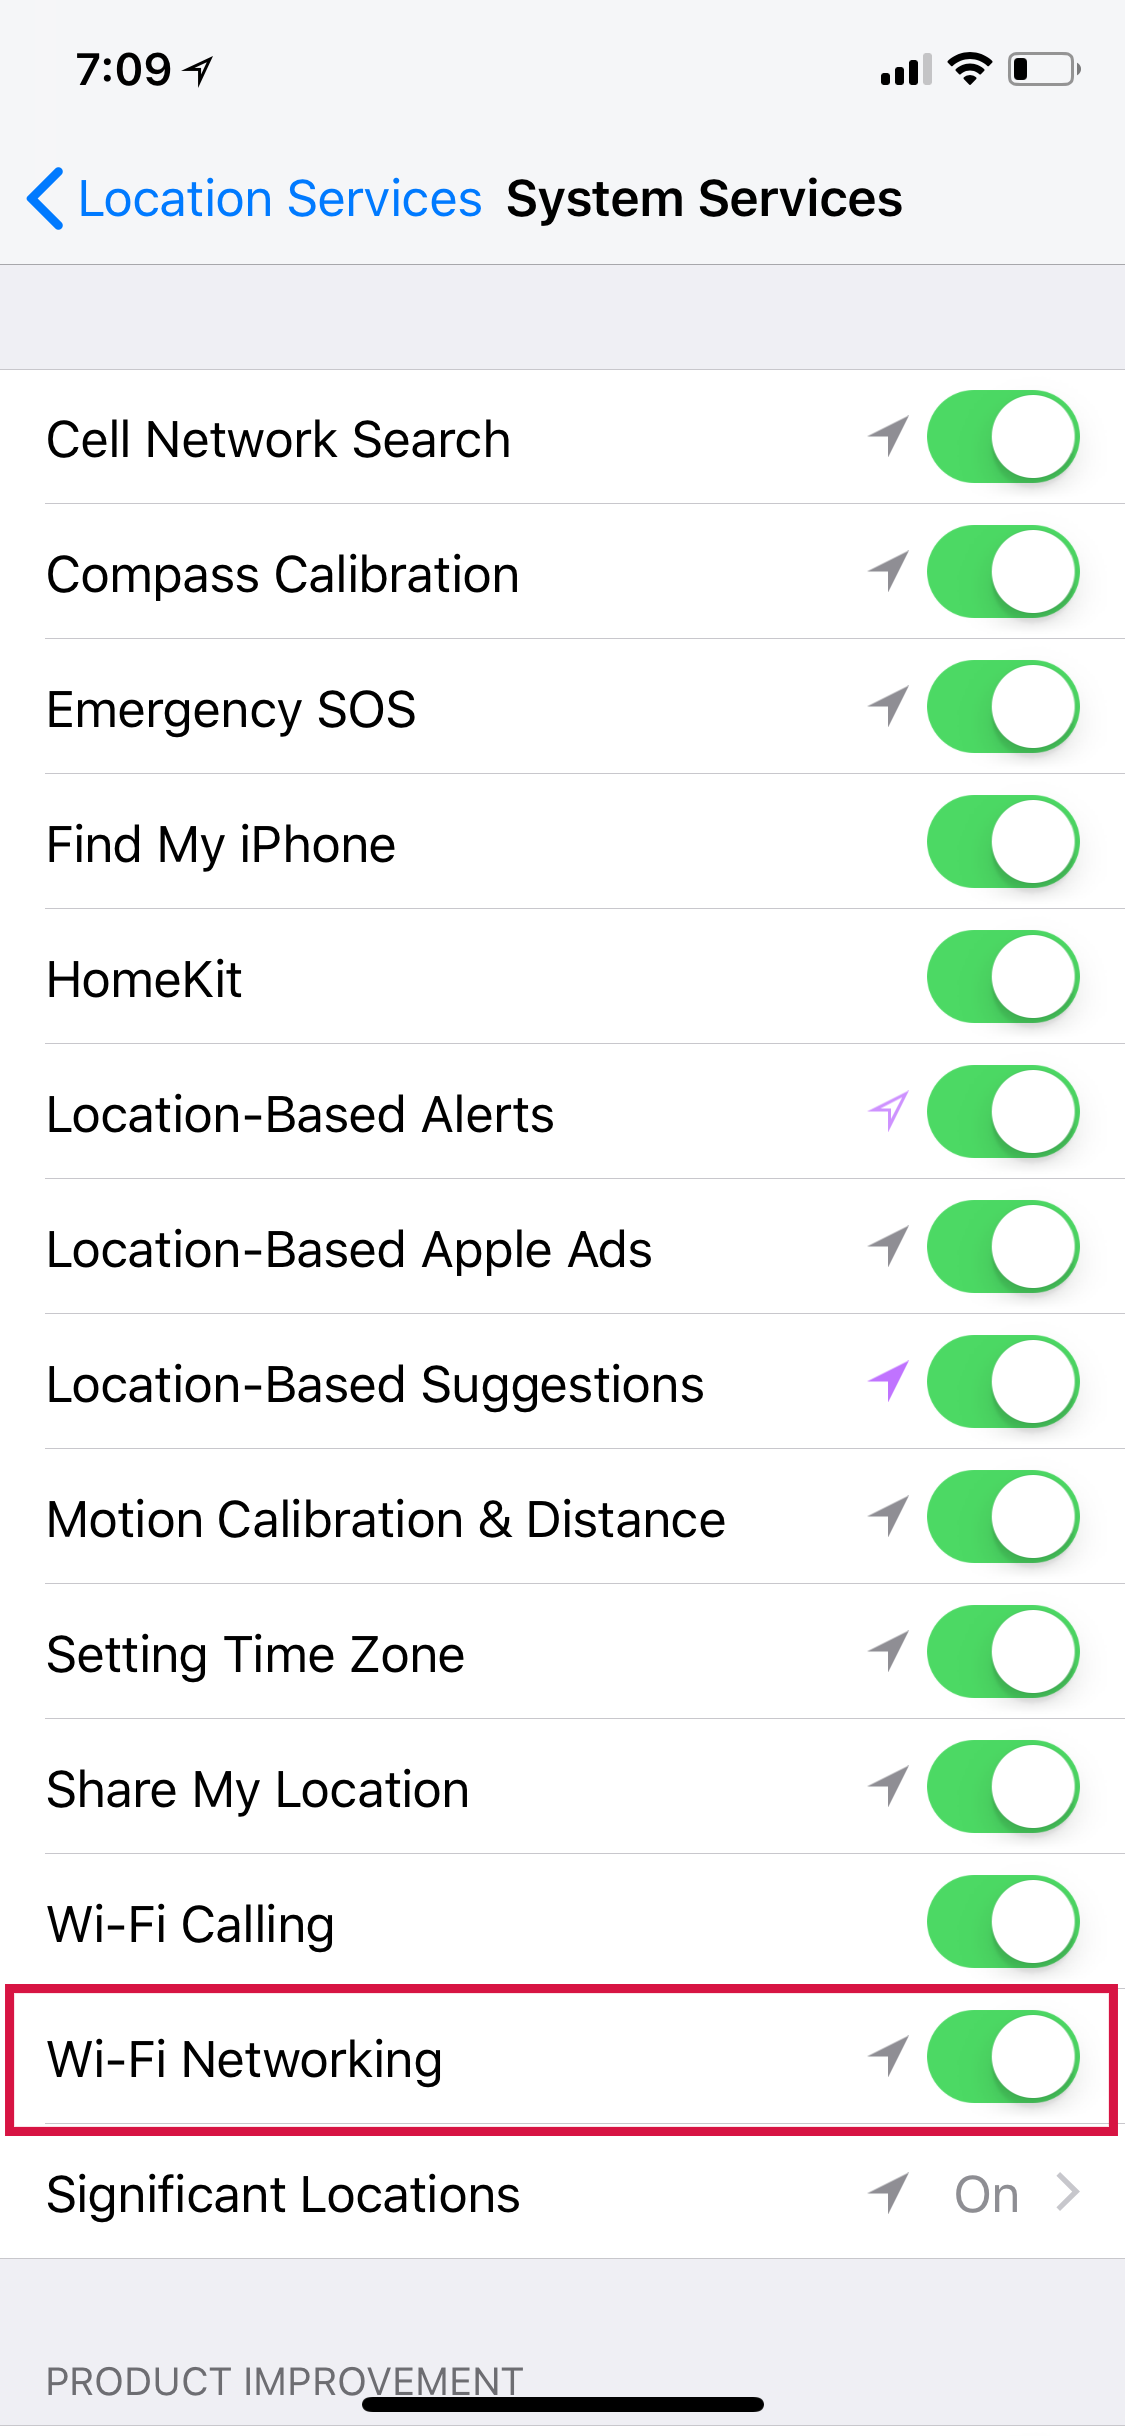
Click Privacy > Location Services
Turn on the option for Location Services.
At the bottom, click “System Services.”
Turn on Wi-Fi Networking
Summary
Knowing how best to set your iPhone’s Wi-Fi settings help to ensure you connect safely to the network and remain safe while using the network. In this article, we discussed how you can set your iPhone Wi-Fi settings, including how to choose networks to connect to. Moreover, we addressed features that can hinder how your iPhone Wi-Fi settings operate. Hopefully, this article guided you on various issues regarding your iPhone Wi-Fi settings.

