Fix Your iPhone Stuck on Verifying Update [Solved]
If you're updating iOS on your iPhone or iPad directly in Settings, you might see a 'Verifying Update...' screen. Sometimes, your device can get stuck on this screen for a long time, or you might face a software update failure.
This article is here to help. We'll explain why this issue happens and show you how to fix it. With our guidance, you'll be able to update your iPhone or iPad smoothly, without any problems.
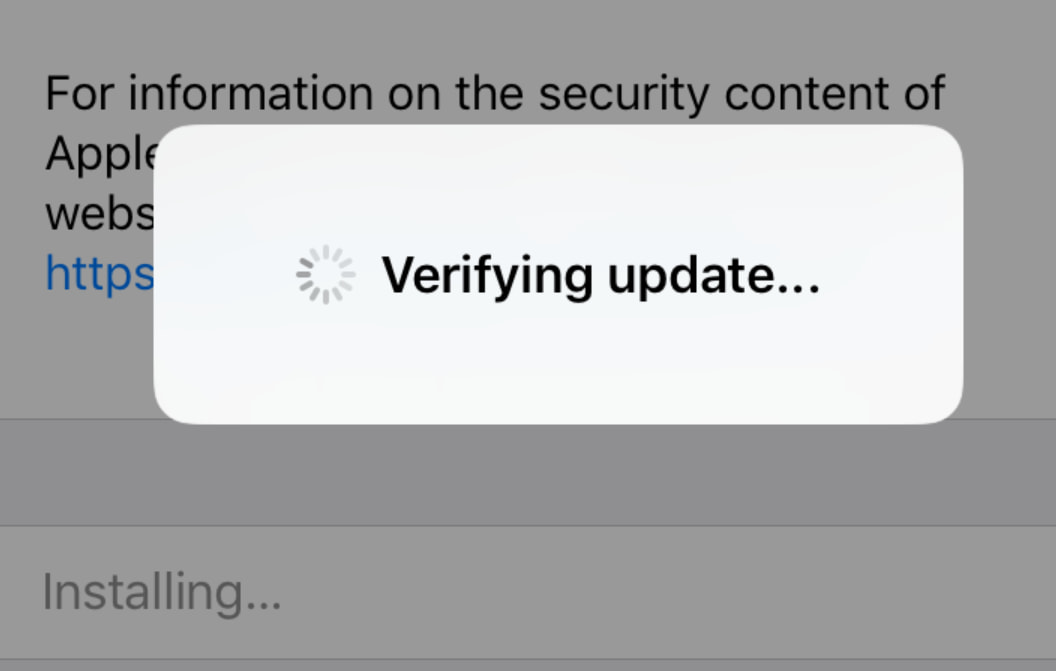
Why is Your iPhone Stuck on the 'Verifying Update' Screen?
Understanding the cause is the first step in troubleshooting the issue. Your iPhone might get stuck on the "Verifying Update" screen for several reasons:
Network Issues: The update process requires a stable internet connection. If your Wi-Fi is unstable or slow, it can hinder the process.
Software Glitches: Minor software glitches on your iPhone can cause the update process to freeze.
Insufficient Storage: Not having enough space on your iPhone can lead to issues during the update process, including getting stuck on verifying.
Outdated iPhone Settings: If your iPhone's settings are outdated or if there are network configuration issues, this can interfere with the update process.
Battery Issues: If your iPhone’s battery is low, it might not proceed with the update to prevent the device from shutting down during the process.
Corrupted Update File: In some cases, the update file itself might be corrupted, which can cause the verification to fail.
Server Overload: Sometimes, Apple's servers get overloaded, especially when a new update is released, which can slow down or stall the verification process.
Method 1: Hard Reset Your iPhone
If your iPhone is stuck on the "Verifying Update" screen, performing a hard reset can be a helpful first step in troubleshooting.
A hard reset, also known as a force restart, does not erase the content of your phone. Instead, it simply reboots the device, which can sometimes clear up software glitches including those that cause your phone to freeze during an update. Here's how you can perform a hard reset on different iPhone models:
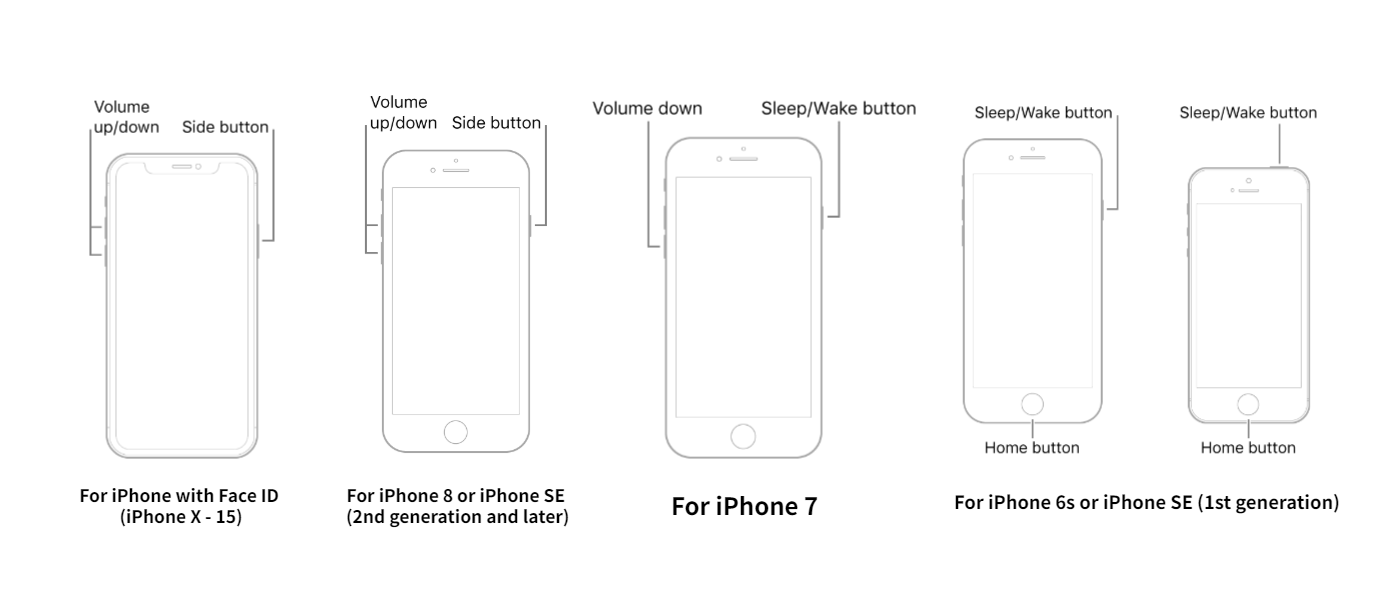
For iPhone with Face ID (iPhone X - 15):
Press the Volume Up button and instantly release it.
Press the Volume Down button and instantly release it.
Press the Side button, then hold it until you see the Apple logo.
When the Apple logo appears, release the button.
For iPhone 8 or iPhone SE (2nd generation and later):
Press and quickly release the Volume Up button
Press and quickly release the Volume Down button
Then press and hold the Side button.
When the Apple logo appears, release the button.
For iPhone 7 and 7 Plus:
Press and hold both the Volume Down button and the Sleep/Wake (Side) button at the same time.
Continue to hold these buttons until the Apple logo appears.
Let go of the buttons when the Apple logo shows up.
For iPhone 6s, 6s Plus, SE (1st generation), and earlier models:
Press and hold both the Home button and the Top (or Side) button simultaneously.
Keep holding these buttons until the Apple logo appears on the screen.
Once the Apple logo is visible, release both buttons.
Your iPhone will go through a restart. After the restart, see if it has moved past the "Verifying Update" screen.
Method 2: Delete the Update and Redownload Again
After successfully performing a hard reset on your iPhone, you can try updating it again. To avoid encountering the "Verifying Update" issue again, follow the preparations below first:
Fully Charge Your iPhone: Ensure your iPhone is fully charged before starting the update process. A well-charged iPhone is crucial to prevent interruptions during the update.
Check Wi-Fi Signal Strength: A strong and stable Wi-Fi connection is essential for the update process. If your Wi-Fi signal is weak, the iPhone might struggle to verify the update and could get stuck again.
Free Up Enough Storage Space: The update requires sufficient space on your iPhone. Check the available storage by going to Settings > General > About > Available. Make sure you have enough space for the update.
Delete Any Previous Update Files: Go to Settings > General > iPhone Storage. Find any existing update files in the list and tap on "Delete Update" to remove them. This ensures that you start fresh with the new update. This method is particularly useful if the update file you originally downloaded was corrupted or incomplete.
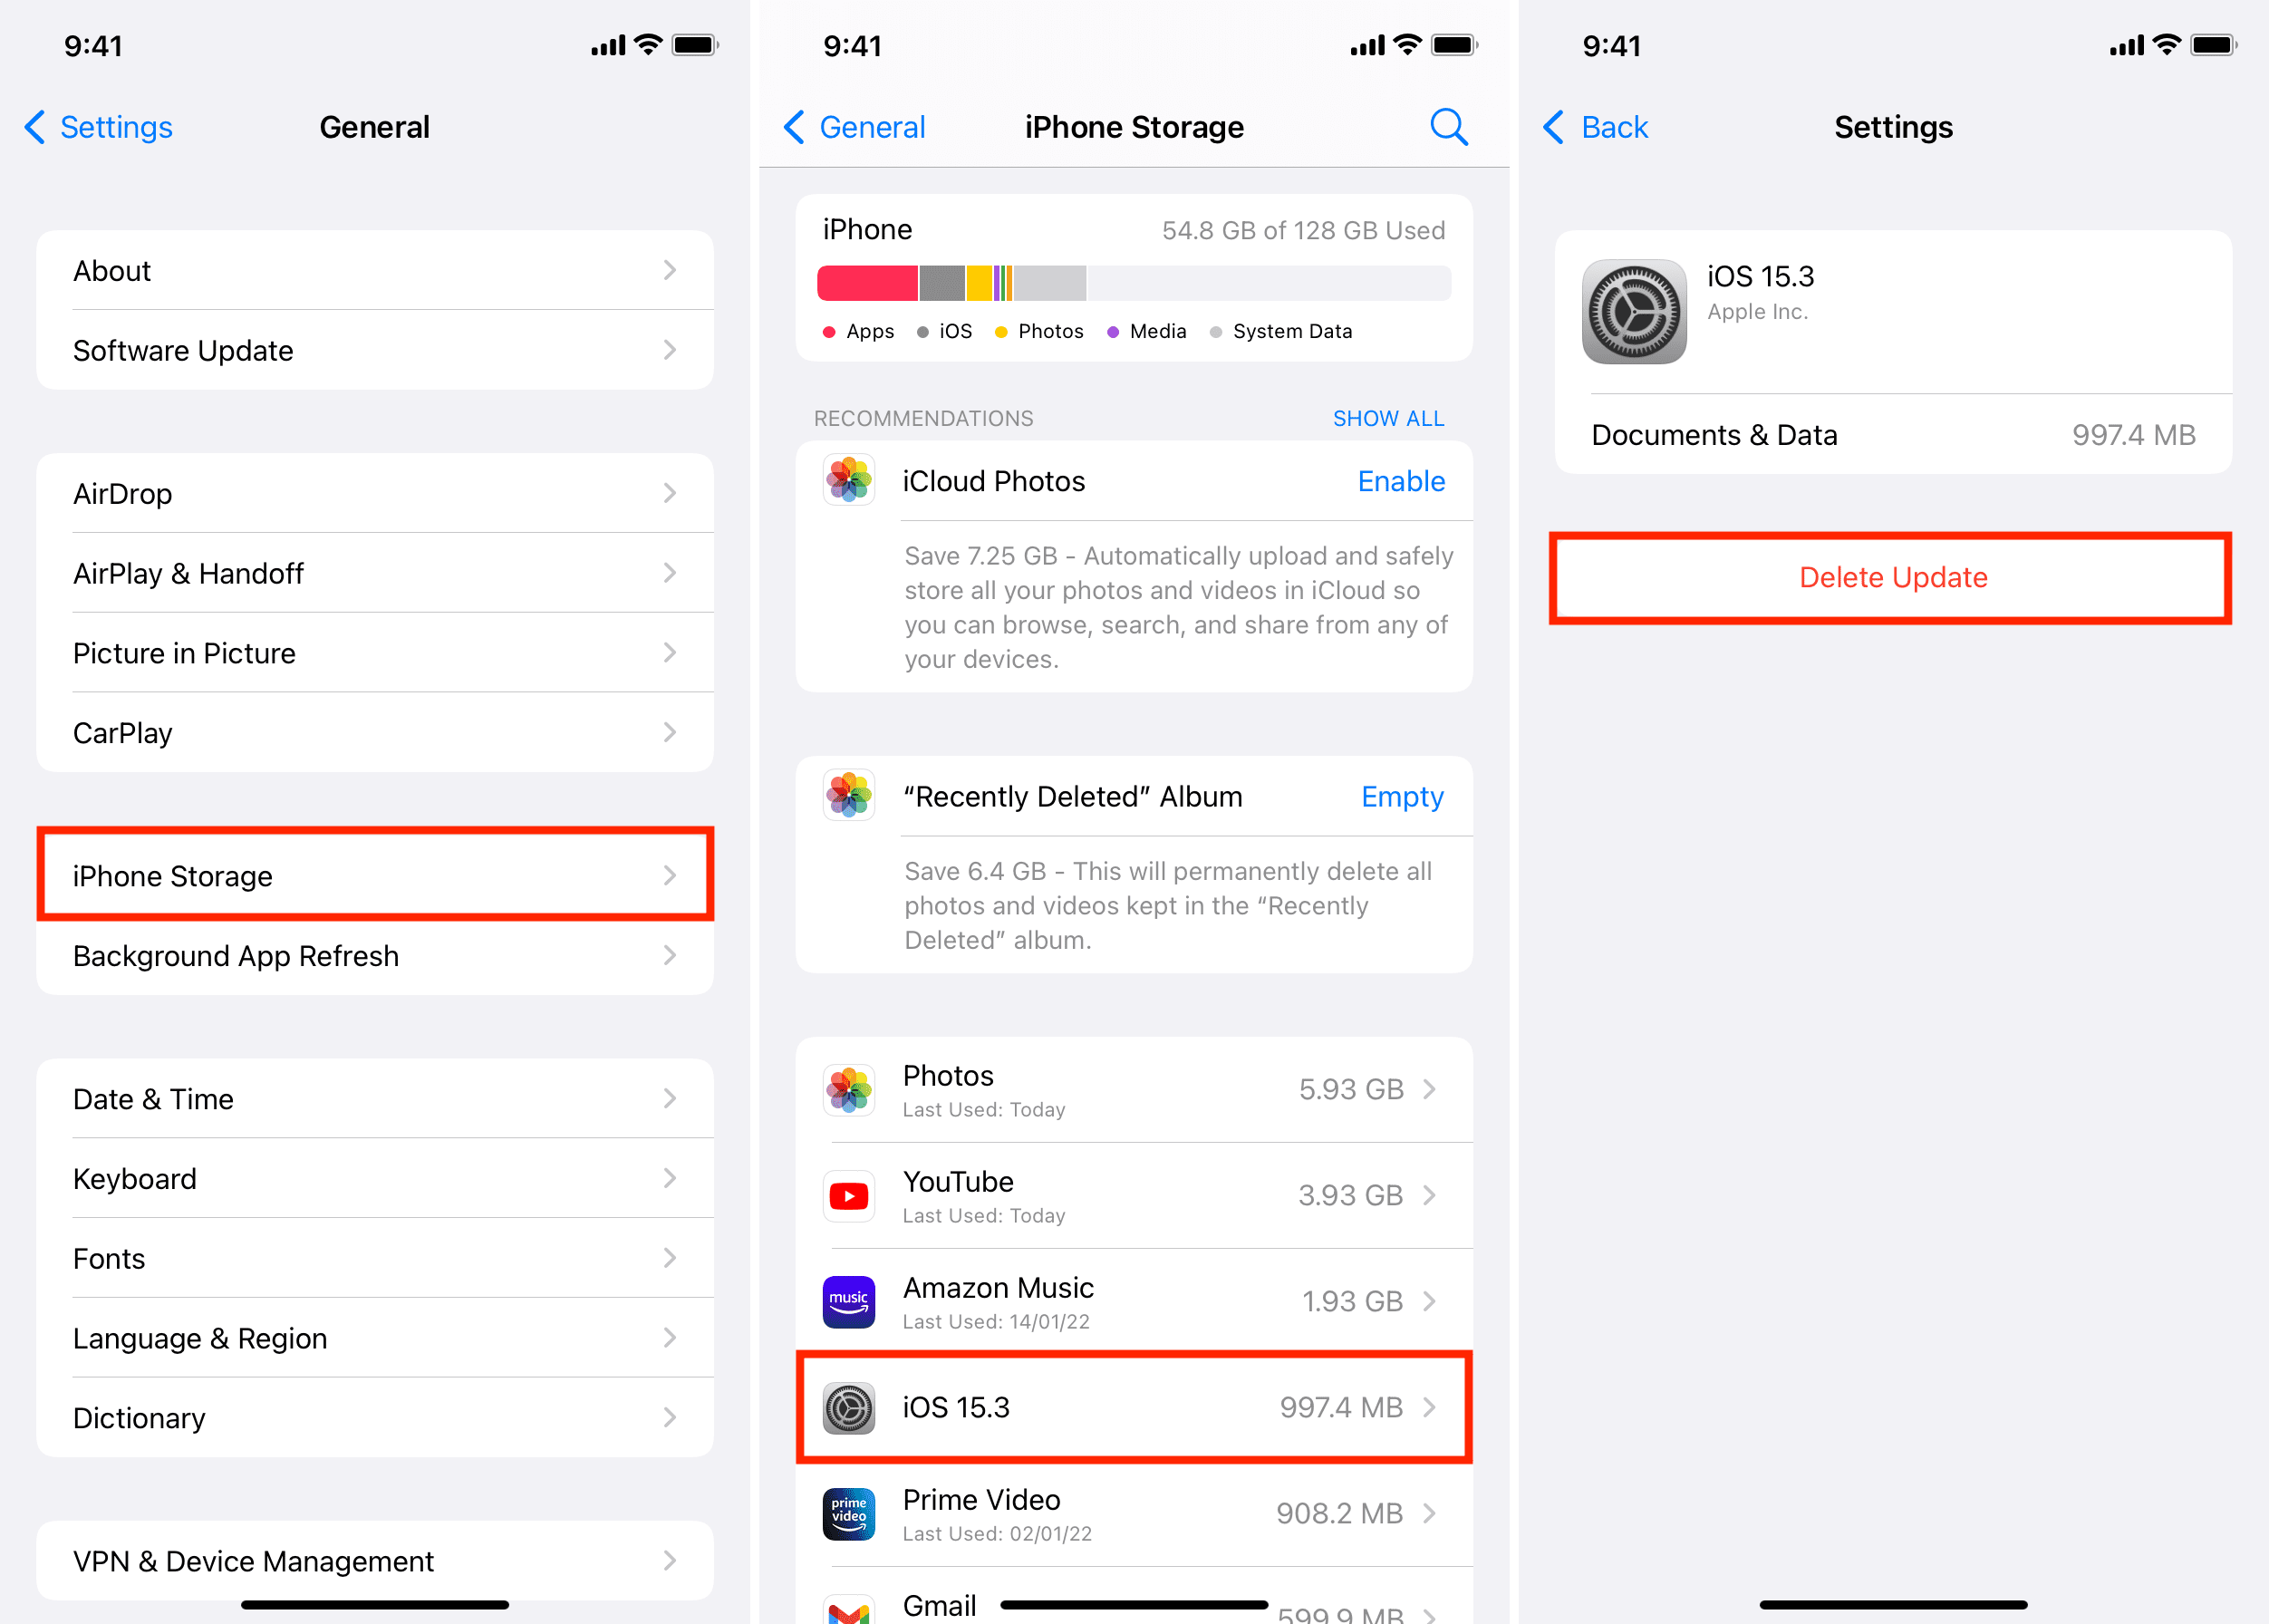
Now, you're set to try updating your iPhone again:
Navigate to Settings > General > Software Update.
Download and install the latest iOS update.
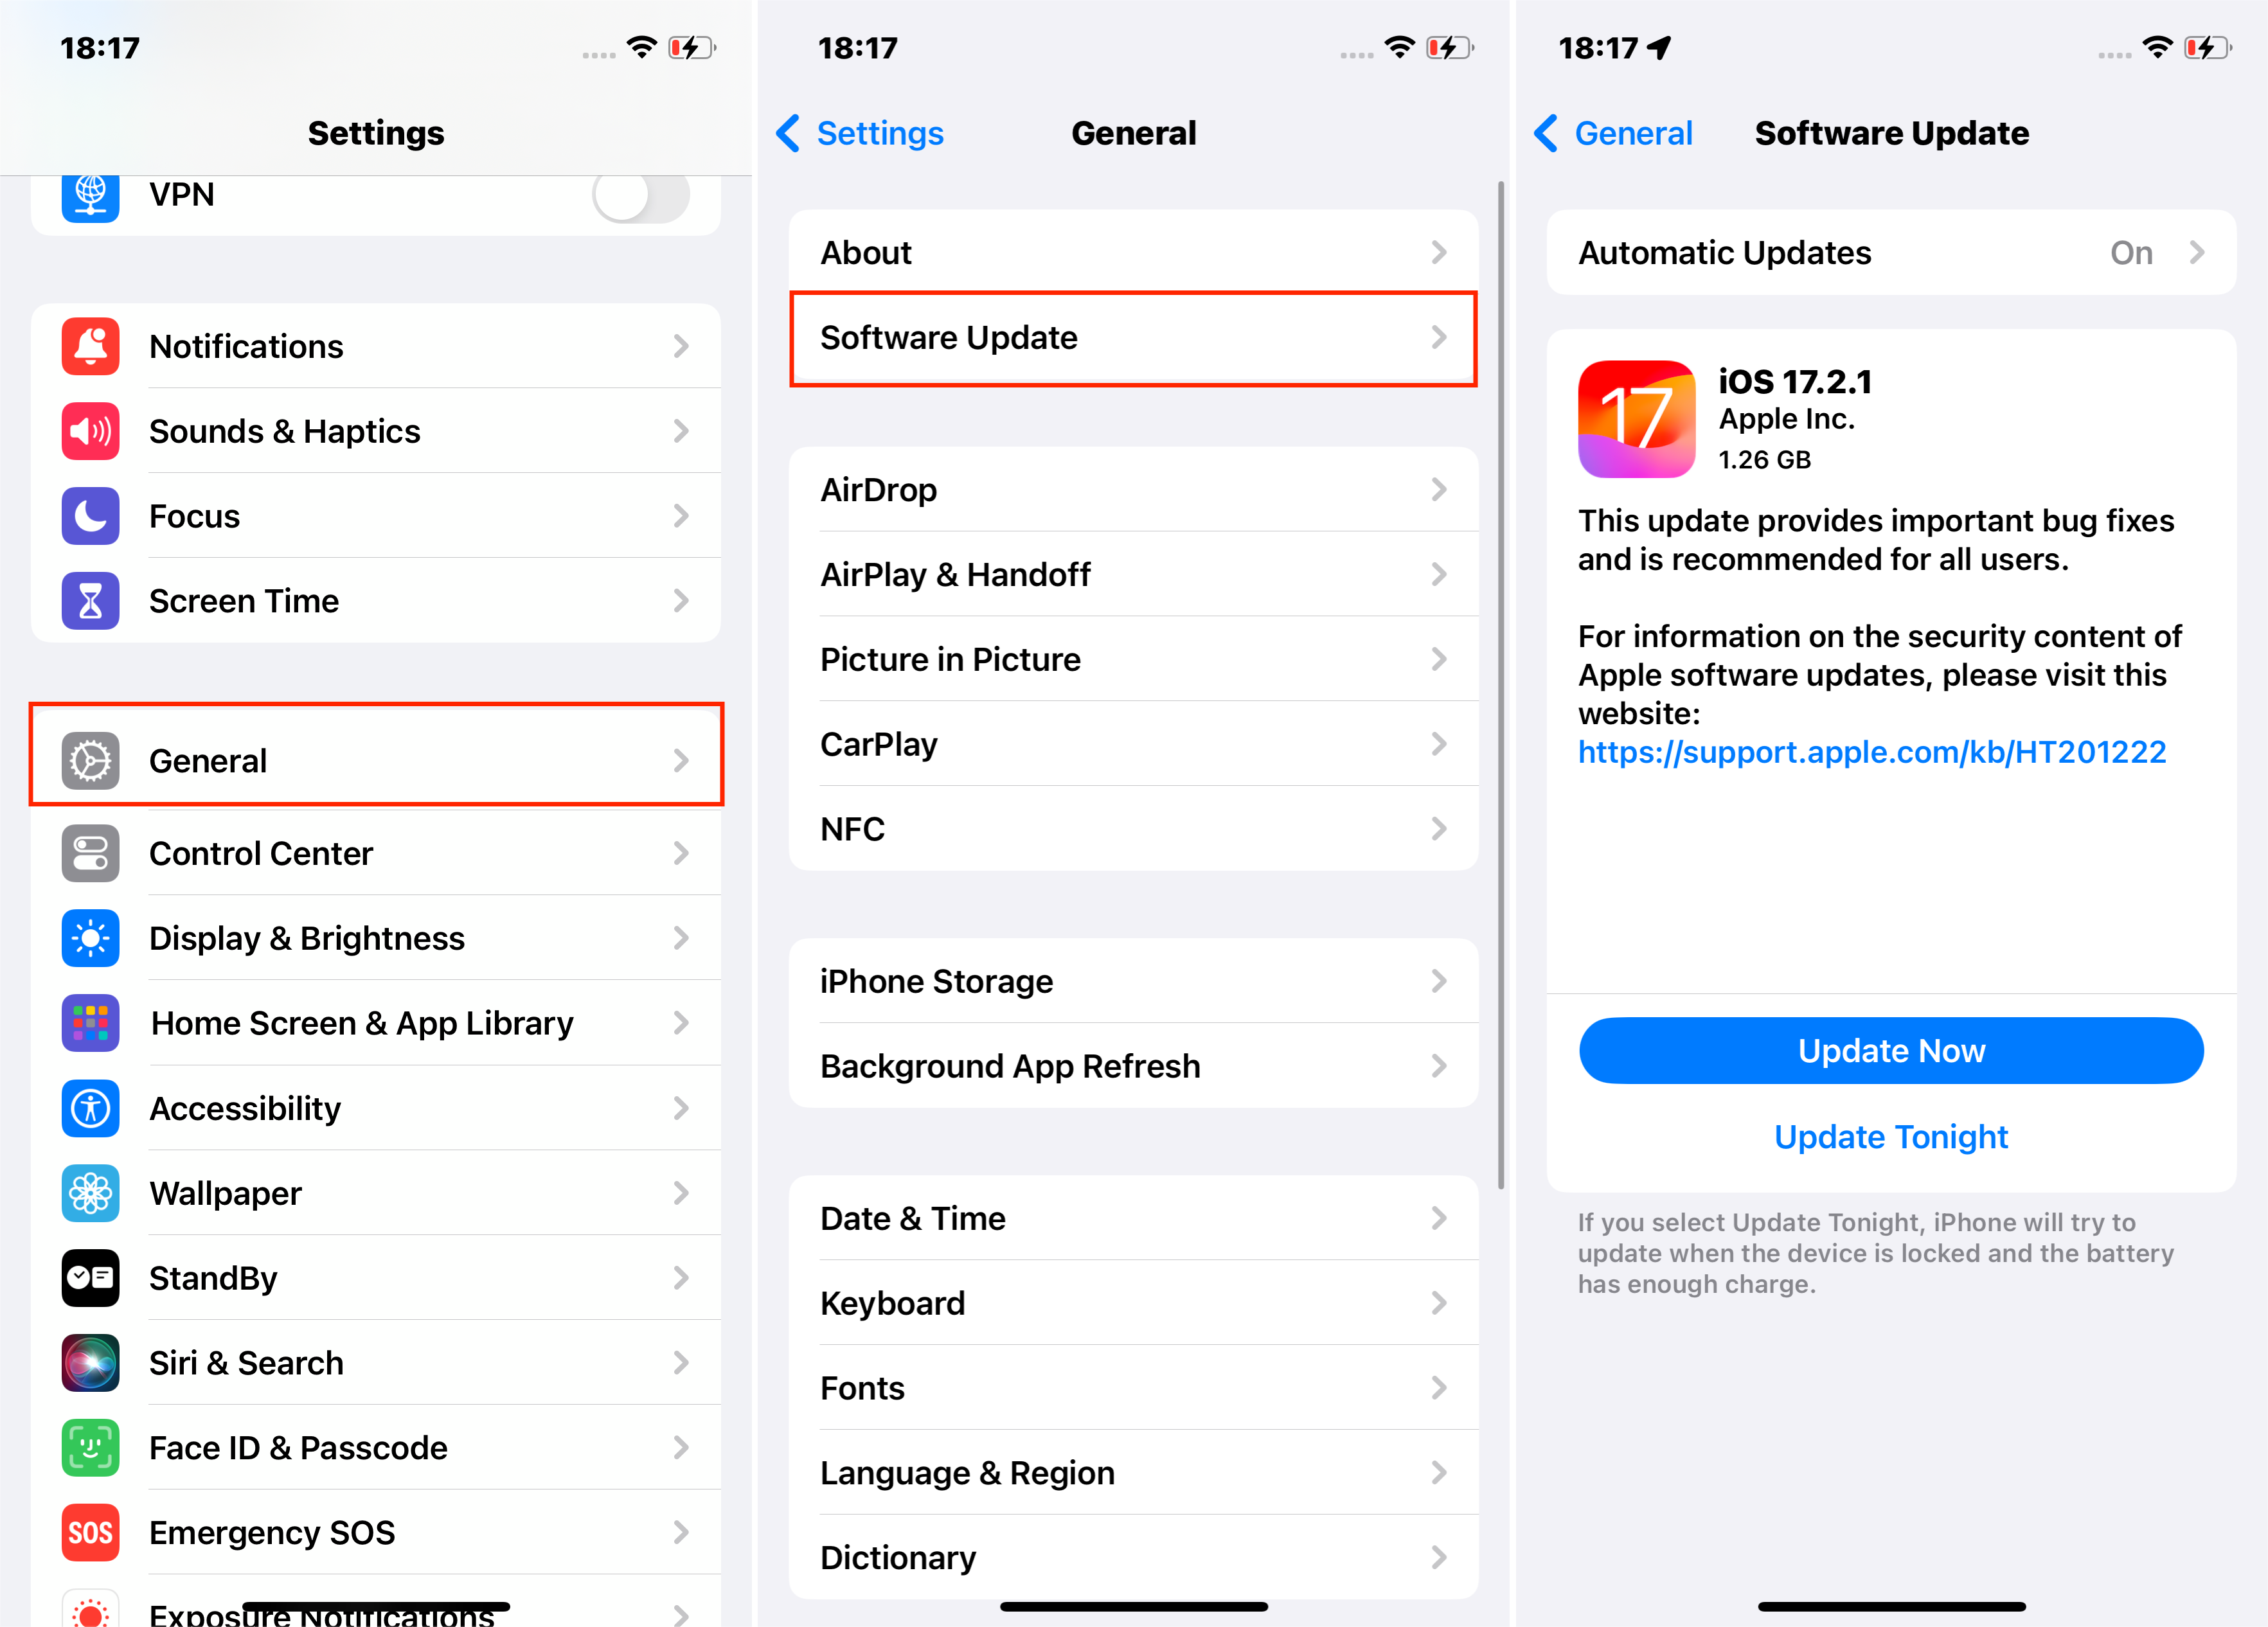
Depending on your internet speed and the size of the update, downloading it might take some time. Be patient and avoid interrupting the process.
After the download is complete, your iPhone will prompt you to install the update. Follow the on-screen instructions to complete the process.
If the hard reset does not resolve the issue and your iPhone is still stuck on verifying update, consider trying a professional iOS repair tool Mobitrix Perfix.
Method 3: Use Mobitrix Perfix to Fix Stuck on Verifying Update Screen [Most Reliable and Fastest]
Mobitrix Perfix is a specialized iOS system repair tool that can fix various iPhone issues, including update failures and screen stuck problems, without losing data.
It is super easy to use and requires only a few simple clicks. Mobitrix Perfix helps you get your iPhone out of the 'Verifying Update' screen and updates it to the latest version of iOS.
Steps:
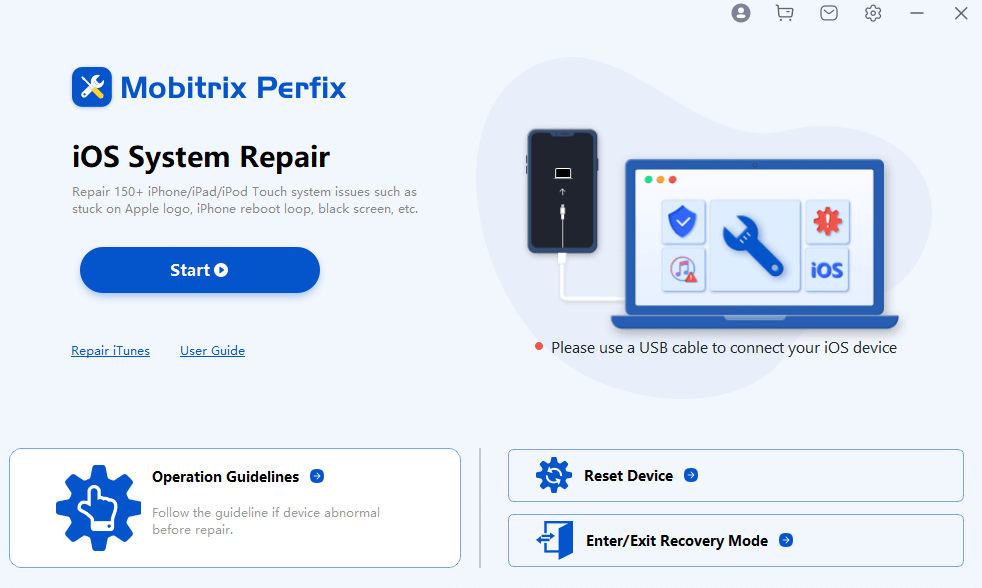
Download and install Mobitrix Perfix on your computer.
Open the software and click Start, then choose iOS Update Problem and select Fix Now.
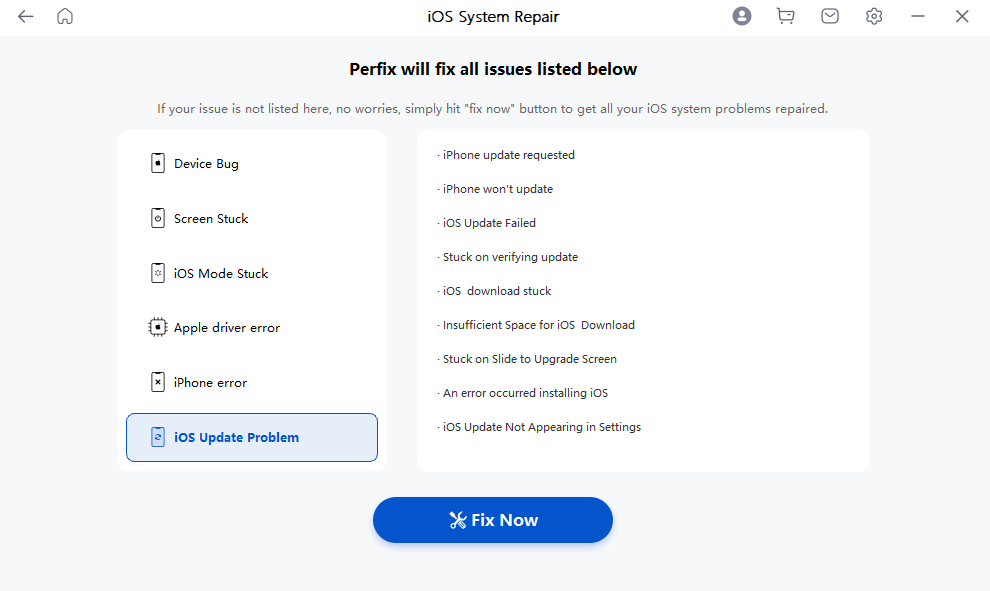
Connect your iPhone to the computer using a USB cable.
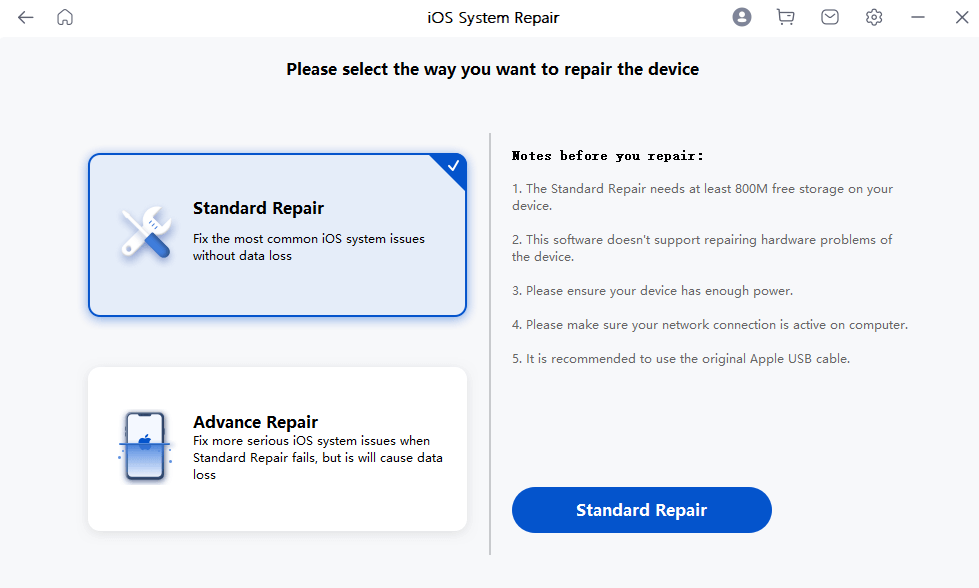
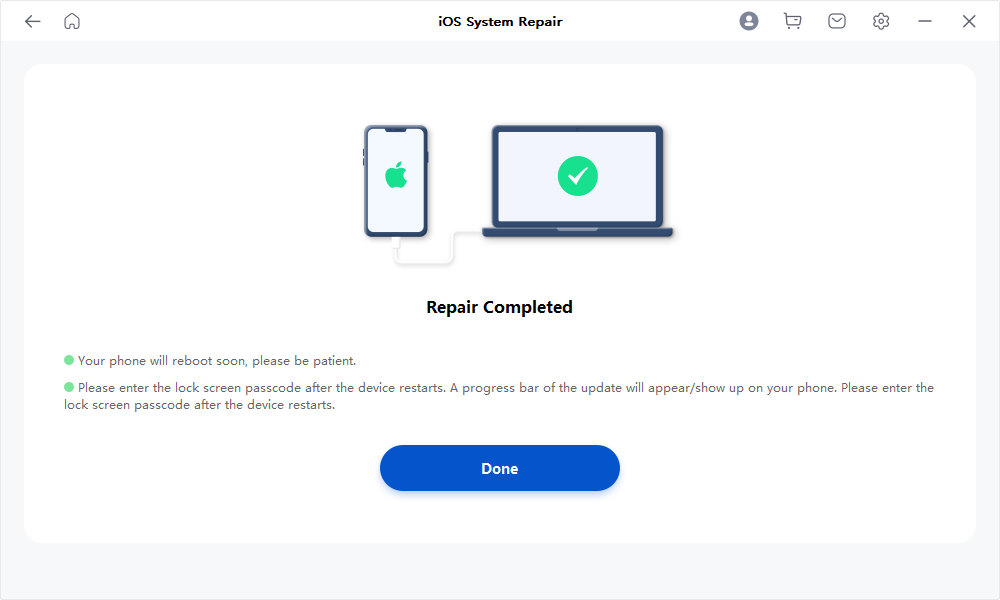
Select Standard Repair. In about 20 minutes, your iPhone should be updated to the latest iOS version, free from being stuck on verifying update.
Advantages of Using Mobitrix Perfix
User-Friendly: Designed for simplicity, it requires no technical expertise. Just a few clicks and you're set.
Wide Compatibility: Supports a range of devices from iPhone 5s through iPhone 16, and iOS versions up to iOS 18.
Safe and Secure: Ensures no data loss and maintains data privacy during the repair process.
Versatile: Capable of fixing various iOS issues, including iPhone freezing, black screen, being stuck on the Apple logo, and more.
Saves Your Time: All iPhone Software Issues Fixed in Just 20 Minutes!
High success rate: Ensures a 100% success rate.
Method 4: Update Your iPhone with iTunes or Finder
If your iPhone remains stuck on 'Verifying Updates,' consider updating to the latest iOS version using iTunes (for Windows or older macOS versions) or Finder (for macOS Catalina and newer).
Preparations:
Ensure You Have the Latest Version of iTunes or Finder
Steps:
Use a USB cable to connect your iPhone to your computer.
Launch iTunes or Finder.
Locate Your Device.
In iTunes, look for the device icon near the top left of the window.
In Finder, find your device listed under 'Locations' on the left sidebar.
Put your iPhone into Recovery Mode to proceed.
For iPhone 8 and later: Quickly press and release the Volume Up button, then the Volume Down button. Next, press and hold the Side button until you see the recovery mode screen.
For iPhone 7 and iPhone 7 Plus: Press and hold both the Volume Down button and the Sleep/Wake (Side) button. Release them when you see the recovery mode screen.
For iPhone 6s and earlier: Press and hold both the Home and the Top (or Side) buttons simultaneously until you see the recovery mode screen.
Update Your iPhone.
Once your iPhone is in Recovery Mode and is detected by iTunes or Finder, you'll be prompted with options to 'Check for Update' or 'Restore iPhone'.
Choose 'Check for Update' to reinstall iOS without erasing your data.
Choose “Download and Update” again to confirm. iTunes or Finder will download and install the latest version of iOS.
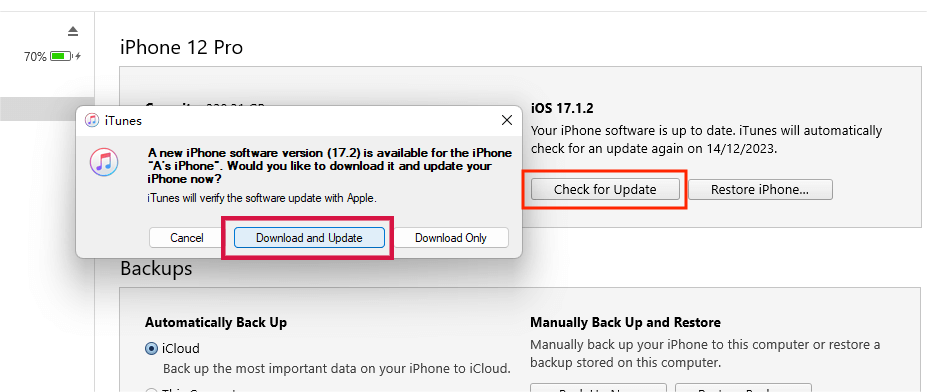
After the update process is complete, your iPhone will restart. You can then disconnect your iPhone from your computer.
Method 5: Restore Your iPhone with iTunes or Finder
If updating your iPhone with iTunes or Finder doesn't fix the 'Verifying Update' issue, try restoring your iPhone using the same tools.
Restoring your iPhone will reinstall the operating system and can often overcome issues that a simple update cannot fix.
Preparations:
Before starting, it's crucial to back up your iPhone. Restoring your iPhone will erase all data and settings. You can back up your iPhone either through iCloud or directly in iTunes or Finder.
The restoration process can take some time, depending on your internet connection and the specific iOS version being installed. Ensure your computer remains on and connected to the internet during this process.
Steps:
Connect your iPhone to your computer using a USB cable.
Open iTunes if you are using a Windows PC or an older Mac. For macOS Catalina or later, open Finder.
Choose the Restore Option. This will download the latest iOS and completely erase everything on your iPhone, then reinstall iOS.
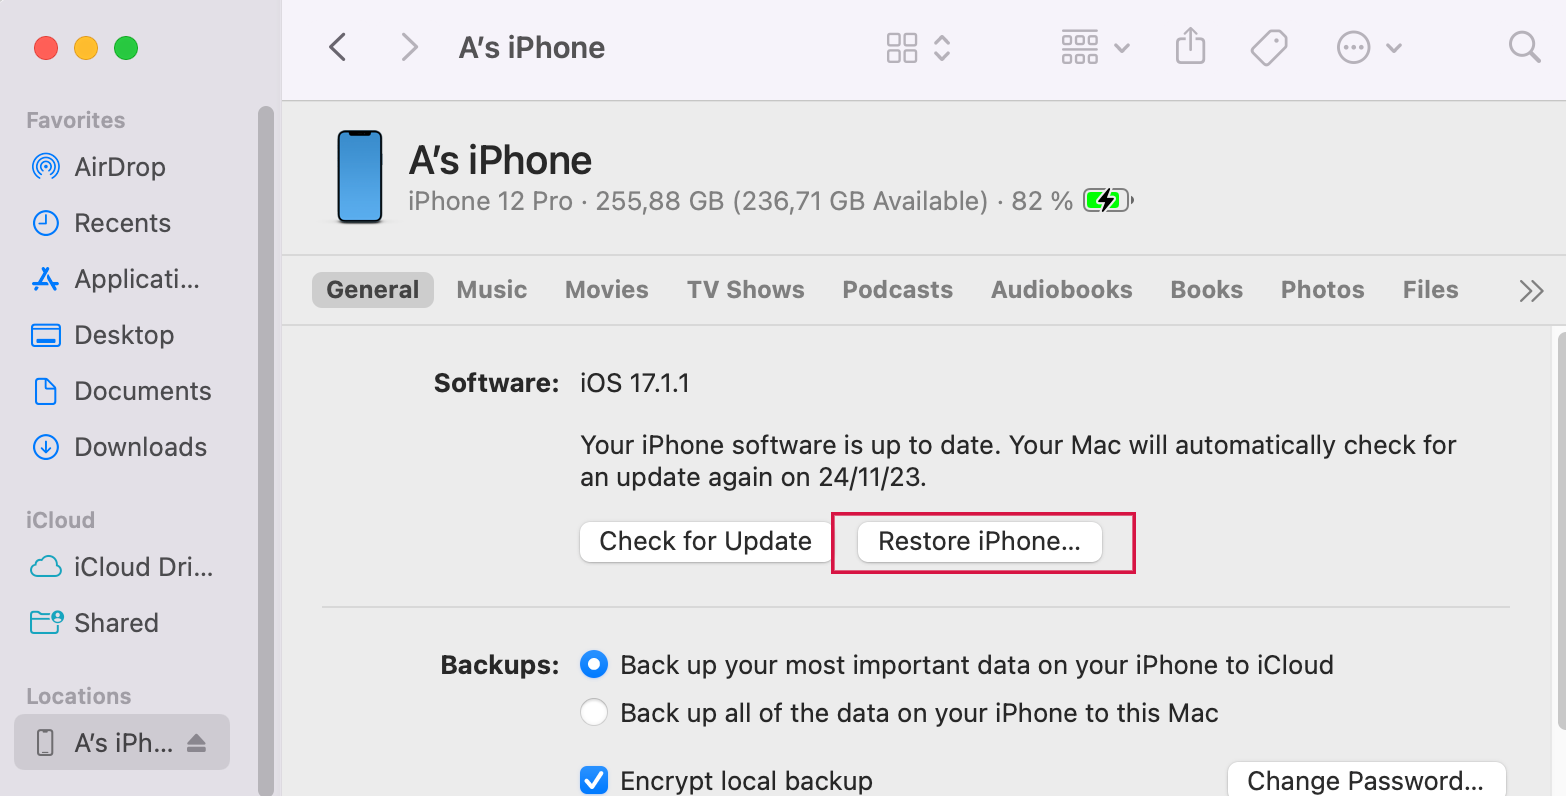
Wait for the Restoration to Complete.
After the restore process is complete, you can set up your iPhone as new or restore it from the backup you made earlier.
Remember, restoring your iPhone should be considered a last resort, as it will completely erase your device. Always ensure that you have a recent backup of your iPhone to avoid losing important data.
Method 6: Put your iPhone into DFU mode
If restoring your iPhone with iTunes or Finder does not resolve the problem, the next step to consider is putting your iPhone into DFU (Device Firmware Update) mode and then restoring it.
DFU mode is a deeper restoration process that can address more complex system issues that neither a standard update nor a restore can fix.
Preparations:
Back Up Your iPhone. As with any major restoration process, it's important to back up your iPhone to avoid losing your data.
Steps:
Use a USB cable to connect your iPhone to a computer and open iTunes (on Windows or older macOS) or Finder (on macOS Catalina or later).
Put your iPhone into DFU mode.
Once in DFU mode, iTunes or Finder will detect an iPhone in recovery mode and prompt you to restore it. Click 'Restore' and iTunes/Finder will download the firmware needed and reinstall iOS.
The DFU restore process will take some time. Keep the device connected until the process is complete and your iPhone restarts.
After the DFU restore, set up your iPhone. You can set it up as a new device or restore it from the backup you created earlier.
Remember, DFU mode is a more advanced and somewhat risky procedure. It should be used as a last resort and only if you're comfortable following technical steps. Incorrectly using DFU mode can lead to more issues, so proceed with caution and ensure that you understand the steps before attempting.
If none of these steps work, there might be a deeper issue with your iPhone. Contact Apple Support or visit an Apple Store for professional assistance.
Remember, it's important to keep your device connected to a charger during the update process to prevent it from running out of battery. Also, ensure that your device is connected to a strong Wi-Fi network and has enough free space for the update.
What Does “iPhone Stuck on Verifying Update” Mean?
During the update process, the iPhone needs to verify the update with Apple's servers.
However, sometimes the iPhone can get stuck on this "Verifying Update" screen, and the process doesn't progress as expected. This means that the iPhone is unable to complete the verification step for some reason, which can be due to various factors like network issues, software glitches, insufficient storage, or problems with the update file itself.
When an iPhone is stuck on this screen, it typically displays a message like "Verifying update..." and doesn't proceed to the next stage of the installation process and may leave the phone in a state where it can't be used normally.
Summary
This article outlines six fixes for an iPhone stuck on "Verifying Update." It recommends Mobitrix Perfix as the quickest, most effective solution, promising to resolve the issue in 20 minutes without data loss and with a 100% success rate. If you're looking for a fast and reliable fix to return your iPhone to normal functionality, consider trying Mobitrix Perfix.

