Top 5 Ways to Install and Activate Your eSIM on iPhone
Got a new eSIM or need to transfer one to a new iPhone?
Wondering how to install and activate an eSIM? You're in the right place!
This might seem complex initially, it’s surprisingly straightforward. Our guide will walk you through the top five methods to install and activate your eSIM on your iPhone, each designed to simplify the process to just a few taps. Let’s get you connected!
What is eSIM?
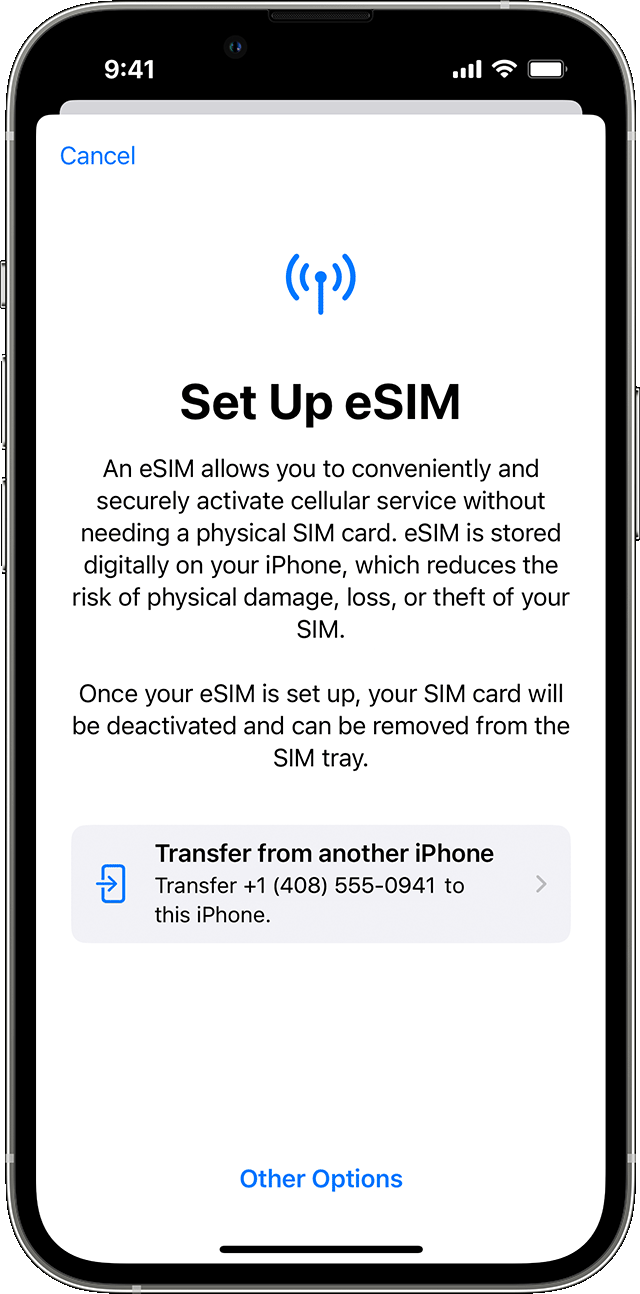
An eSIM, or embedded SIM, is a modern substitute for traditional physical SIM cards. This digital SIM lets you activate a cellular plan without needing a physical card. Instead, everything is done through software, making it easier and faster to switch carriers or plans. eSIM technology is particularly advantageous for travelers and those who frequently switch between networks.
For instance, iRoamly offers versatile eSIM solutions that cater to globetrotters seeking convenient international calling and data services without the hassle of physical SIM cards.
Preparing to Install Your eSIM
Before you install your eSIM, there are a few checks you need to perform to ensure a smooth setup:
Check Device Compatibility: First, confirm that your iPhone supports eSIM technology. Most newer iPhone models from the XR and XS onwards include this feature.
Carrier Status: It's crucial to verify that your iPhone is unlocked. This means that it isn't tied to a specific carrier and can support an eSIM from any provider.
Prepare eSIM QR Code: Finally, have your eSIM QR code ready. This code is typically provided by your eSIM provider when you purchase a plan and is essential for the installation process.
Now, let’s walk through how to get eSIM up and running on your iPhone.
Way 1: Steps to Direct Installation via the App
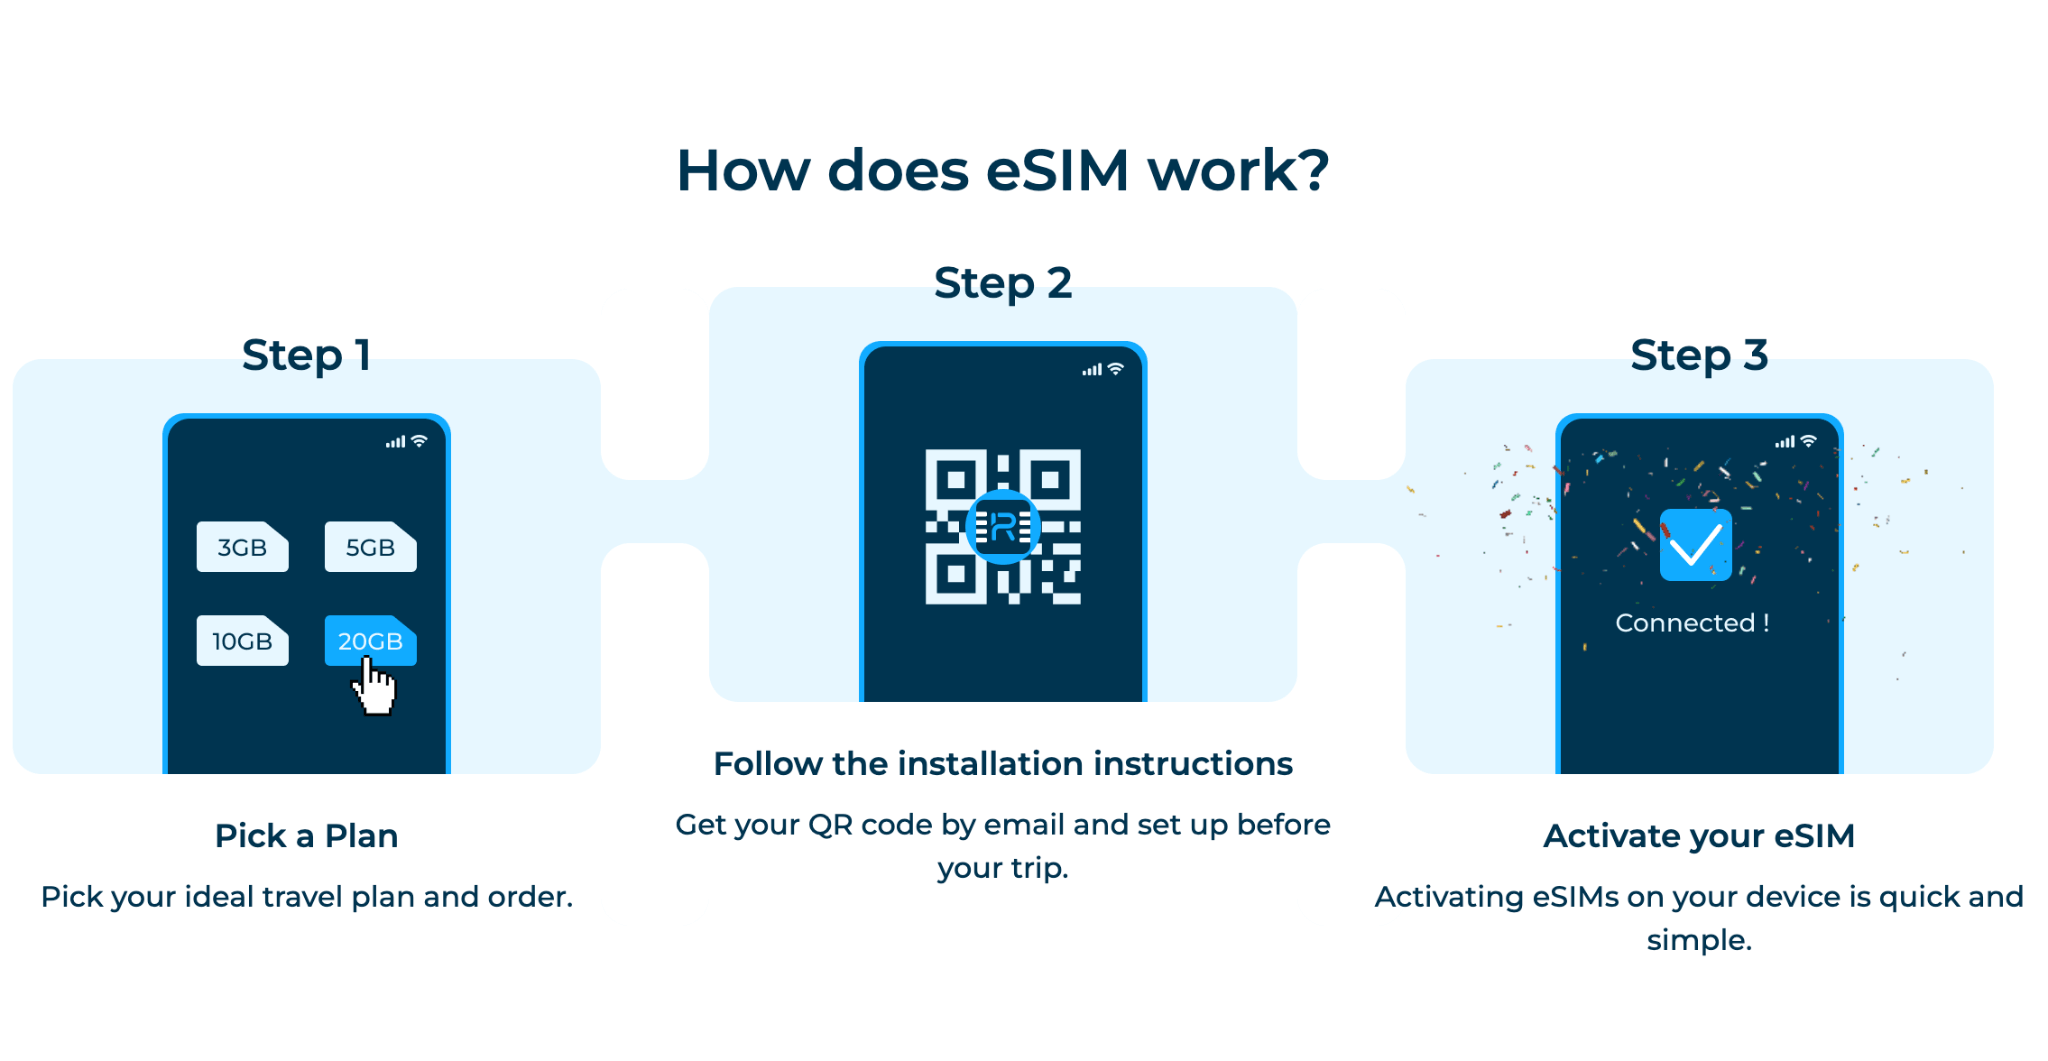
Alright, let’s dive into the first method: Direct Installation via the App.
With iOS 17.4 and later, Apple has further simplified the eSIM installation process through the use of Universal Links. These links make the setup nearly automatic, removing the need for manual entry or scanning QR codes.
Here’s how you can install your eSIM using a Universal Link:
Receive Universal Link: Your eSIM provider will send you a Universal Link via email, in-app or through their service portal. This link contains all the necessary details like the SM-DP+ Address and Activation Code.
Click the Universal Link. The link automatically directs you to the installation process, embedding all required information for setting up your eSIM.
Follow On-Screen Instructions: The installation process is mostly automated.
You’ll be prompted to confirm certain actions: Tap “Install eSIM.” > Tap “Continue” twice to allow your eSIM to connect to the network. >
After a few minutes, once the network connection is established, tap “Done.”
Assign a label to your eSIM. For instance, choose “Primary” if you want this to be your main communication line, then tap “Continue.”
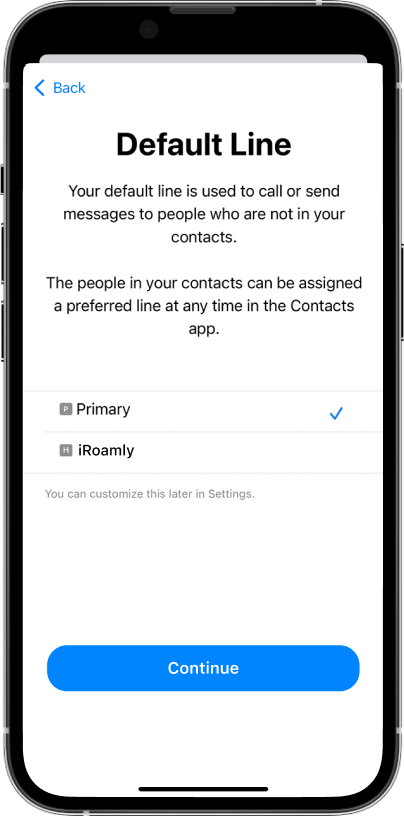
Opt to use this line for iMessage and FaceTime linked to your Apple ID by pressing “Continue.”
Set the eSIM as your preferred choice for cellular/mobile data usage by tapping “Continue” again.
Your eSIM will typically activate during the installation, but in some cases, you may choose to activate it later based on your travel plans or data needs.
Lastly, activating your eSIM when you need to use it is crucial. For guidance on this, refer to the "Activating and Accessing Data" section on this page.
Ensure your device is connected to a stable internet connection throughout the installation to avoid any disruptions.
Ensure your iPhone’s iOS is updated to the latest version to avoid any compatibility issues.
If you encounter any issues during the installation, restarting your iPhone can clear up minor glitches.
Way 2: Using a QR Code
If direct installation via an app isn't an option, the QR code method is your go-to.
Steps:
Obtain the QR Code: Your eSIM provider will send you a QR code. This might be via email, or you could find it in your user account on the provider's website. If you haven't received one, get in touch with your provider.
Prepare Your Devices: You’ll need two devices for this. One will display the QR code—it could even be a computer screen or a printed piece of paper. The other device, your iPhone, will scan the code.
Start the Setup: On your iPhone, go to ‘Settings > Cellular’ or ‘Settings > Mobile Data’ and then tap ‘Add Cellular Plan’ or ‘Add Mobile Data Plan’.
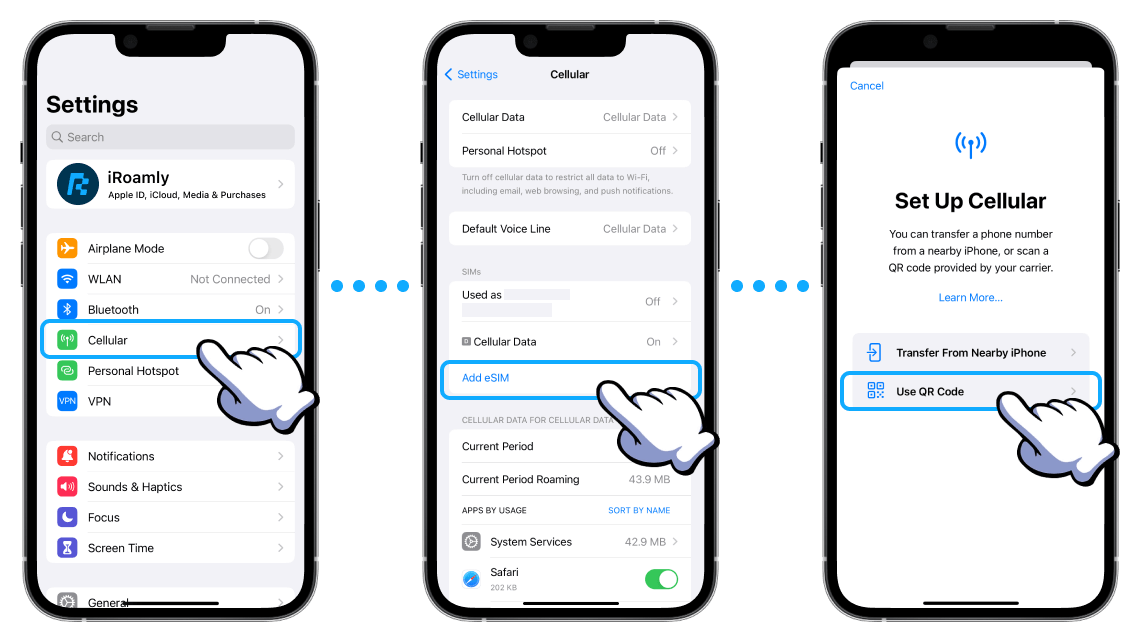
Scan the QR Code: Use your iPhone’s camera to scan the QR code. If it’s more convenient, you can also save the QR code image to your phone and upload it directly from your photo album.
Label Your eSIM: After scanning, you’ll get the option to label your eSIM. You can choose from the default labels or create a custom one for easy identification later.
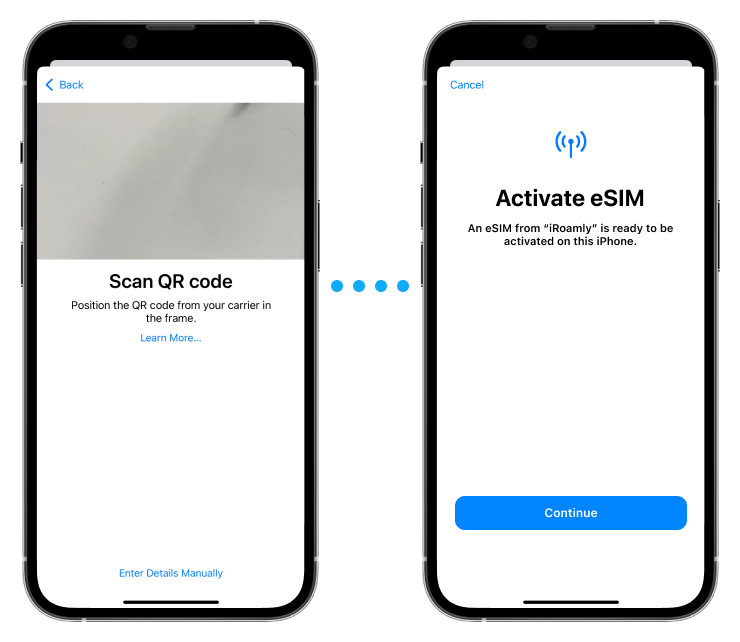
Set as Default Line: On the ‘Default Line’ page, select your eSIM if you want it to handle your cellular data usage.
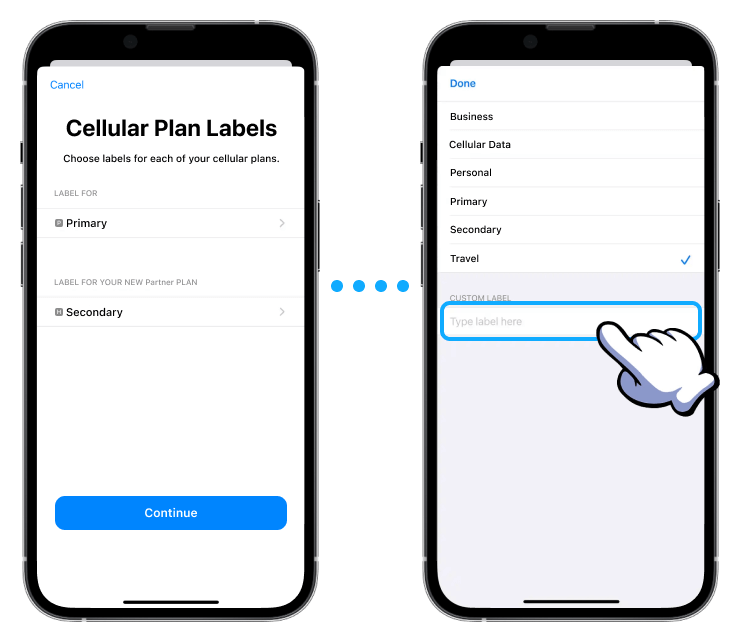
Finalize: Your new eSIM should now be active and appear under your Cellular or Mobile Data Plans settings.
Activate eSIM: Lastly, activating your eSIM when you need to use it is crucial. For guidance on this, refer to the "Activating and Accessing Data" section on this page.
If you encounter issues during scanning, ensure sufficient light and the QR code is not damaged or blurred.
Remember, this method allows you to manage multiple eSIM profiles on the same device, making it ideal for frequent travelers or those who need separate numbers for work and personal use.
Way 3: Manual Installation
If you lack a second device for scanning a QR code, don't worry. Manually setting up your eSIM is a reliable alternative, though it takes a bit more effort.
Here’s how to manually set up your eSIM:
Contact your eSIM provider and request the necessary information for manual setup. This typically involves two crucial pieces of information: the SM-DP+ Address and the Activation Code.
On your iPhone, go to ‘Settings,’ then ‘Cellular,’ and tap on ‘Add Cellular Plan.’
You'll see an option that says ‘Enter Details Manually.’ Tap on it to proceed.
Here, you’ll need to enter the SM-DP+ address, the activation code, and possibly other details your provider has given you.
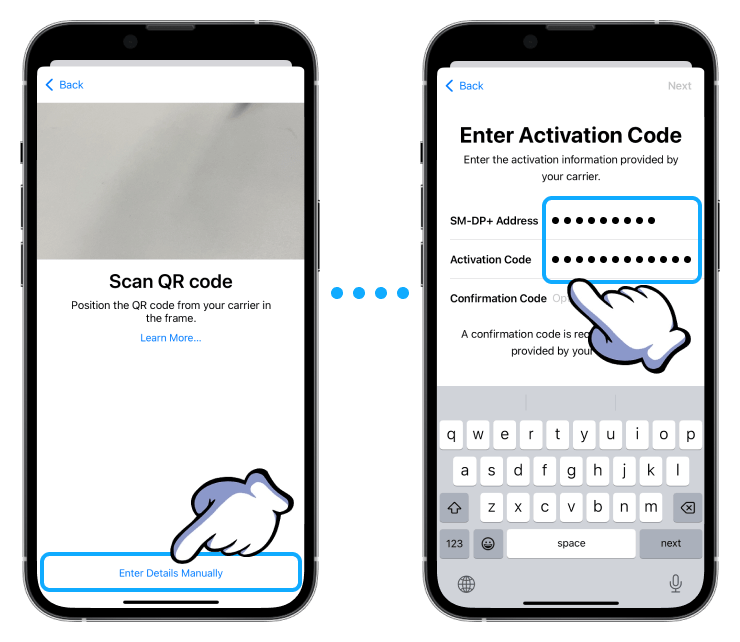
The iPhone will guide you through the rest of the setup process. Follow the prompts to integrate your eSIM into your iPhone's data plan.
Once the setup is complete, you’ll have the option to label your eSIM. This helps identify it later, especially if you plan to use multiple eSIMs.
Decide which functions (like calls, messages, and data) you want to assign to this eSIM.
Activate eSIM: Lastly, activating your eSIM when you need to use it is crucial. For guidance, refer to this page's "Activating and Accessing Data" section.
Double-check the information you enter during setup to avoid errors that could delay activation.
If you encounter issues during the manual setup, quickly restarting your iPhone might help refresh the settings and complete the installation.
Way 4: Using eSIM Quick Transfer
eSIM Quick Transfer is a feature designed to make your life easier when upgrading to a new iPhone, especially if you're moving to an eSIM-only model like the iPhone 14 or 14 Pro in the US. This method allows you to seamlessly transfer your phone line from an old iPhone to a new one without needing a physical SIM card.
When to Use It:
You're upgrading to an eSIM-compatible iPhone.
Both your old and new iPhones are running iOS 16 or later.
Your carrier supports eSIM transfer without direct contact (most carriers do).
How to Use eSIM Quick Transfer:
Initiate on New iPhone:
Navigate to Settings > Cellular and tap Add Cellular Plan. In some regions, this might be under Mobile Data.
Choose Transfer from a Nearby iPhone. If this option isn’t available, you might need to use the QR code method described earlier.

Prepare Both Devices:
Turn on Bluetooth on both iPhones to allow them to communicate.
Keep both devices close together during the transfer process to ensure smooth communication.
Follow On-Screen Instructions:
On your new iPhone, you'll follow prompts to start the transfer. You may need to enter a verification code displayed on your new device into your old one to authenticate the transfer.
Follow any additional instructions that appear on either device to complete the setup.
Finalize the Transfer:
Once you enter all the necessary information, your carrier will likely send a notification to finalize the setup. Follow any last steps provided in this notification.
After the transfer, your old iPhone’s SIM will be deactivated, and your new iPhone will take over the line through its eSIM.
Discard the Old SIM:
Since your phone line is now associated with the eSIM on your new iPhone, the physical SIM card in your old device is deactivated and can be safely disposed of.
If your previous phone isn’t an iPhone or the transfer feature doesn’t work as expected, contact your carrier to transfer the phone number.
Way 5: Convert a Physical SIM to an eSIM
What is it? Converting a physical SIM to an eSIM is a convenient option for those who prefer a digital-only approach without needing a physical SIM card. This process, often referred to as "Quick convert," allows you to transition your existing cellular plan from a physical SIM card to your device's embedded eSIM.
When to Use It:
You have a compatible iPhone model that supports eSIM technology.
Your carrier offers the conversion service without the need to physically visit a store.
You want to free up the SIM slot for potentially using dual SIM capabilities or simply prefer not to have a physical SIM.
How to Convert Your Physical SIM to an eSIM:
On your iPhone, open Settings > Cellular.
Here, you’ll see an option that says “Convert to eSIM” or “Convert Cellular Plan” depending on your iOS version.
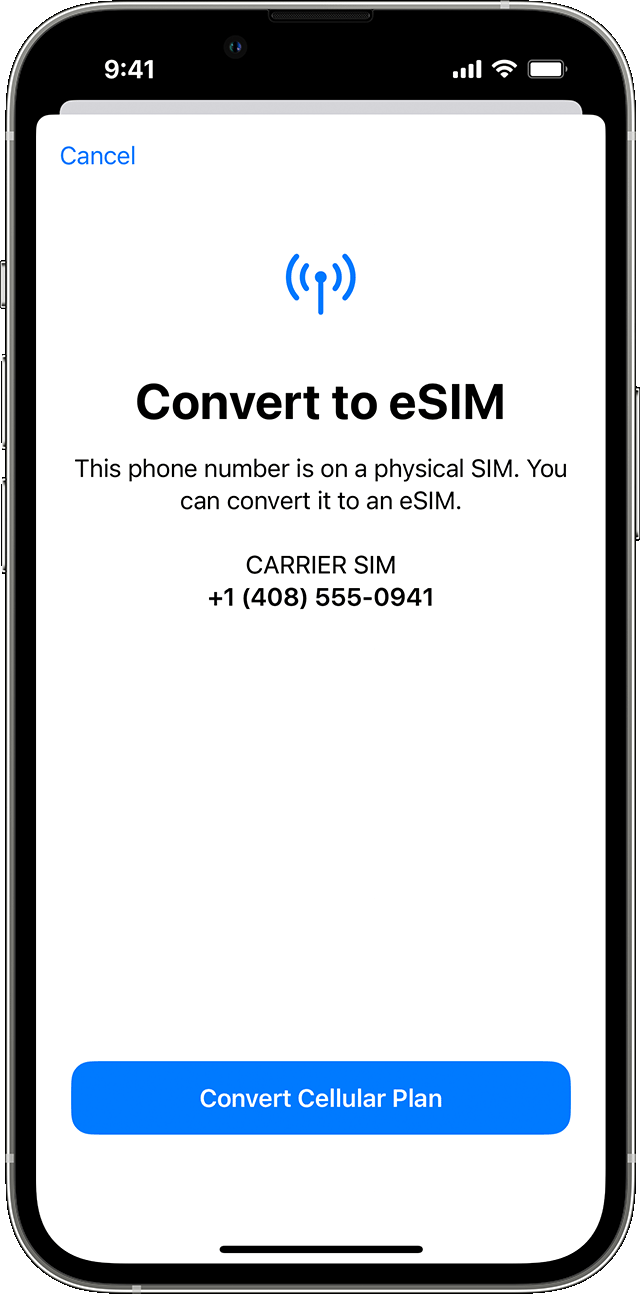
Tap on “Convert Cellular Plan”. Confirm the cellular plan you wish to convert from a physical SIM to an eSIM. This step ensures you select the correct line in case of multiple plans.
Once you confirm the plan, tap “Convert to eSIM”. Follow any additional on-screen instructions to complete the process. This might include verifying your decision or entering a confirmation code sent by your carrier.
After initiating the conversion, your iPhone will begin switching the cellular plan from the physical SIM to the eSIM.
This process may take a few minutes, and your carrier might require you to restart your device to complete activation.
Once your device restarts, return to Settings > Cellular to ensure the eSIM is listed and active.
At this point, the physical SIM becomes deactivated, and you can remove it from your device.
If you encounter any issues during the conversion, such as the option not being available or the process failing, contact your carrier directly. Some carriers may still require specific steps to be completed in-store or over the phone.
Activating and Accessing Data
Once your eSIM is installed, it's not yet active. Think of it like having a physical SIM card inserted in your phone but not turning on the device. Activation is a crucial step, as for most carriers, the validity period of your eSIM begins the moment you connect to a telecom network.
Here's how and when to activate your eSIM:
Activate When Needed: It’s best to activate your eSIM only when you’re in the country where you intend to use it. This prevents starting your service period prematurely or connecting to a network in an unintended location.
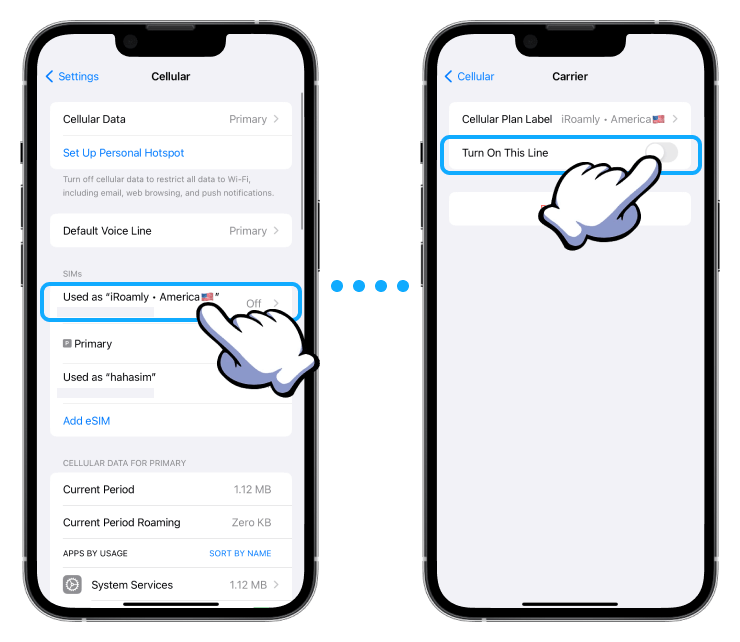
Go to ‘Settings > Cellular’ (or ‘Mobile’) on your iPhone.
Tap on your new eSIM plan. Toggle ‘TURN ON THIS LINE’ to activate the eSIM.
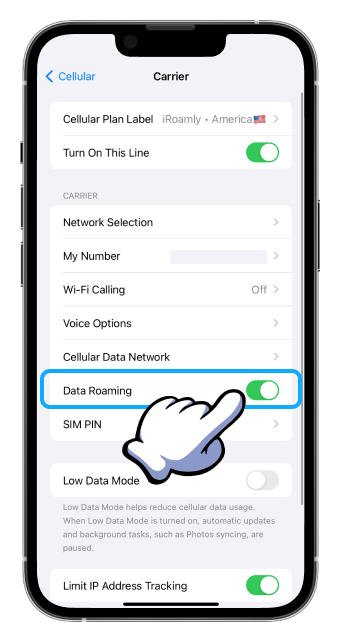
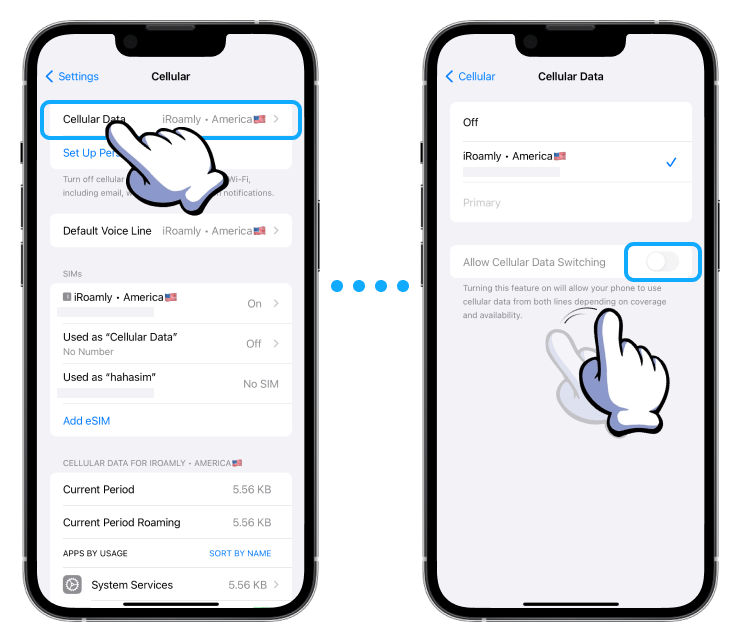
Choose your eSIM for ‘Cellular Data’ or ‘Mobile Data’. If you’re traveling or need data outside your home network, make sure ‘Data Roaming’ is enabled on your eSIM settings.
Disable ‘Allow Cellular Data Switching’ to avoid unintended charges if you have multiple SIMs.
Go to ‘Network Selection’, and turn off the ‘Automatic’ toggle. This allows you to manually select the right network, especially if your eSIM isn’t connecting automatically.
The Bottom Line
That's all there is to it! Whether you're tapping through settings, scanning a QR code, or converting your physical SIM, setting up your eSIM is straightforward and fast. In just a few steps, you'll be all set to enjoy the seamless connectivity and flexibility that eSIM technology offers.

