5-Min Fix: Quick Steps for Optimal iPhone Display Settings!
Welcome to the world of iPhone display settings, a realm often unexplored yet brimming with possibilities!
If you've ever felt like you're not fully harnessing the power of your iPhone's display, you're not alone. Many users miss out on useful features simply because they're unaware of them. This guide is your key to unlocking those hidden gems.
Dive in and discover how to tailor your iPhone's display to your needs, ensuring a more enjoyable and efficient experience with every swipe and tap. Let's dive in!
Adjust the Screen Brightness and Color on Your iPhone.
Properly adjusting your iPhone's display brightness and color settings is key to enhancing your overall experience.
Whether you're reading, browsing social media, or simply using various iPhone apps, these settings not only make viewing more comfortable but also help conserve battery life.
Steps to Manually Control Brightness:
Swipe down from the top-right corner of your screen (or up from the bottom if you have an iPhone with a Home button).
Find the Brightness icon (represented by a sun symbol), and slide your finger up or down on the icon to increase or decrease the brightness.
![]()
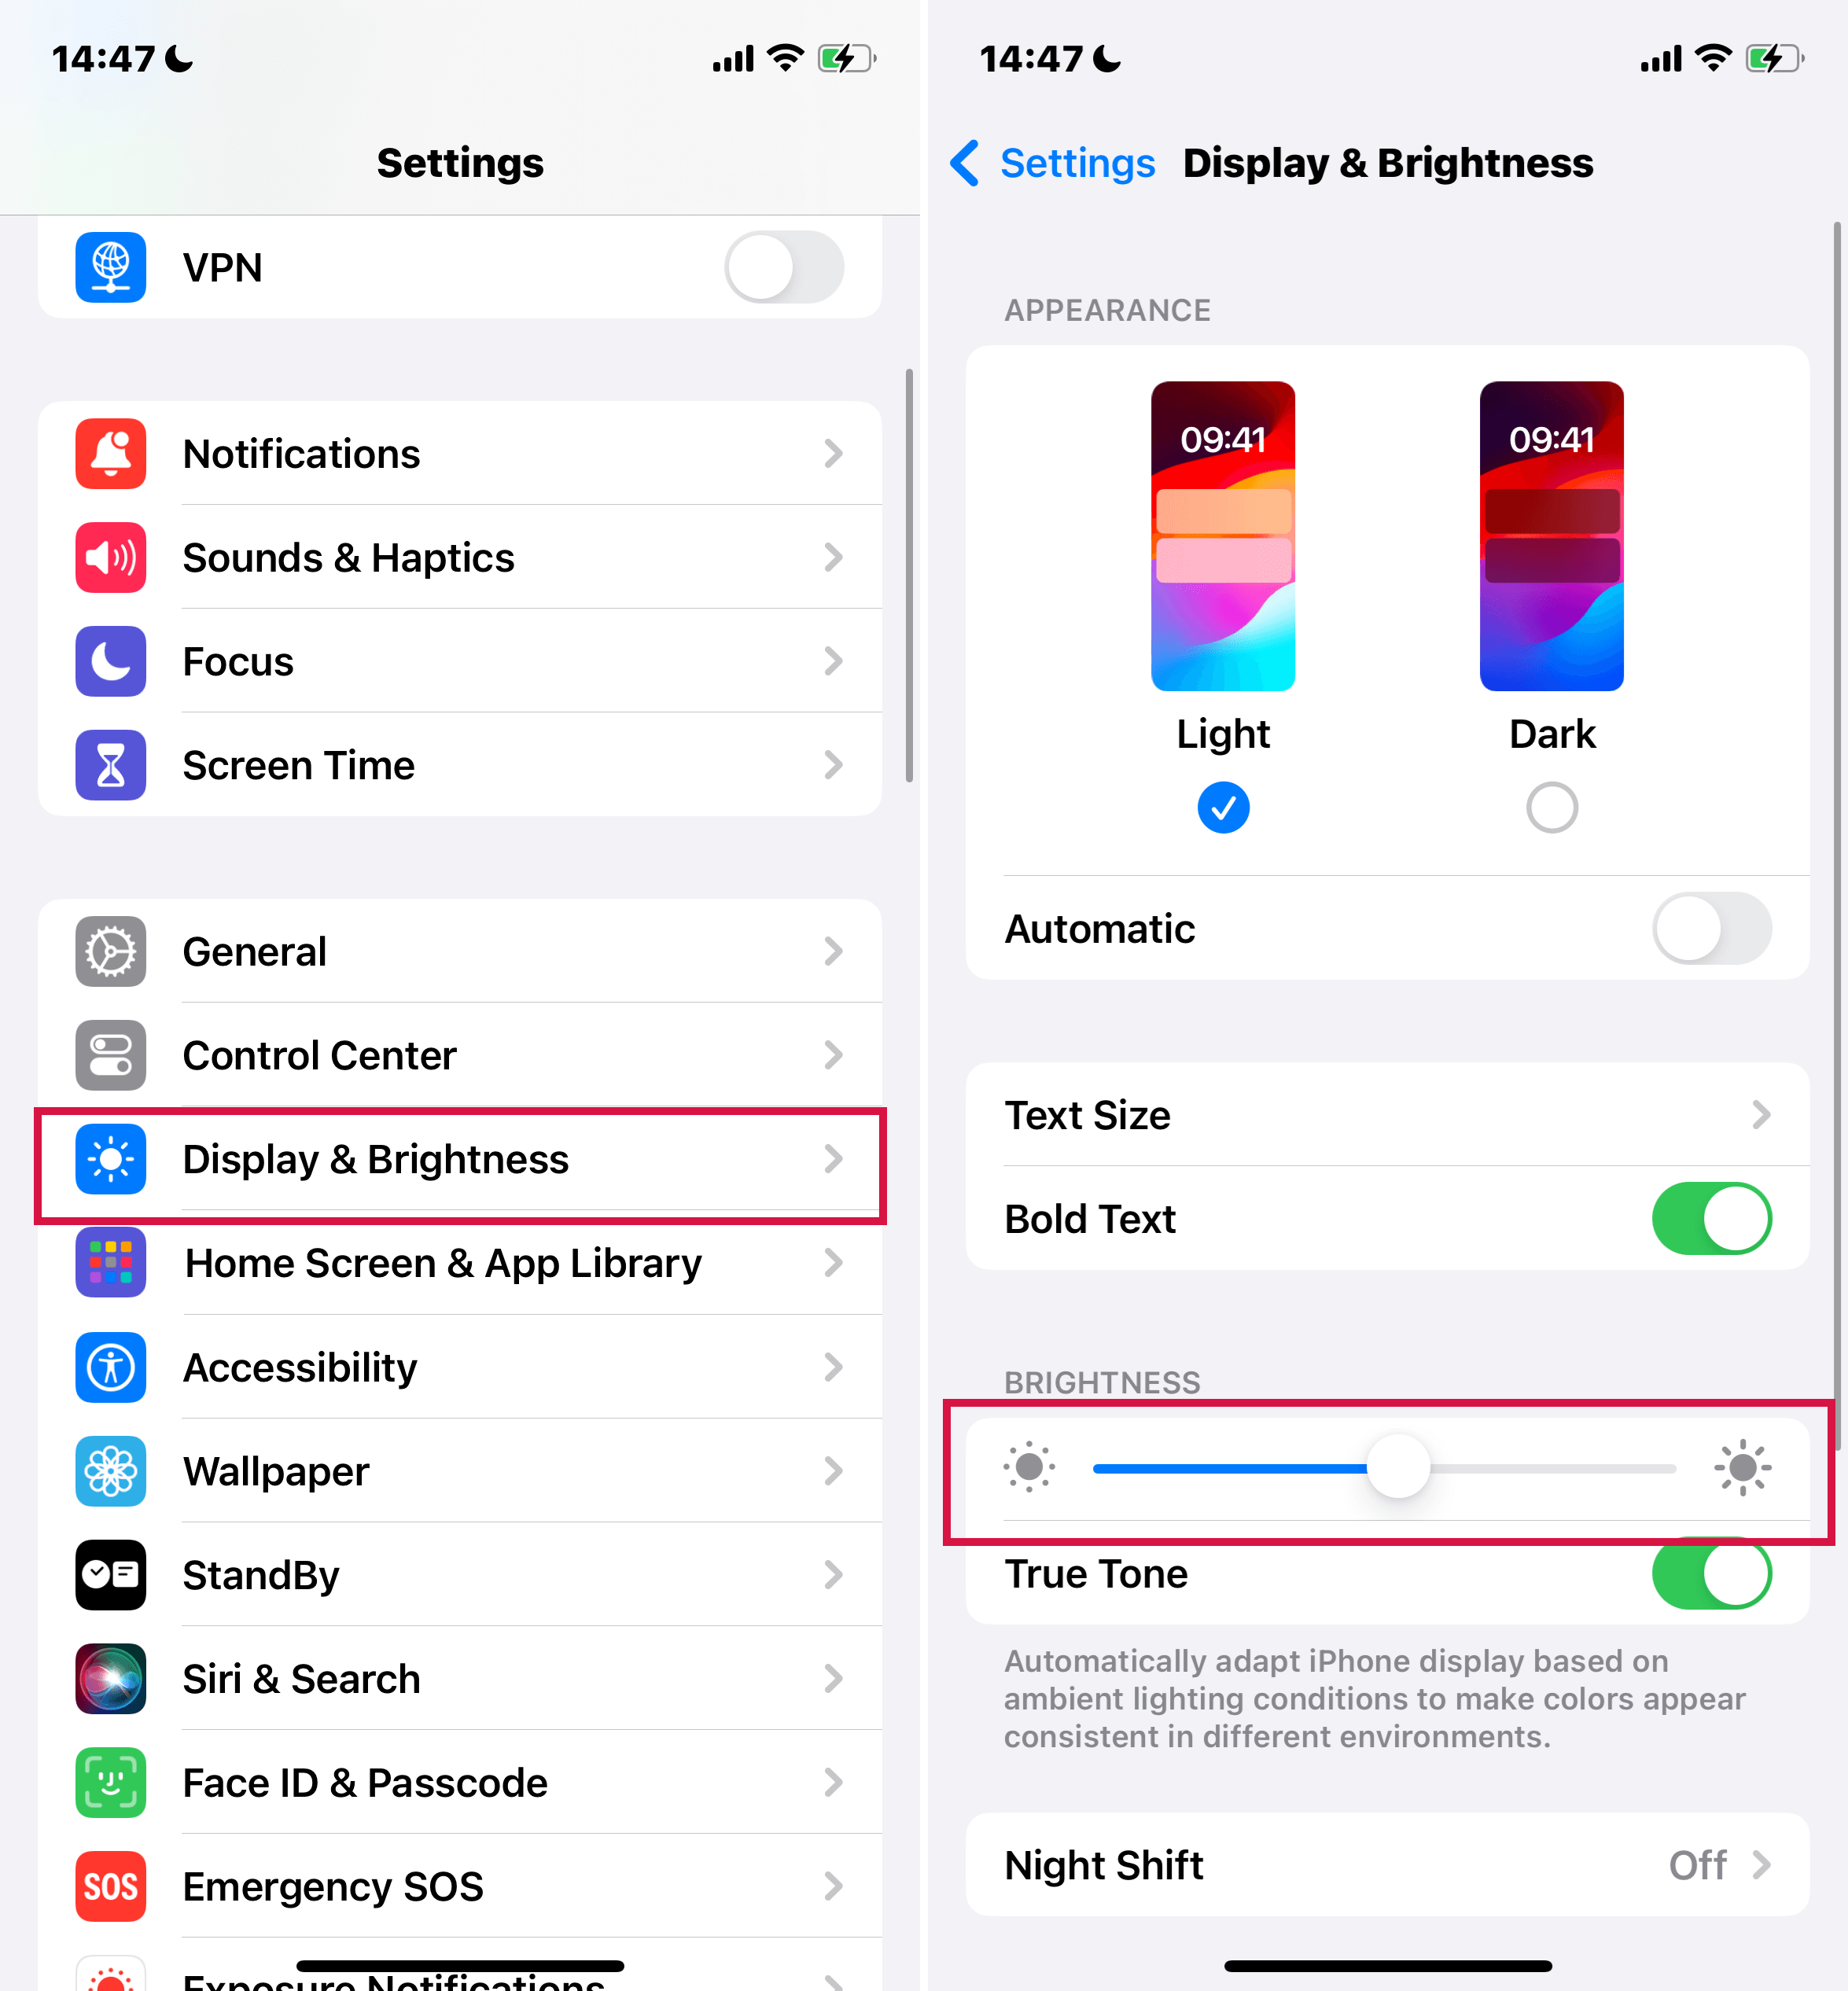
Alternatively, you can adjust brightness via the Settings app:
Open your Settings app.
Scroll down and tap on 'Display & Brightness'.
Use the brightness slider to customize your screen's brightness level.

Using Auto-Brightness on iPhone Screen
Equipped with an ambient light sensor, your iPhone features auto-brightness, automatically adjusting screen brightness to match surrounding light conditions. It helps conserve battery life by lowering brightness in darker environments.
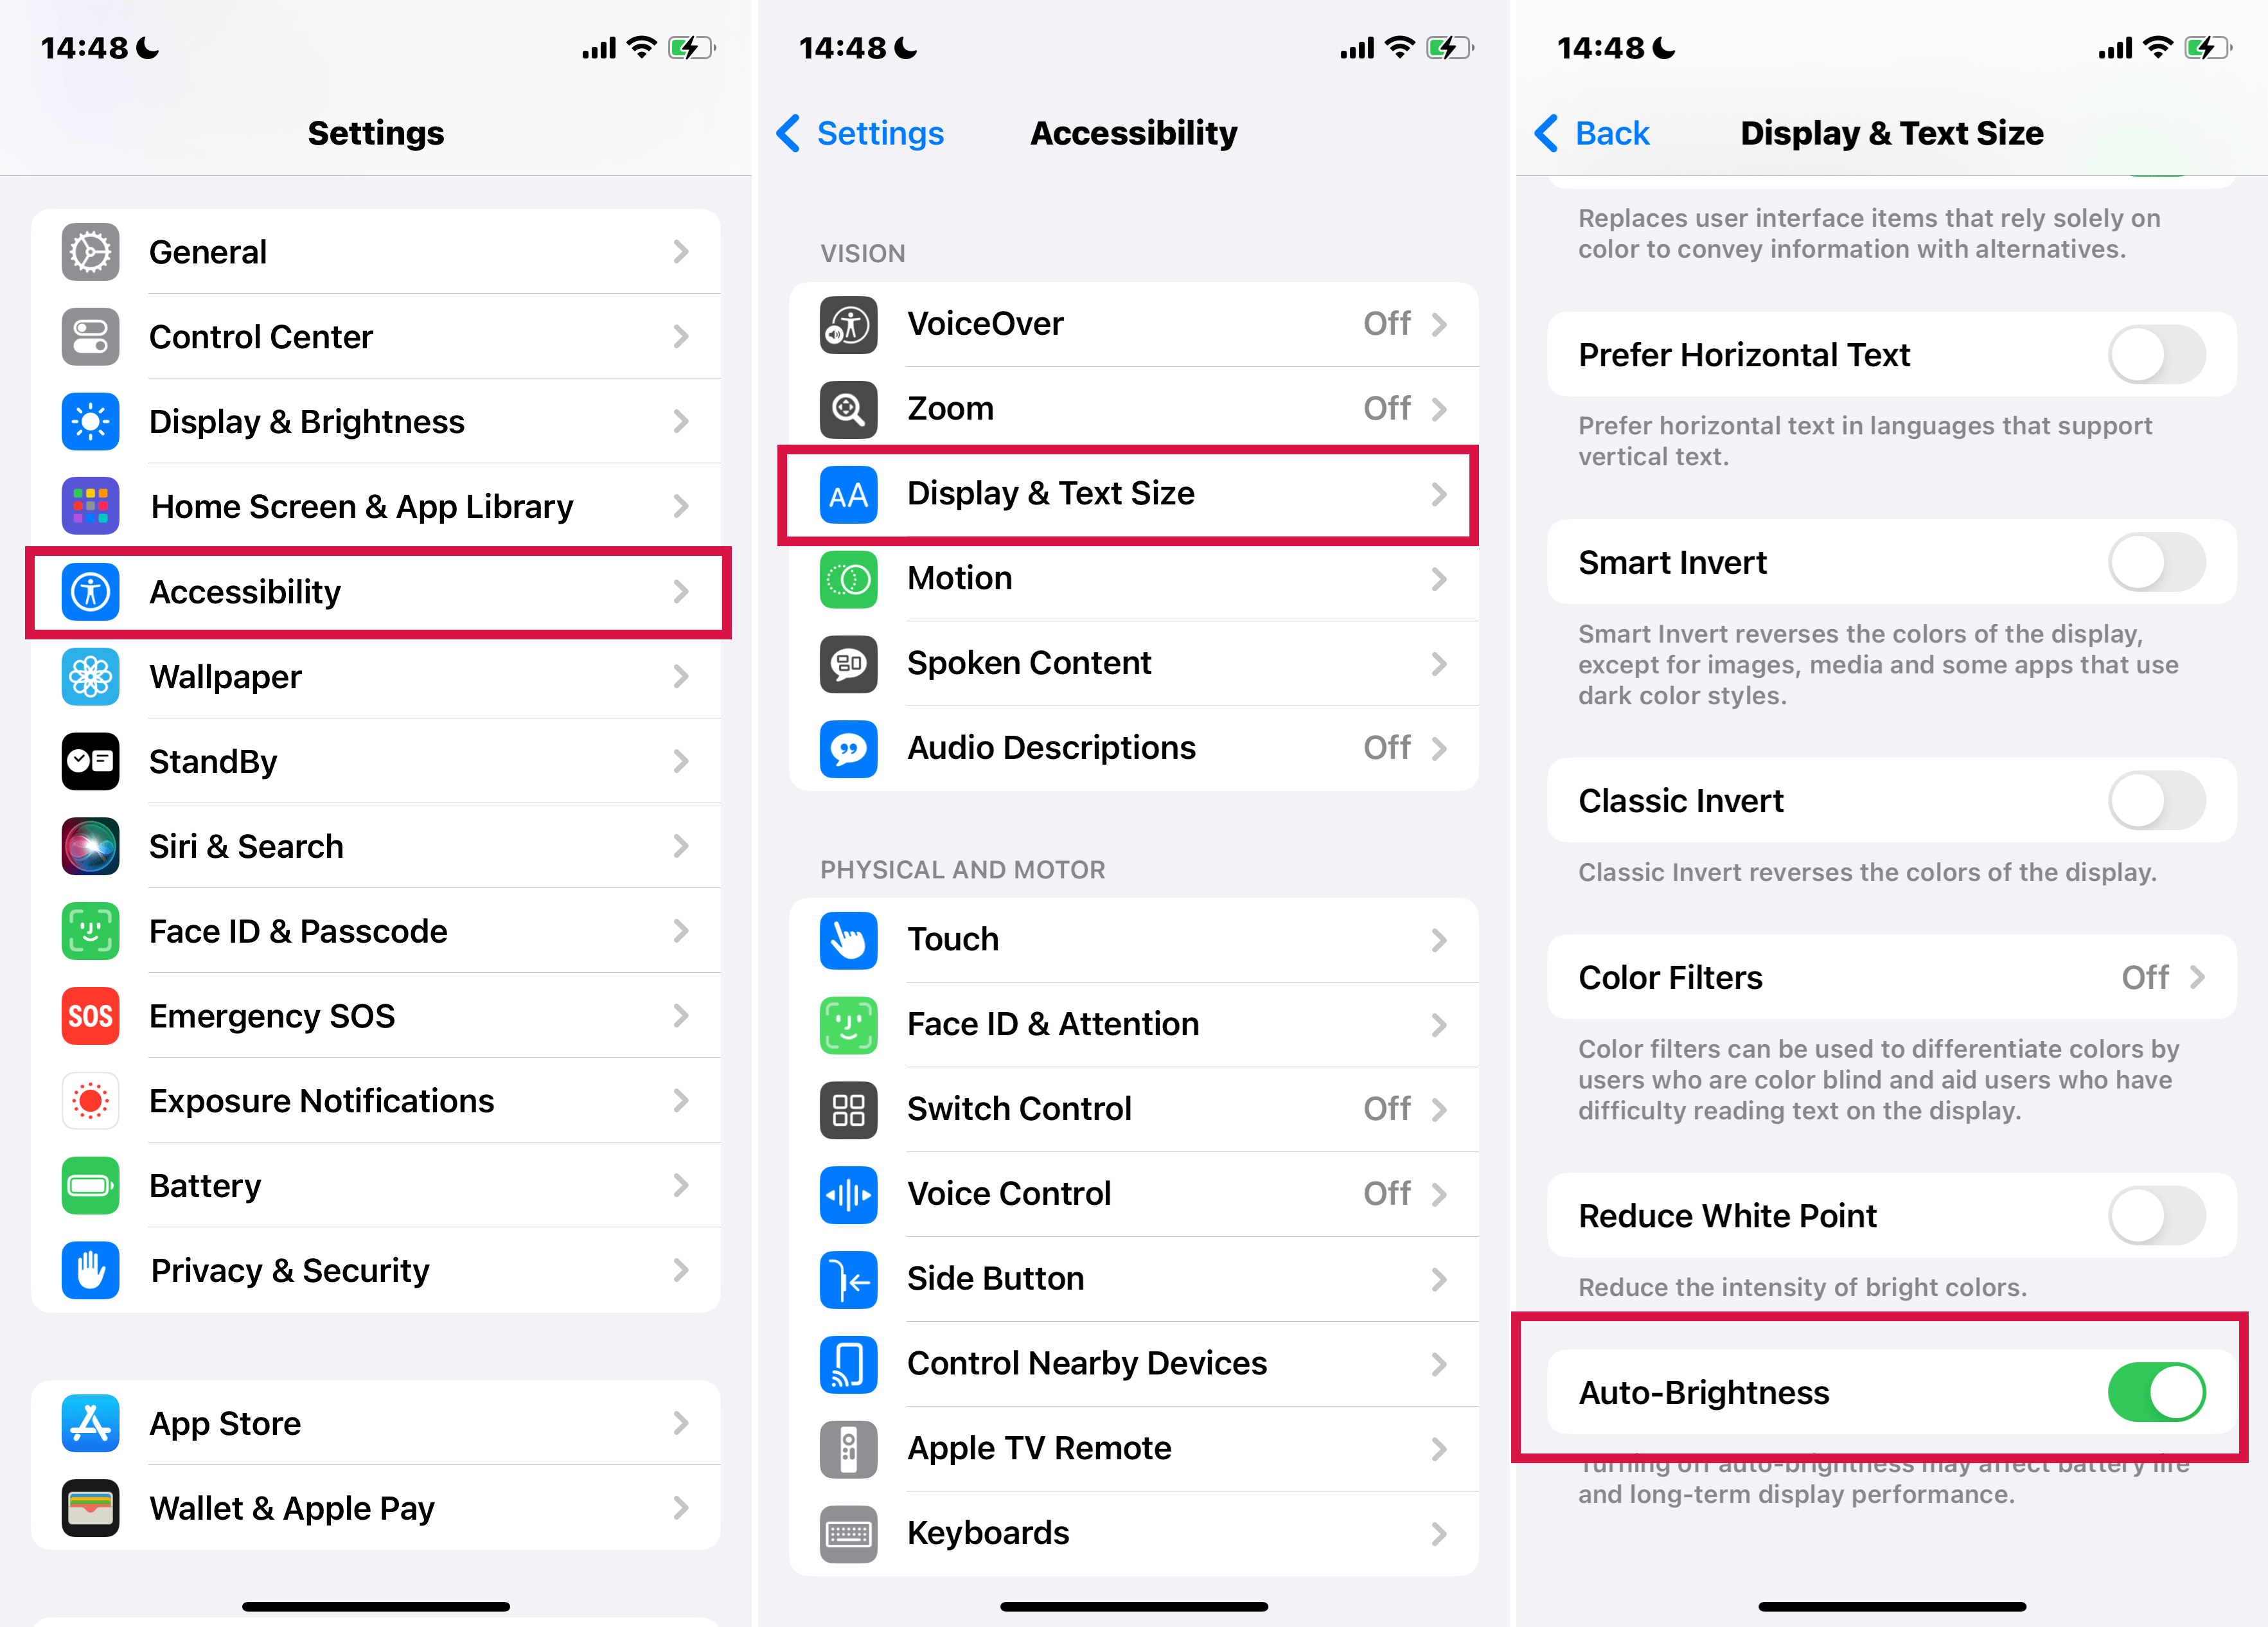
Go to Settings, then tap 'Accessibility'.
Within Accessibility, select 'Display & Text Size'.
Toggle the 'Auto-Brightness' option to enable it.
Why Use Auto-Brightness?
Tip:
Remember, though, that this feature might increase the display brightness frequently in brightly lit areas, which could lead to quicker battery drainage.
Dark Mode on Your iPhone
Dark Mode is a feature on your iPhone that offers a dark color theme across the entire interface. It's instrumental in low-light environments, such as reading in bed at night, as it reduces screen glare and is less likely to disturb others nearby.
How to Turn Dark Mode On or Off
Way 1 Manual Adjustment of Dark Mode:
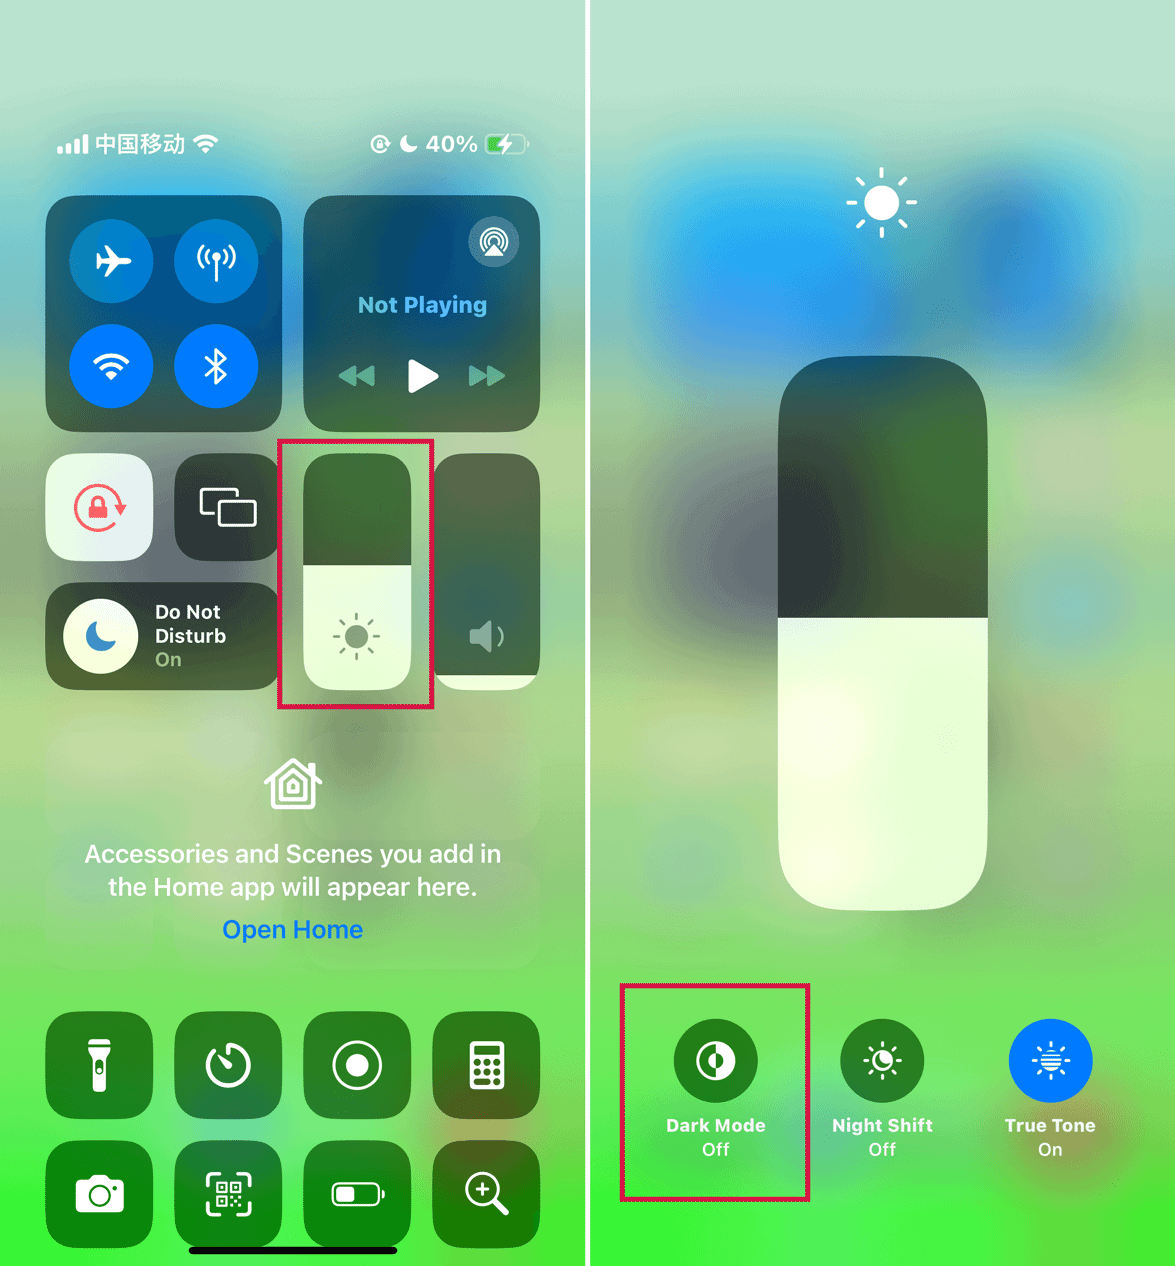
Via Control Center:
Swipe down from the top-right corner of the screen (or up from the bottom edge on models with a Home button).
Press and hold the Brightness control. Then, tap the Appearance button (depicted as a sun/moon icon) to switch between Dark and Light mode.
Via Settings:
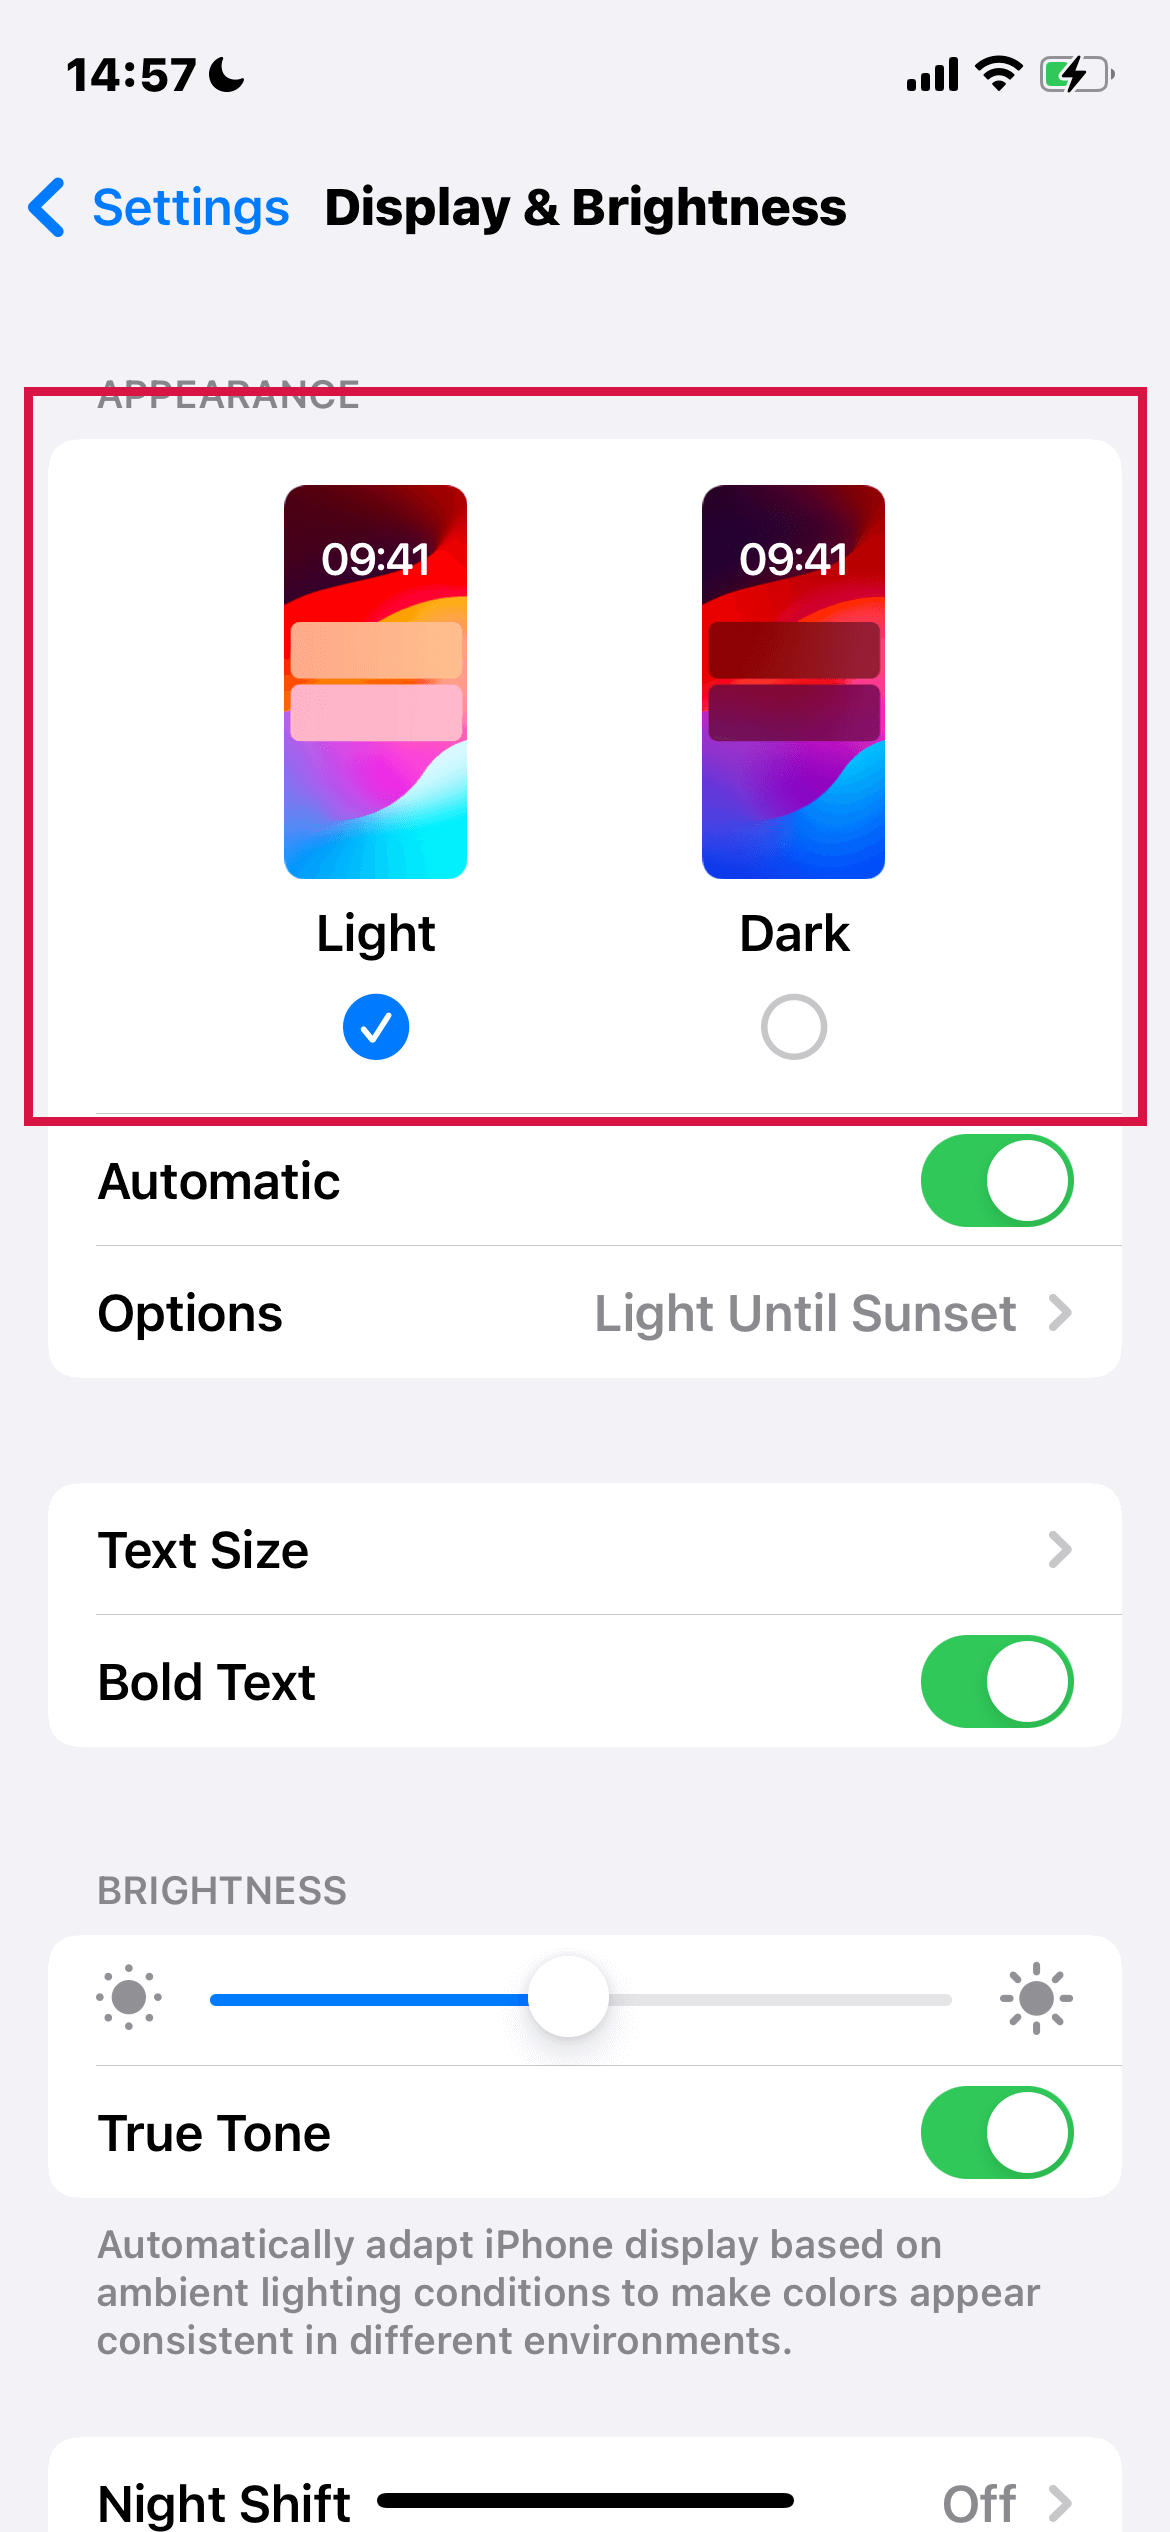
Open the Settings app on your iPhone.
Look for the 'Display & Brightness' option.
Tap on 'Dark' to enable Dark Mode, or select 'Light' to turn it off.
Setting Up an Automatic Dark Mode Schedule:
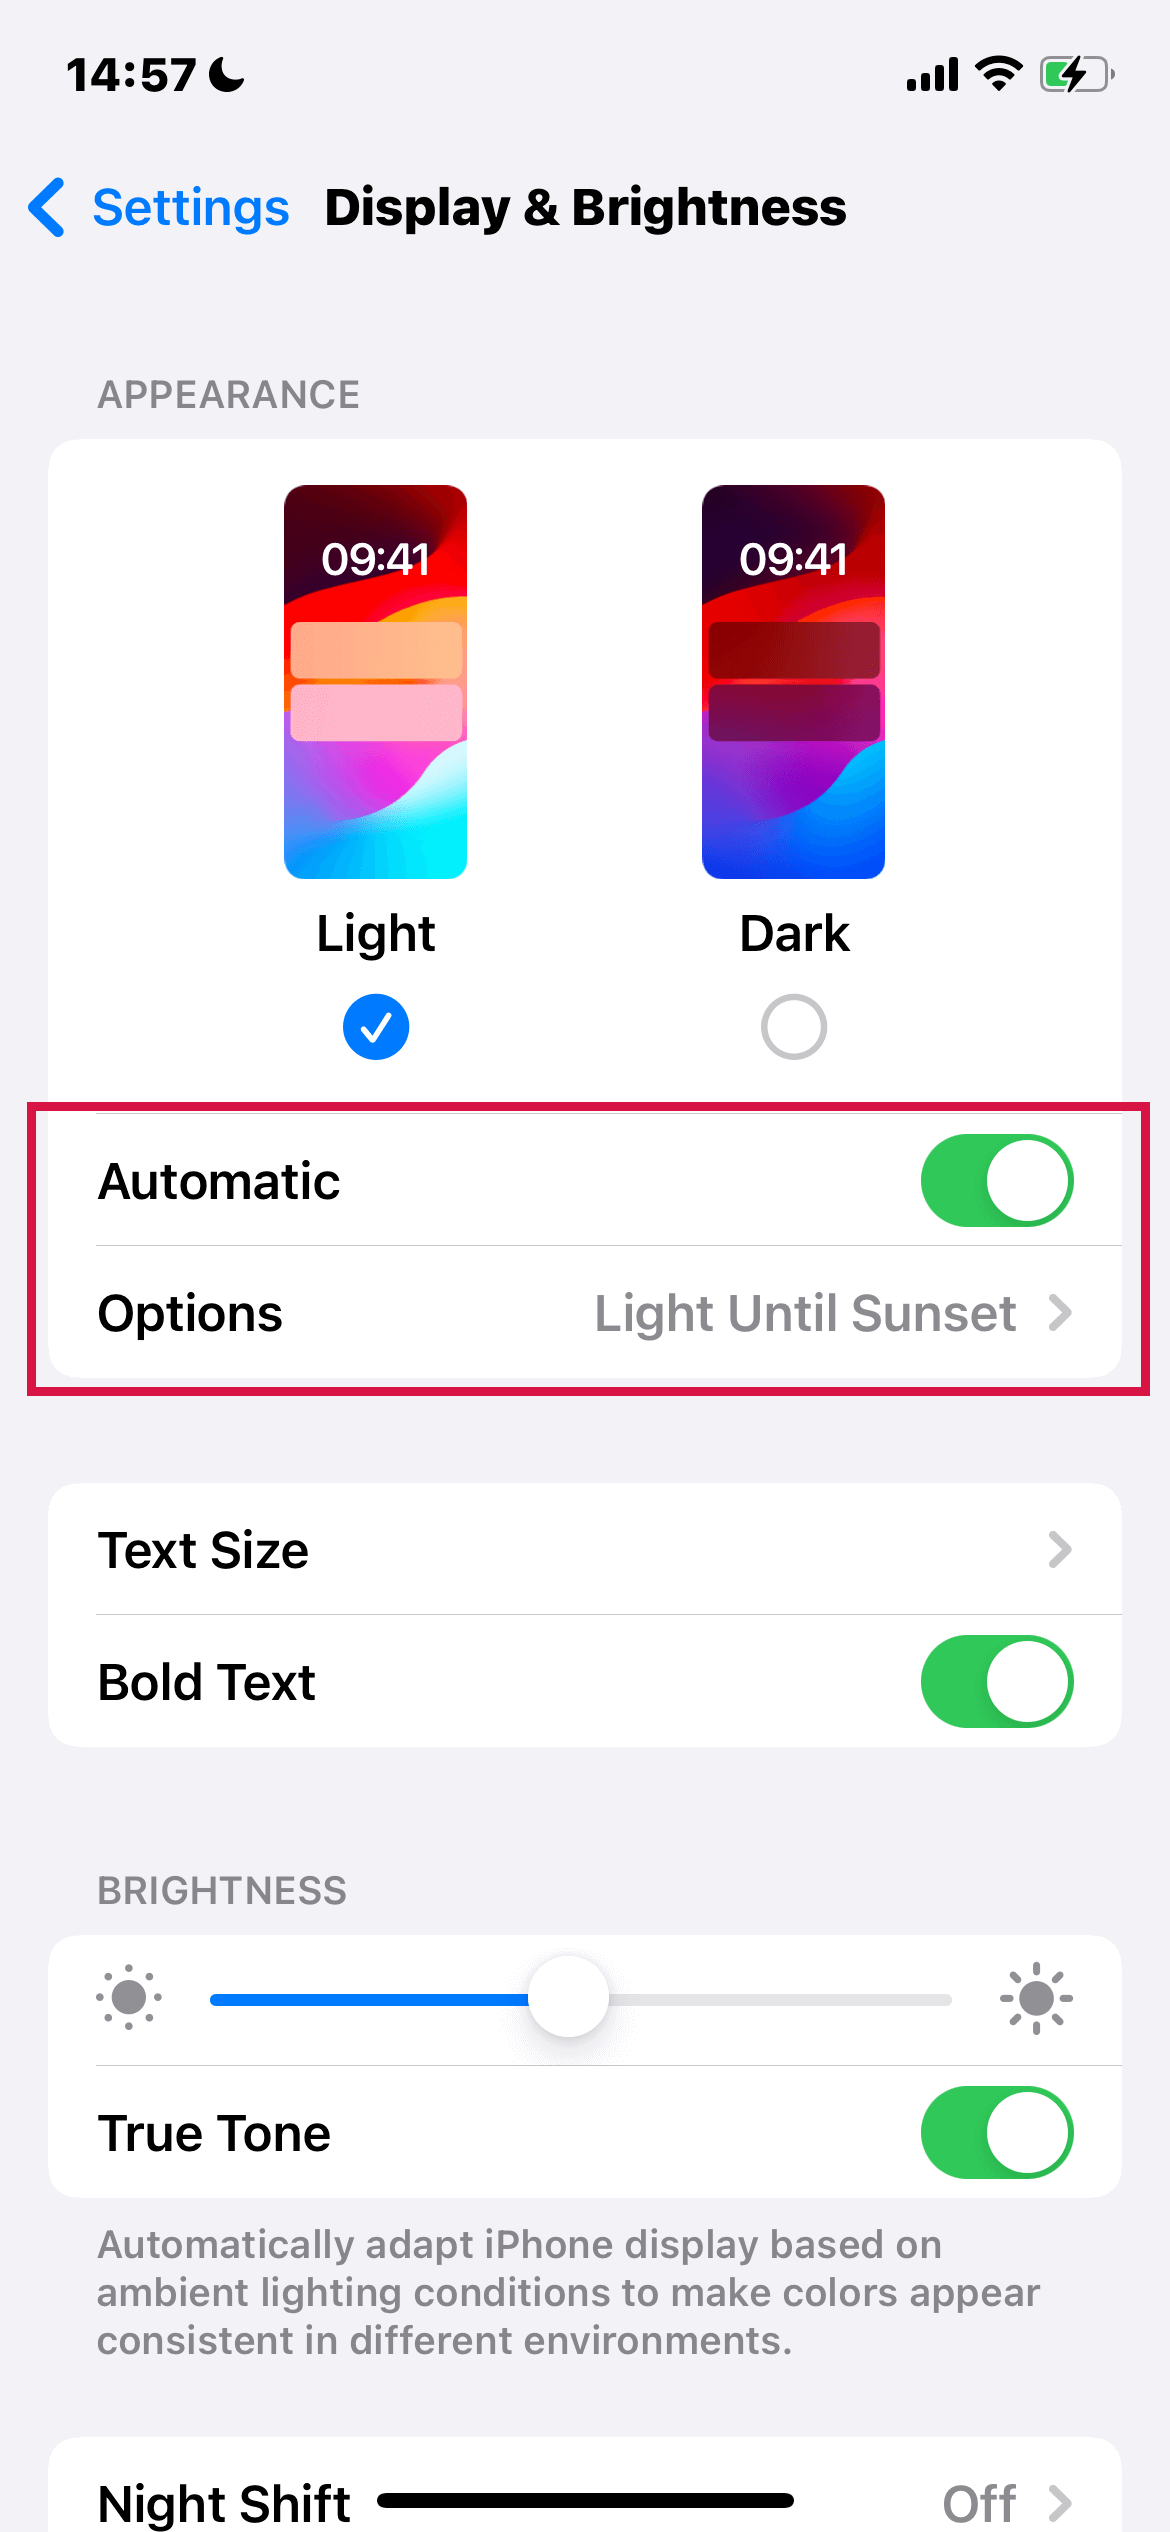
Open Settings and go to 'Display & Brightness'.
Turn on the 'Automatic' option.
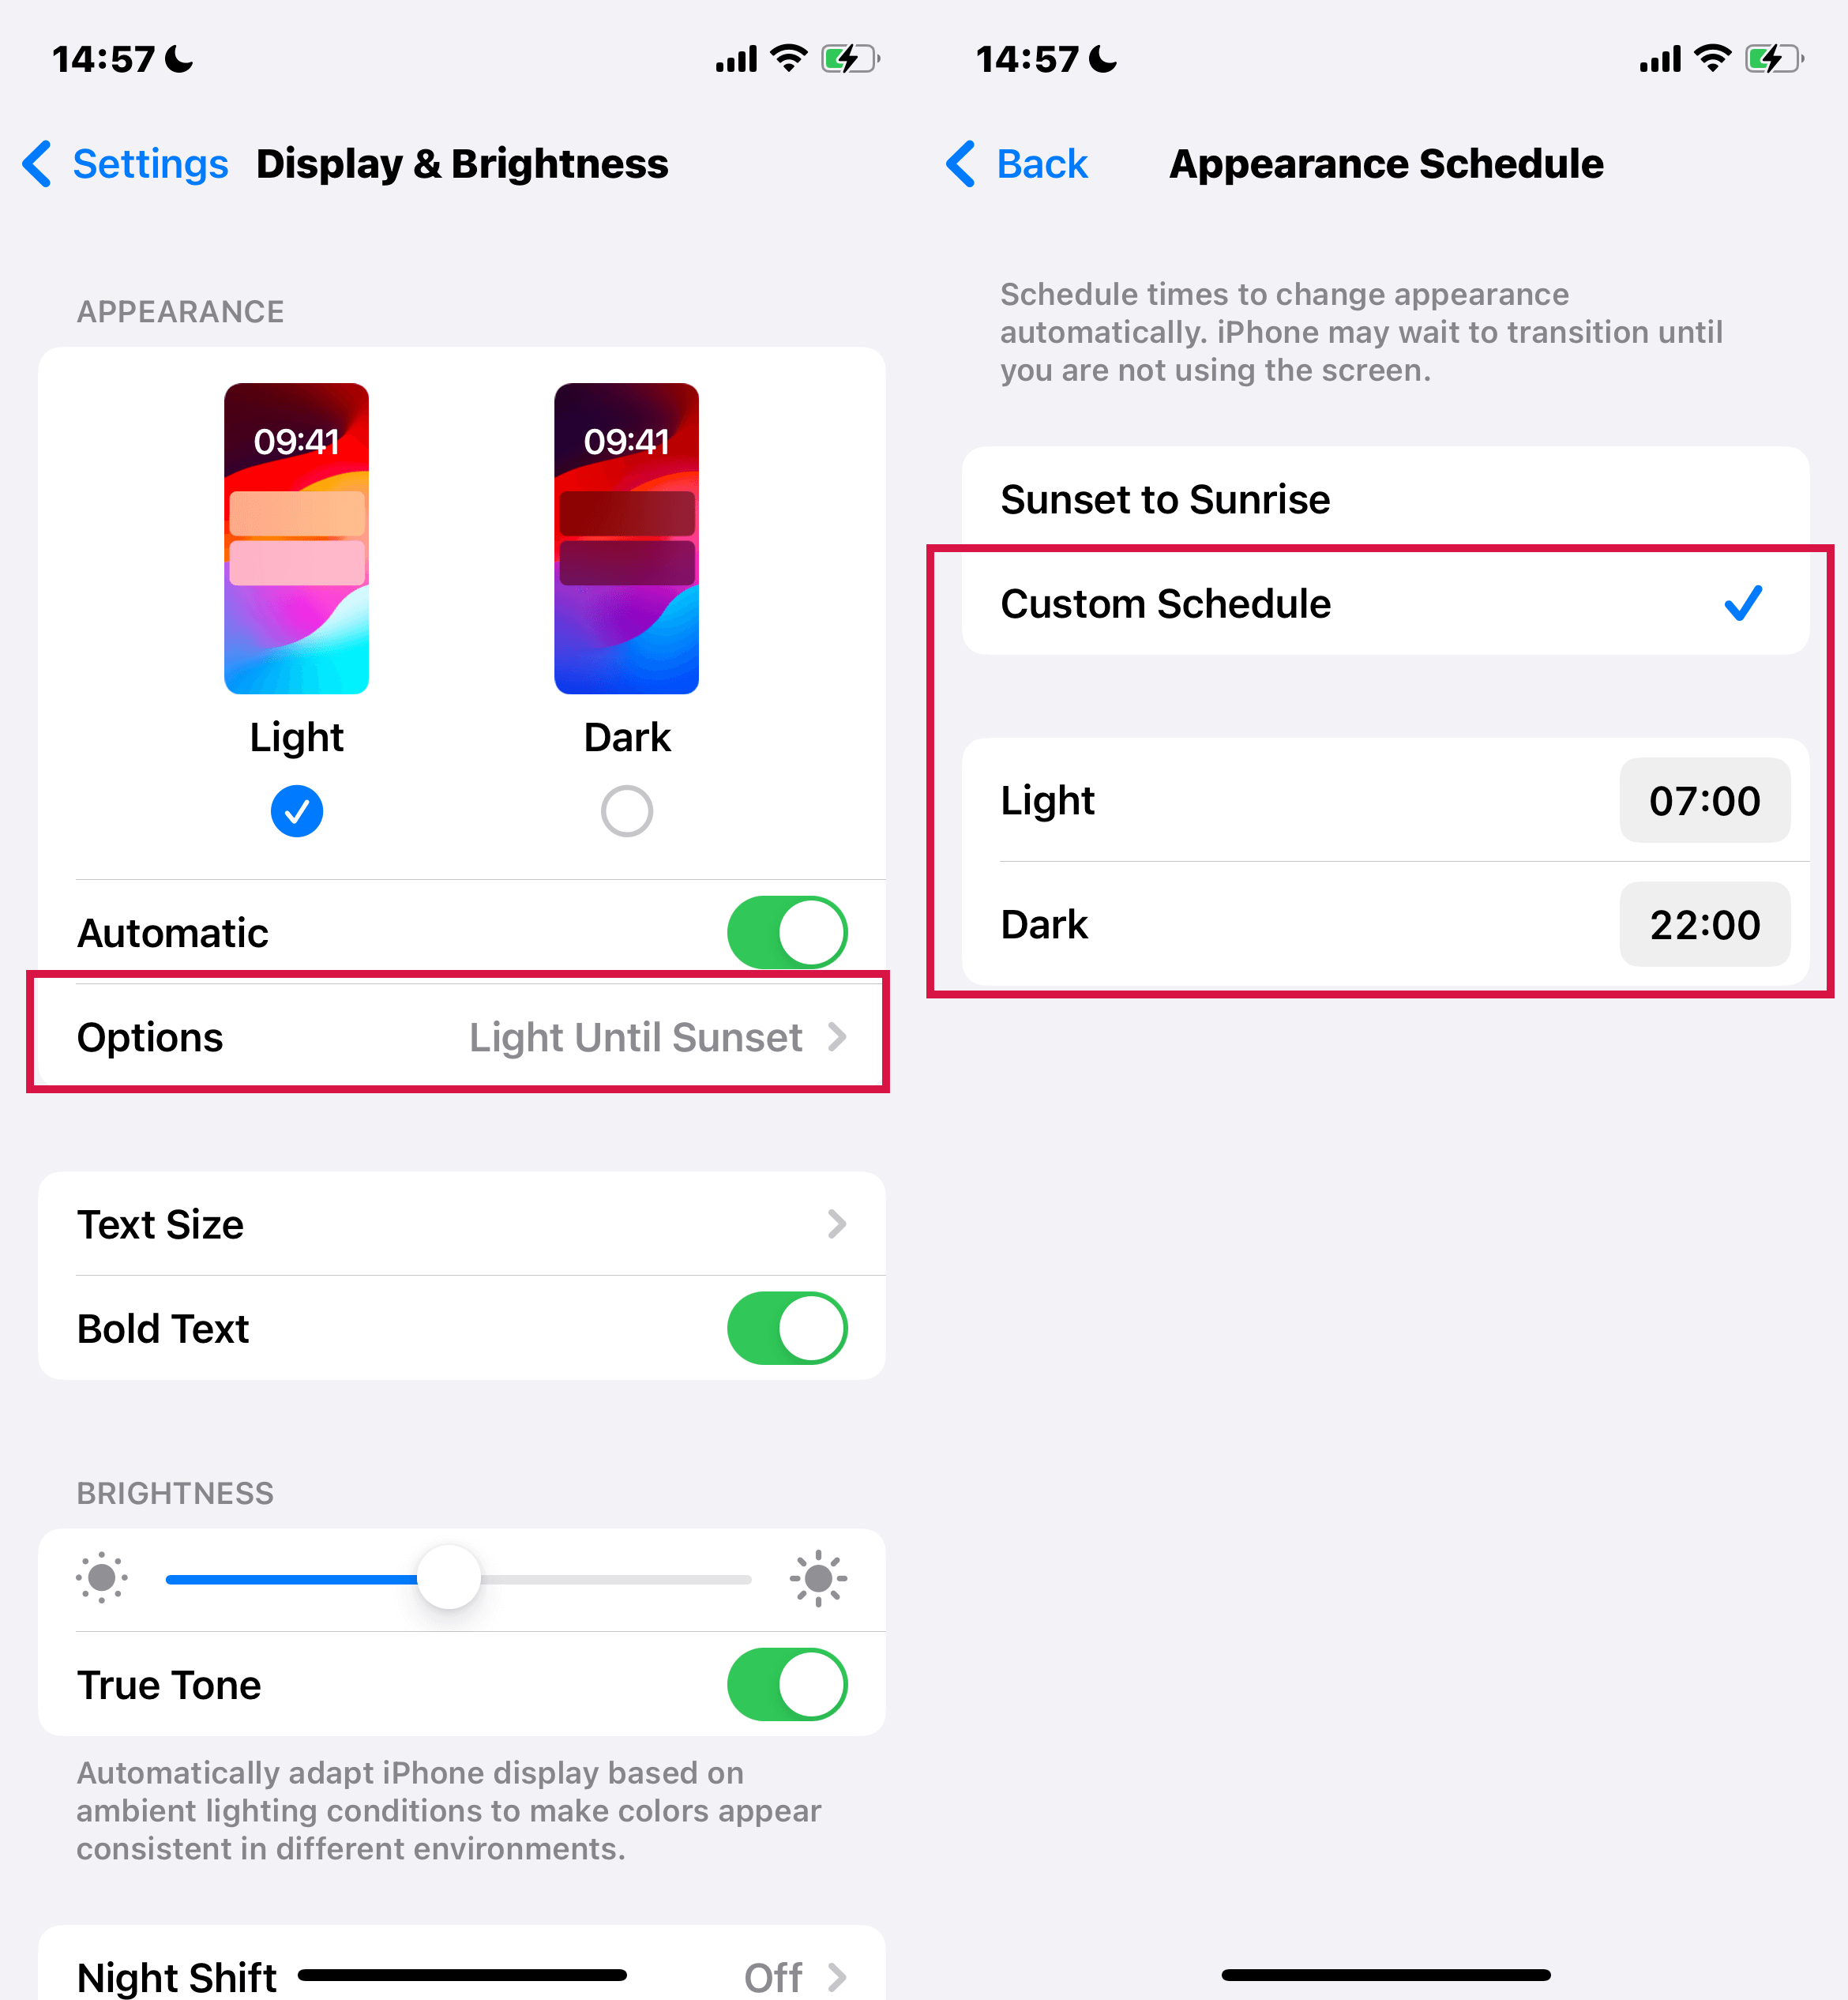
Tap on 'Options' to set your preferences.
This option uses local time and geolocation data to switch to Dark Mode at night and revert to Light Mode during the day.
If you prefer a personalized schedule, select 'Custom Schedule' and specify the times for Dark Mode to activate and deactivate.
Use Night Shift on Your iPhone
Night Shift adjusts the colors on your display, making them warmer in the evenings. This feature is particularly beneficial before bedtime, as it reduces exposure to blue light, known for disrupting sleep patterns and making it harder to fall asleep.
Manually Turning On the Night Shift:
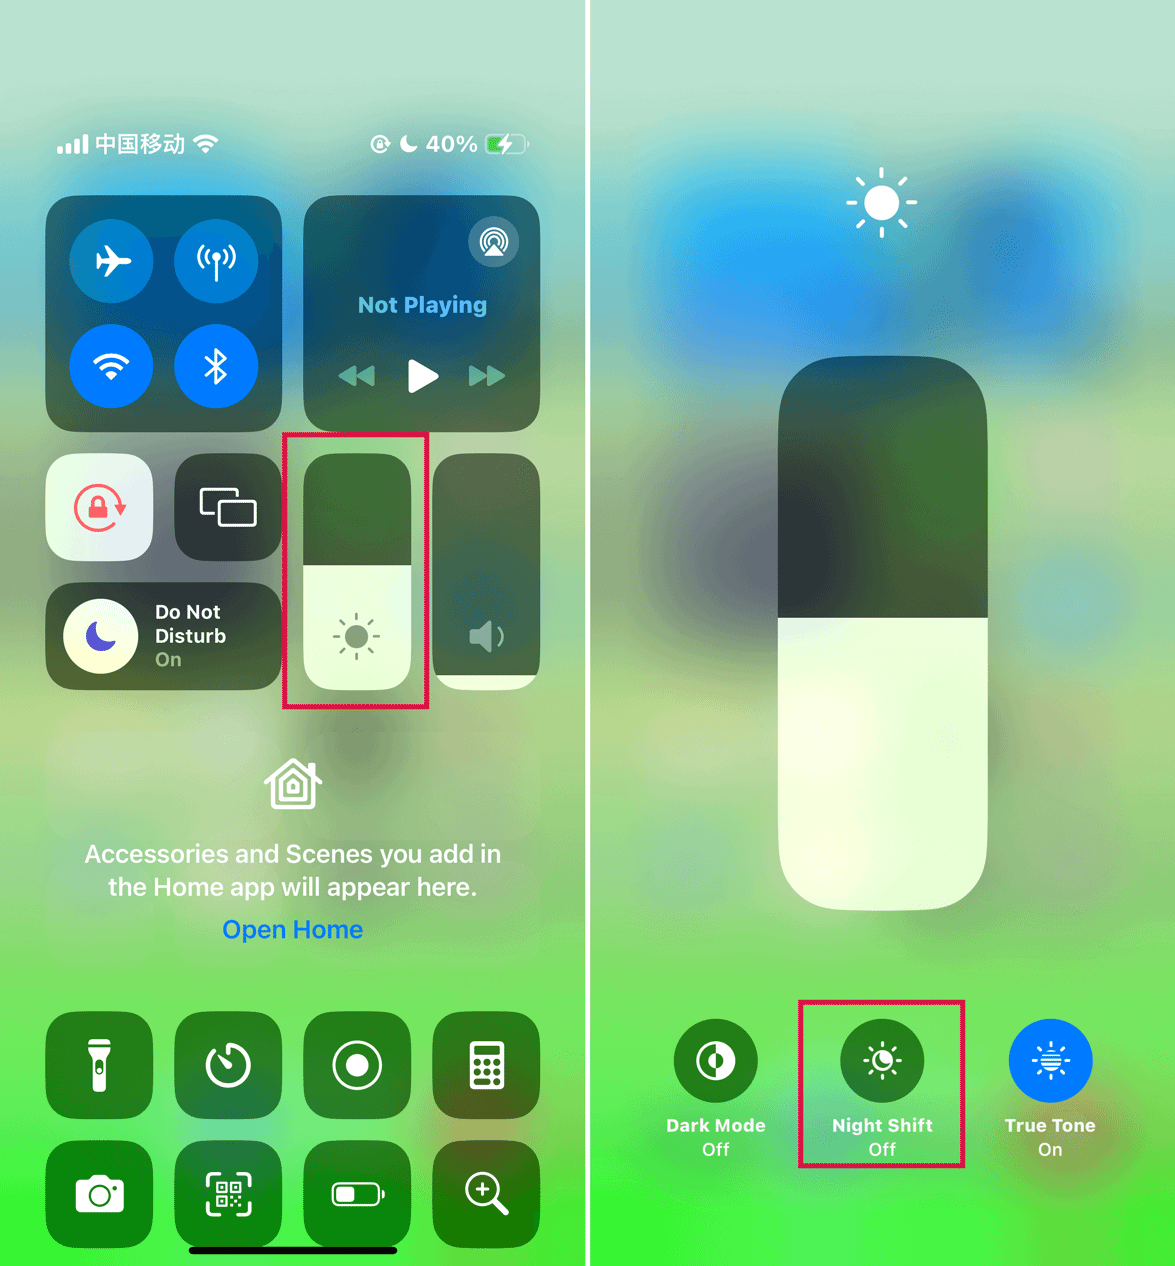
Access Control Center: Swipe down from the top-right corner of your screen (or up from the bottom for iPhones with a Home button).
Press and hold the Brightness control.
Then tap the Night Shift icon (which looks like a sun and moon intertwined) to activate or deactivate Night Shift.
Scheduling Night Shift Automatically:
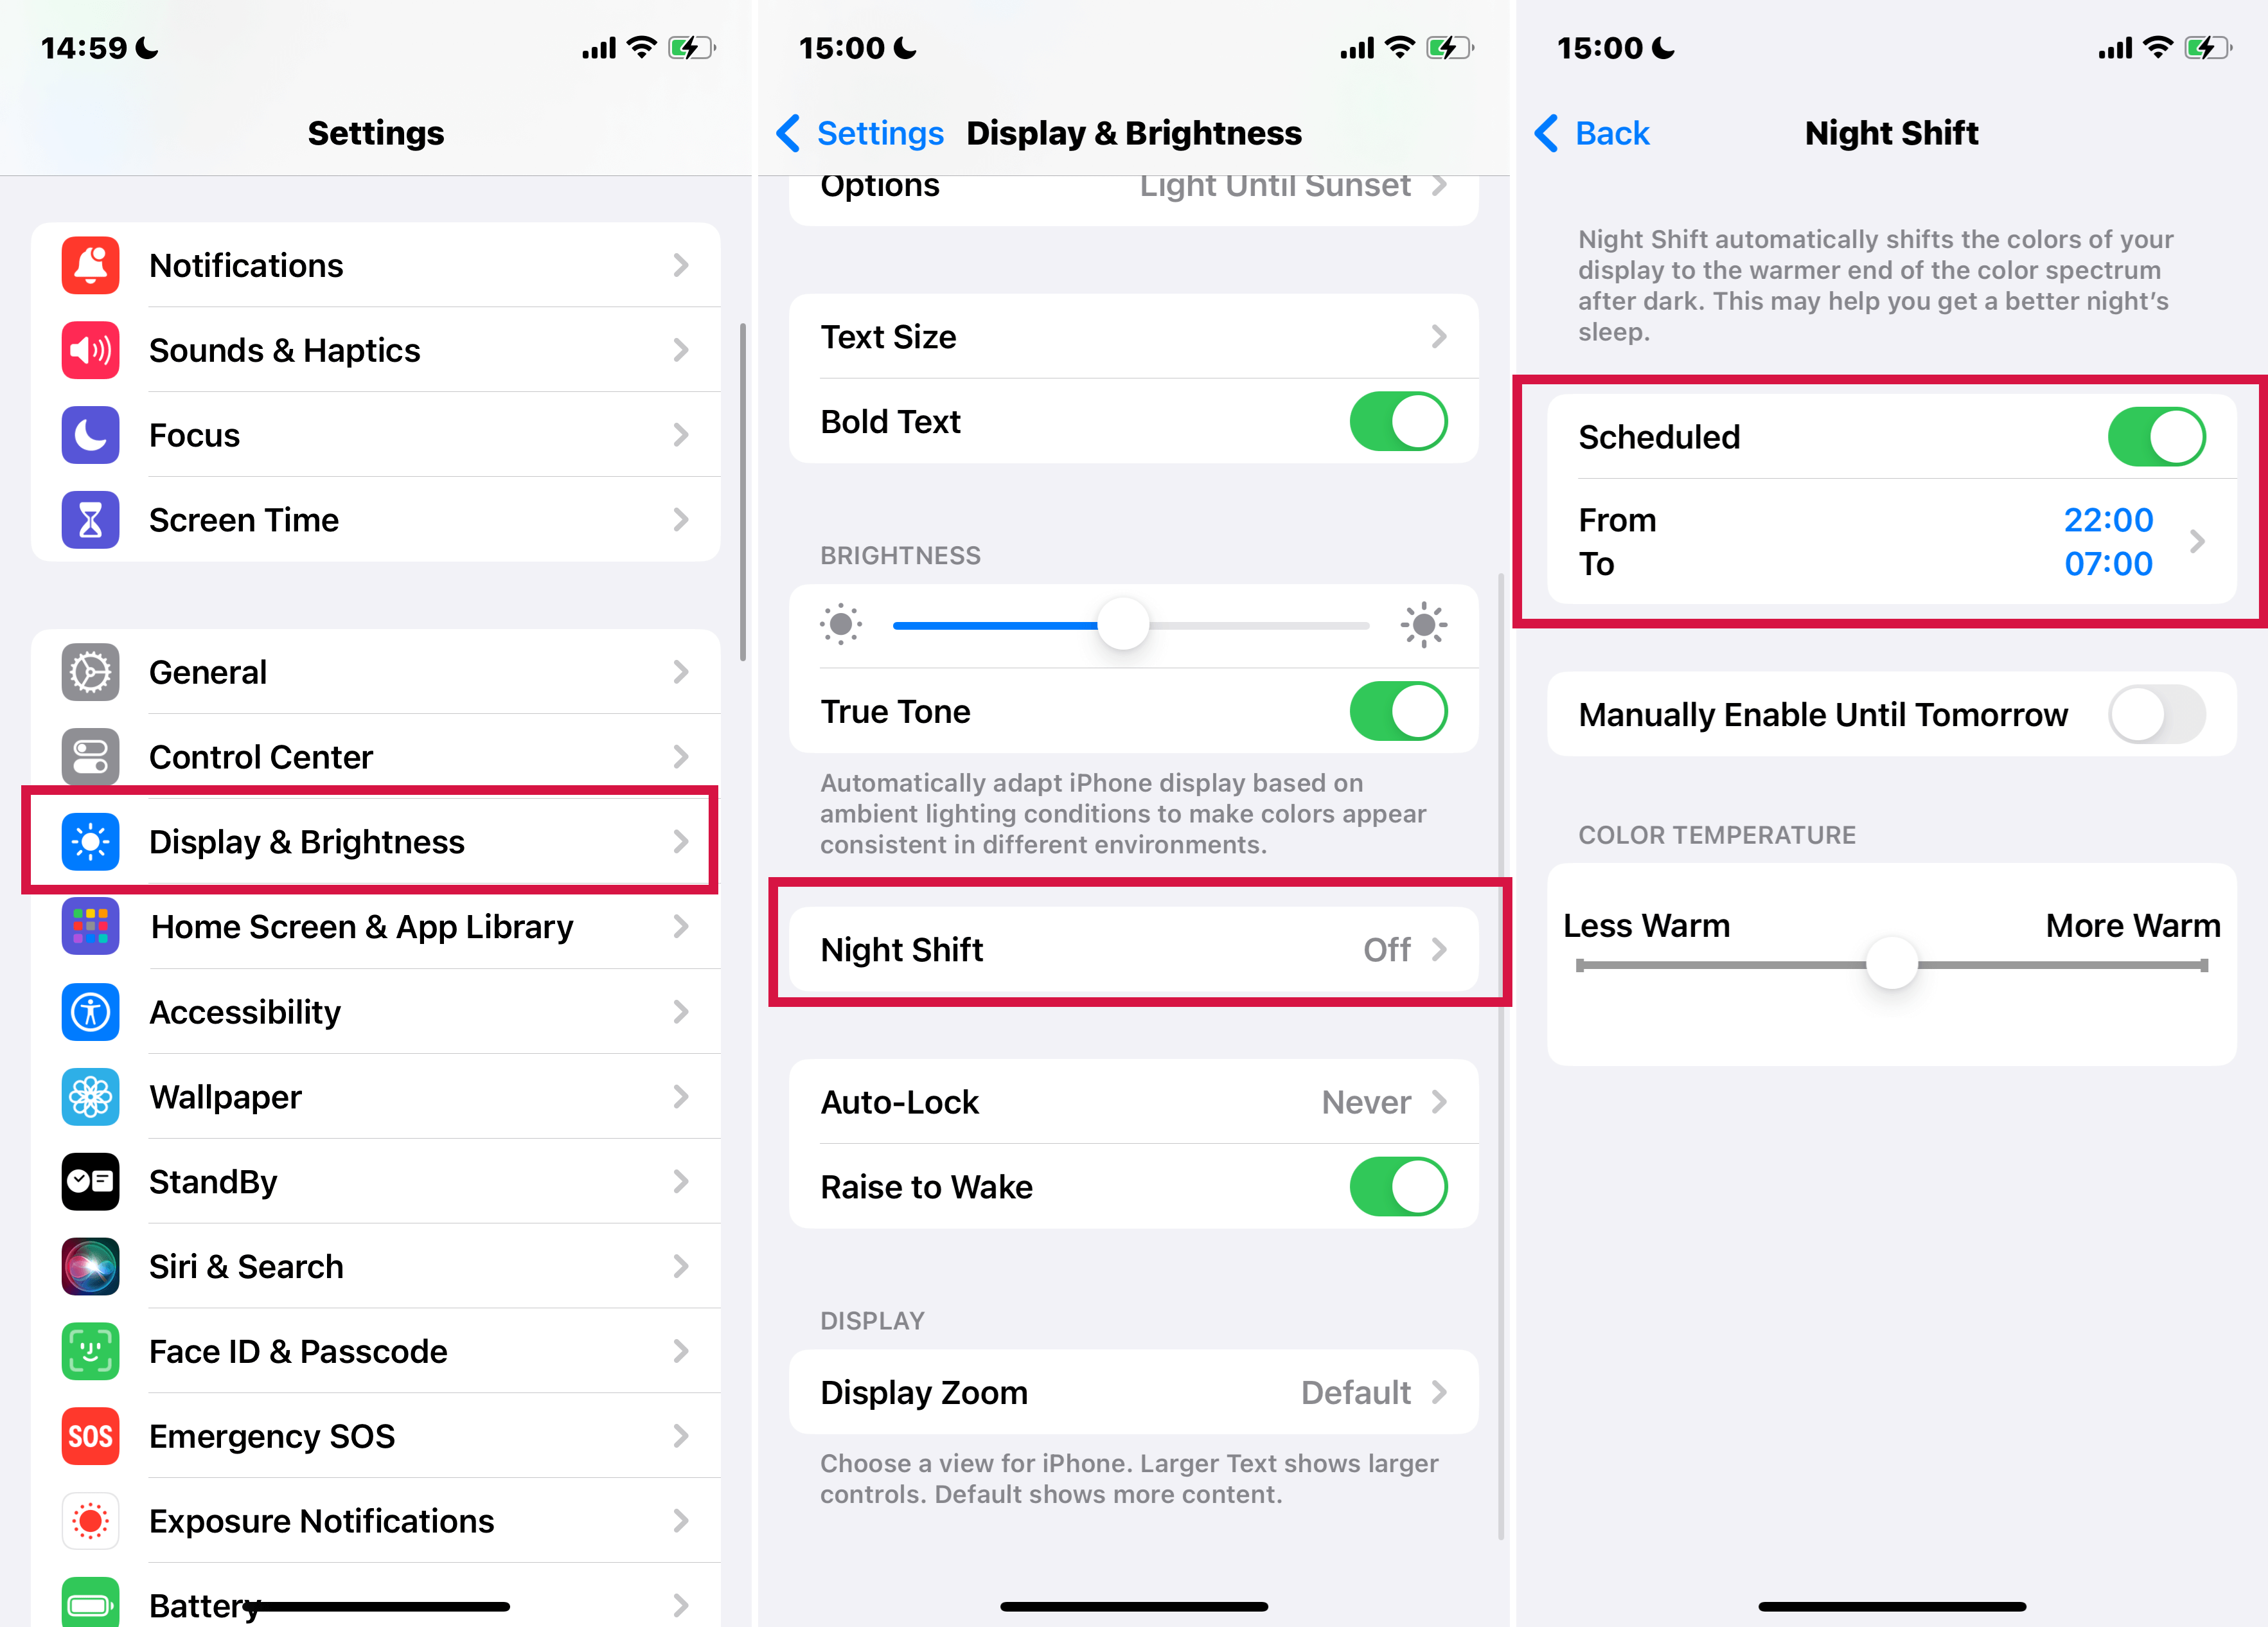
Open the Settings app, navigate to 'Display & Brightness', and select 'Night Shift.'
Switch on the 'Scheduled' option.
Customize Your Schedule:
Sunset to Sunrise: For automatic adjustments based on local sunrise and sunset times, choose 'Sunset to Sunrise.' This requires Location Services to be active.
Custom Schedule: To set specific times for Night Shift to turn on and off, select 'Custom Schedule' and input your preferred times.
Adjusting Color Temperature:
Control Warmth: Below the Color Temperature, a slider lets you adjust how warm the display gets during the Night Shift. Slide it towards the warmer end for a more pronounced effect.
Tips:
Daytime Use: Manually turning on Night Shift can be helpful in dark environments during the day.
Location Services: The 'Sunset to Sunrise' option is unavailable if Location Services are disabled in 'Settings > Privacy & Security'.
Mastering True Tone and Auto-Lock on Your iPhone
True Tone: Enhanced Viewing Experience
True Tone technology is available on iPhone 8, iPhone 8 Plus, and iPhone X models. It intelligently adjusts your display's white balance to match the ambient light in your surroundings, providing a more natural and accurate visual experience. Many users find this feature to enhance the display's color accuracy.
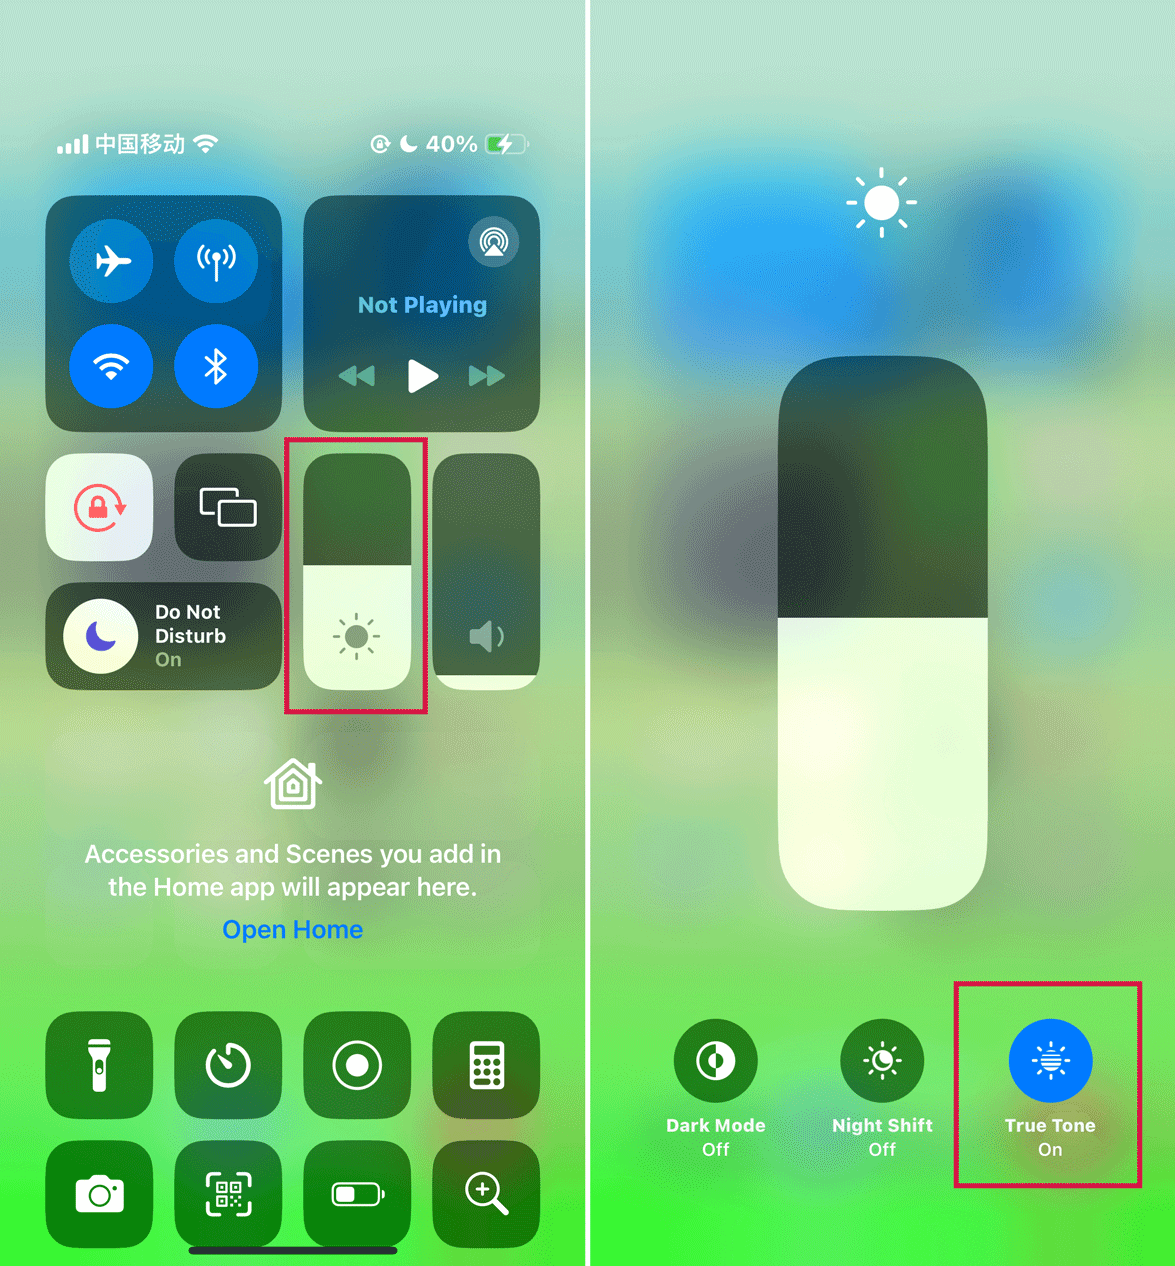
How to Enable or Disable True Tone Using Control Center:
Swipe down from the top-right corner of your screen (or up from the bottom for iPhones with a Home button).
Press and hold the Brightness control, then tap the True Tone button to toggle it on or off.
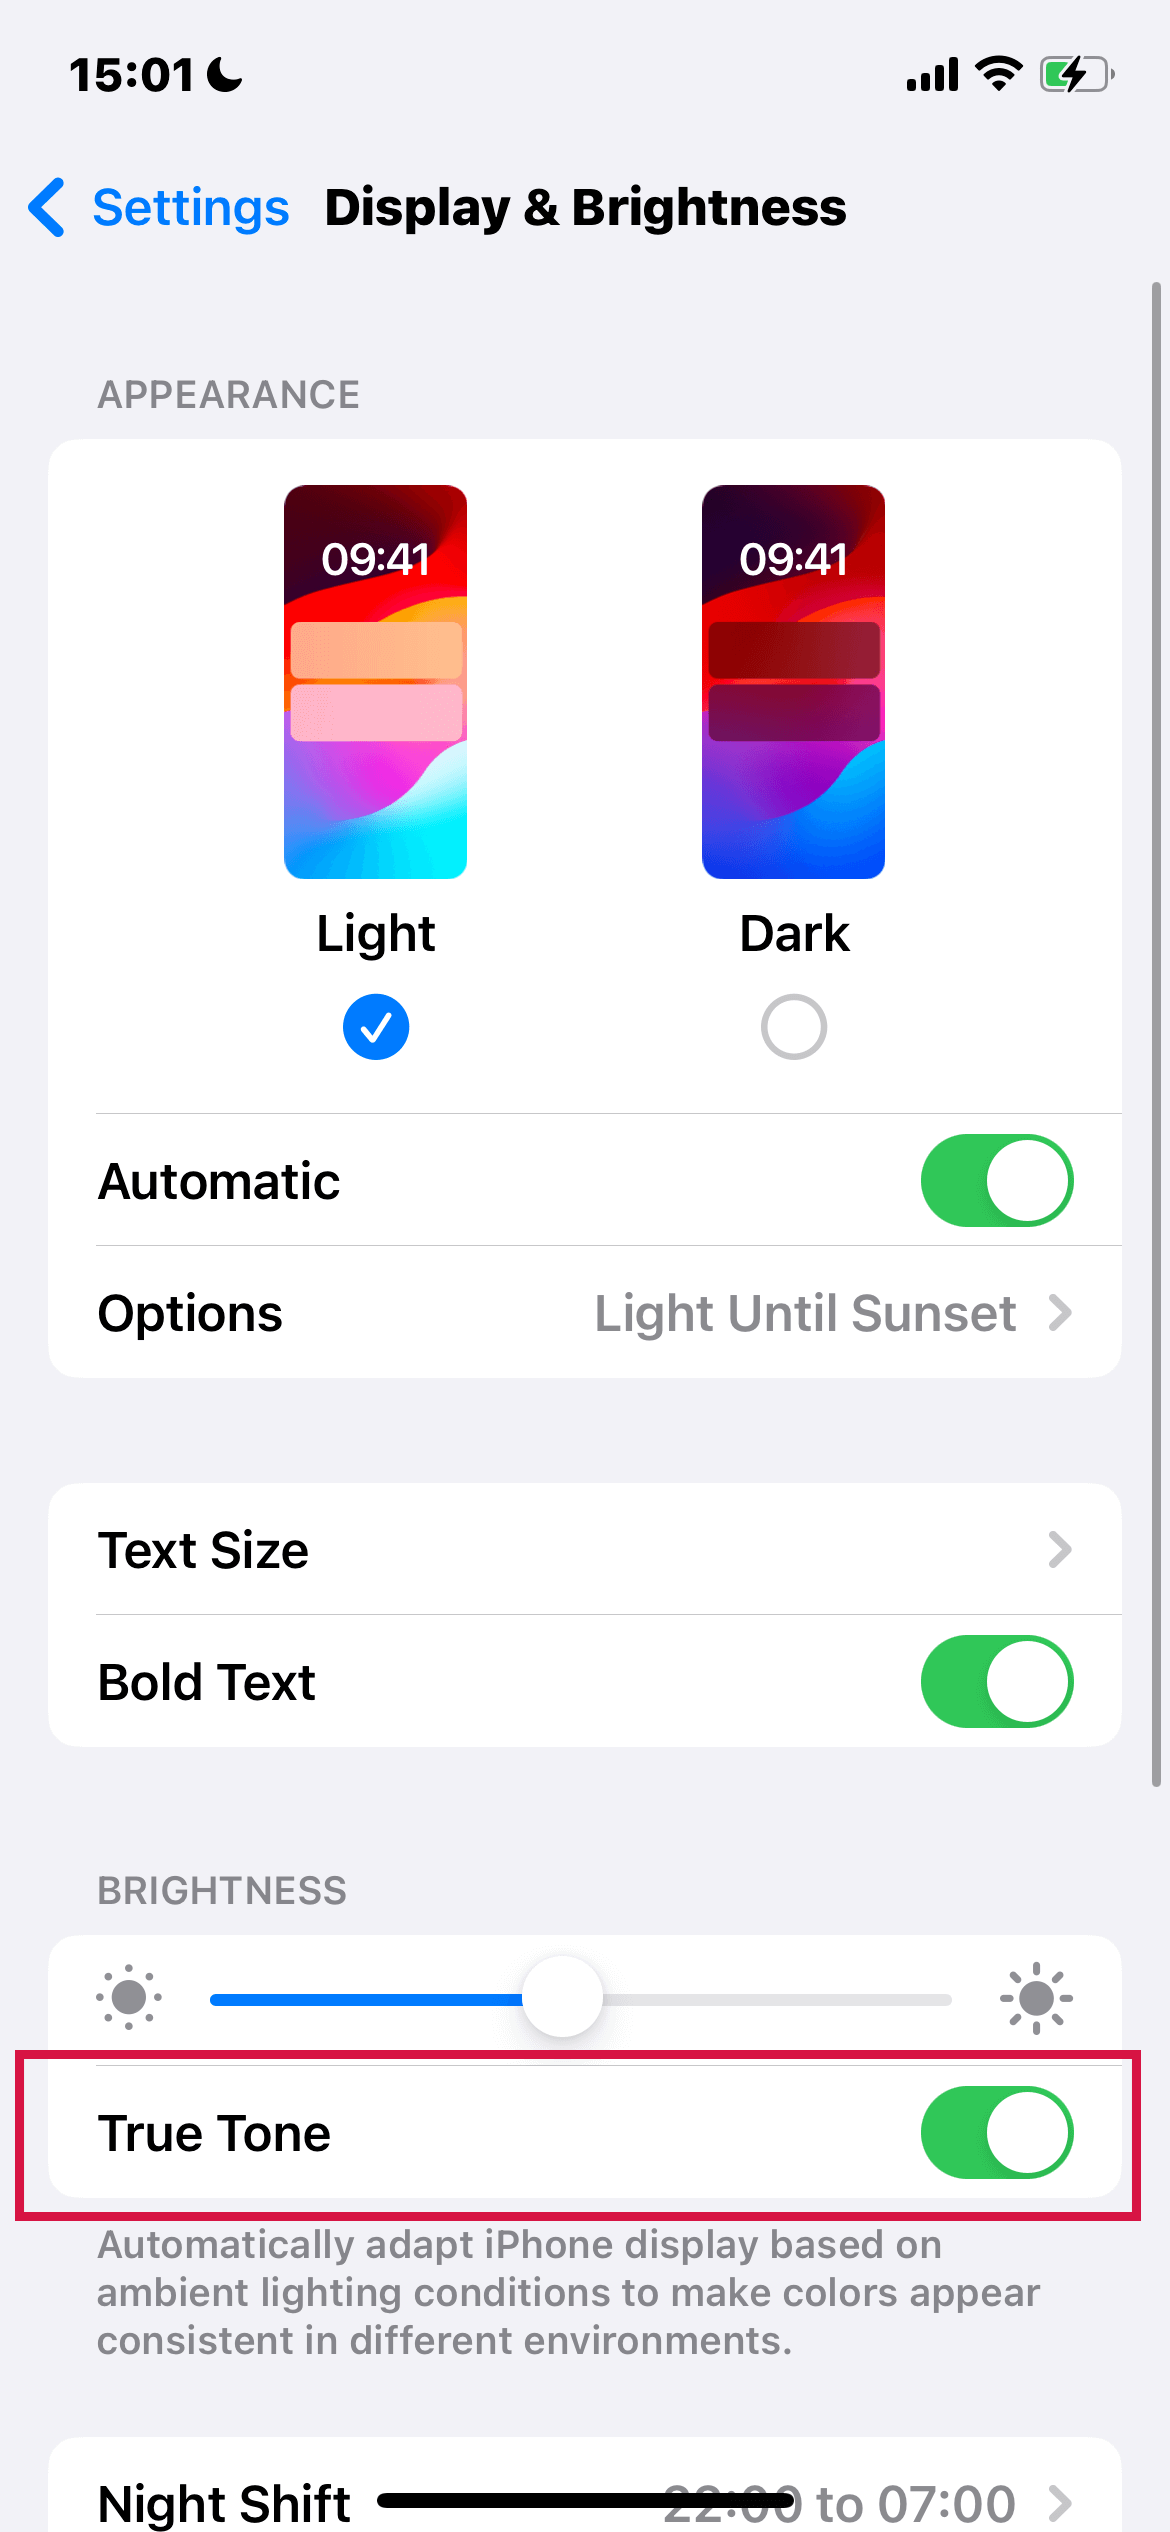
Through Settings:
Open the Settings app.
Find and tap 'Display & Brightness'.
Use the switch to turn True Tone on or off.
Auto-Lock: Balancing Convenience and Battery Life
Auto-Lock is a feature that determines how long your iPhone stays active before the screen locks and turns off. It's a crucial setting for balancing convenience and battery life, as the display is one of the most power-consuming components of your iPhone.
Setting Up Auto-Lock
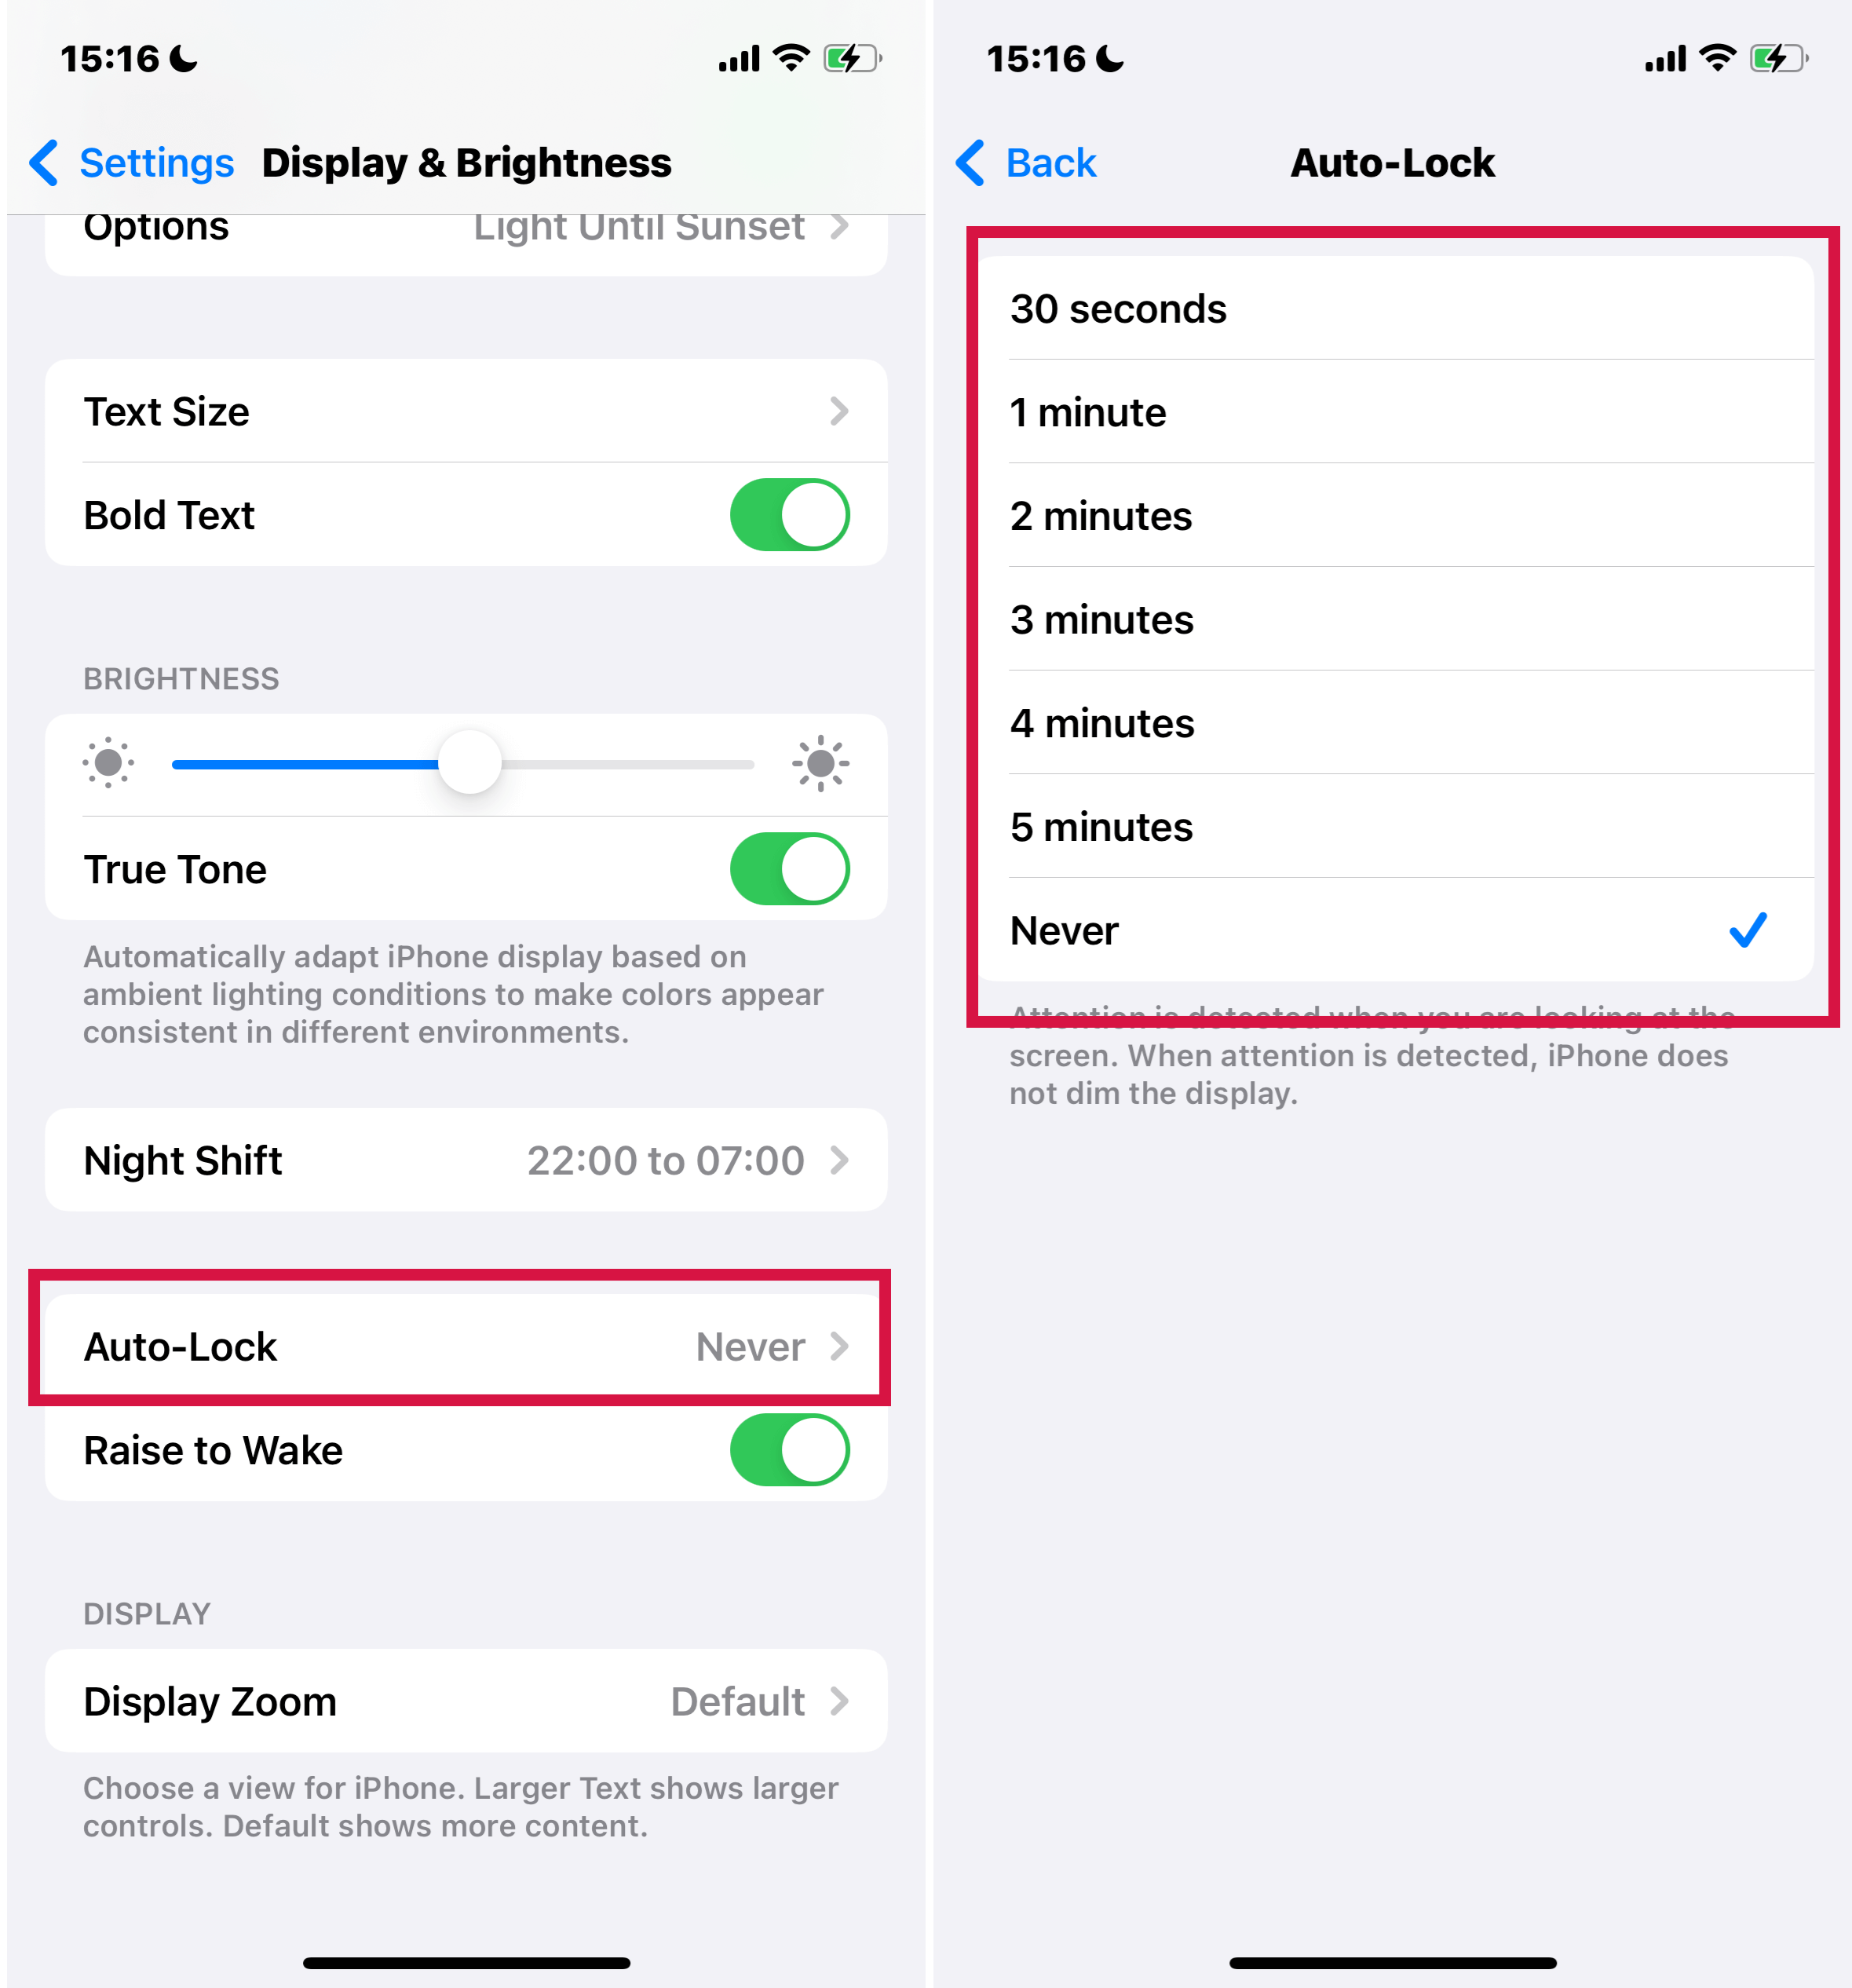
Open Settings, go to 'Display & Brightness', and then select 'Auto-Lock'.
Options range from 30 seconds to 5 minutes. Select the time that suits your usage habits.
There's also a 'Never' option, which keeps the display on indefinitely but can significantly impact battery life.
This feature is only available on iPhone 8, iPhone 8 Plus, and iPhone X models.
Change iPhone Colors to Enhance iPhone Screen Visibility
Inverting Colors for Easier Reading
Invert Colors on the iPhone can make text easier to read, especially on apps and websites that don't offer Dark Mode. This feature is excellent for those who prefer high contrast or need to view items against a dark background.
How to Invert Colors
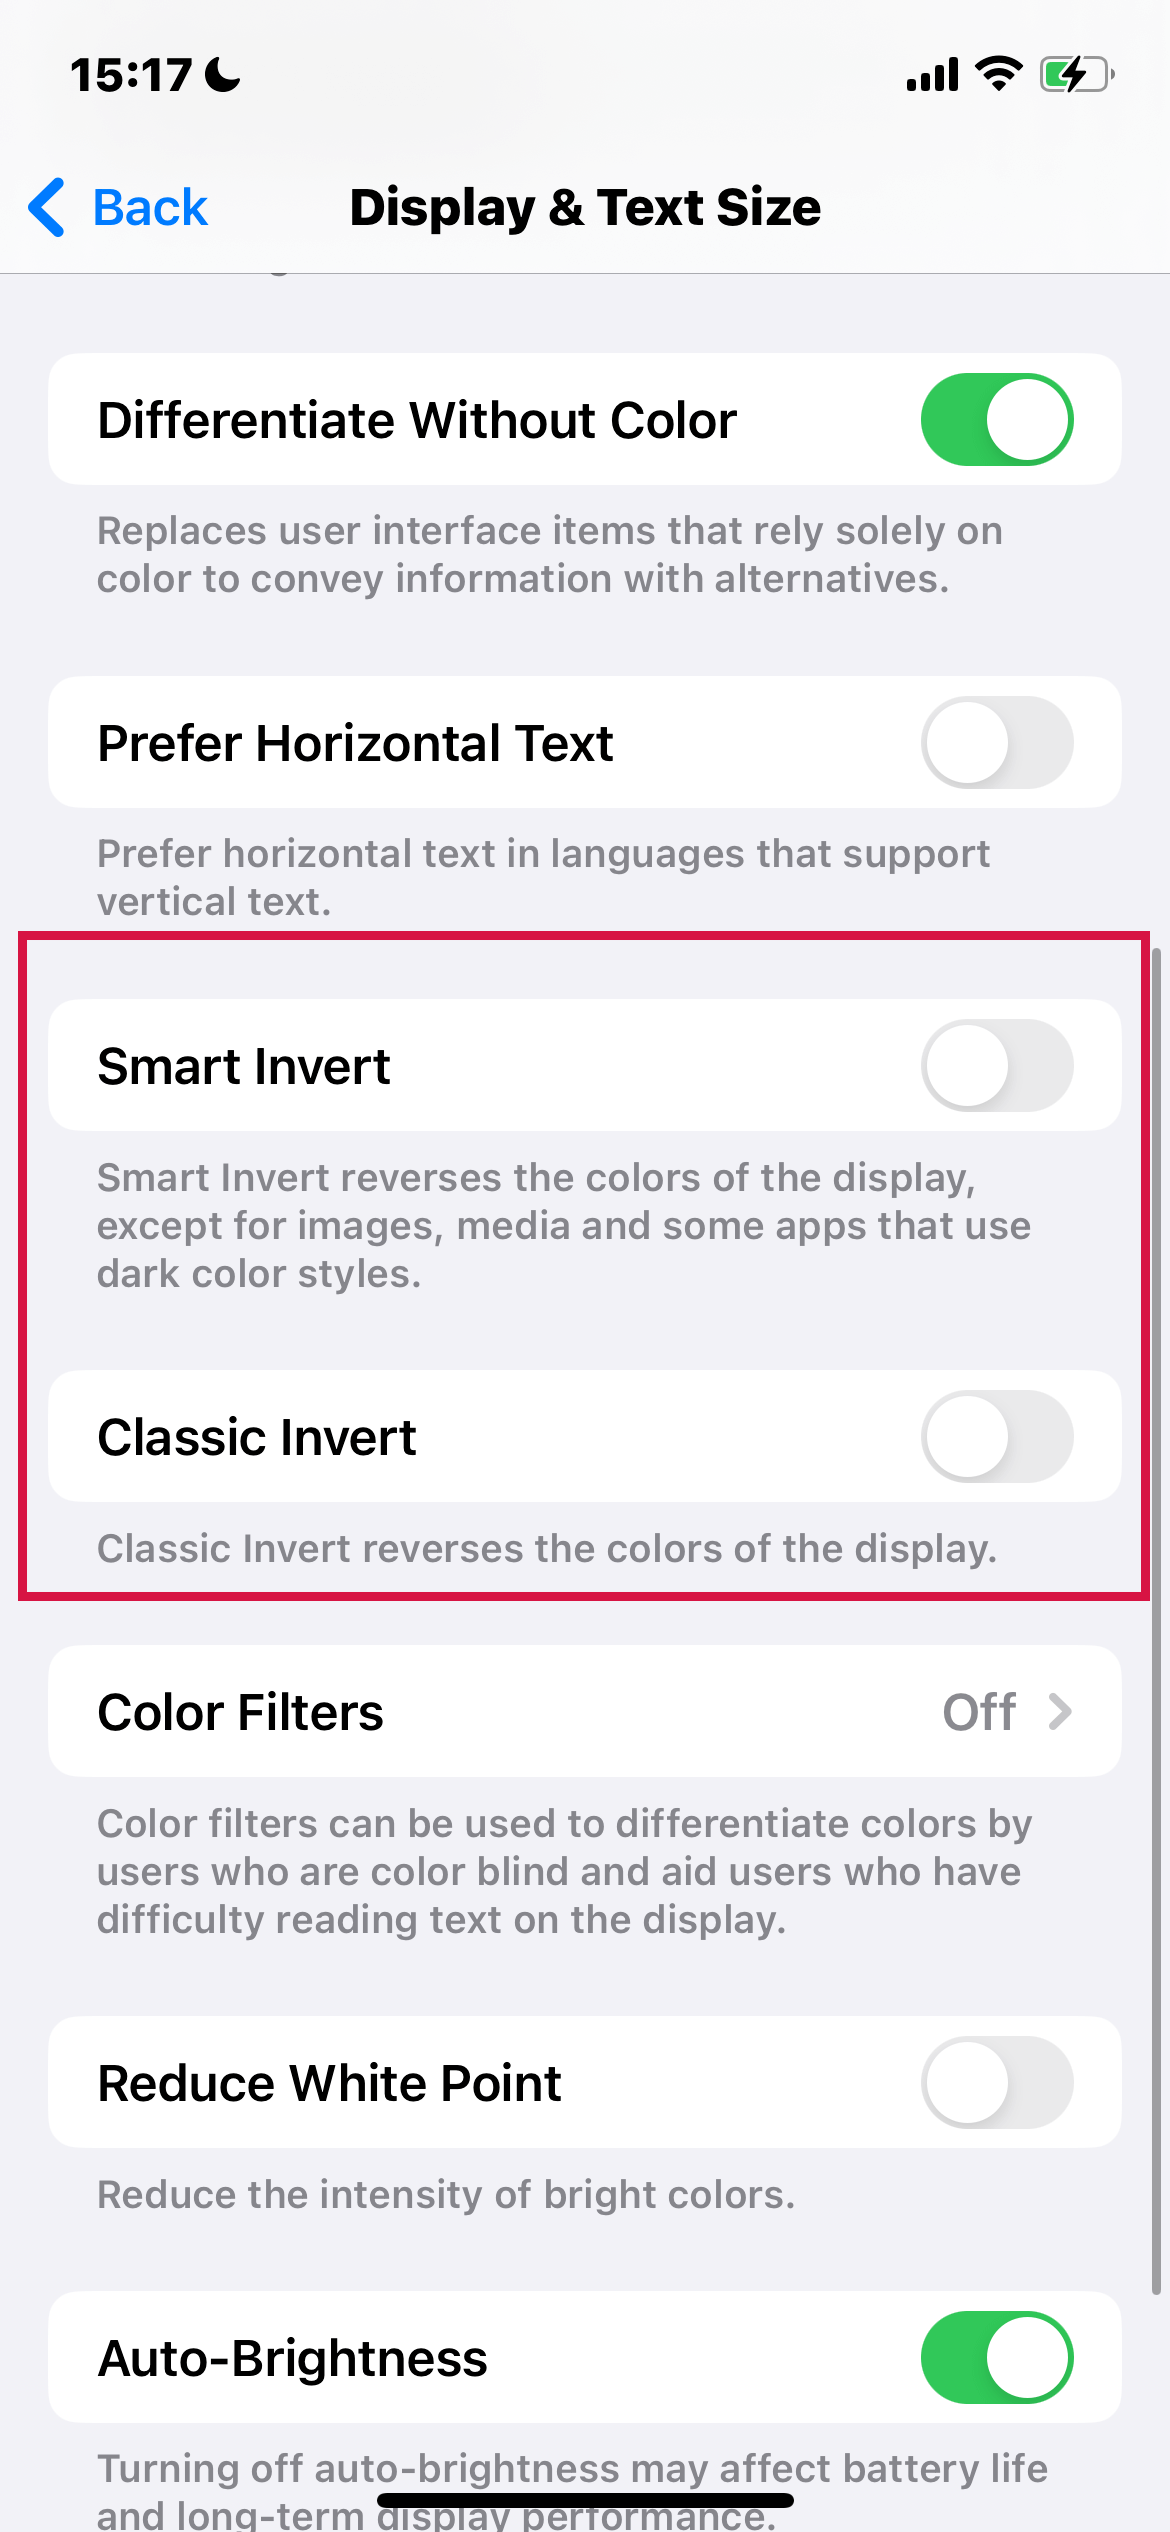
Open Settings, then go to 'Accessibility' followed by 'Display & Text Size'.
Choose Your Inversion Style:
Smart Invert: This option reverses the display's colors except for images, media, and apps that already use dark color styles.
Classic Invert: It reverses all colors on the display.
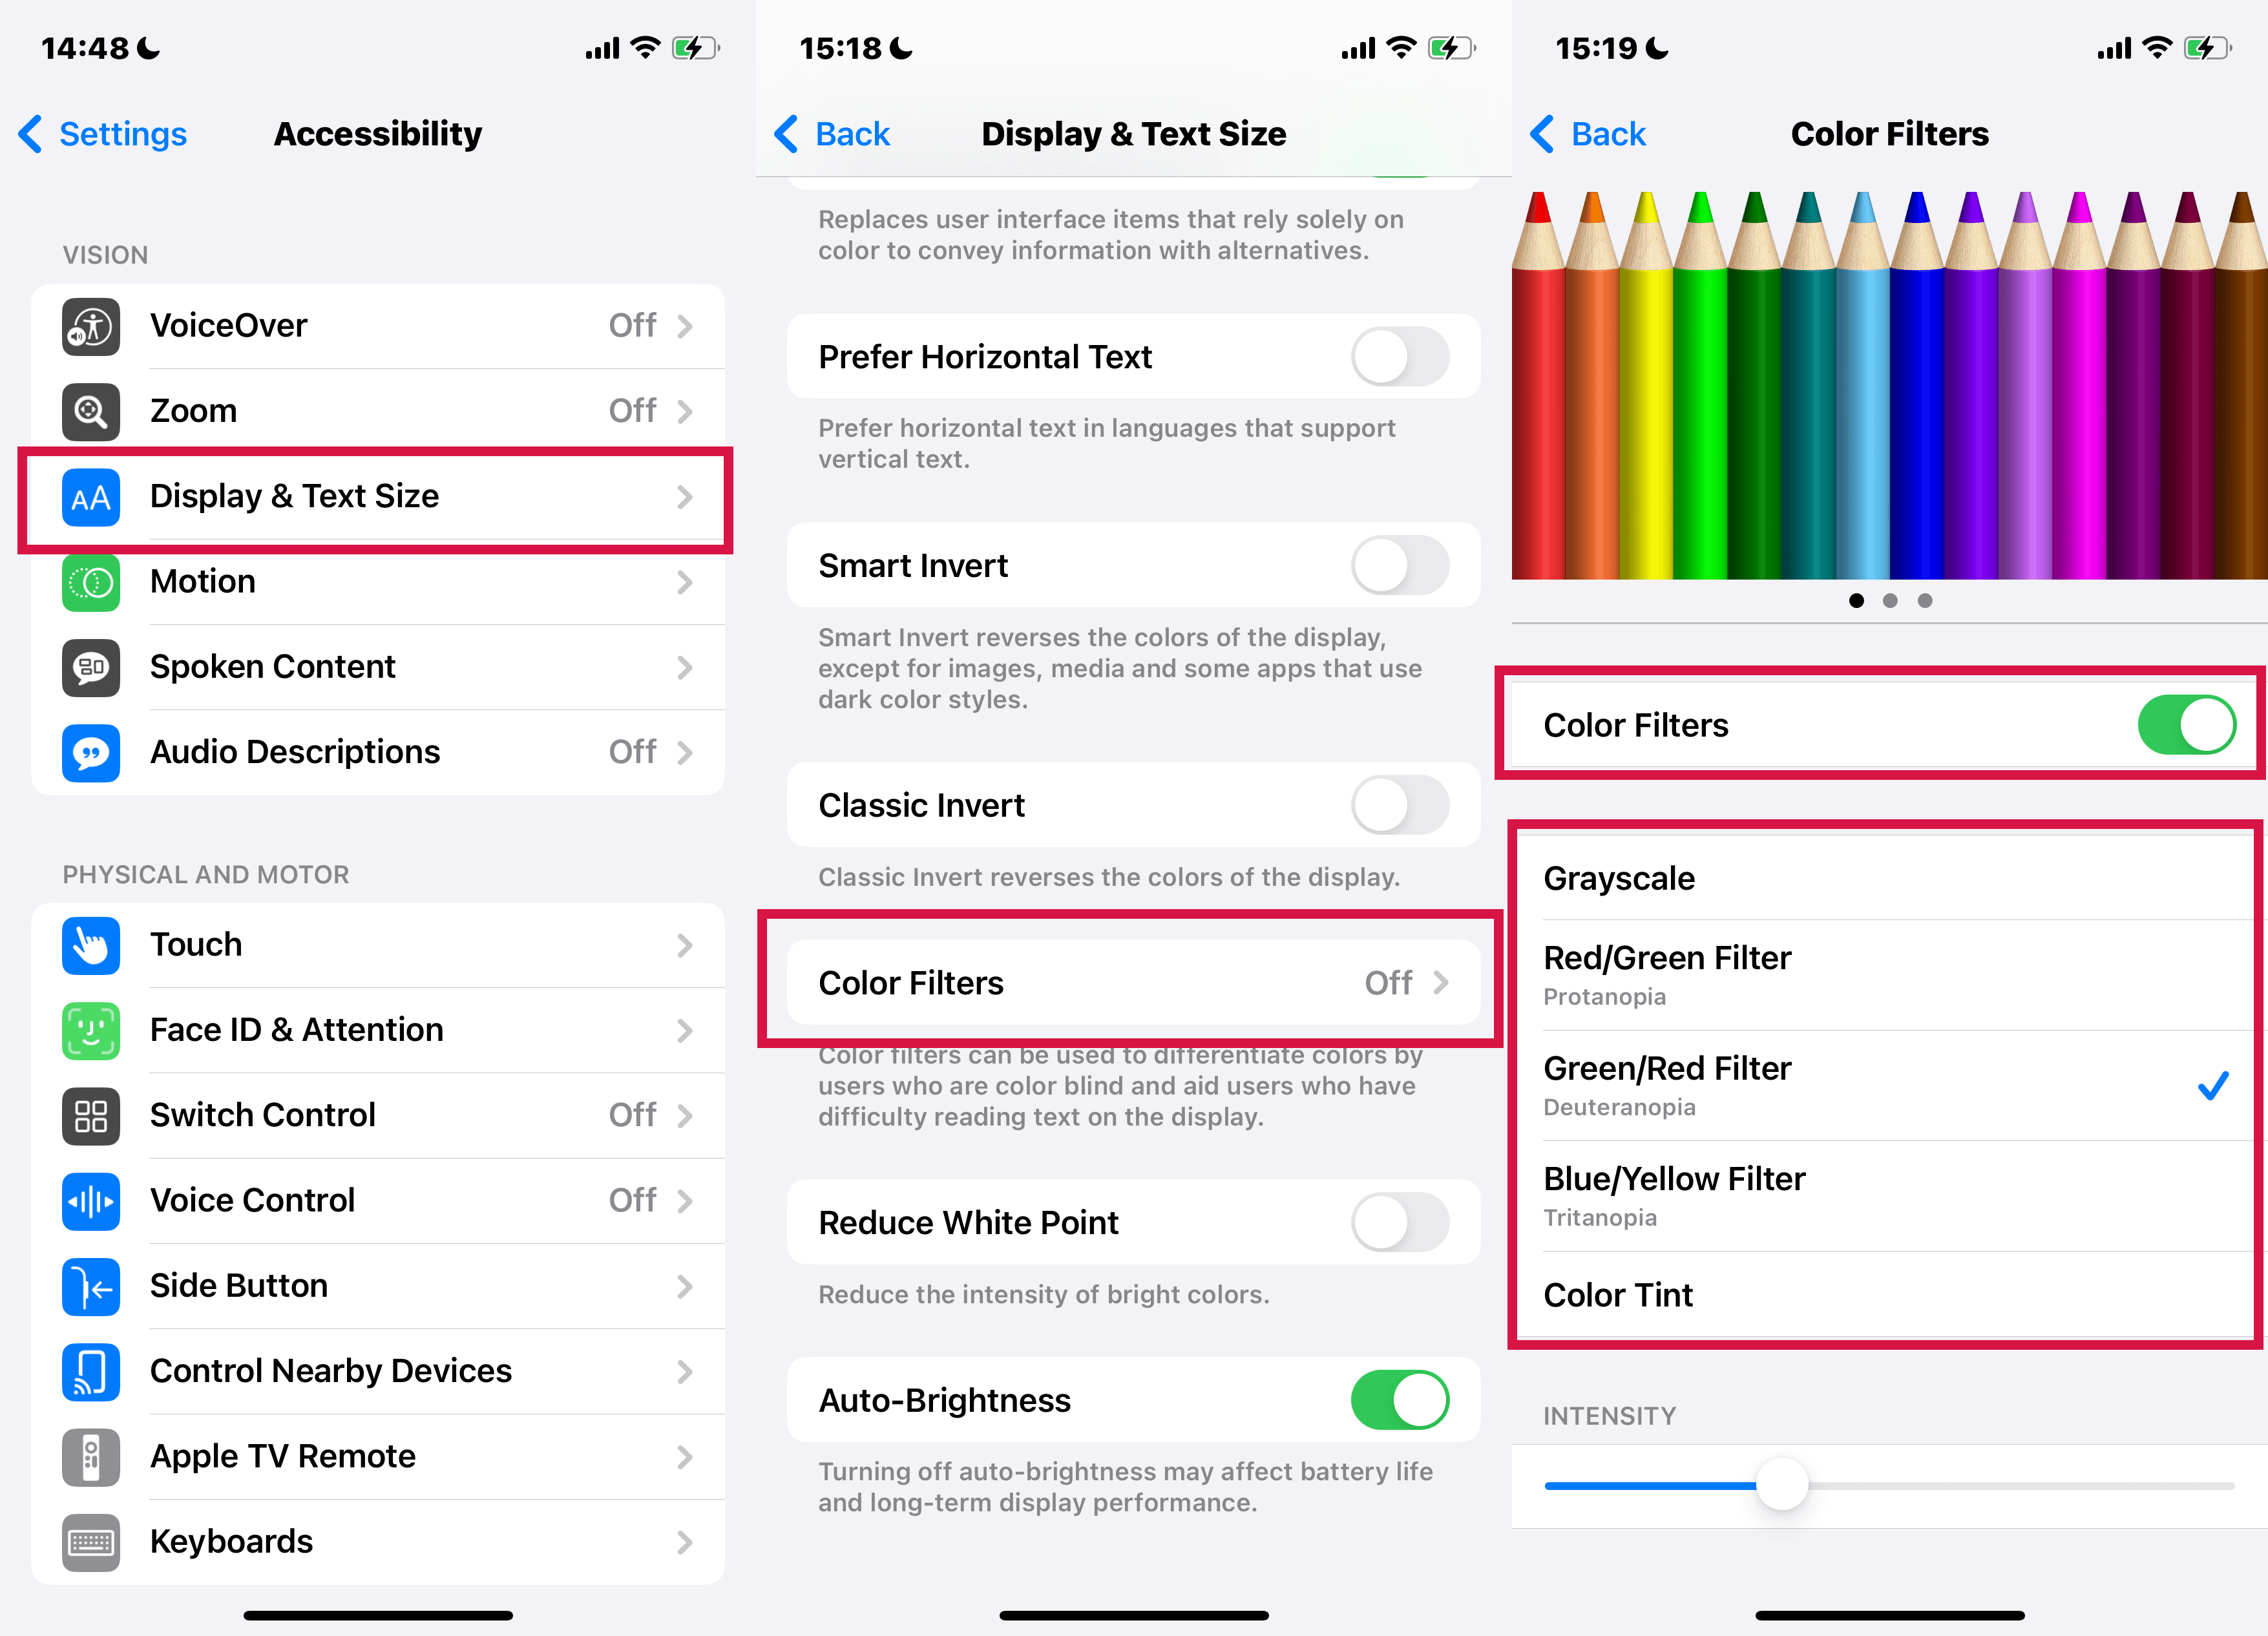
Using Color Filters
Color filters can be a significant aid for those with color blindness or other visual challenges, helping to differentiate between colors. Remember, Color Filters can alter the appearance of images and videos.
Access Color Filters:
Go to Settings > Accessibility > Display & Text Size, then tap 'Color Filters.'
Turn on Color Filters and choose a filter. Use the sliders to adjust intensity or hue.
Other Accessibility Features for Improved Visibility
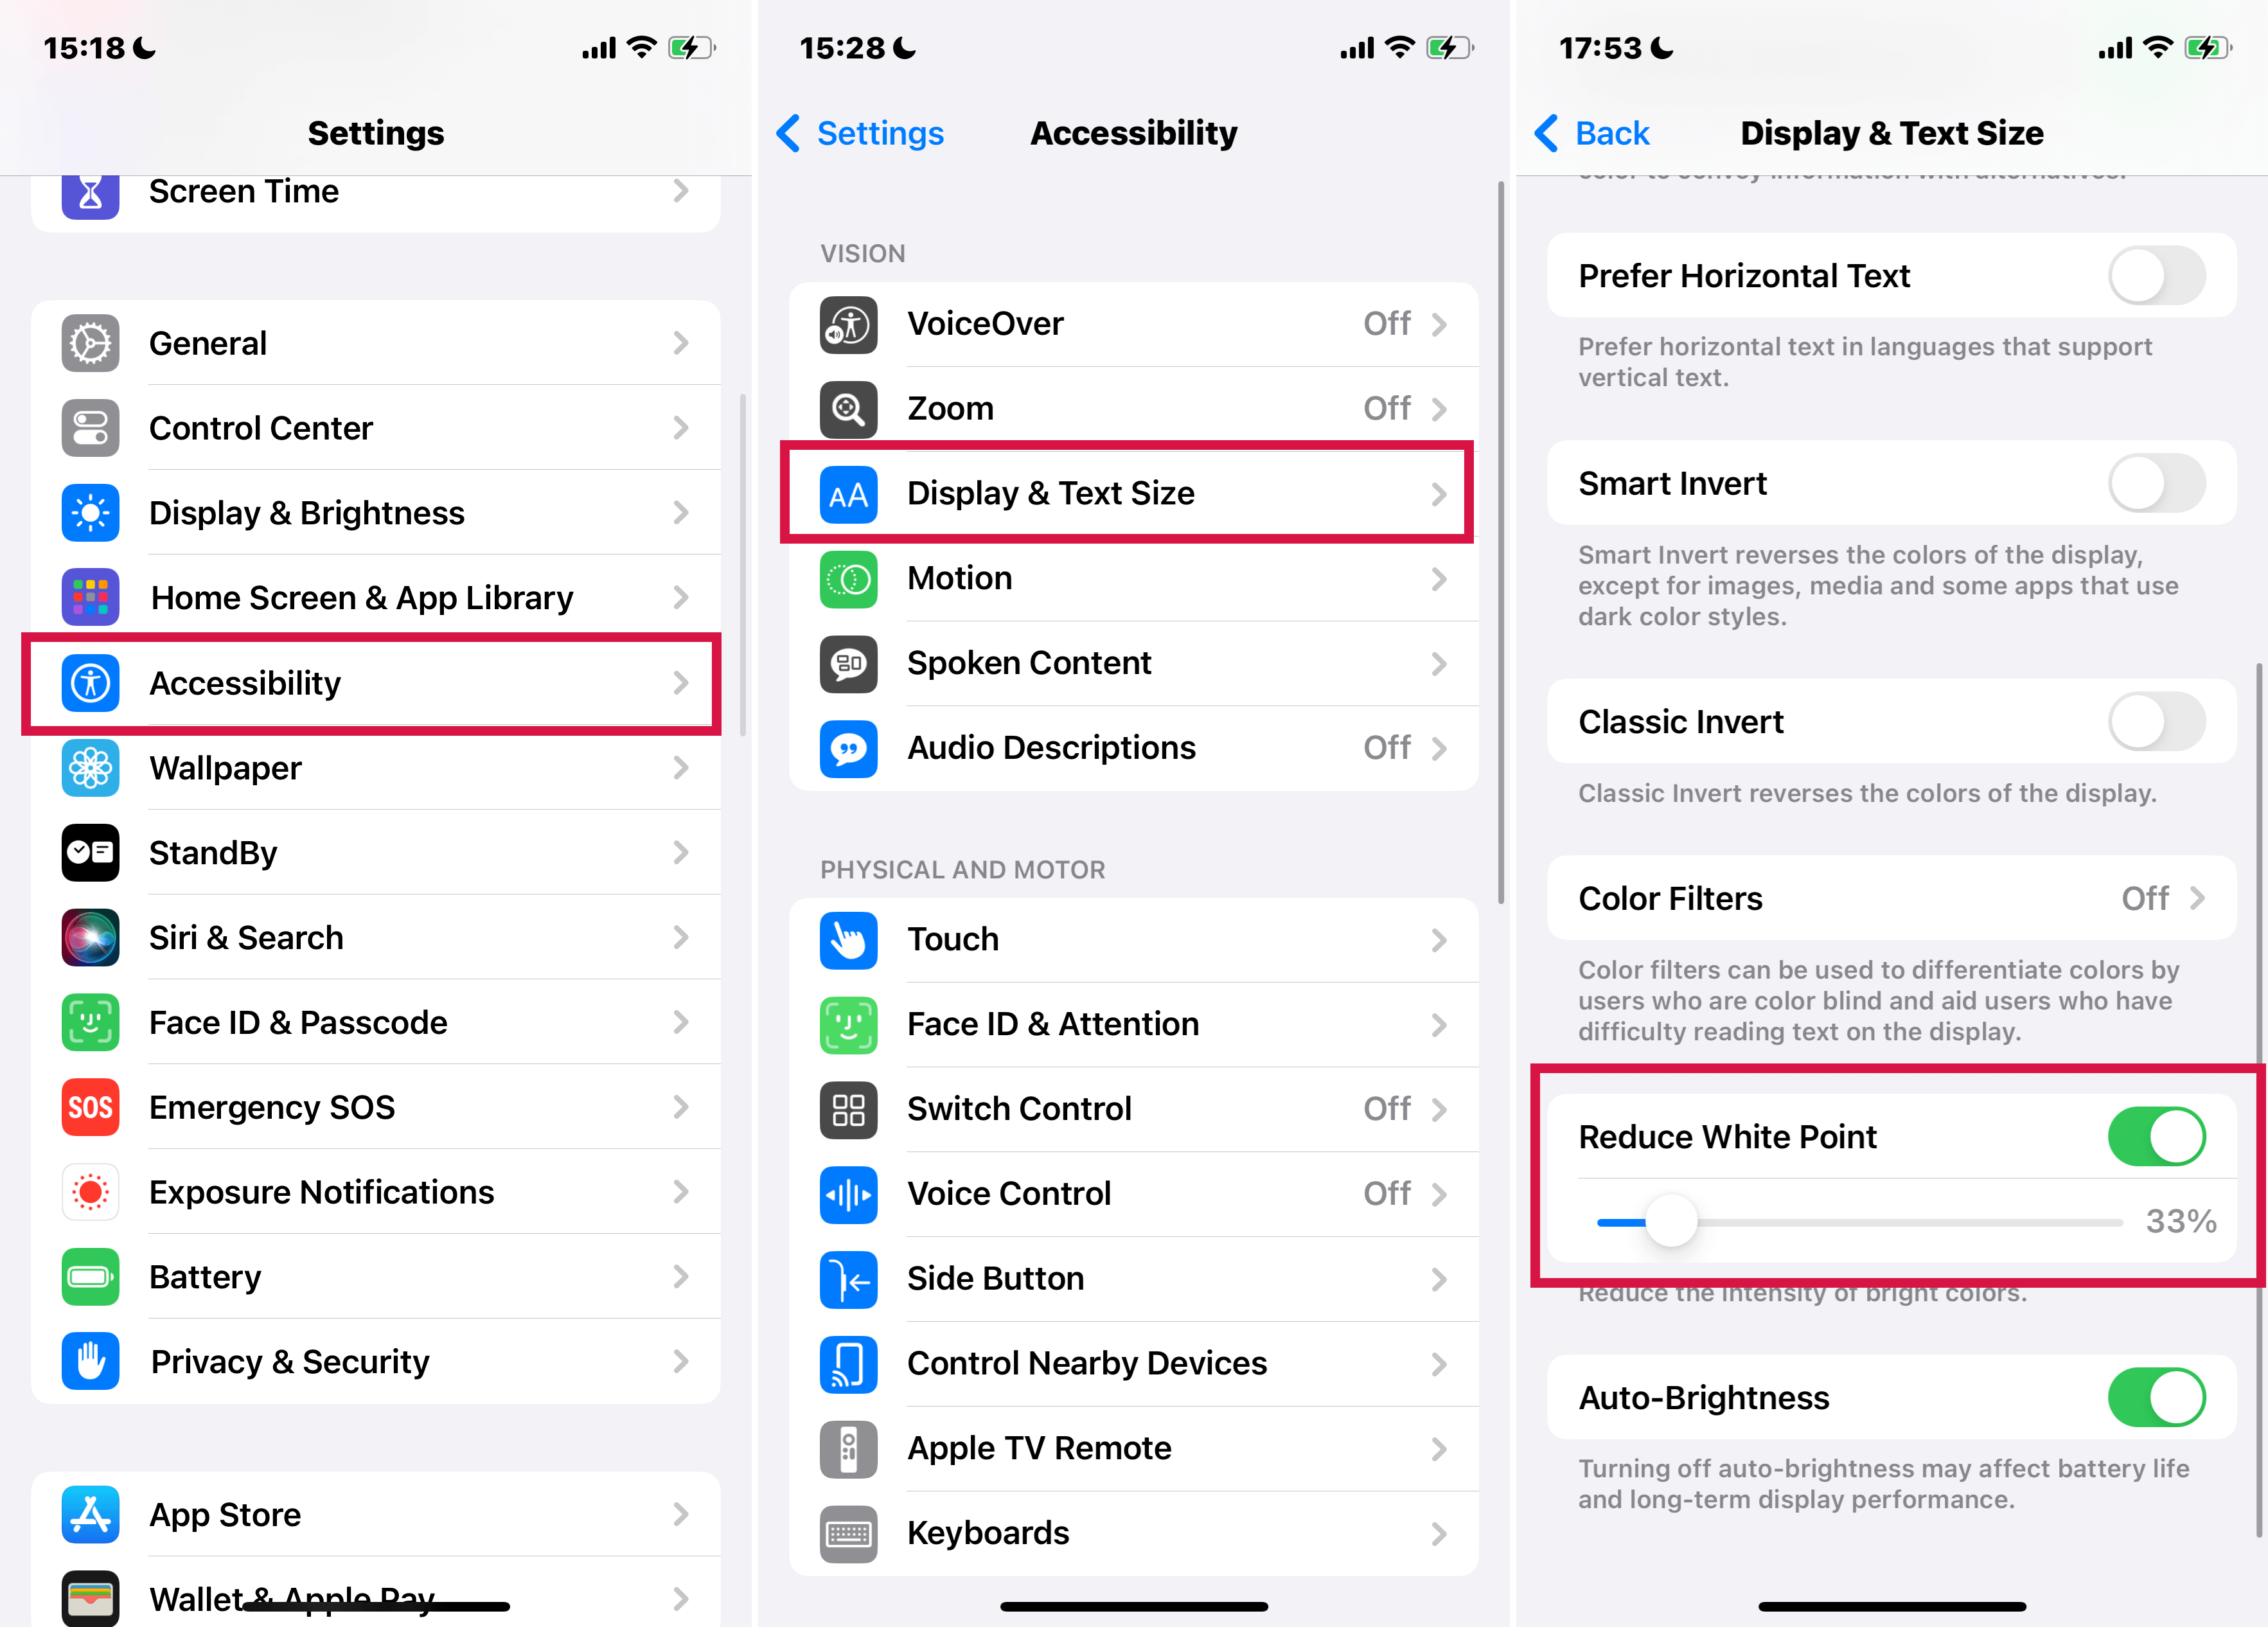
Reduce White Point: Reduce the intensity of bright colors without changing the brightness of the screen.
Navigate to Accessibility settings > Display & Text Size.
Toggle on 'Reduce White Point'.
Adjust the slider to control its effect.
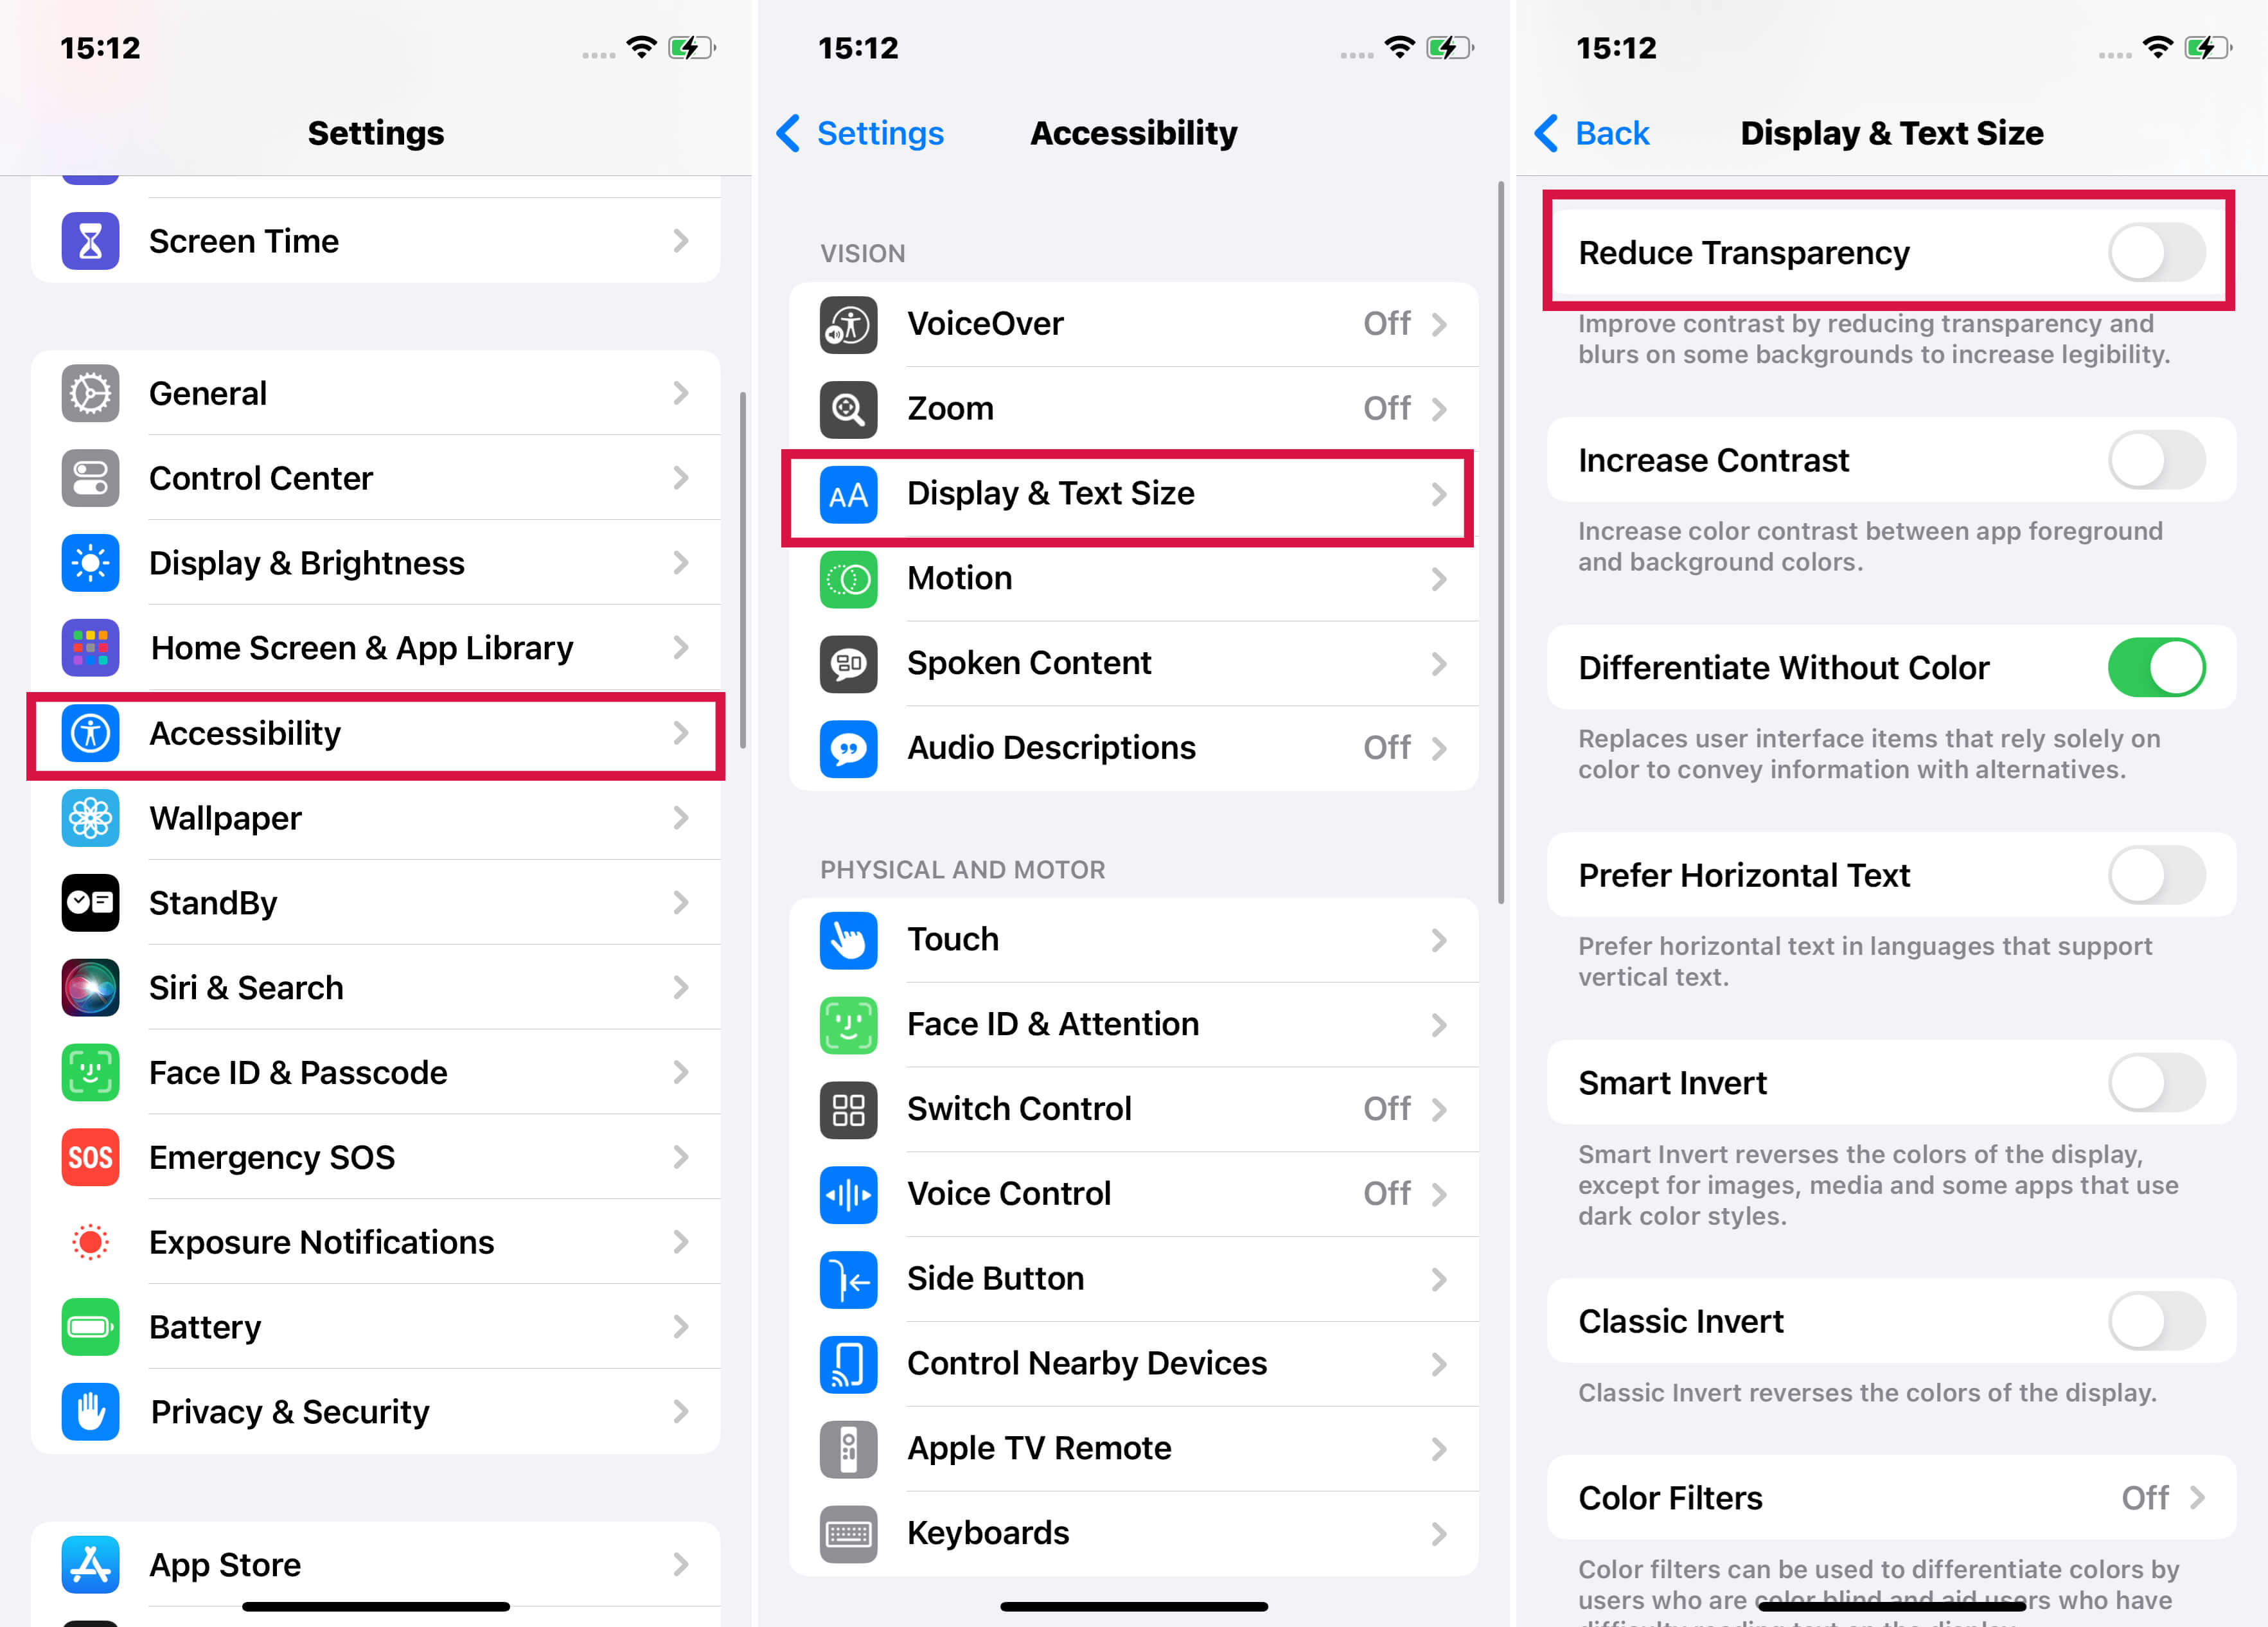
Reduce Transparency: Makes transparent or blurred backgrounds solid, simplifying the screen's appearance.
Go to Accessibility settings
Enable 'Reduce Transparency'. Search for it if you can't find it.
Differentiate Without Color: Replace color-based indicators with shapes or text for better differentiation.
Activate this in the Accessibility settings under 'Display & Text Size.'
On/Off Labels for Switches:
Switches will display "1" when on and "0" when off instead of just changing color.
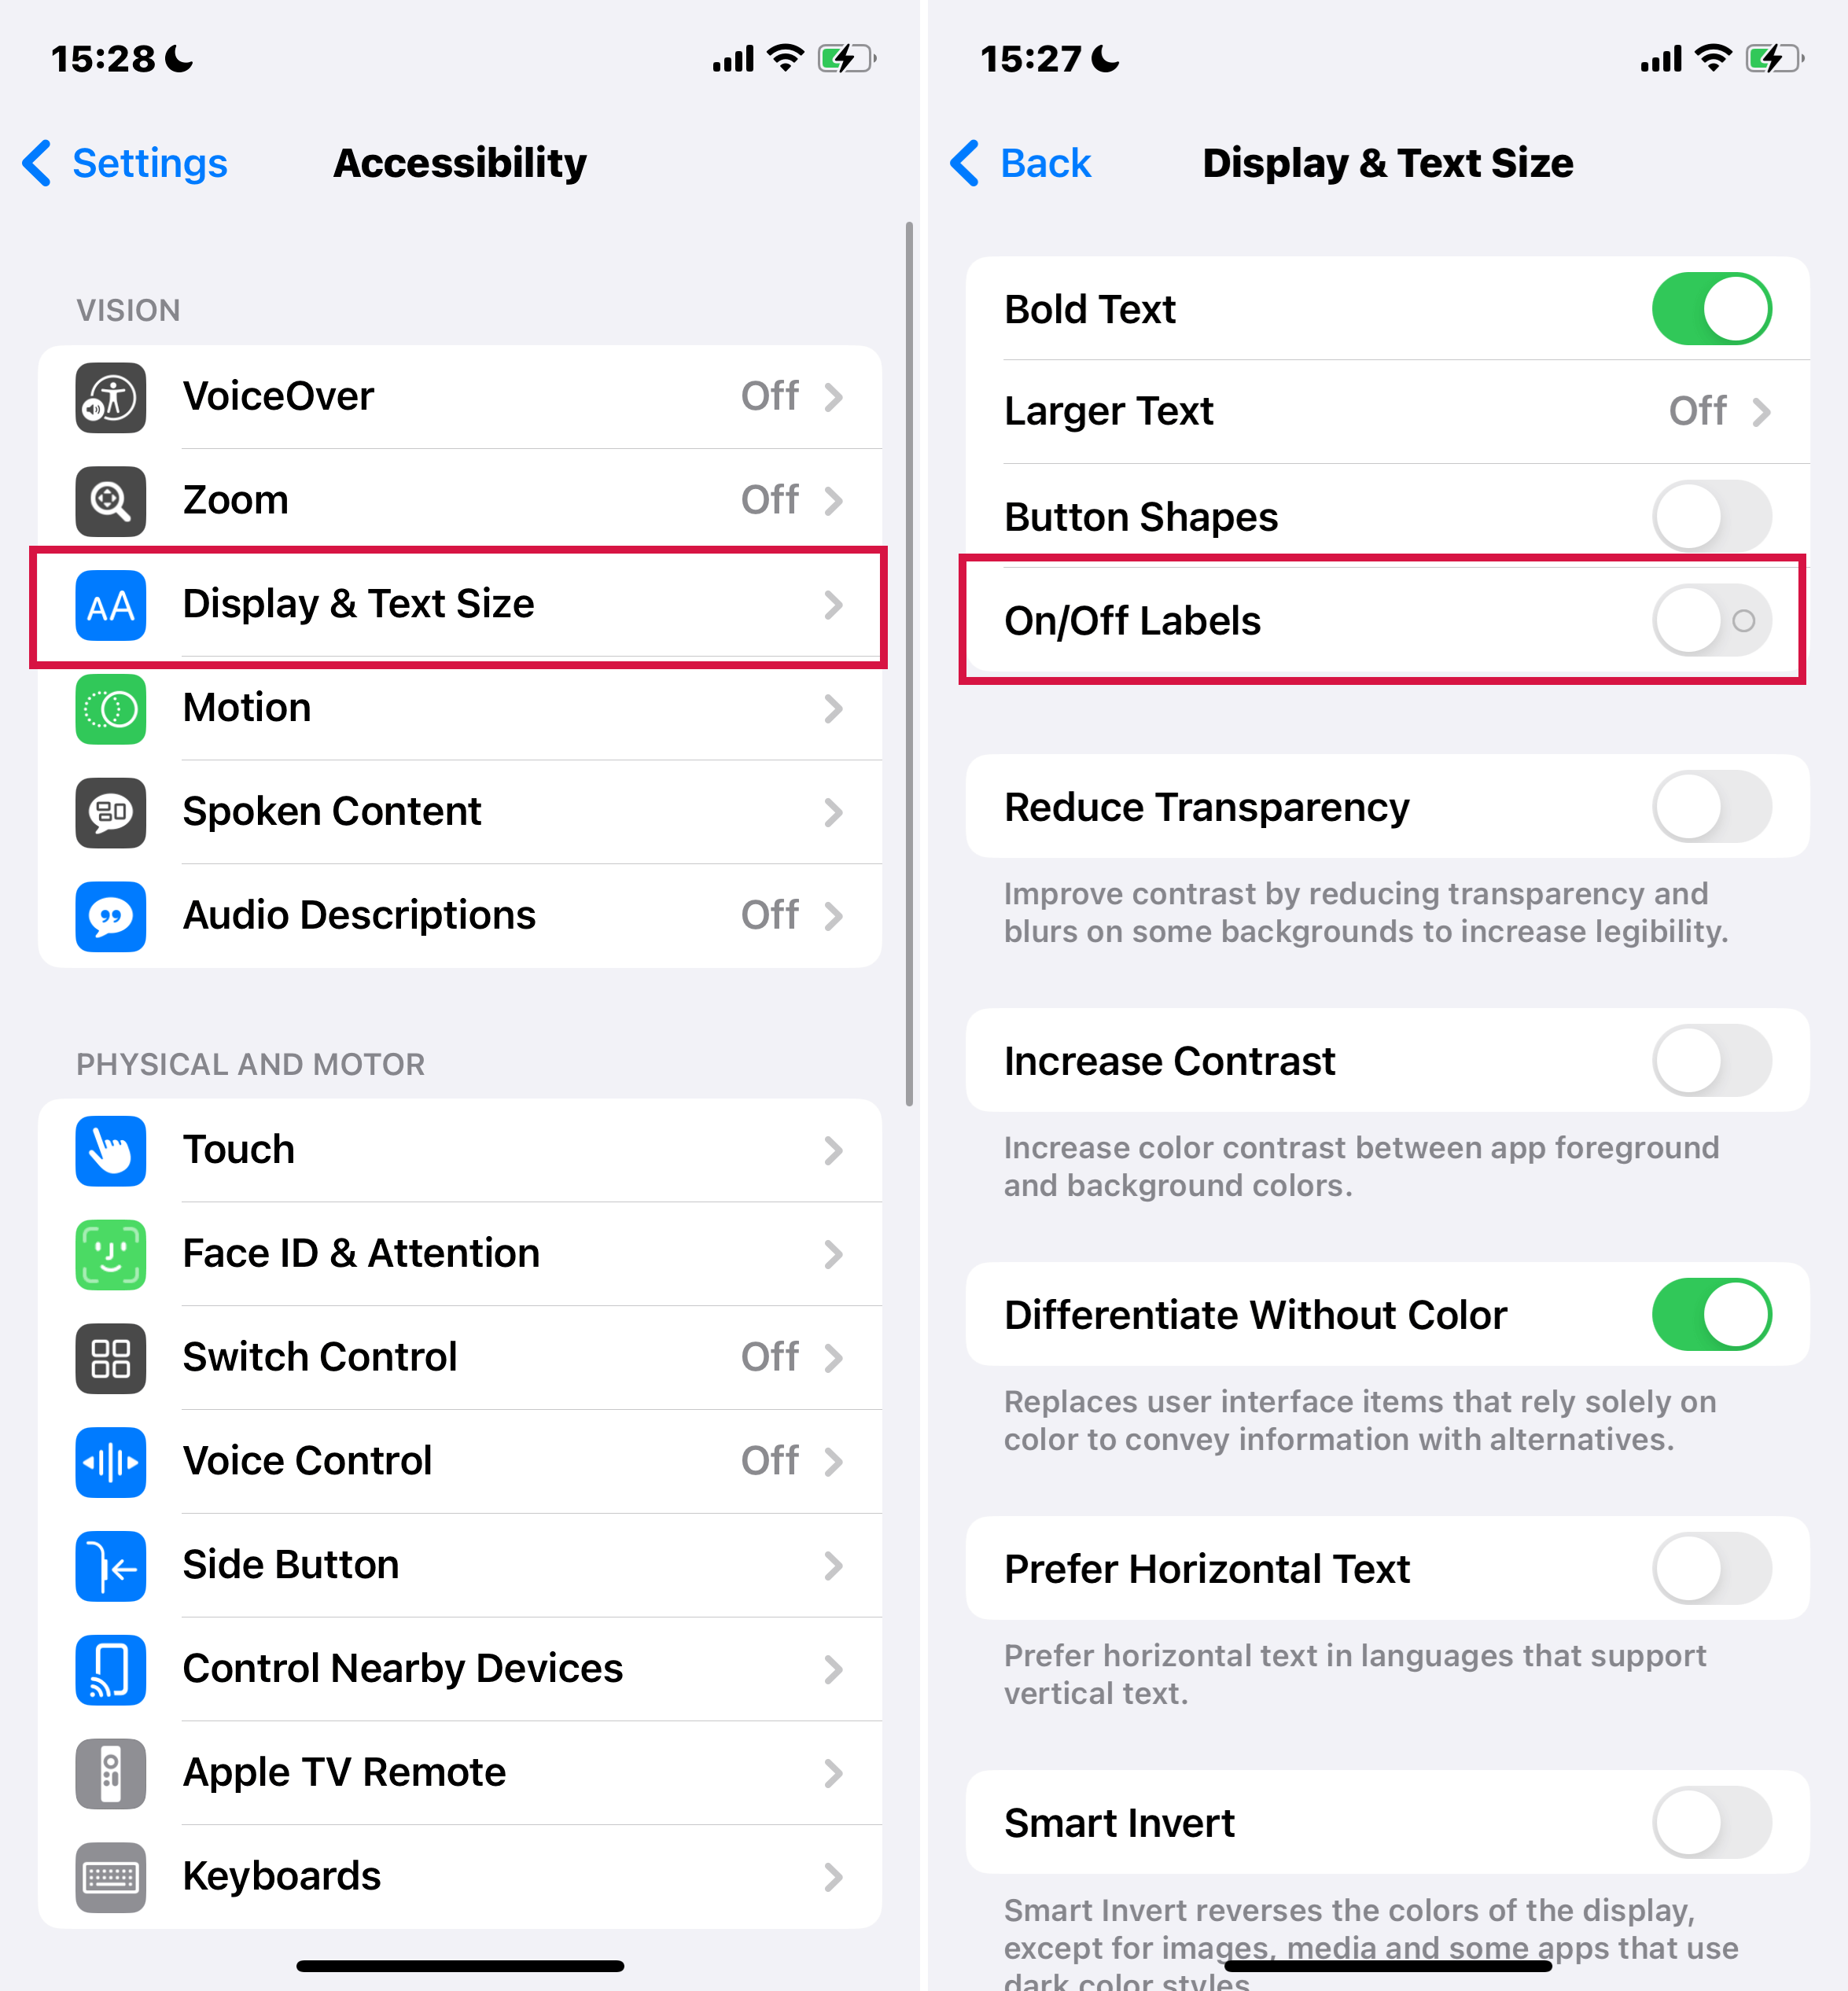
Find this option in Accessibility settings under 'Display & Text Size'.
Zoom-Specific Settings: To apply these settings only within the Zoom window, explore the Zoom settings on your iPhone.
Using Magnifier for Color Adjustment: The Magnifier app can also modify colors in your environment. Check the Magnifier settings for customization options.
Additional Display Accommodations on Your iPhone
Enable Larger Accessibility Sizes: Go to Settings > Accessibility > Display & Text Size, then turn on 'Larger Accessibility Sizes'.
Adjust Text Size: Use the slider to choose your preferred reading size. This feature is particularly helpful for far-sighted users or those who prefer larger text.
Button Shapes Feature: Adds visual indicators like underlines beneath 'Back' buttons to make navigation more intuitive.
On/Off Labels: Adds labels to switches in preference screens, enhancing clarity on what settings are enabled or disabled.
Reduce Transparency: This setting reduces transparency and blurs on some backgrounds, thereby improving overall screen contrast.
Increase Contrast: Enhances color contrast between app foreground and background colors, making content more distinguishable.
Differentiate Without Color: Replaces elements that rely solely on color to convey information, ensuring accessibility for all users, regardless of color perception.
Dynamic Text Size: Allows you to adjust the text size using a slider. This feature is supported by apps like Mail and Messages, catering to users who need larger or smaller text for comfortable reading.
Bold Text Option: Makes text more legible by displaying it in bold. Note that enabling this feature requires restarting your iPhone.
Final Words
In conclusion, mastering the various iPhone display settings can significantly enhance your visual experience.
Whether you're adjusting brightness, embracing Dark Mode, utilizing Night Shift, or exploring accessibility features, these tools offer a personalized and comfortable viewing experience.
Remember, your iPhone is designed to adapt to your needs, so take advantage of these settings to optimize your device for the best possible use.Stay tuned for more tips and tricks to enhance your iPhone experience!

