7 Ways to Clear 'iCloud Storage Is Full' Fast - Free
Have you ever encountered a pop-up alert saying your iCloud storage is full? Don't worry; it's a common scenario for many Apple users. This concise guide is designed to help you navigate through this digital clutter.
From simple tips on managing your iCloud storage to detailed steps for deleting unnecessary files, our article provides easy-to-follow solutions to reclaim your iCloud space efficiently. Let's dive in and free up that much-needed storage!
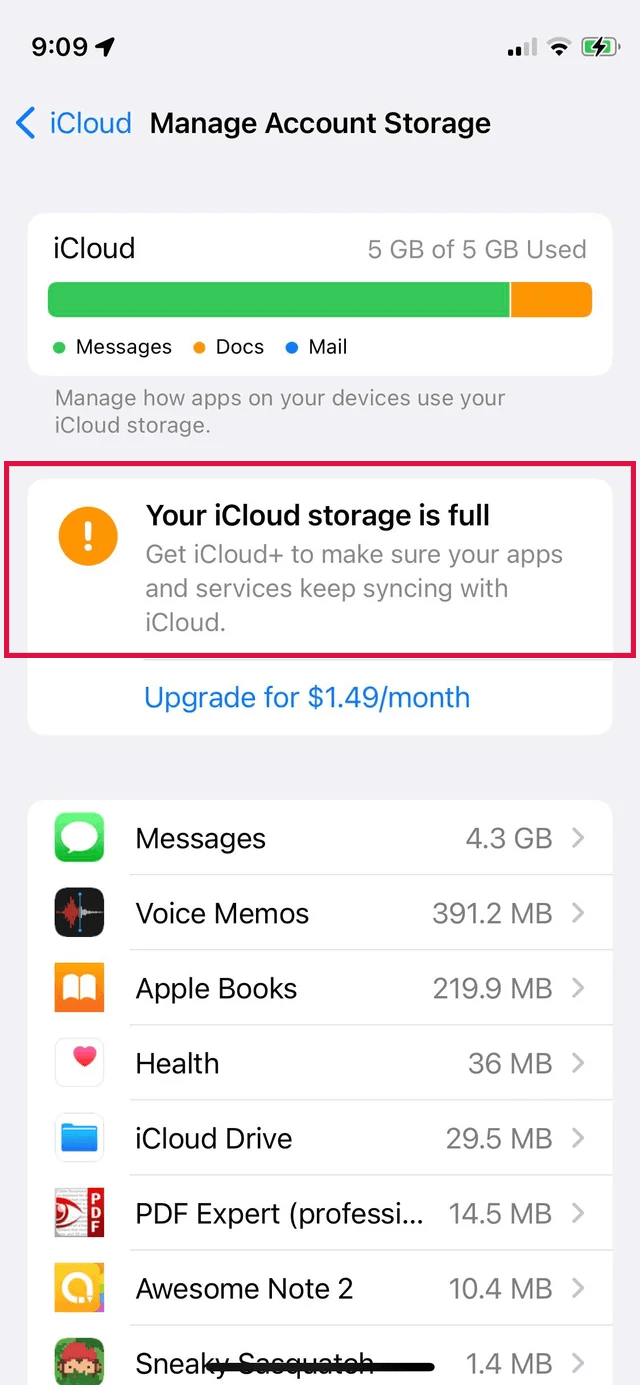
Why is Your iCloud Storage Full?
Apple provides a complimentary 5GB iCloud storage with its devices for various purposes like iCloud backups, iCloud Photos, and iCloud Drive. However, this space can quickly fill up, leading to a "storage full" alert.
To manage this, it's essential to understand what consumes your iCloud storage. You can check your iCloud storage usage in your device settings or on iCloud.com.
Steps to Identify What Consumes Your iCloud Storage=
Go to your device's settings and select iCloud.
Choose to Manage Storage.
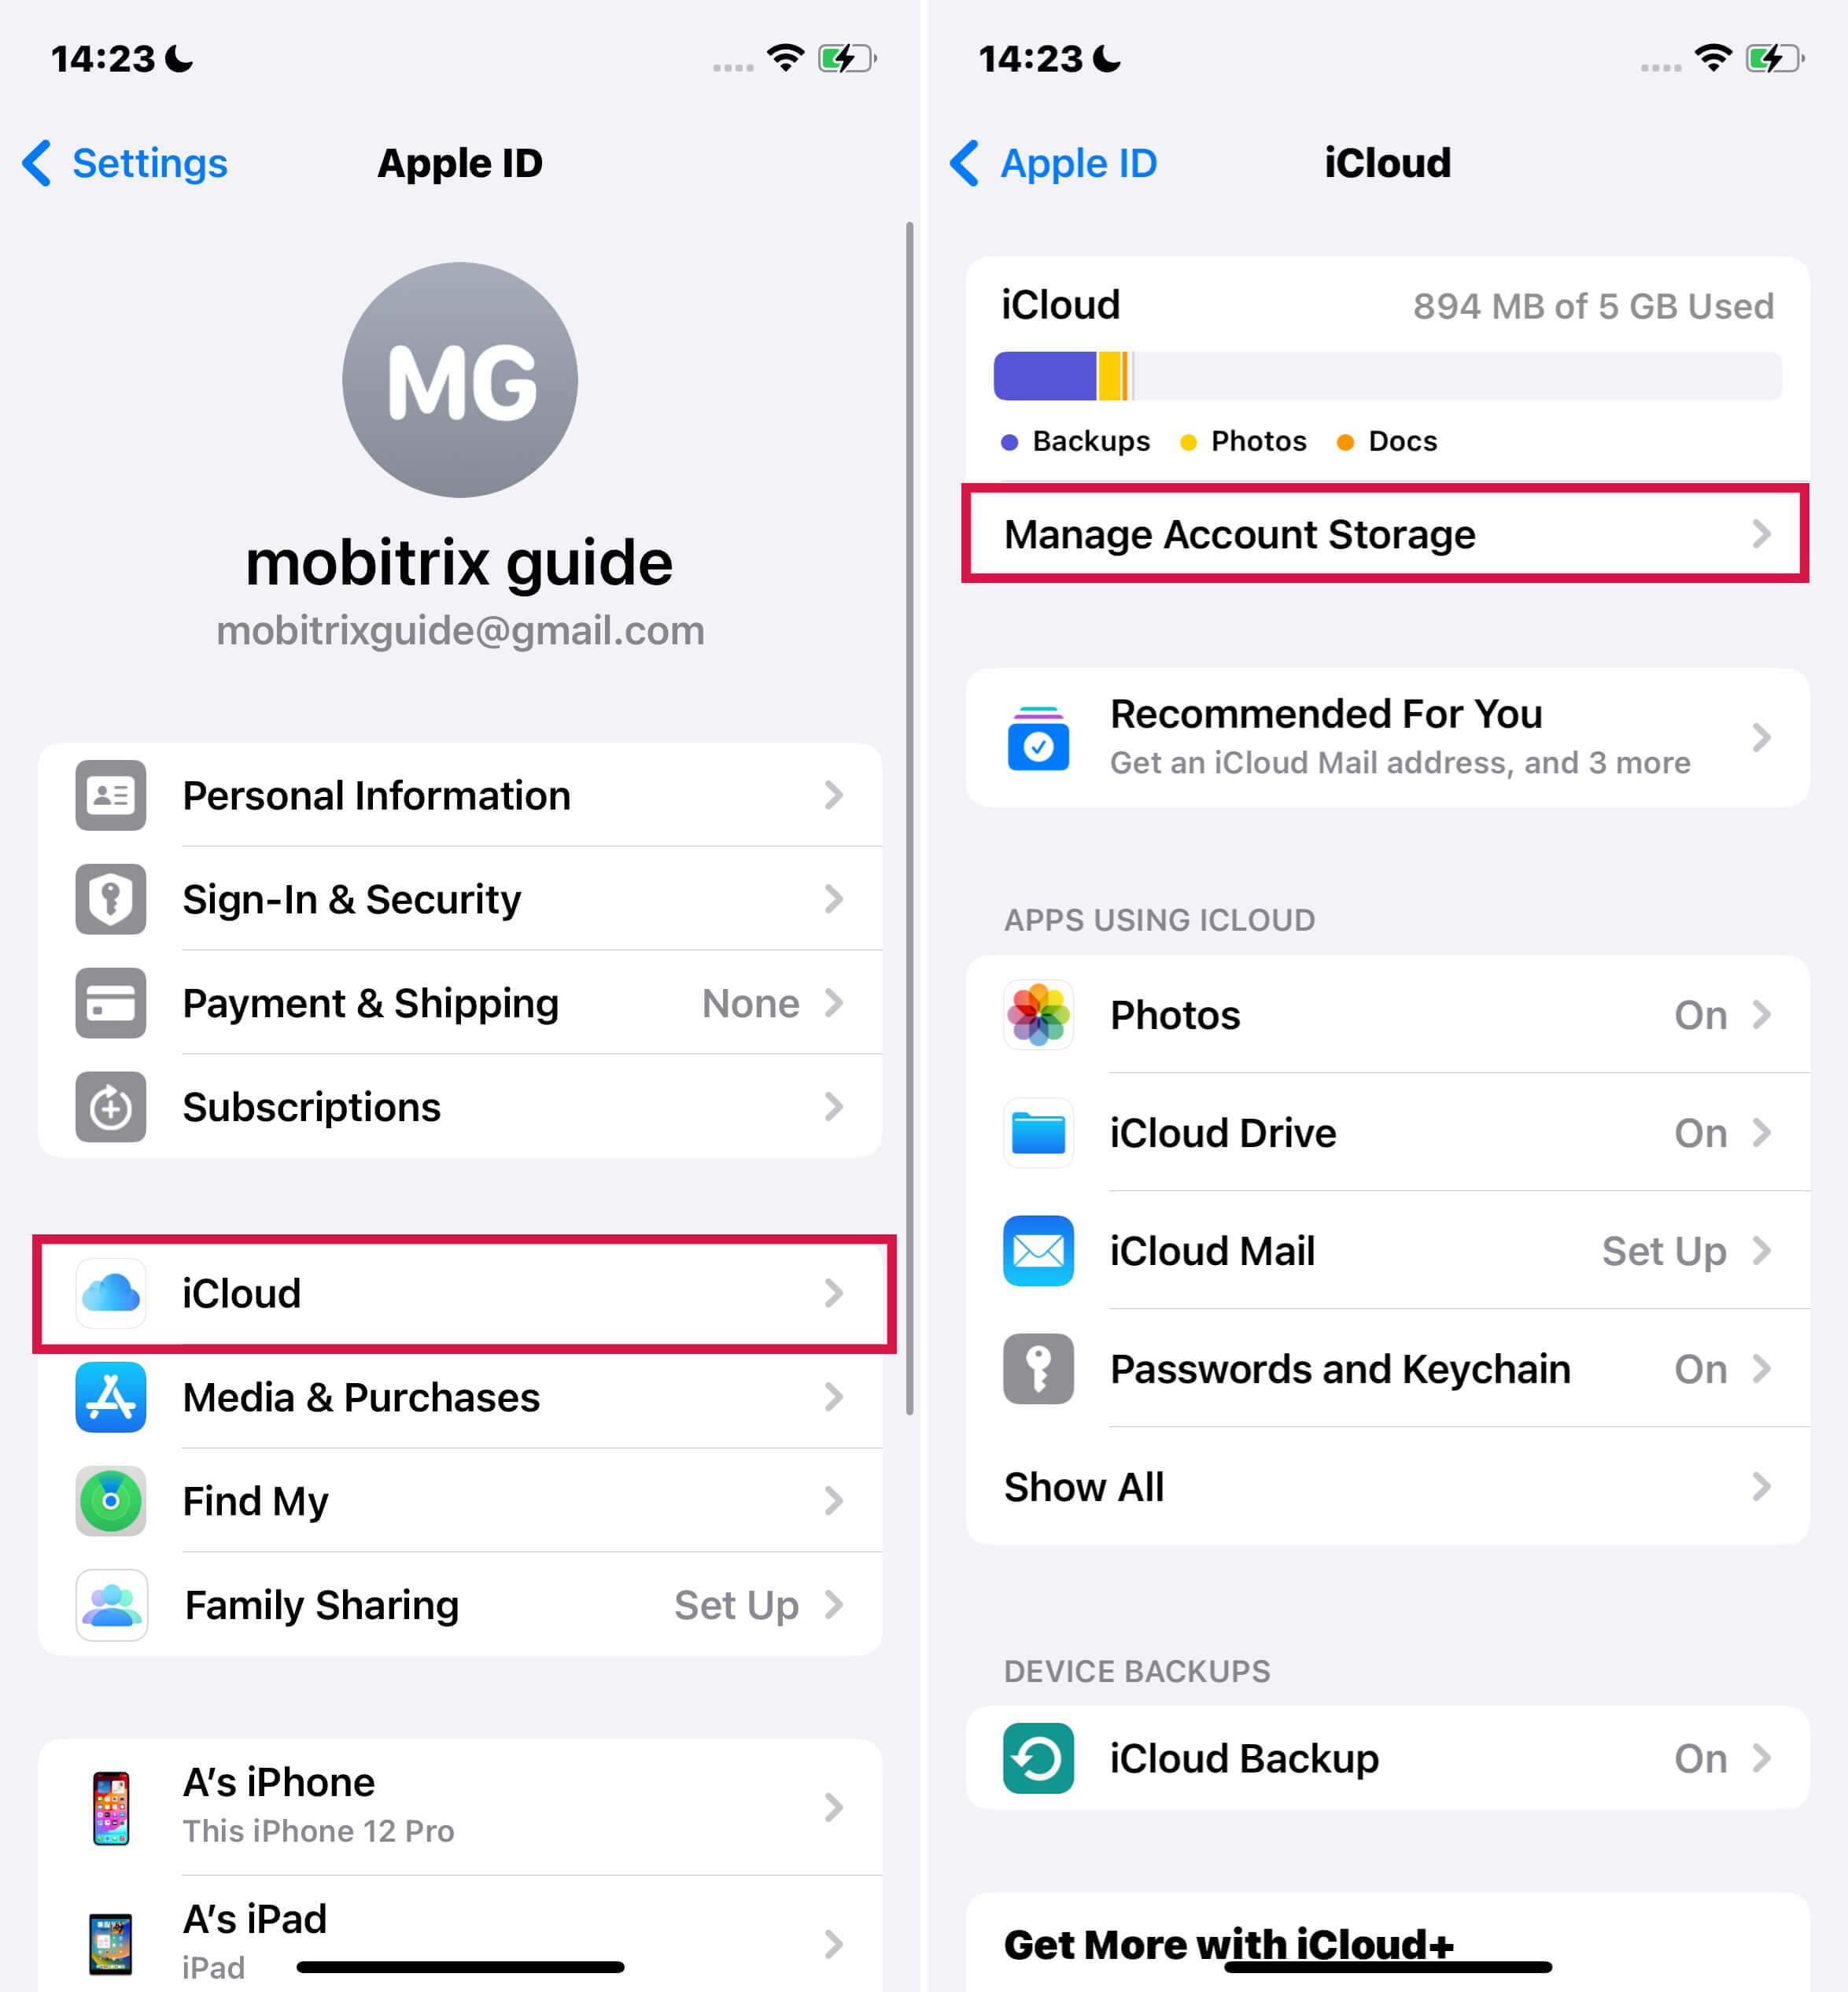
Here, you'll see a bar chart detailing the files occupying your iCloud space, such as backups, photos, and messages.
Below the chart, there's a list of apps along with the amount of iCloud storage they're using.
Fix 1: Utilize 'Recommended for You' to Free Up iCloud Storage
For iOS 18 or iPadOS 17 users and later, the 'Recommended for You' feature in iCloud settings is a helpful tool for managing storage. It identifies items like redundant photos, large files, or outdated backups that you can delete to free up space.
Steps to Use 'Recommended for You'
On your device, go to Settings, tap on your name, and then select iCloud.
Explore 'Recommended for You': In the iCloud menu, tap 'Recommended for You'. This section will present various options to help you manage your storage effectively.
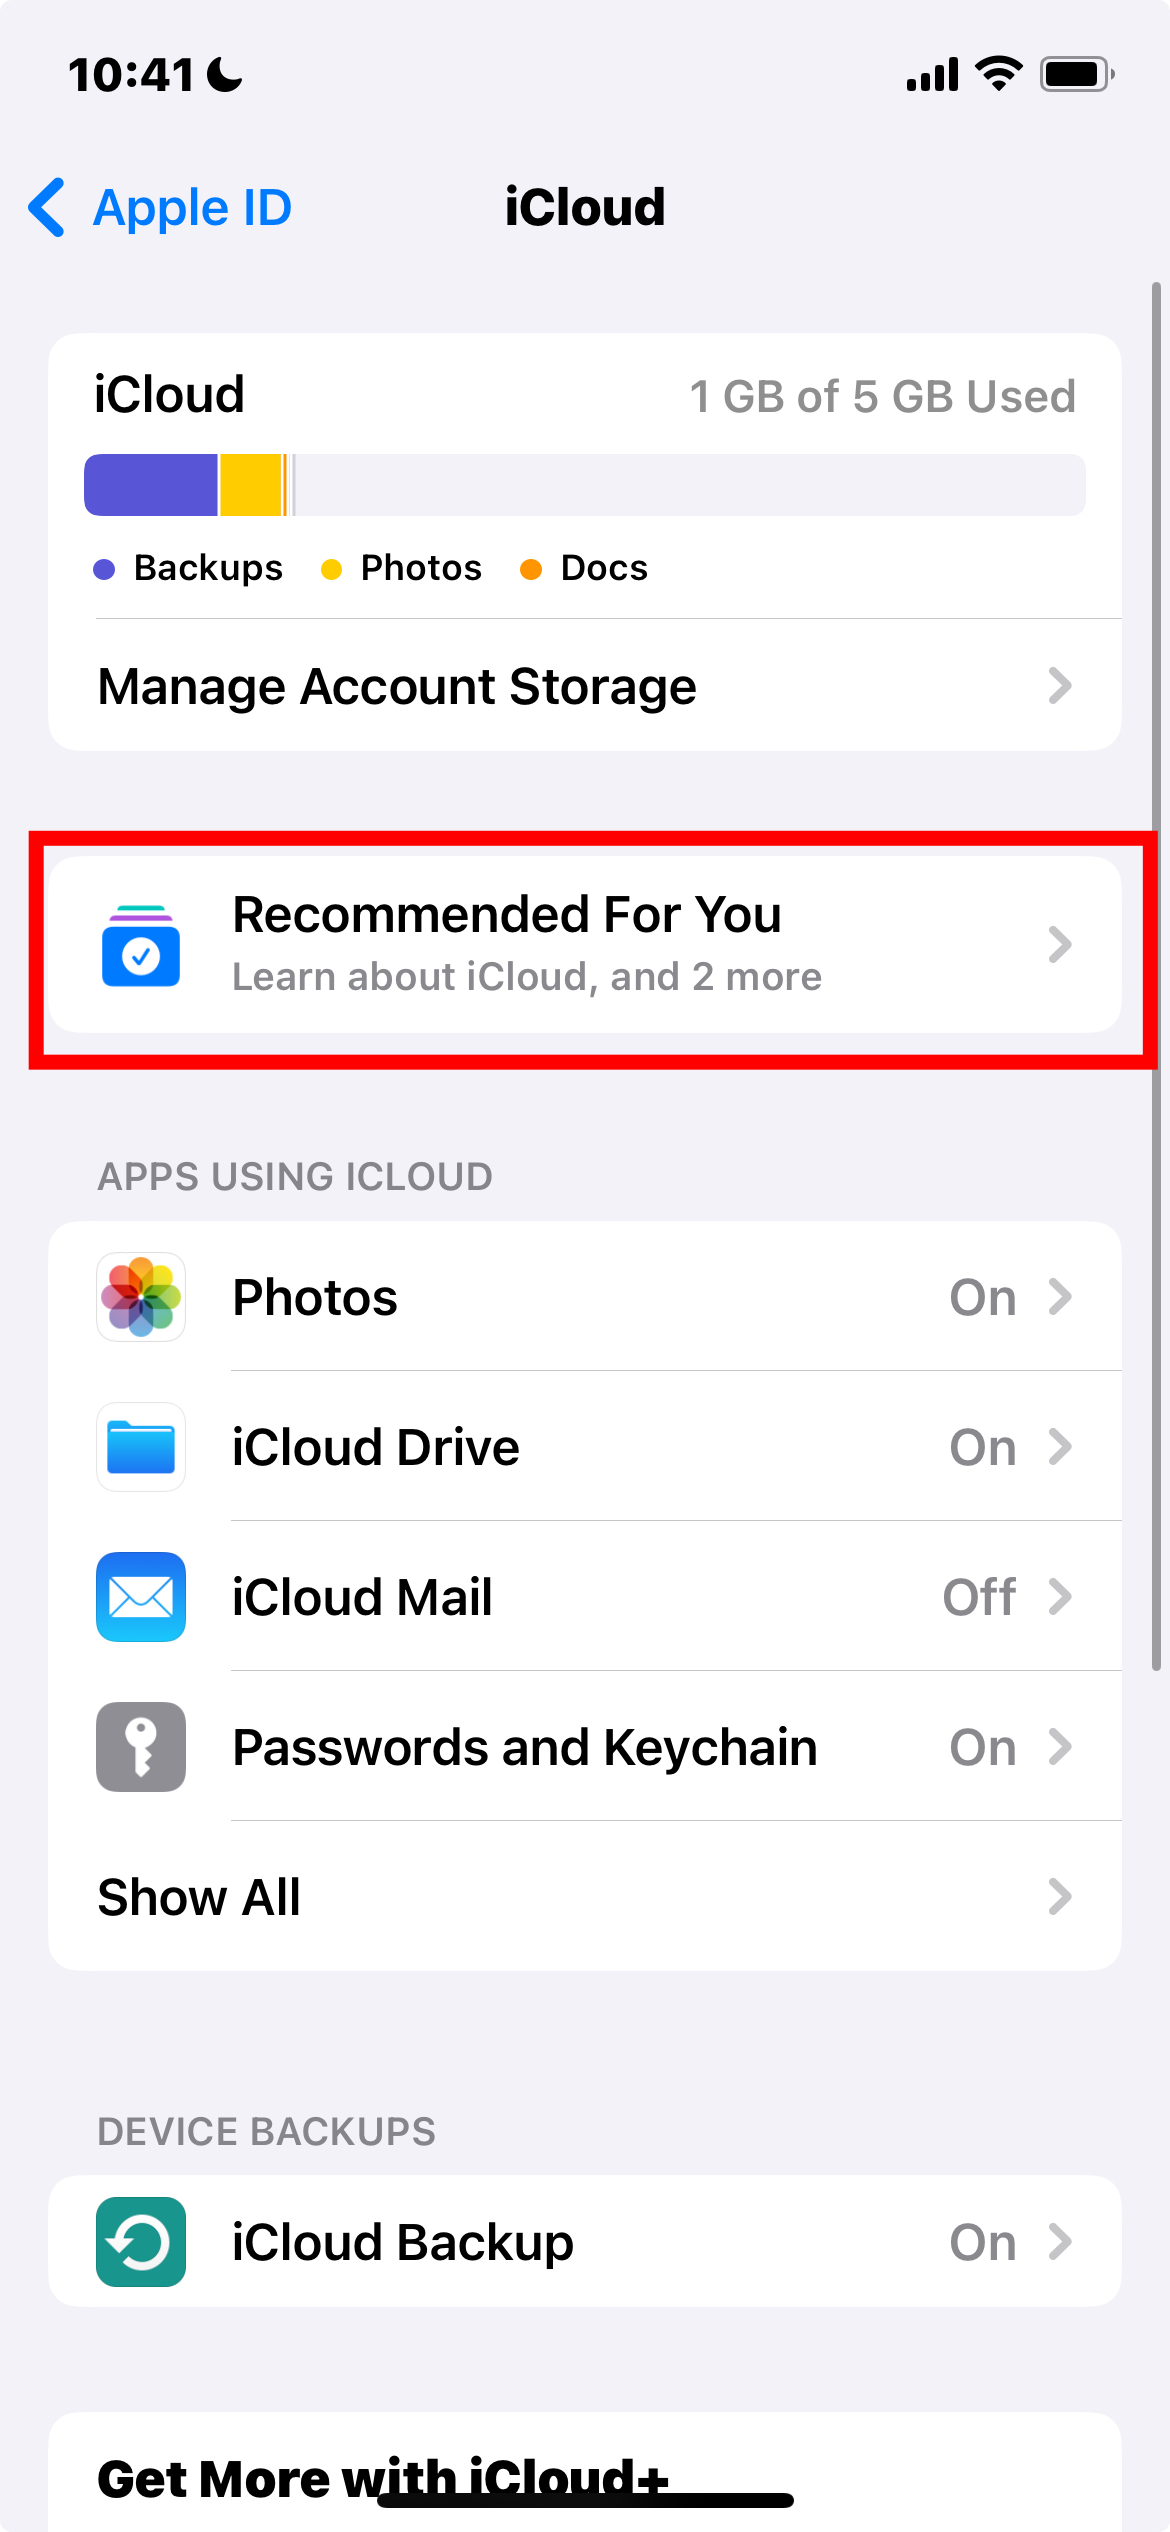
Review Backups: Tap on this to find and delete backups from devices you no longer use.
Review Photos & Videos: Use this to eliminate duplicate photos, unnecessary screenshots, or videos taking up extra space.
Review Large Files: This option allows you to identify and delete large files you might not need, freeing up a significant amount of space.
If 'Recommended for You' doesn't show any suggestions, you can still manually go through your iCloud content and decide what to delete.
Fix 2: Delete Photos in iCloud Photos
iCloud Photos syncs and updates all your photos and videos across devices, consuming iCloud storage.
You can free up space by deleting unnecessary images and videos from the Photos app on any device. Or you can delete all of them if you have a backup.
Remember, when you delete a photo or video in iCloud Photos, it gets removed from all devices logged in with the same Apple ID.
Steps to Delete Photos and Videos in iCloud Photos
Backup Important Photos and Videos: Before deleting, ensure you've backed up any photos and videos you wish to keep.
Steps for Deleting on iPhone or iPad:
Open the Photos app and tap Library at the bottom.
Select All Photos.

Tap Select, then choose the photos or videos you want to delete.
Tap the Delete button, then confirm by tapping Delete Photo.

Deleting on Mac:
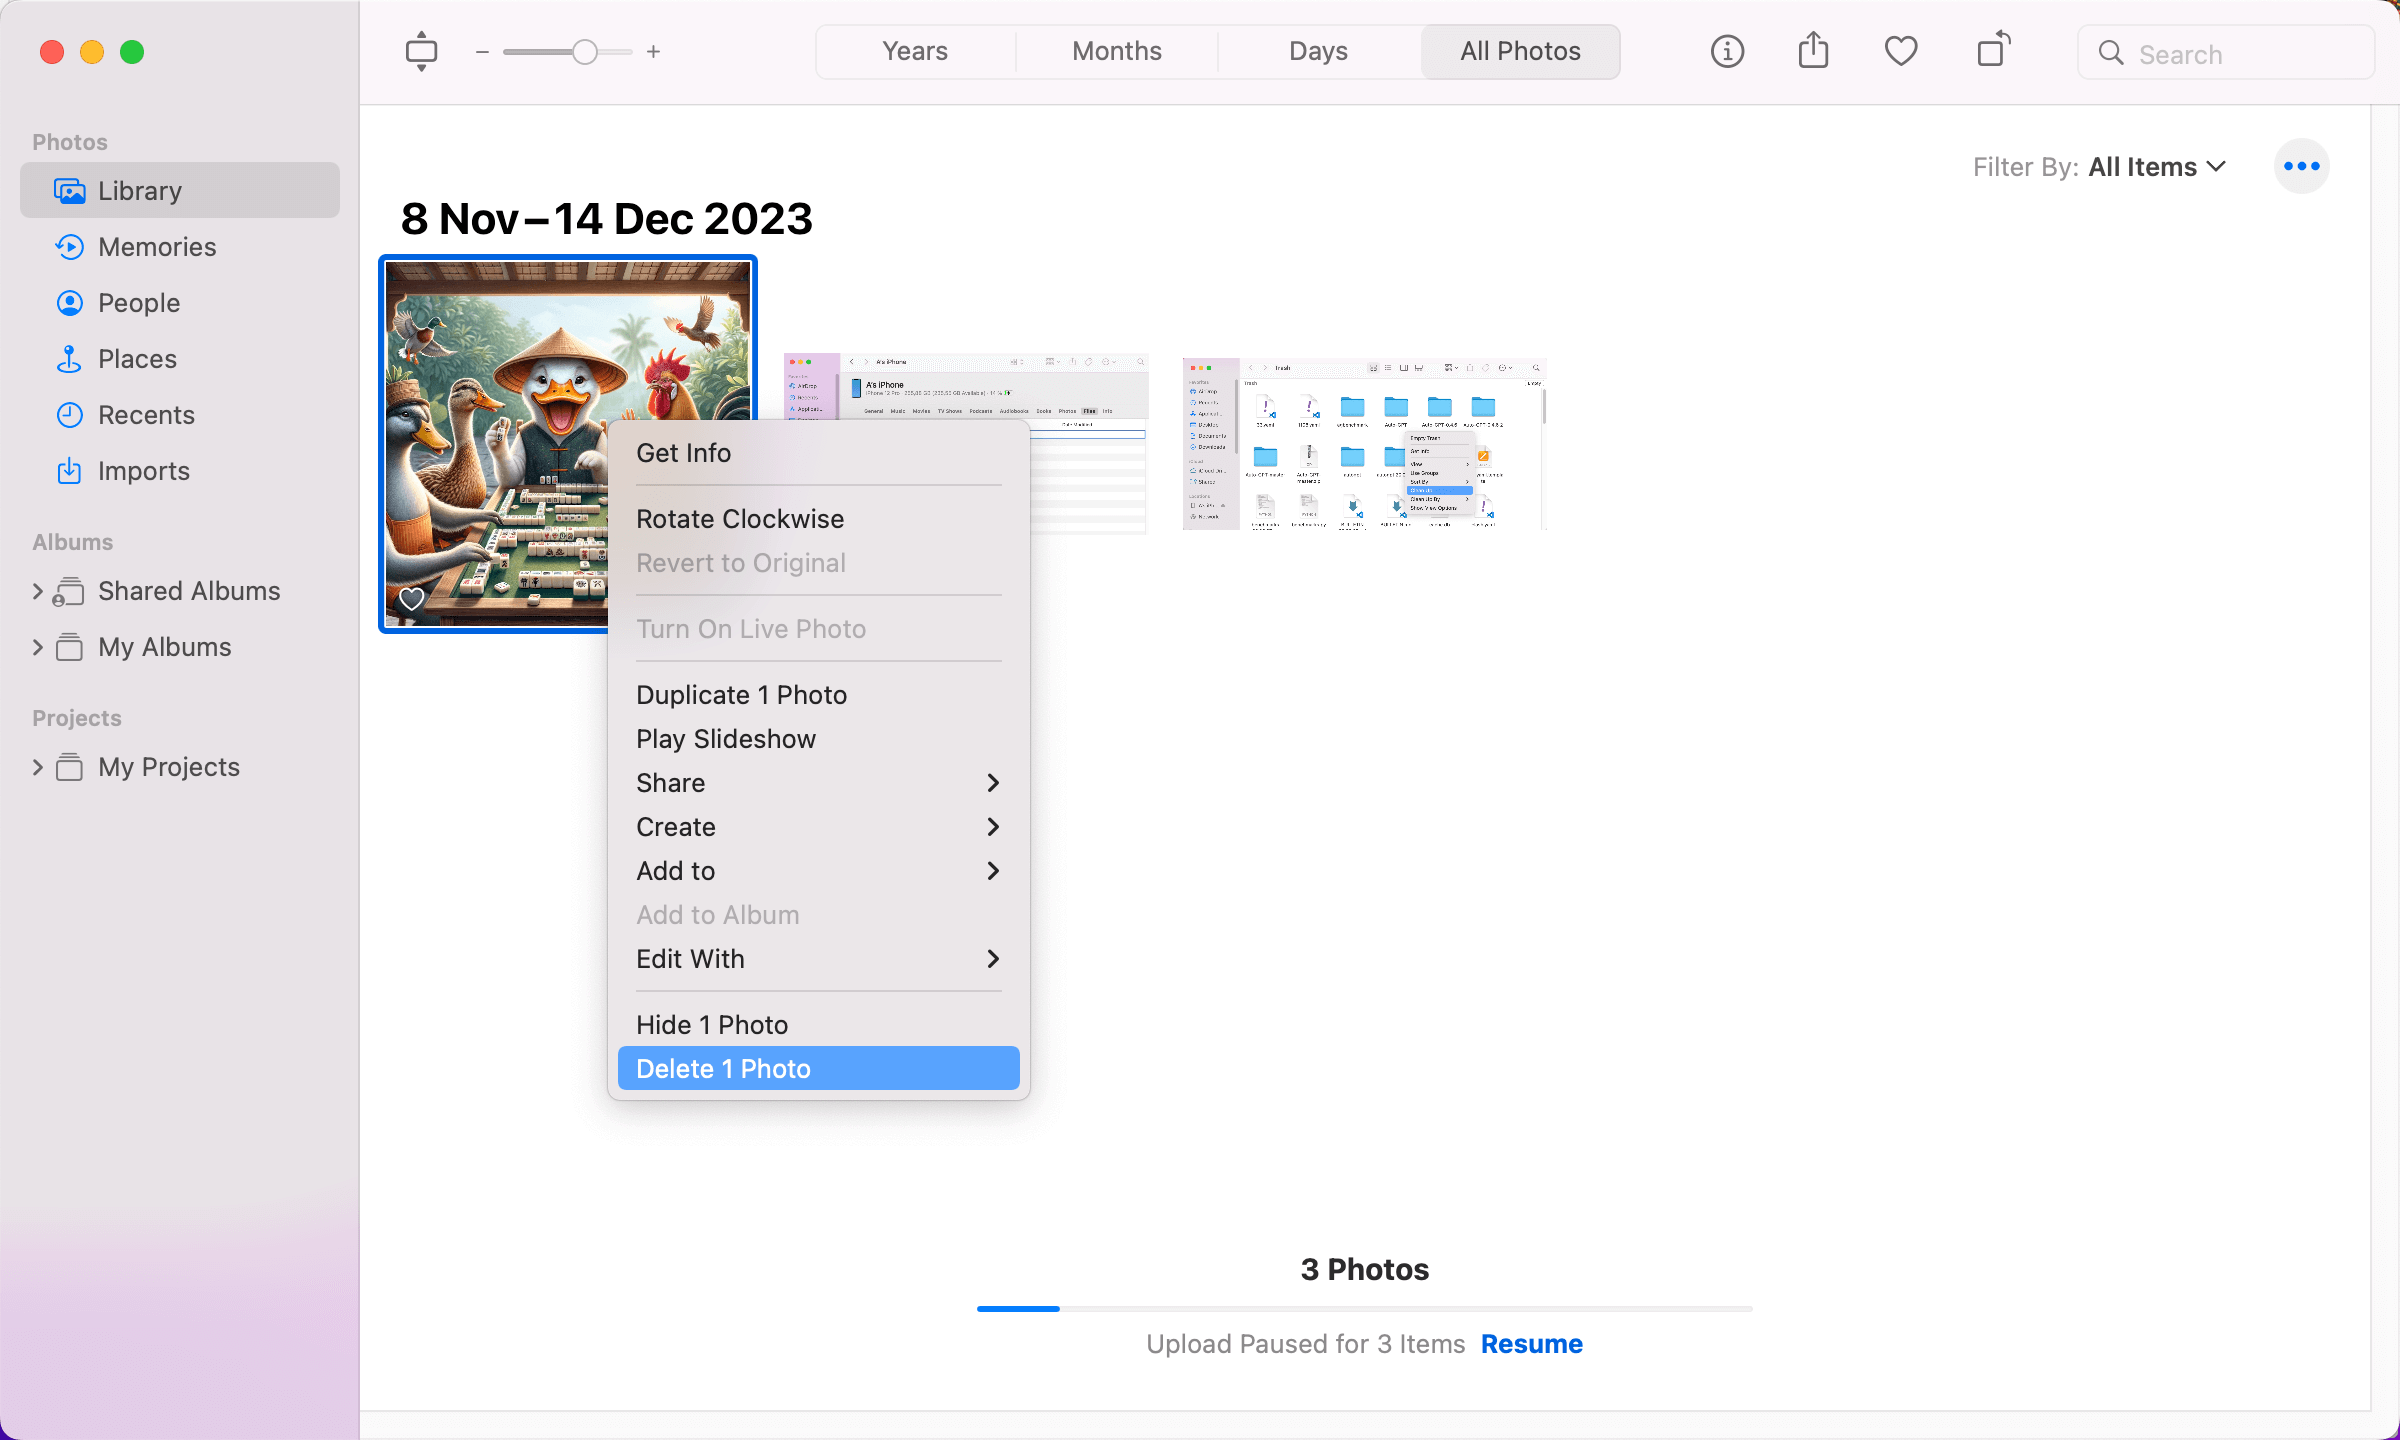
Open the Photos app.
Select the items you wish to delete.
Press the delete key, control-click, or right-click and choose Delete Photos. Confirm the deletion.
Deleting on iCloud.com:
Sign in to iCloud.com from any device.
Open the Photos app.
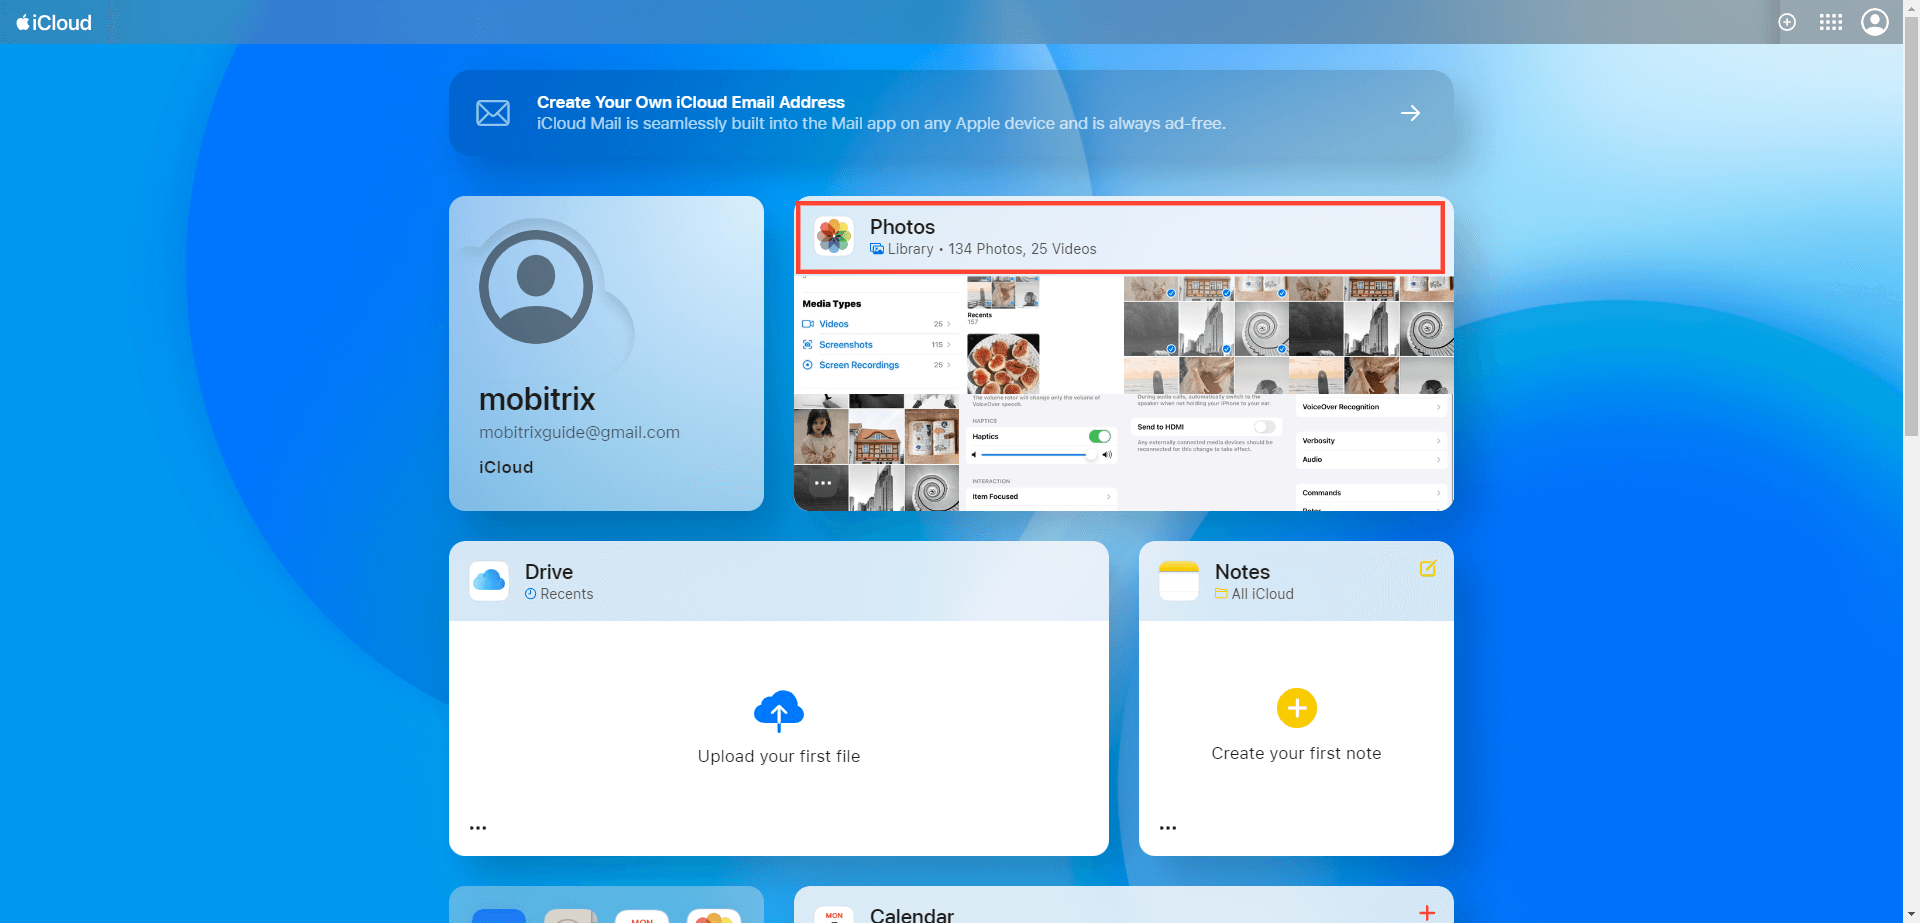
Select the photos or videos to delete. Use Command (Mac) or Control (PC) for multiple selections.
Tap the Delete button, then confirm by tapping Delete.

Note:
If you don't use iCloud Photos, your Camera Roll is part of your iCloud Backup. To manage this, save photos to your computer, then manually back up your device.
To reduce backup size, turn off Photos in Backup or upgrade to iCloud+ for additional storage.
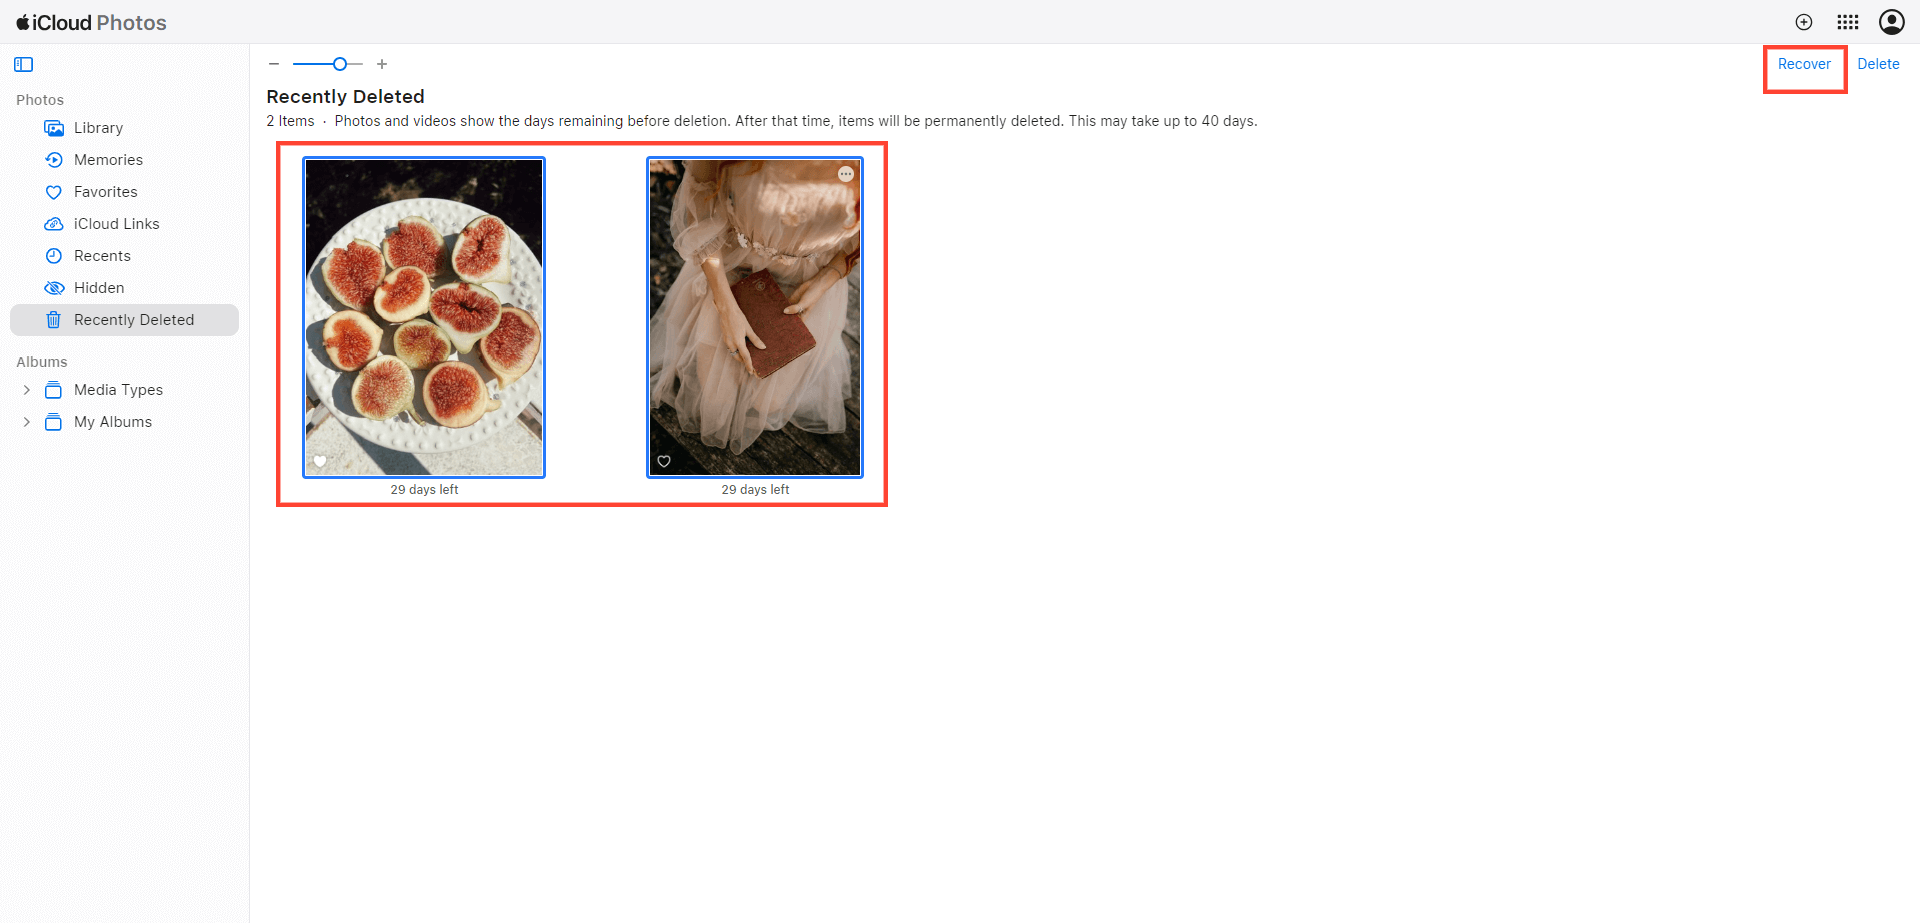
If you accidentally deleted a photo on your iPhone, try to recover them immediately.
Fix 3: Minimize the Size of Your iCloud Backup
iCloud automatically backs up the most critical data on your iPhone or iPad. While many apps will back up to iCloud by default, you can reduce your iCloud backup size by deselecting apps you don't use or deleting old backups. This can significantly free up space in your iCloud account.
Steps to Reduce iCloud Backup Size
Choose Which Apps to Back Up:
Navigate to Settings > [your name] > iCloud.
Select Manage Account Storage or Manage Storage, then tap Backups.
Choose the device you're currently using.
For each app, decide if you want to back it up. Turn off backups for apps you don't use by toggling them off.
Select Turn Off & Delete to confirm. This action stops iCloud Backup for that app and removes its data from iCloud.
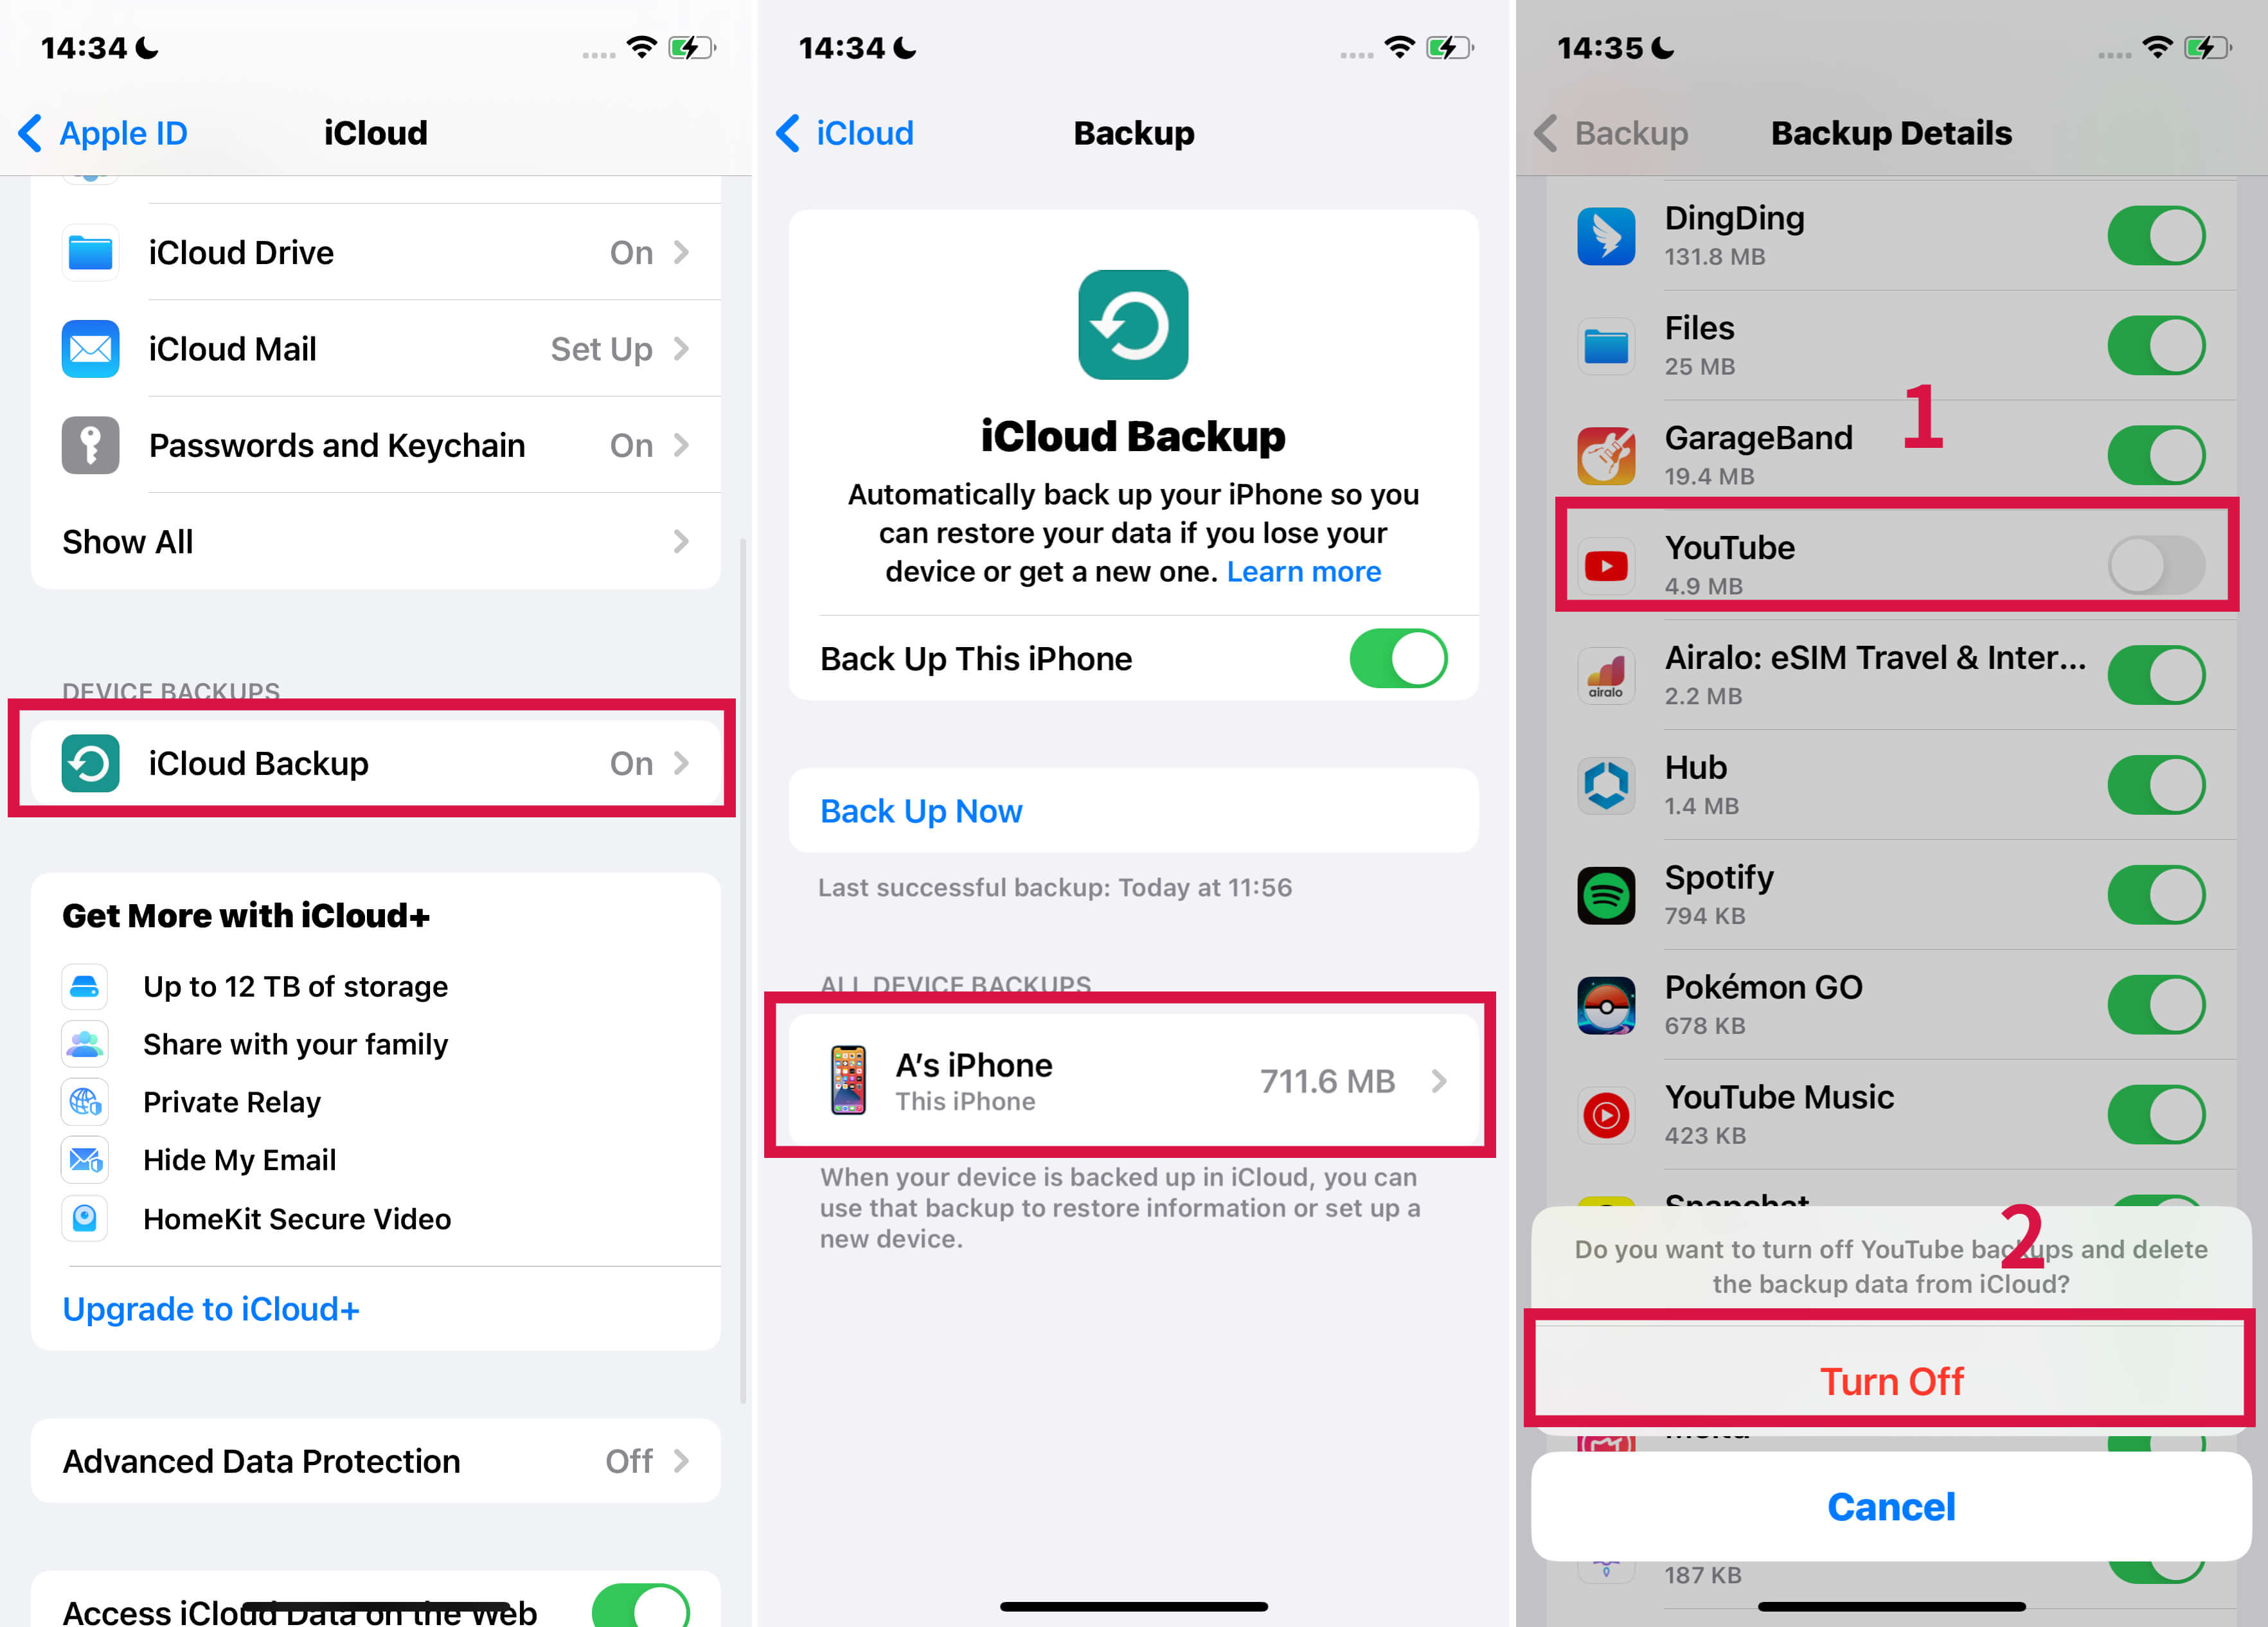
Note: Some essential apps are always backed up and cannot be turned off.
Delete Old Backups and Turn Off iCloud Backup:
For iPhone or iPad:
Go to Settings > [your name] > iCloud.
Tap Manage Account Storage or Manage Storage, then select Backups.
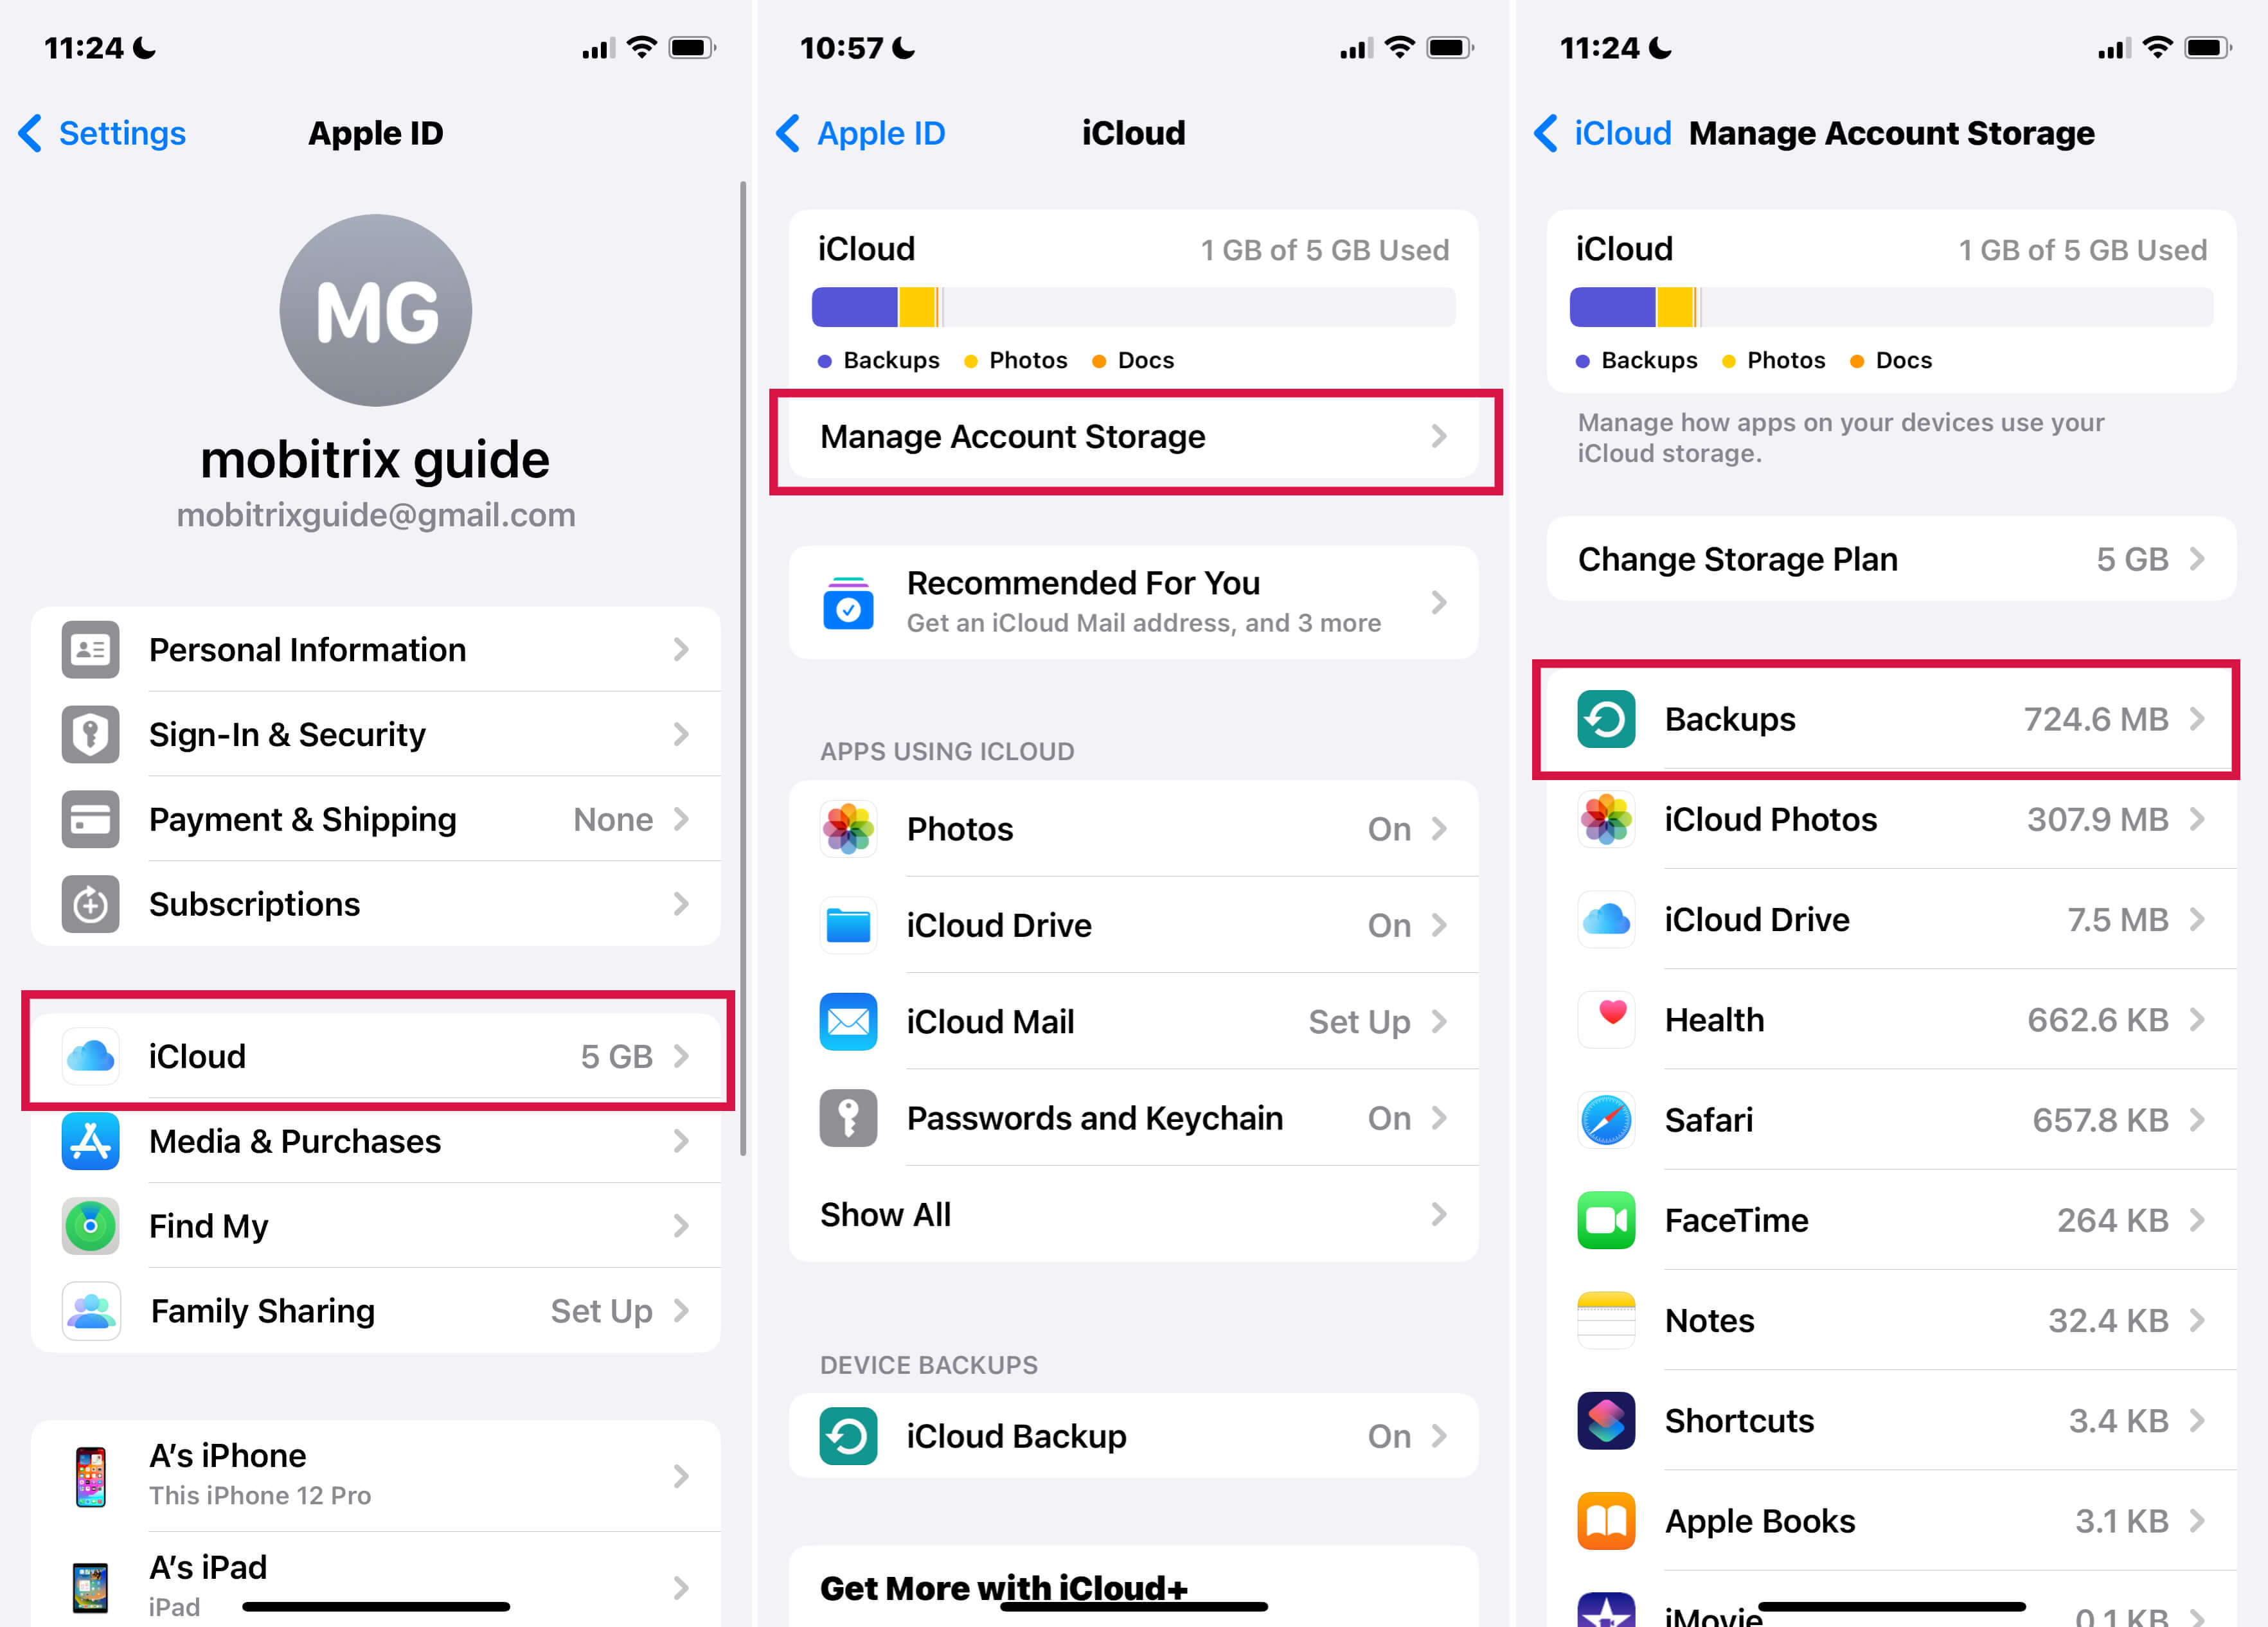
Choose the device backup to delete, and tap Delete Backup> Turn Off & Delete.
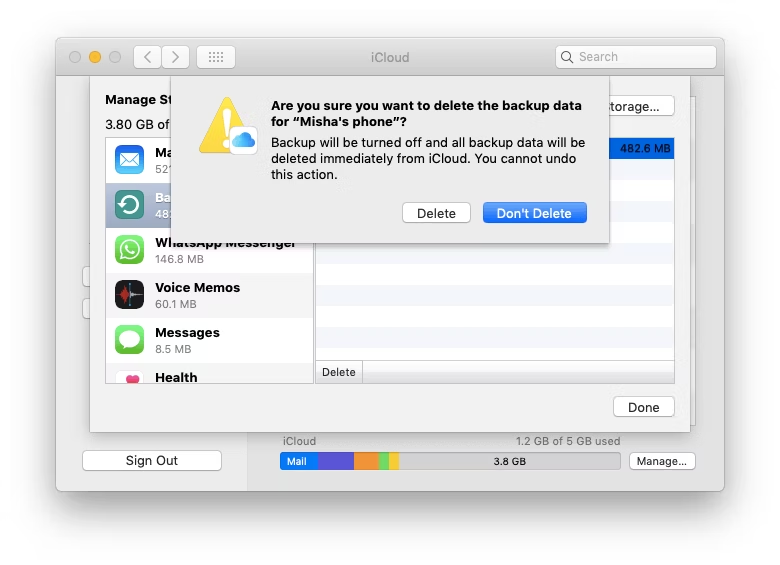
For Mac:
Click on the Apple menu > System Settings or System Preferences.
Go to Apple ID, then click iCloud.
Under Manage, select Backups, choose the Backup to delete, then click the minus sign (-).
Confirm by choosing Delete.
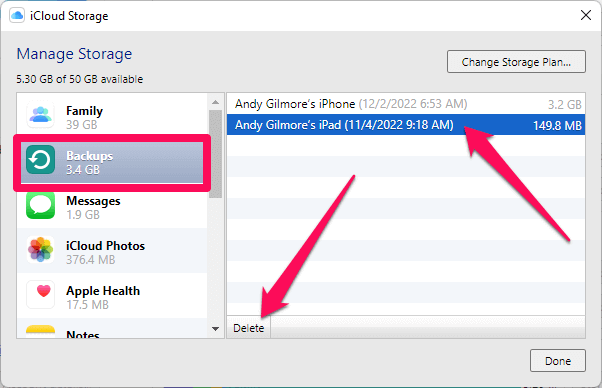
For Windows PC:
Open iCloud for Windows, click Storage, and select Backup from the items listed.
Choose the device backup, then click Delete.
Confirm deletion when prompted.
Deleting a backup will also turn off iCloud Backup for that device. You can re-enable iCloud Backup in your device's iCloud settings.
Fix 4: Delete Folders or Files in iCloud Drive
Deleting unneeded folders and files across your devices is straightforward and helps optimize your iCloud storage. Note that items in shared folders don't count towards your storage quota.
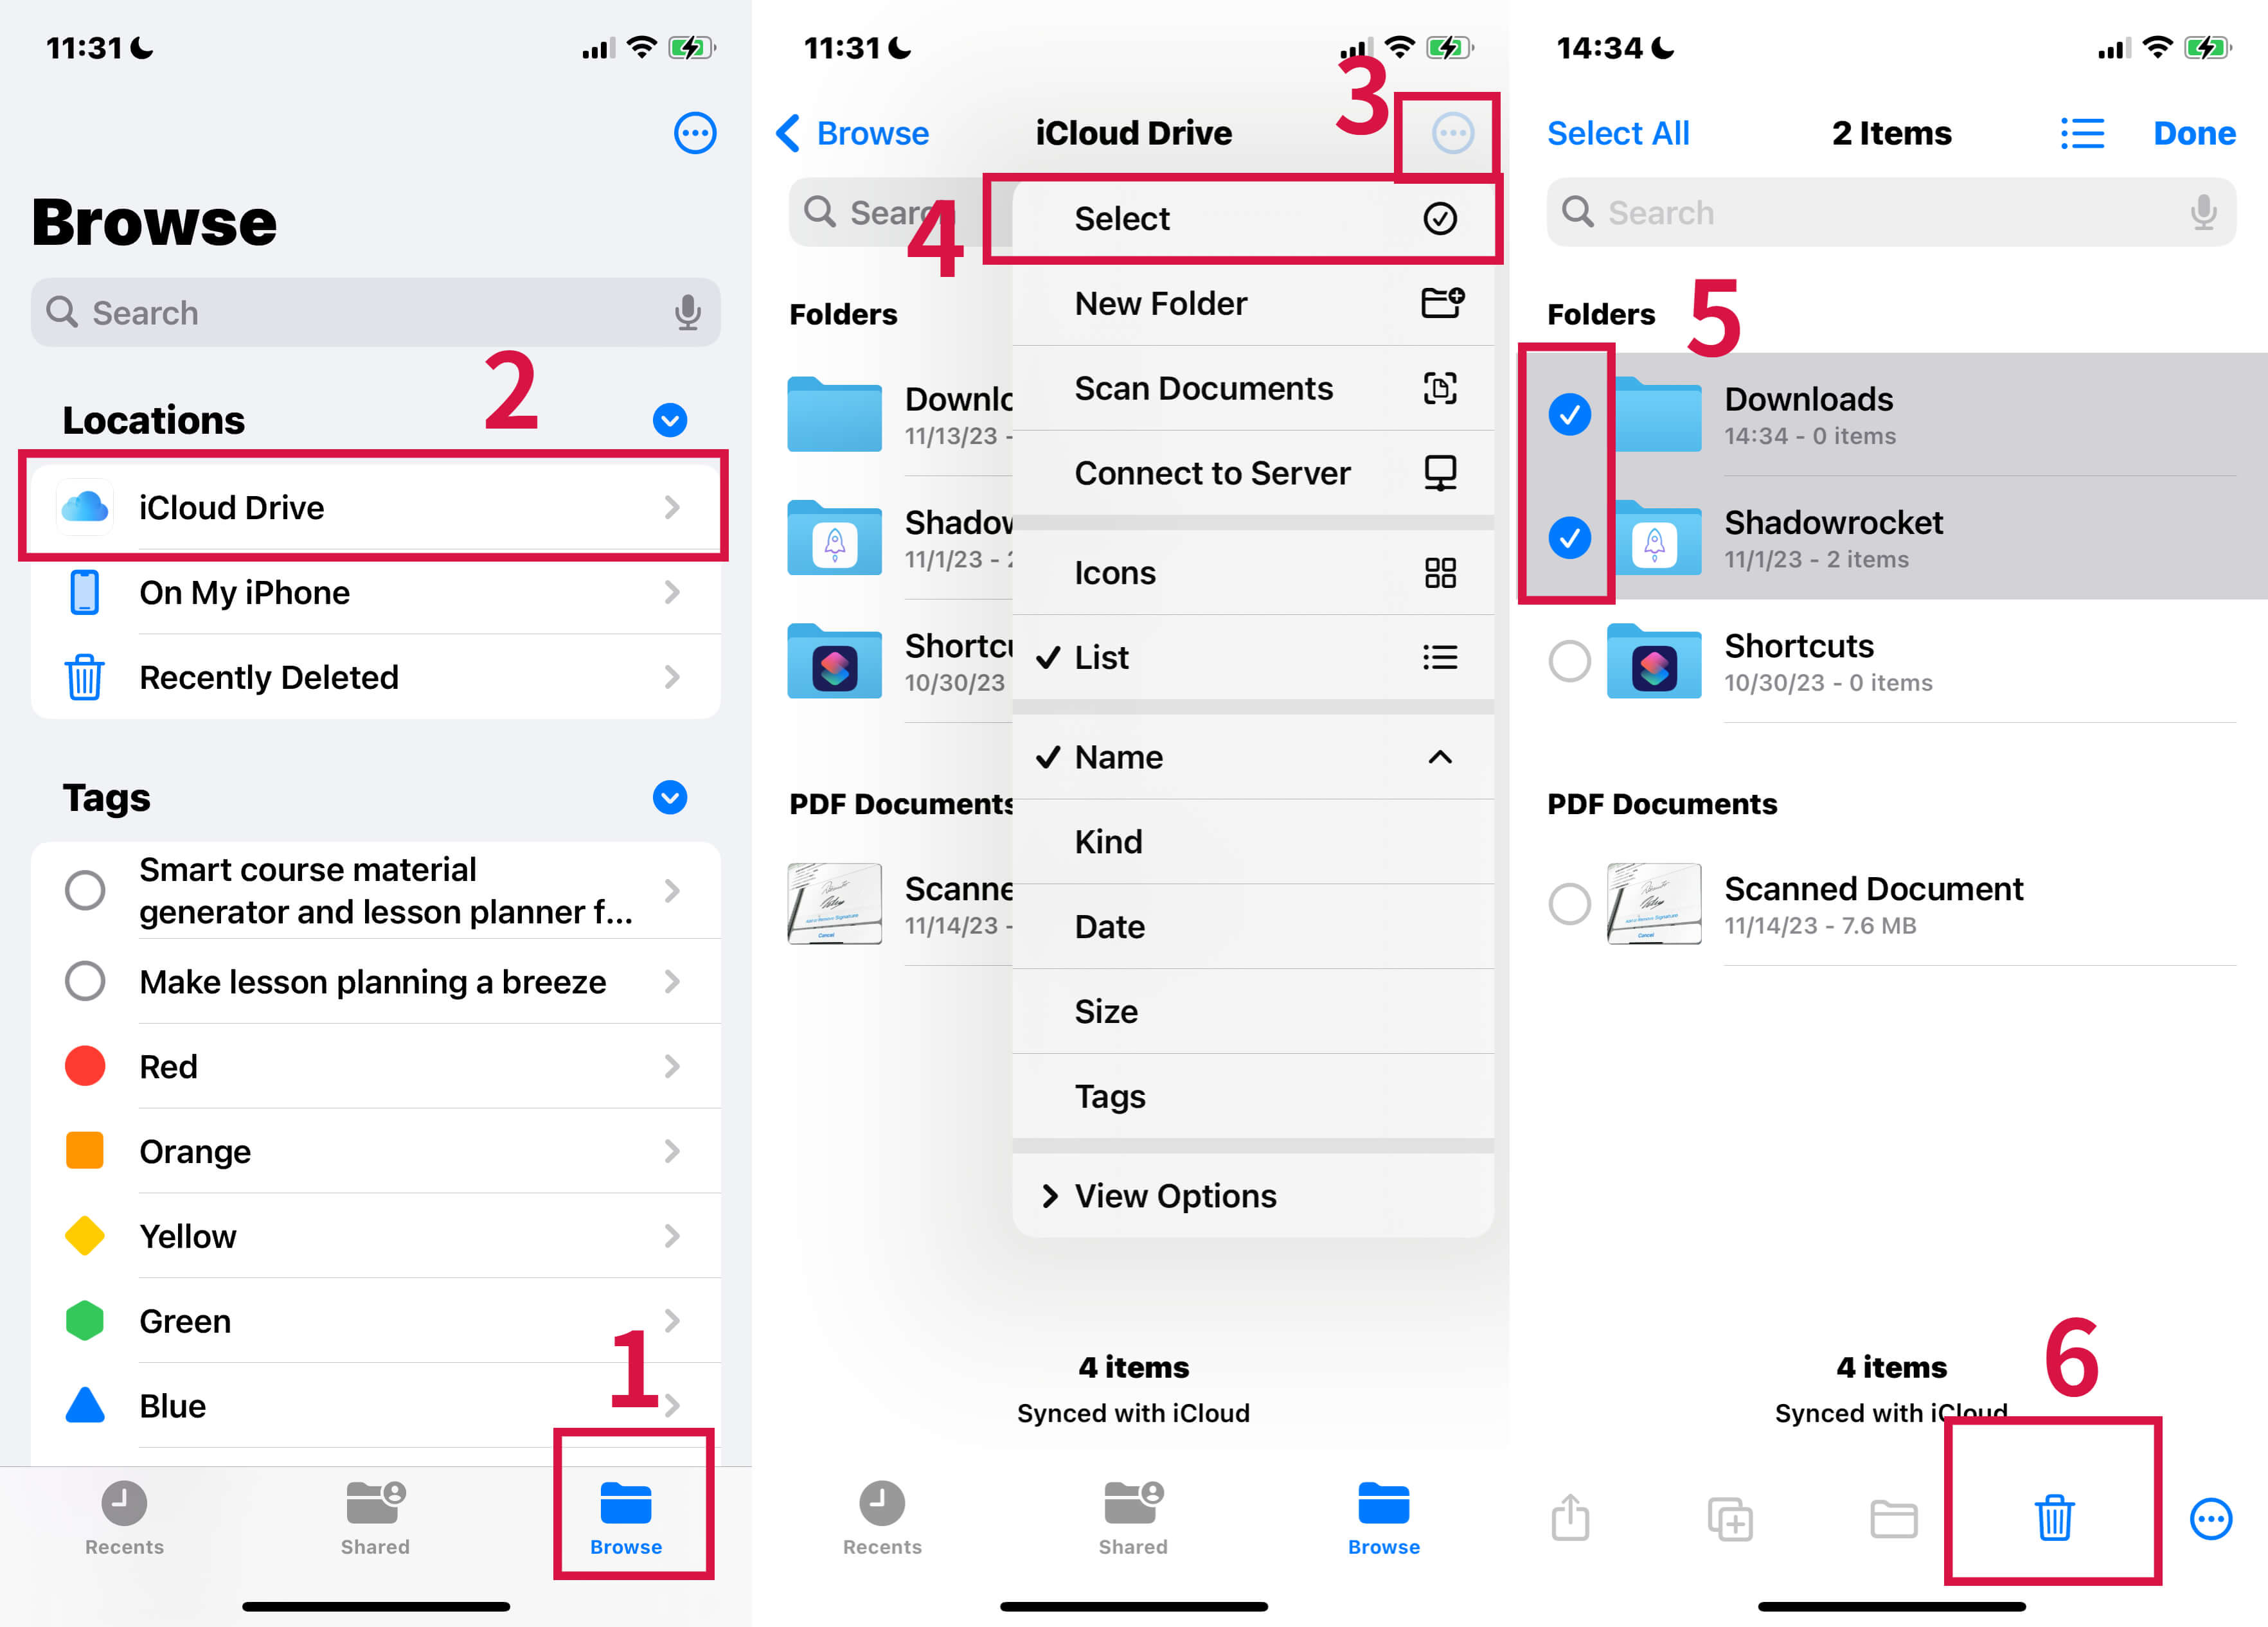
Steps to Delete Files and Folders in iCloud Drive On iPhone & iPad:
Open the Files app and tap Browse.
Under Locations, select iCloud Drive.
Tap the More button, then tap Select.
Choose the files or folders you wish to delete.
To delete, tap the Delete button. Deleted items move to the Recently Deleted folder for 30 days.
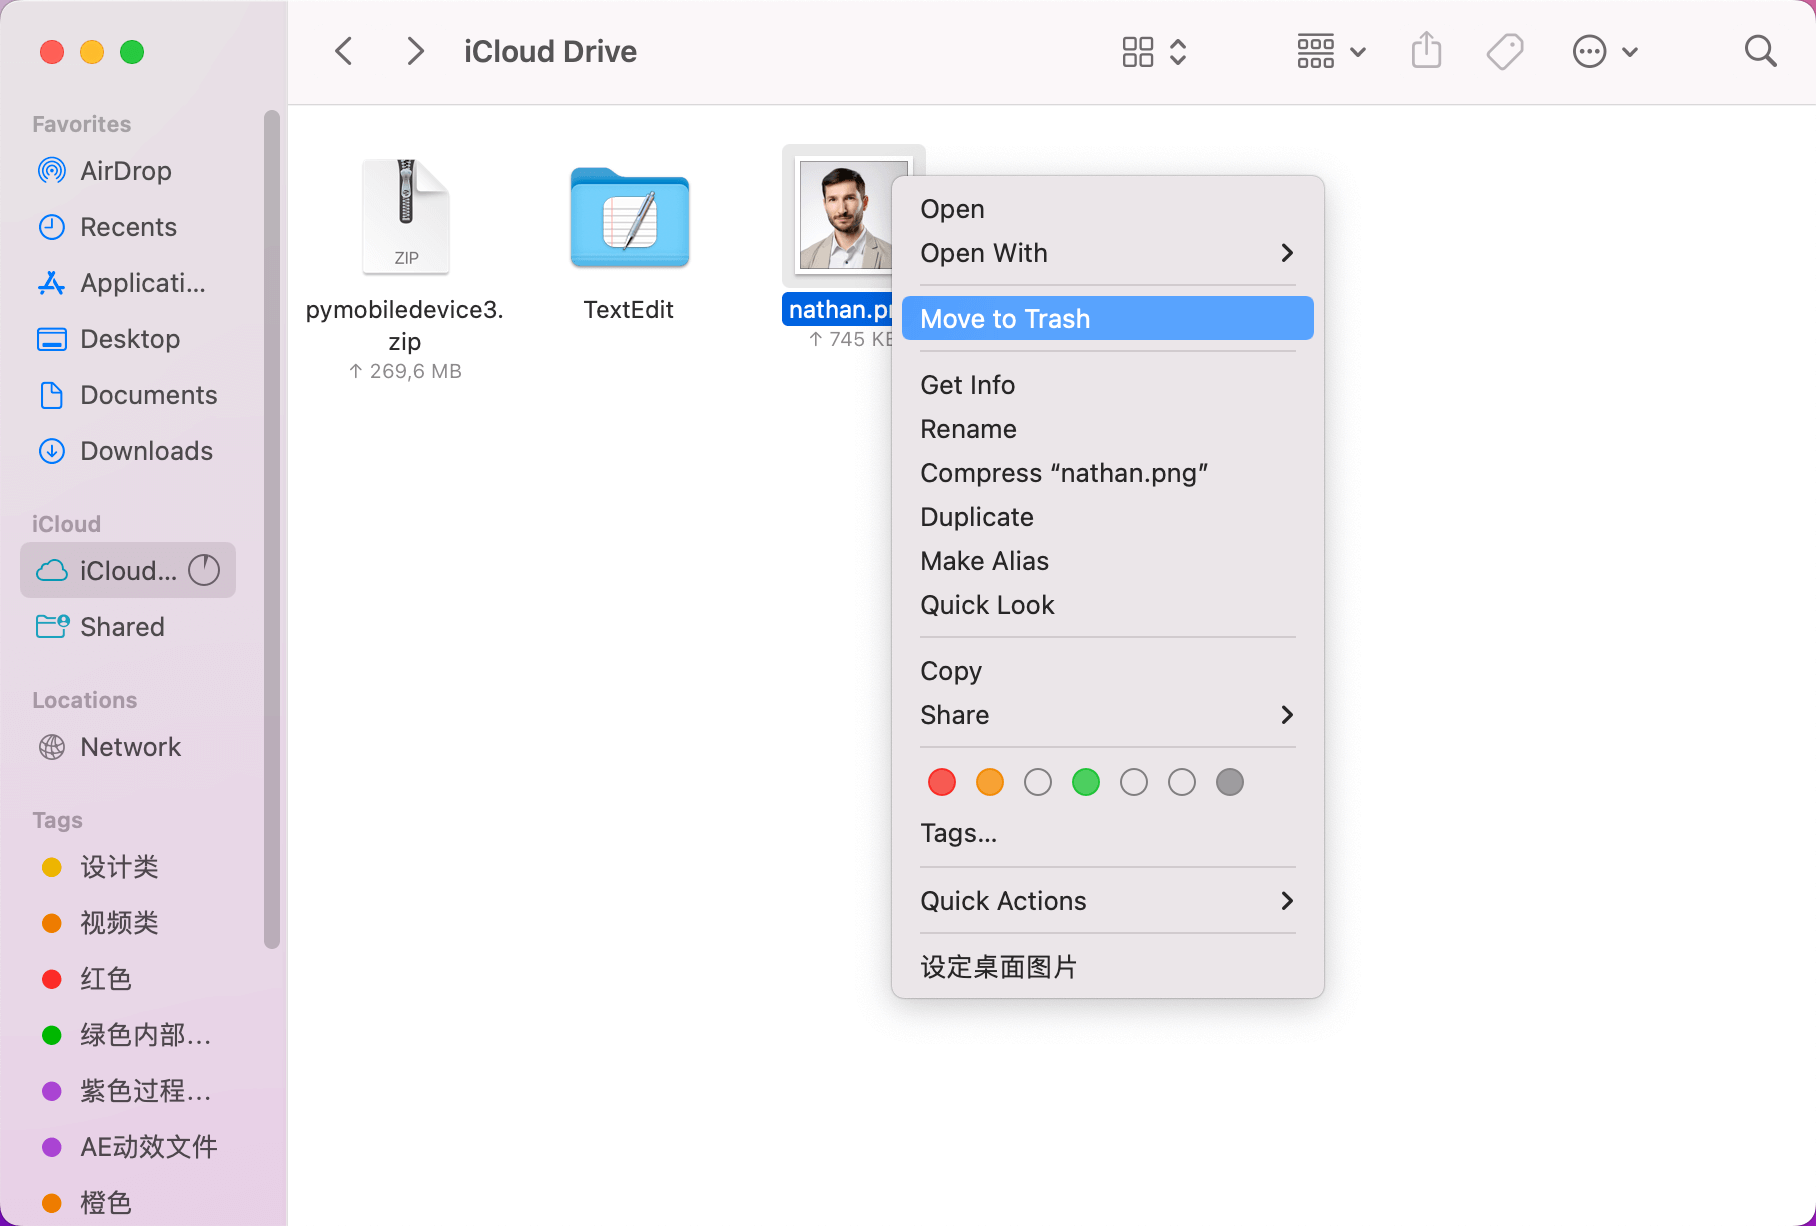
Steps to Delete Files and Folders in iCloud Drive On Mac:
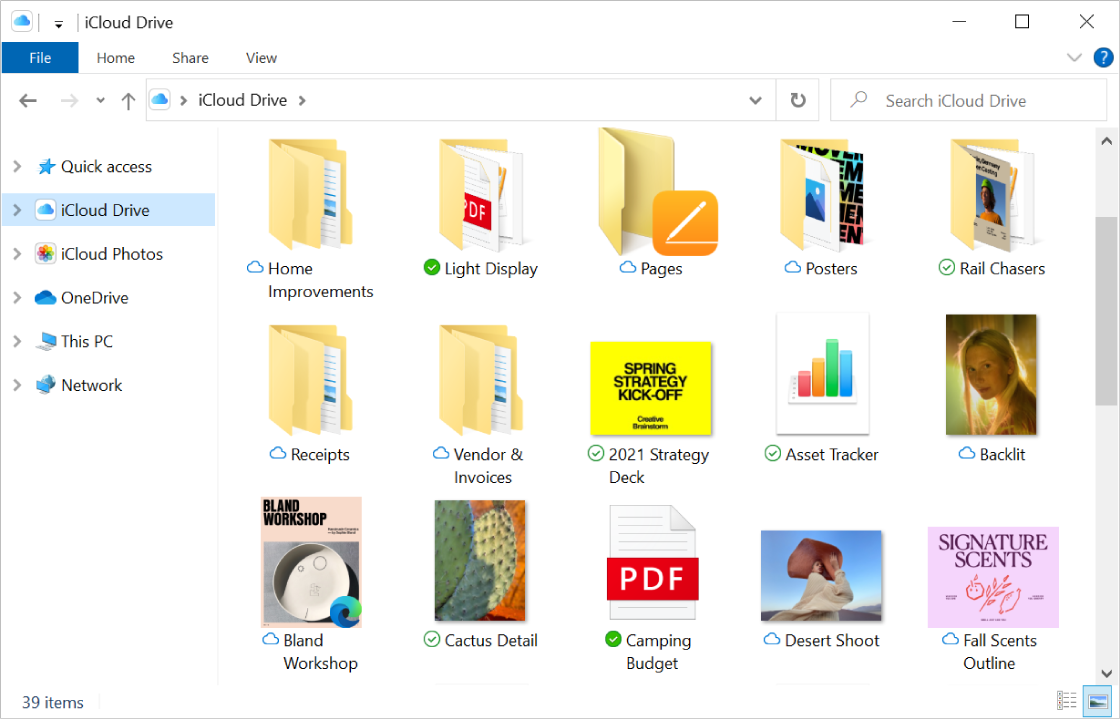
Open Finder and navigate to the iCloud Drive folder.
Drag the item to the Trash, or move it to a different folder on your Mac. Items moved to the Trash are available in Recently Deleted for 30 days.
On Windows PC:
Ensure iCloud for Windows is installed and signed in with your Apple ID.
Enable iCloud Drive in the iCloud for Windows settings.
Navigate to the iCloud Drive folder in Windows Explorer.
Select the files or folders you want to delete and click Delete. These will be in Recently Deleted for 30 days.
On iCloud.com:
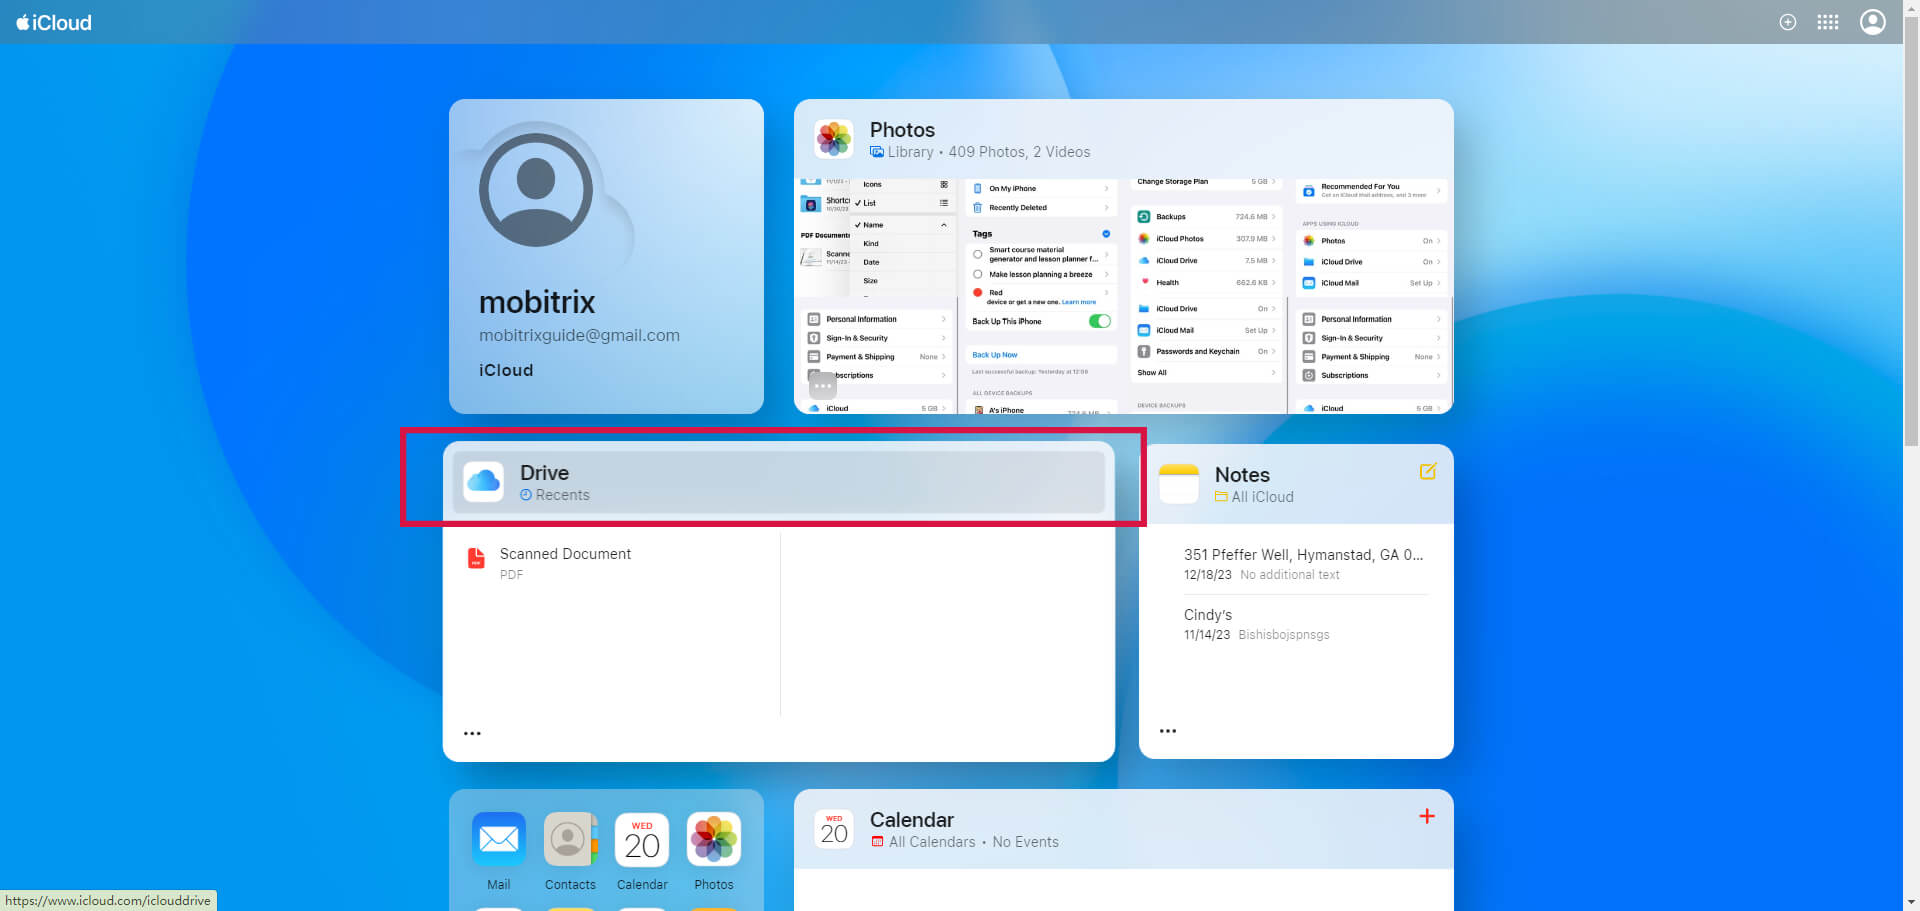
Sign in to iCloud.com.
Open the iCloud Drive app.
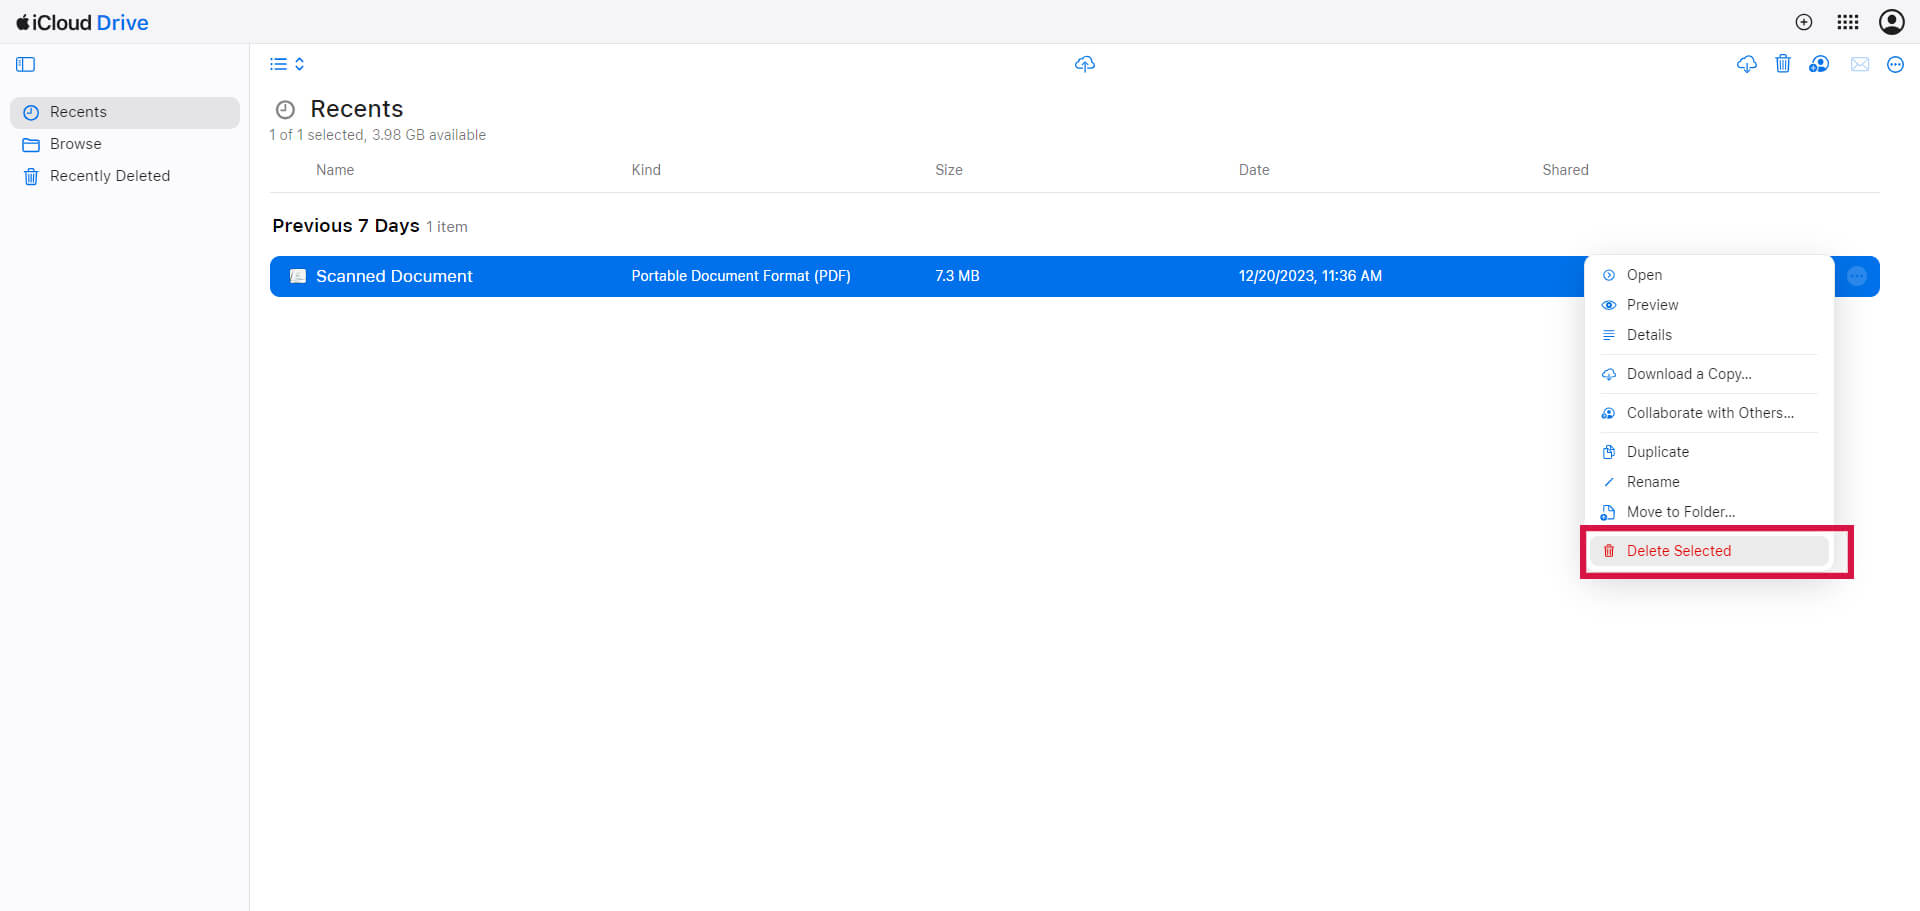
Select the files you wish to delete and tap the Delete button. These items will be in the Recently Deleted folder for 30 days.
Regularly review and clean up your iCloud Drive to ensure you're not storing unnecessary files.
Remember, items in the Recently Deleted folder still occupy storage space. Permanently delete them if you're sure you won't need them again.
Fix 5: Delete Messages and Manage Mail in iCloud
Deleting unnecessary email messages, especially those with large attachments, can make a noticeable difference.
You can also move emails from your iPhone, iPad, or iCloud Mail to your Mac or PC, reducing the storage used in your iCloud account.
Steps to Delete Messages in iCloud Mail On iPhone or iPad
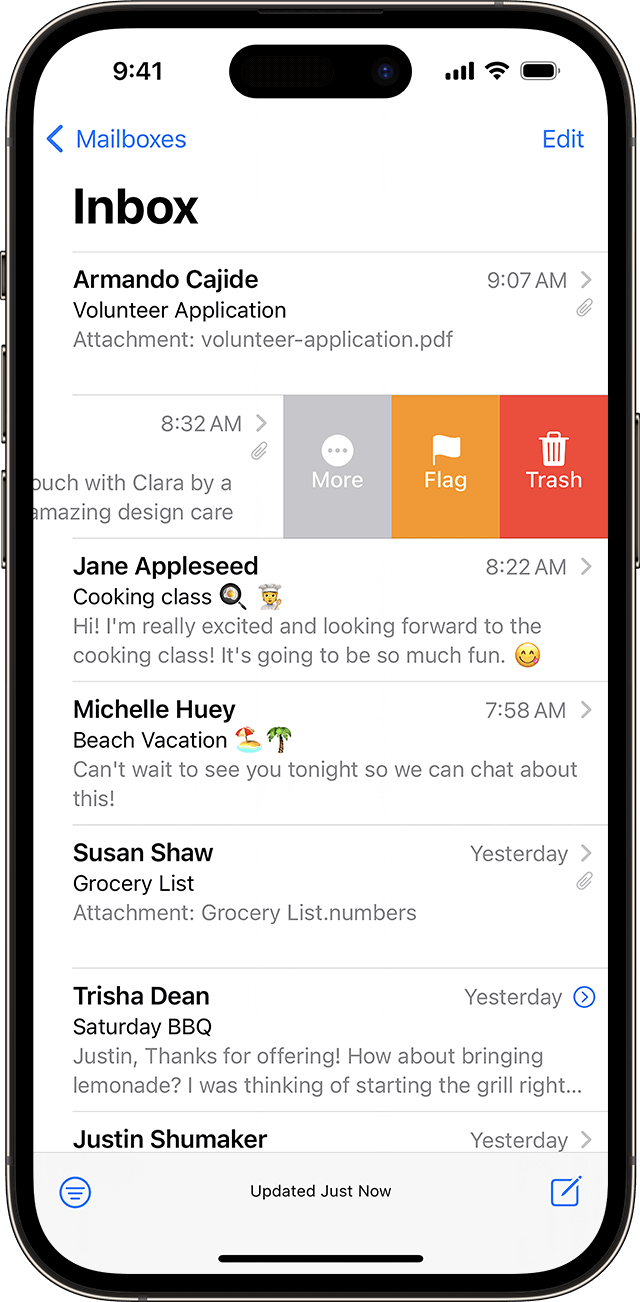
Swipe left across any message you wish to delete.
Go to your Mailboxes and open the Trash folder.
To delete messages individually, swipe left on each message.
To delete all messages, tap Edit, then Select All, and finally tap Delete. Confirm by tapping Delete All.
Steps On Mac (Using Mail app):
Delete the messages you no longer need.
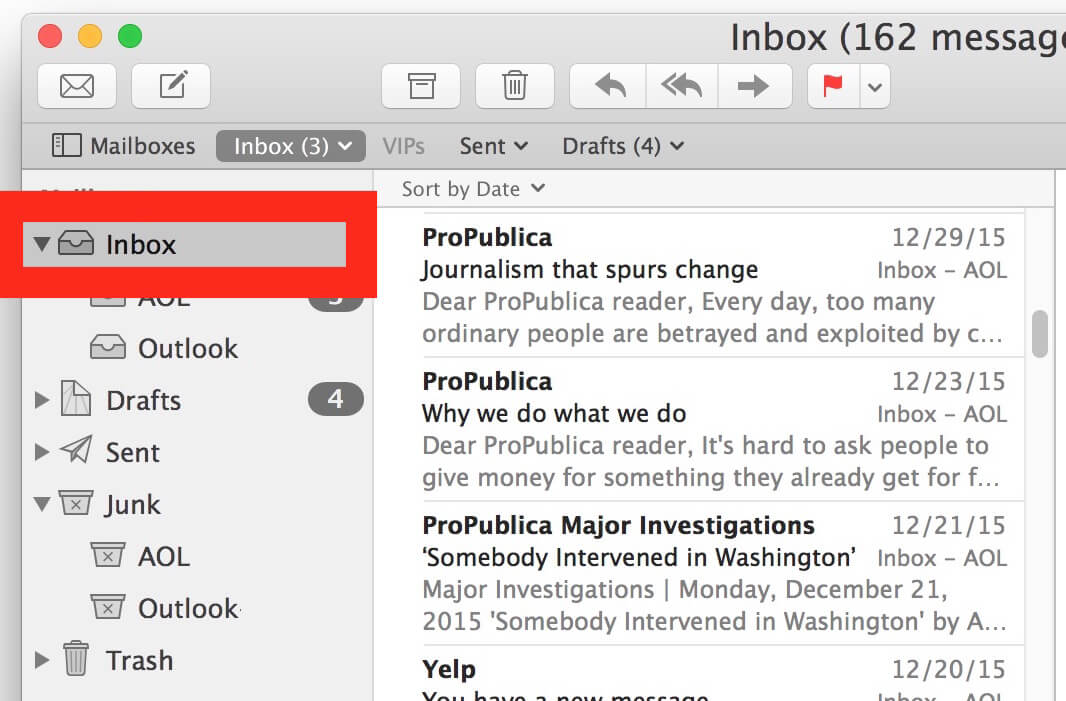
Then, choose Mailbox > Inbox
Clickn Erase Deleted Items.
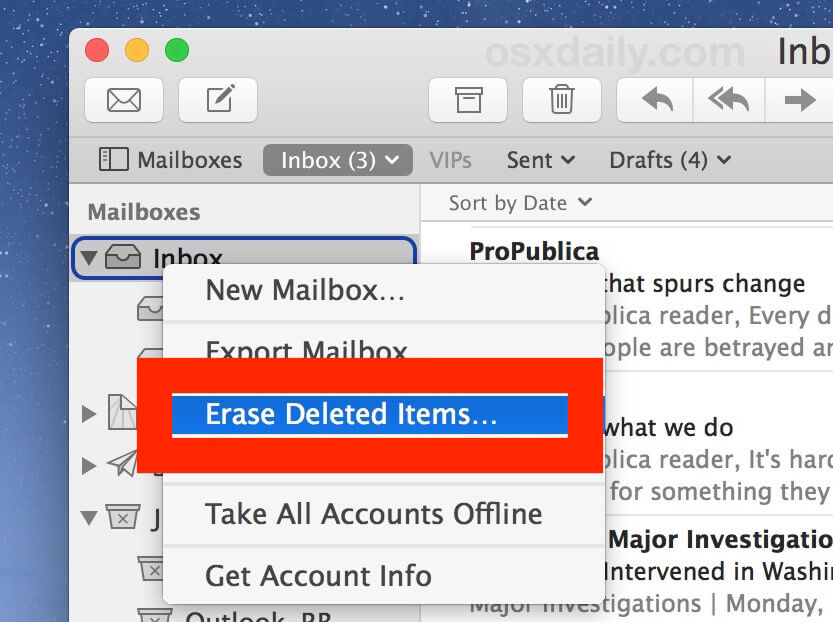
Select your iCloud email account and click Erase to confirm.
Steps On Windows PC (Using Microsoft Outlook 2010 through Outlook 2016):
Delete the unwanted messages.
Outlook will permanently delete these messages the next time you close and restart the app.
Steps On iCloud.com:
Sign in to iCloud.com.
Select Mail and choose your Trash folder.
To delete messages individually, select the message, then the Trash button.
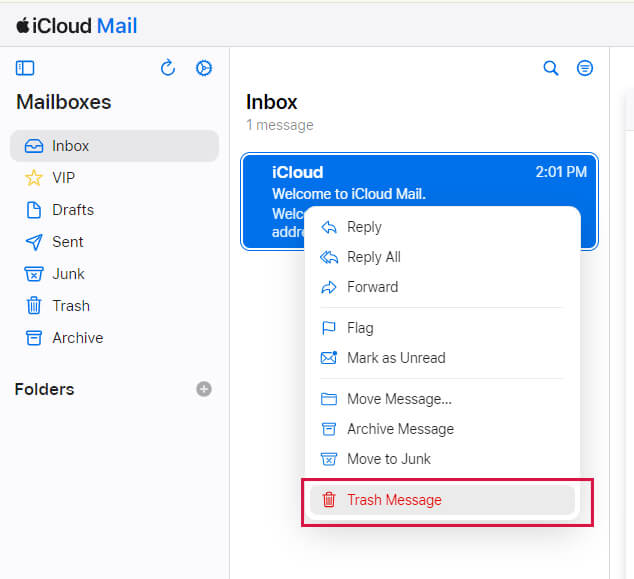
To delete multiple messages, select them and then choose Delete.
Regularly check and clean your mailbox to avoid unnecessary buildup of emails.
Consider creating folders or labels to organize emails you wish to keep, making it easier to identify and delete unnecessary ones.
Fix 6: Delete Texts and Attachments in Messages
Text messages and attachments in Messages can significantly contribute to your iCloud storage usage. These can accumulate considerably over time, especially with heavy use of photos, videos, and emojis.
Regularly managing texts, attachments, and email attachments in iCloud can significantly reduce your iCloud storage usage, ensuring you have space for what's essential.
On iPhone or iPad:
Deleting a Message or Attachment:
In a message conversation, touch and hold the message bubble or attachment you want to delete.
Tap More.
Tap the Delete button, then confirm by tapping Delete Message. To delete an entire thread, tap Delete All in the upper-left corner, then Delete Conversation.
Steps to Deleting a Message or Attachment on iphone
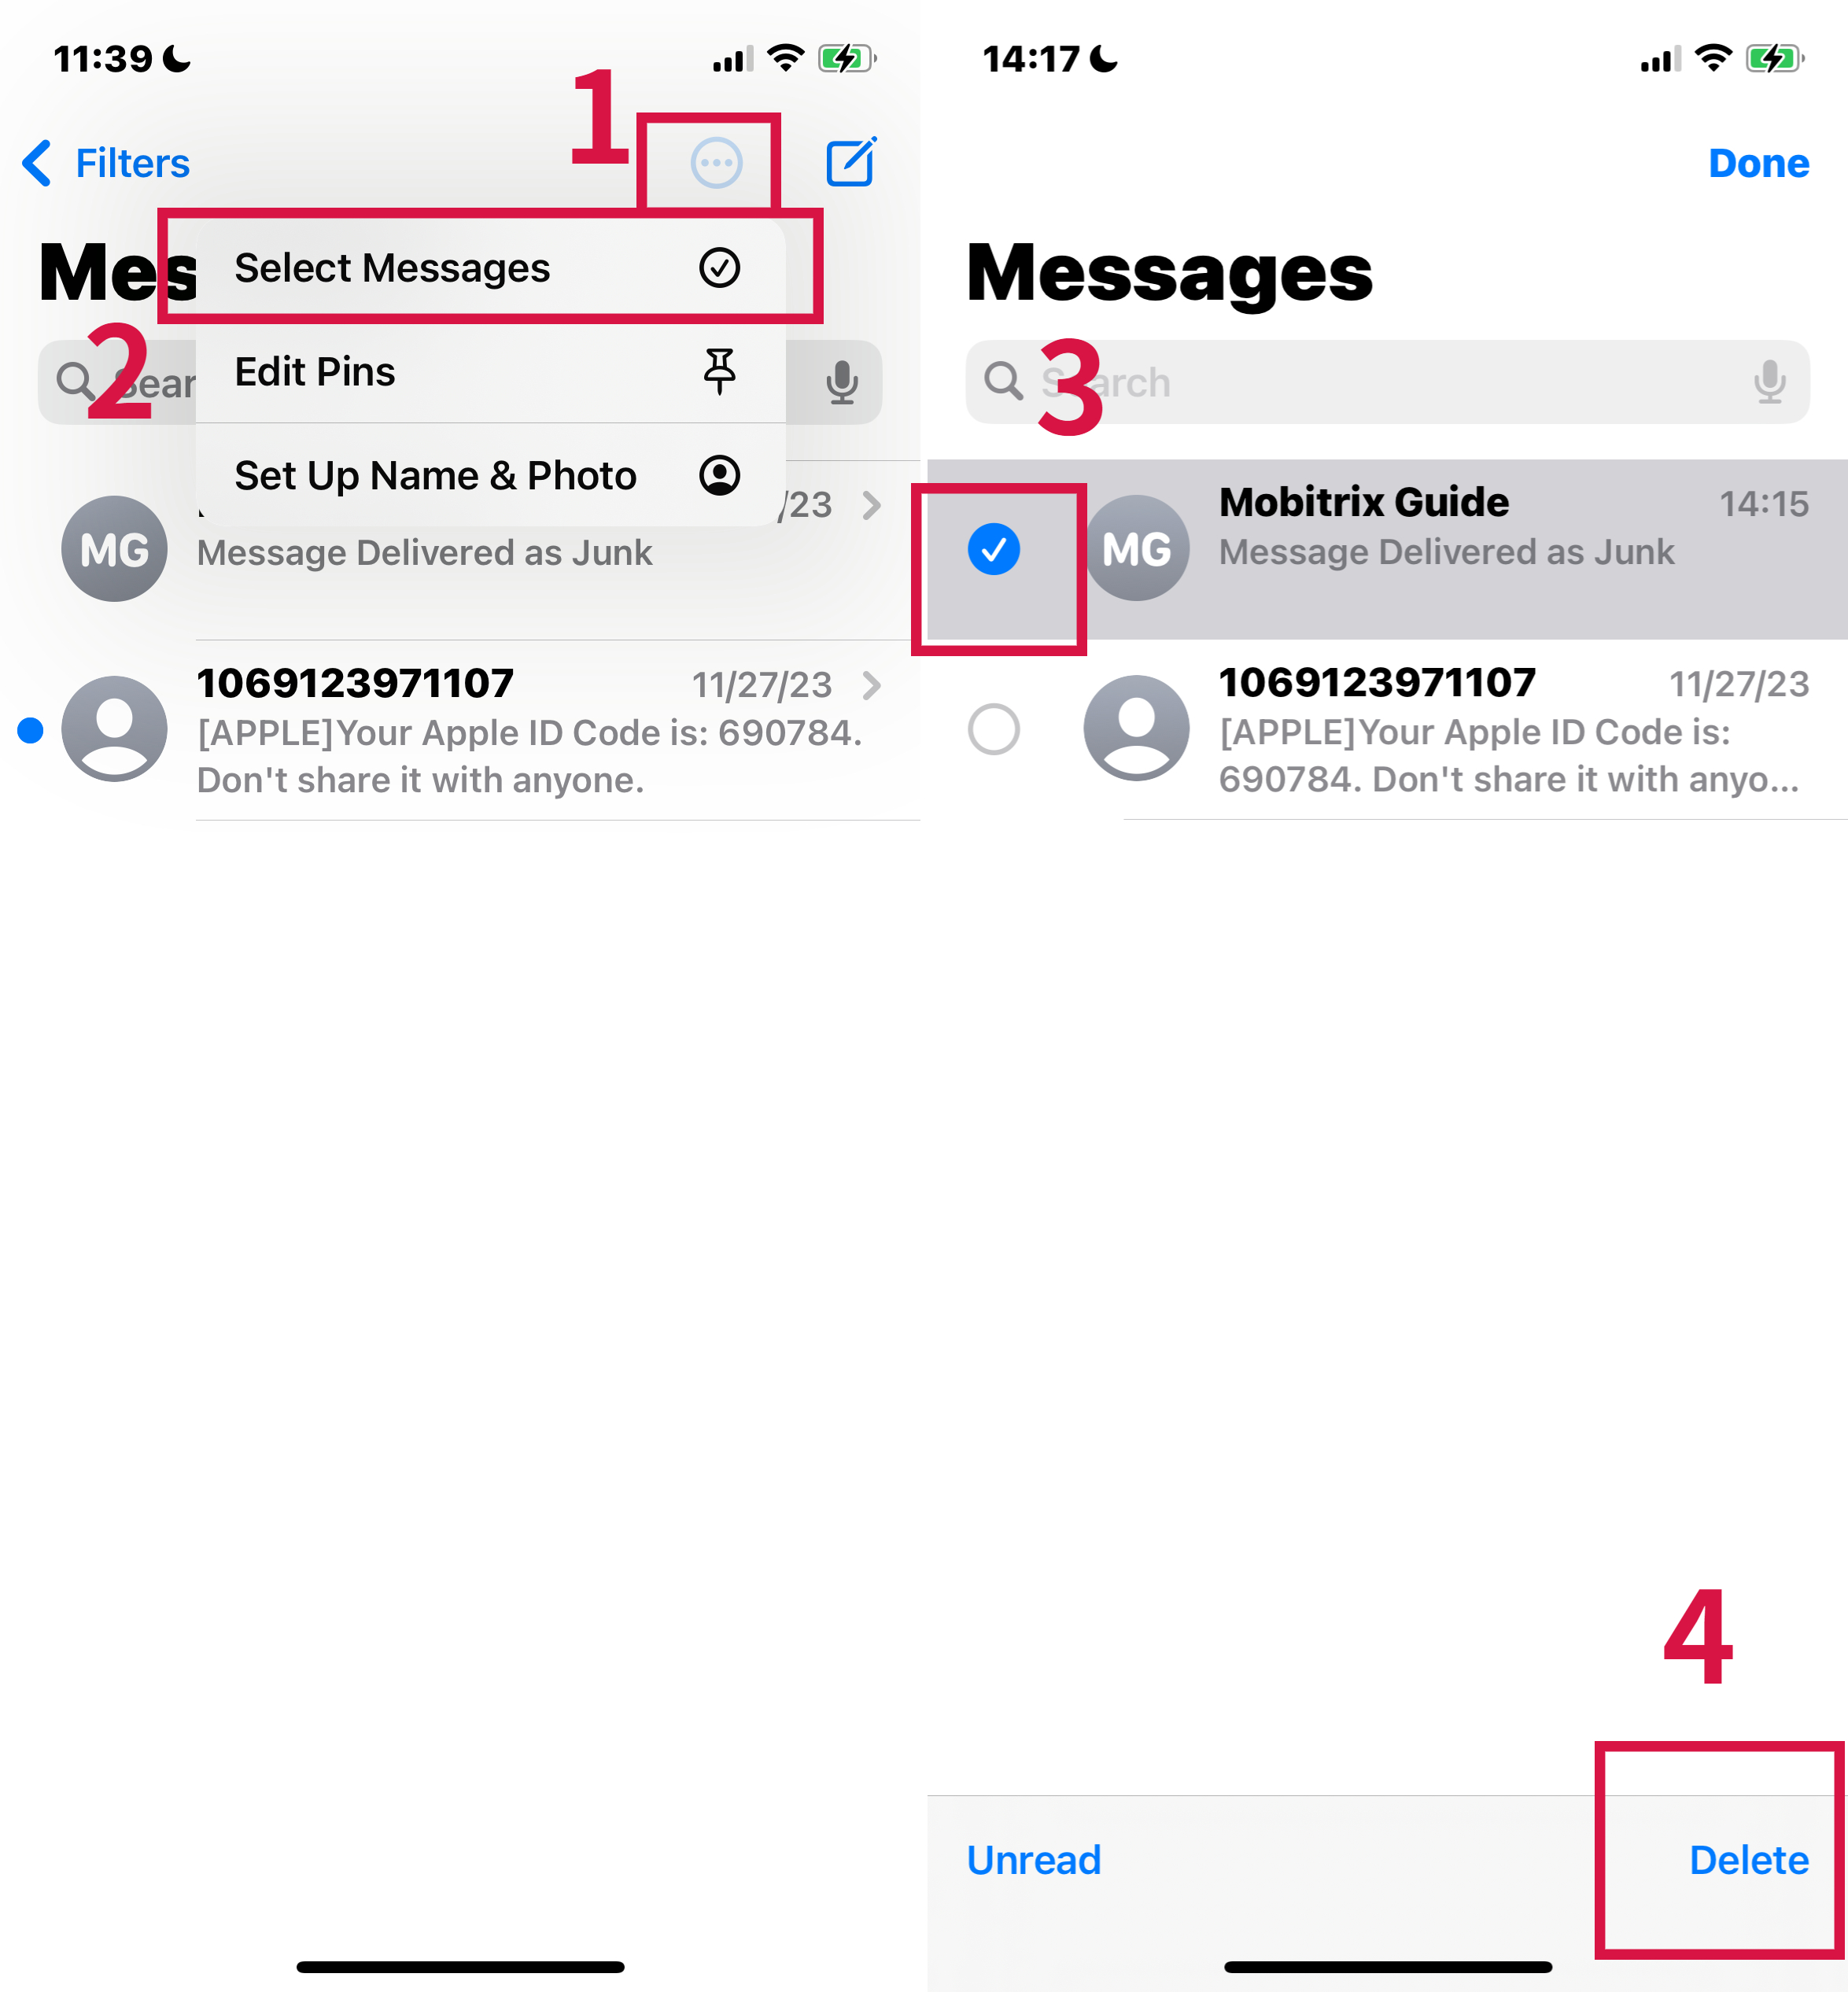
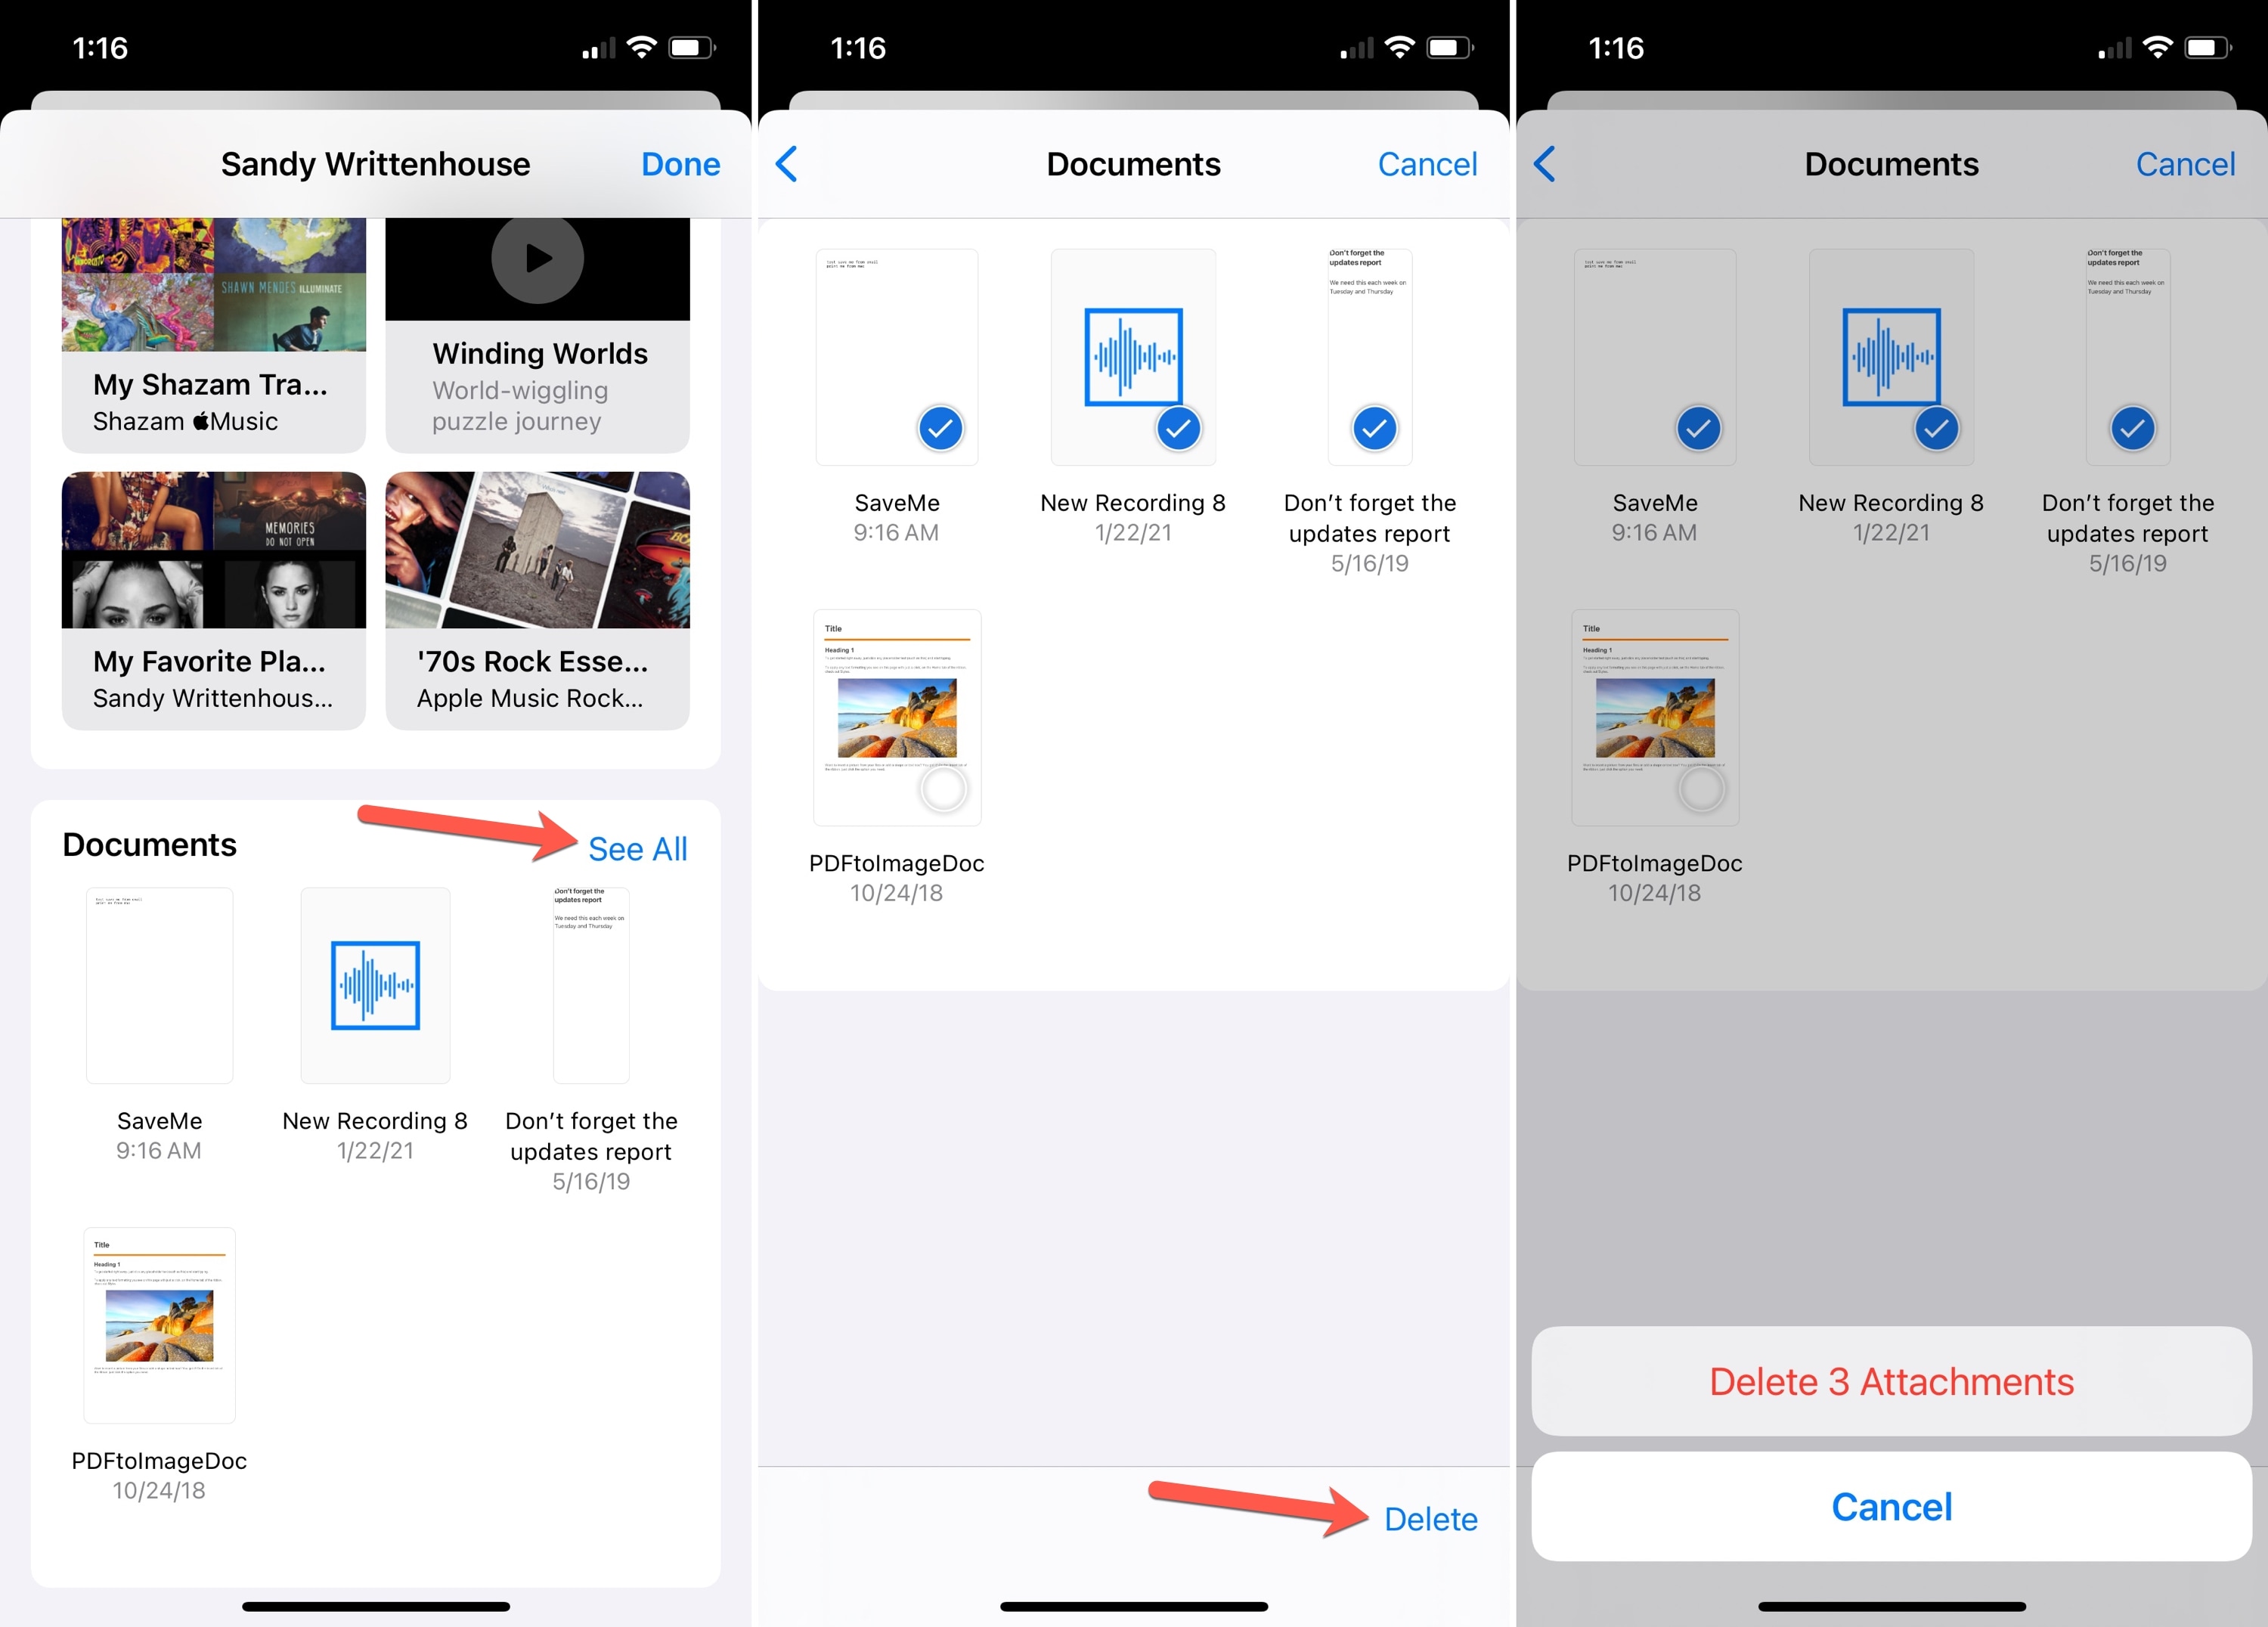
Deleting Multiple Attachments from a Contact or Conversation:
In a conversation, tap the contact's name at the top.
Go to the Photos section and tap See All.
Tap Select, and choose the attachments to delete.
Tap Delete, then confirm by tapping Delete Attachment.
Deleting an Entire Conversation:
Swipe left over the Conversation you want to delete.
Tap Delete and confirm the action.

On Mac
Deleting a Message or Attachment:
Open a message conversation.
Control-click the blank area of a message bubble you wish to delete.
Choose Delete and confirm by clicking Delete.

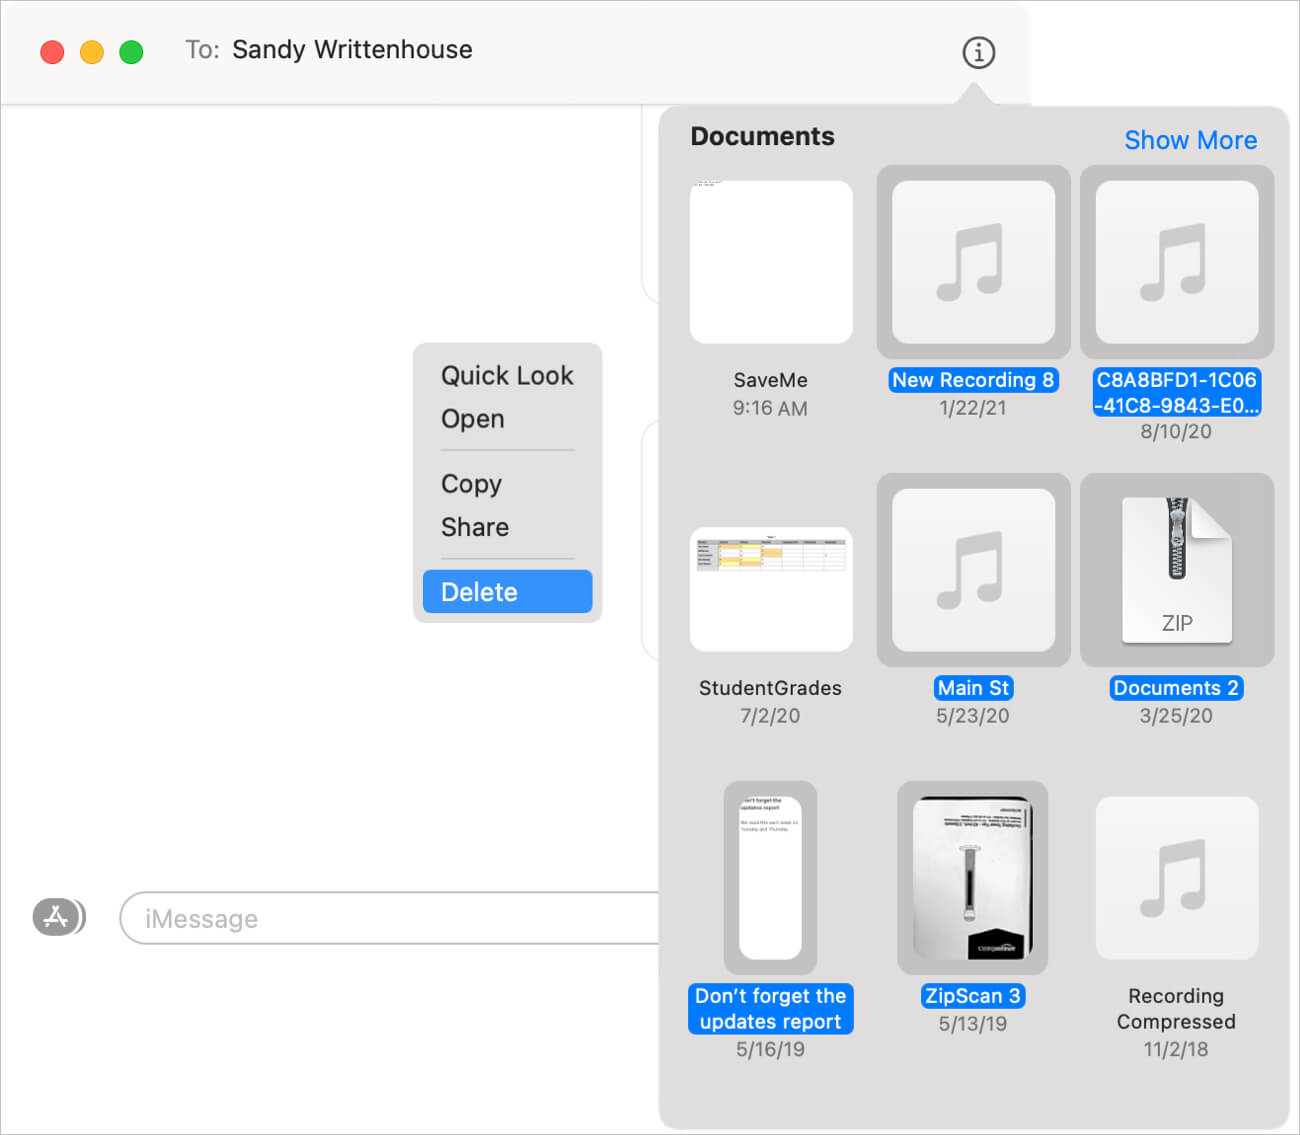
Deleting Multiple Attachments from a Contact or Conversation:
Open a message conversation.
Click the Info button.
In the Photos section, click on an attachment and hold the Command key to select multiple attachments.
Control-click or right-click, then choose Delete.
Click Delete Attachment to confirm.
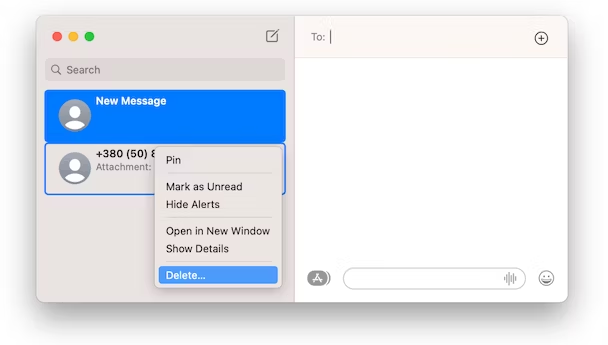
Deleting an Entire Conversation:
Control-click a conversation.
Choose Delete or Delete Conversation.
Click Delete to confirm.
If you use iCloud Mail, you can also manage email attachments to save space:
Open iCloud Mail and select View, then Sort by Attachments.
Choose to delete emails with large attachments or set a size limit, such as 15 MB, and delete emails exceeding that limit.
Fix 7: Delete Voice Memos to Free Up iCloud Space
Voice Memos stored in iCloud can occupy a significant amount of storage space, especially if there are many or long recordings. Deleting unnecessary voice memos can free up your iCloud storage.
Steps to Delete Voice Memos
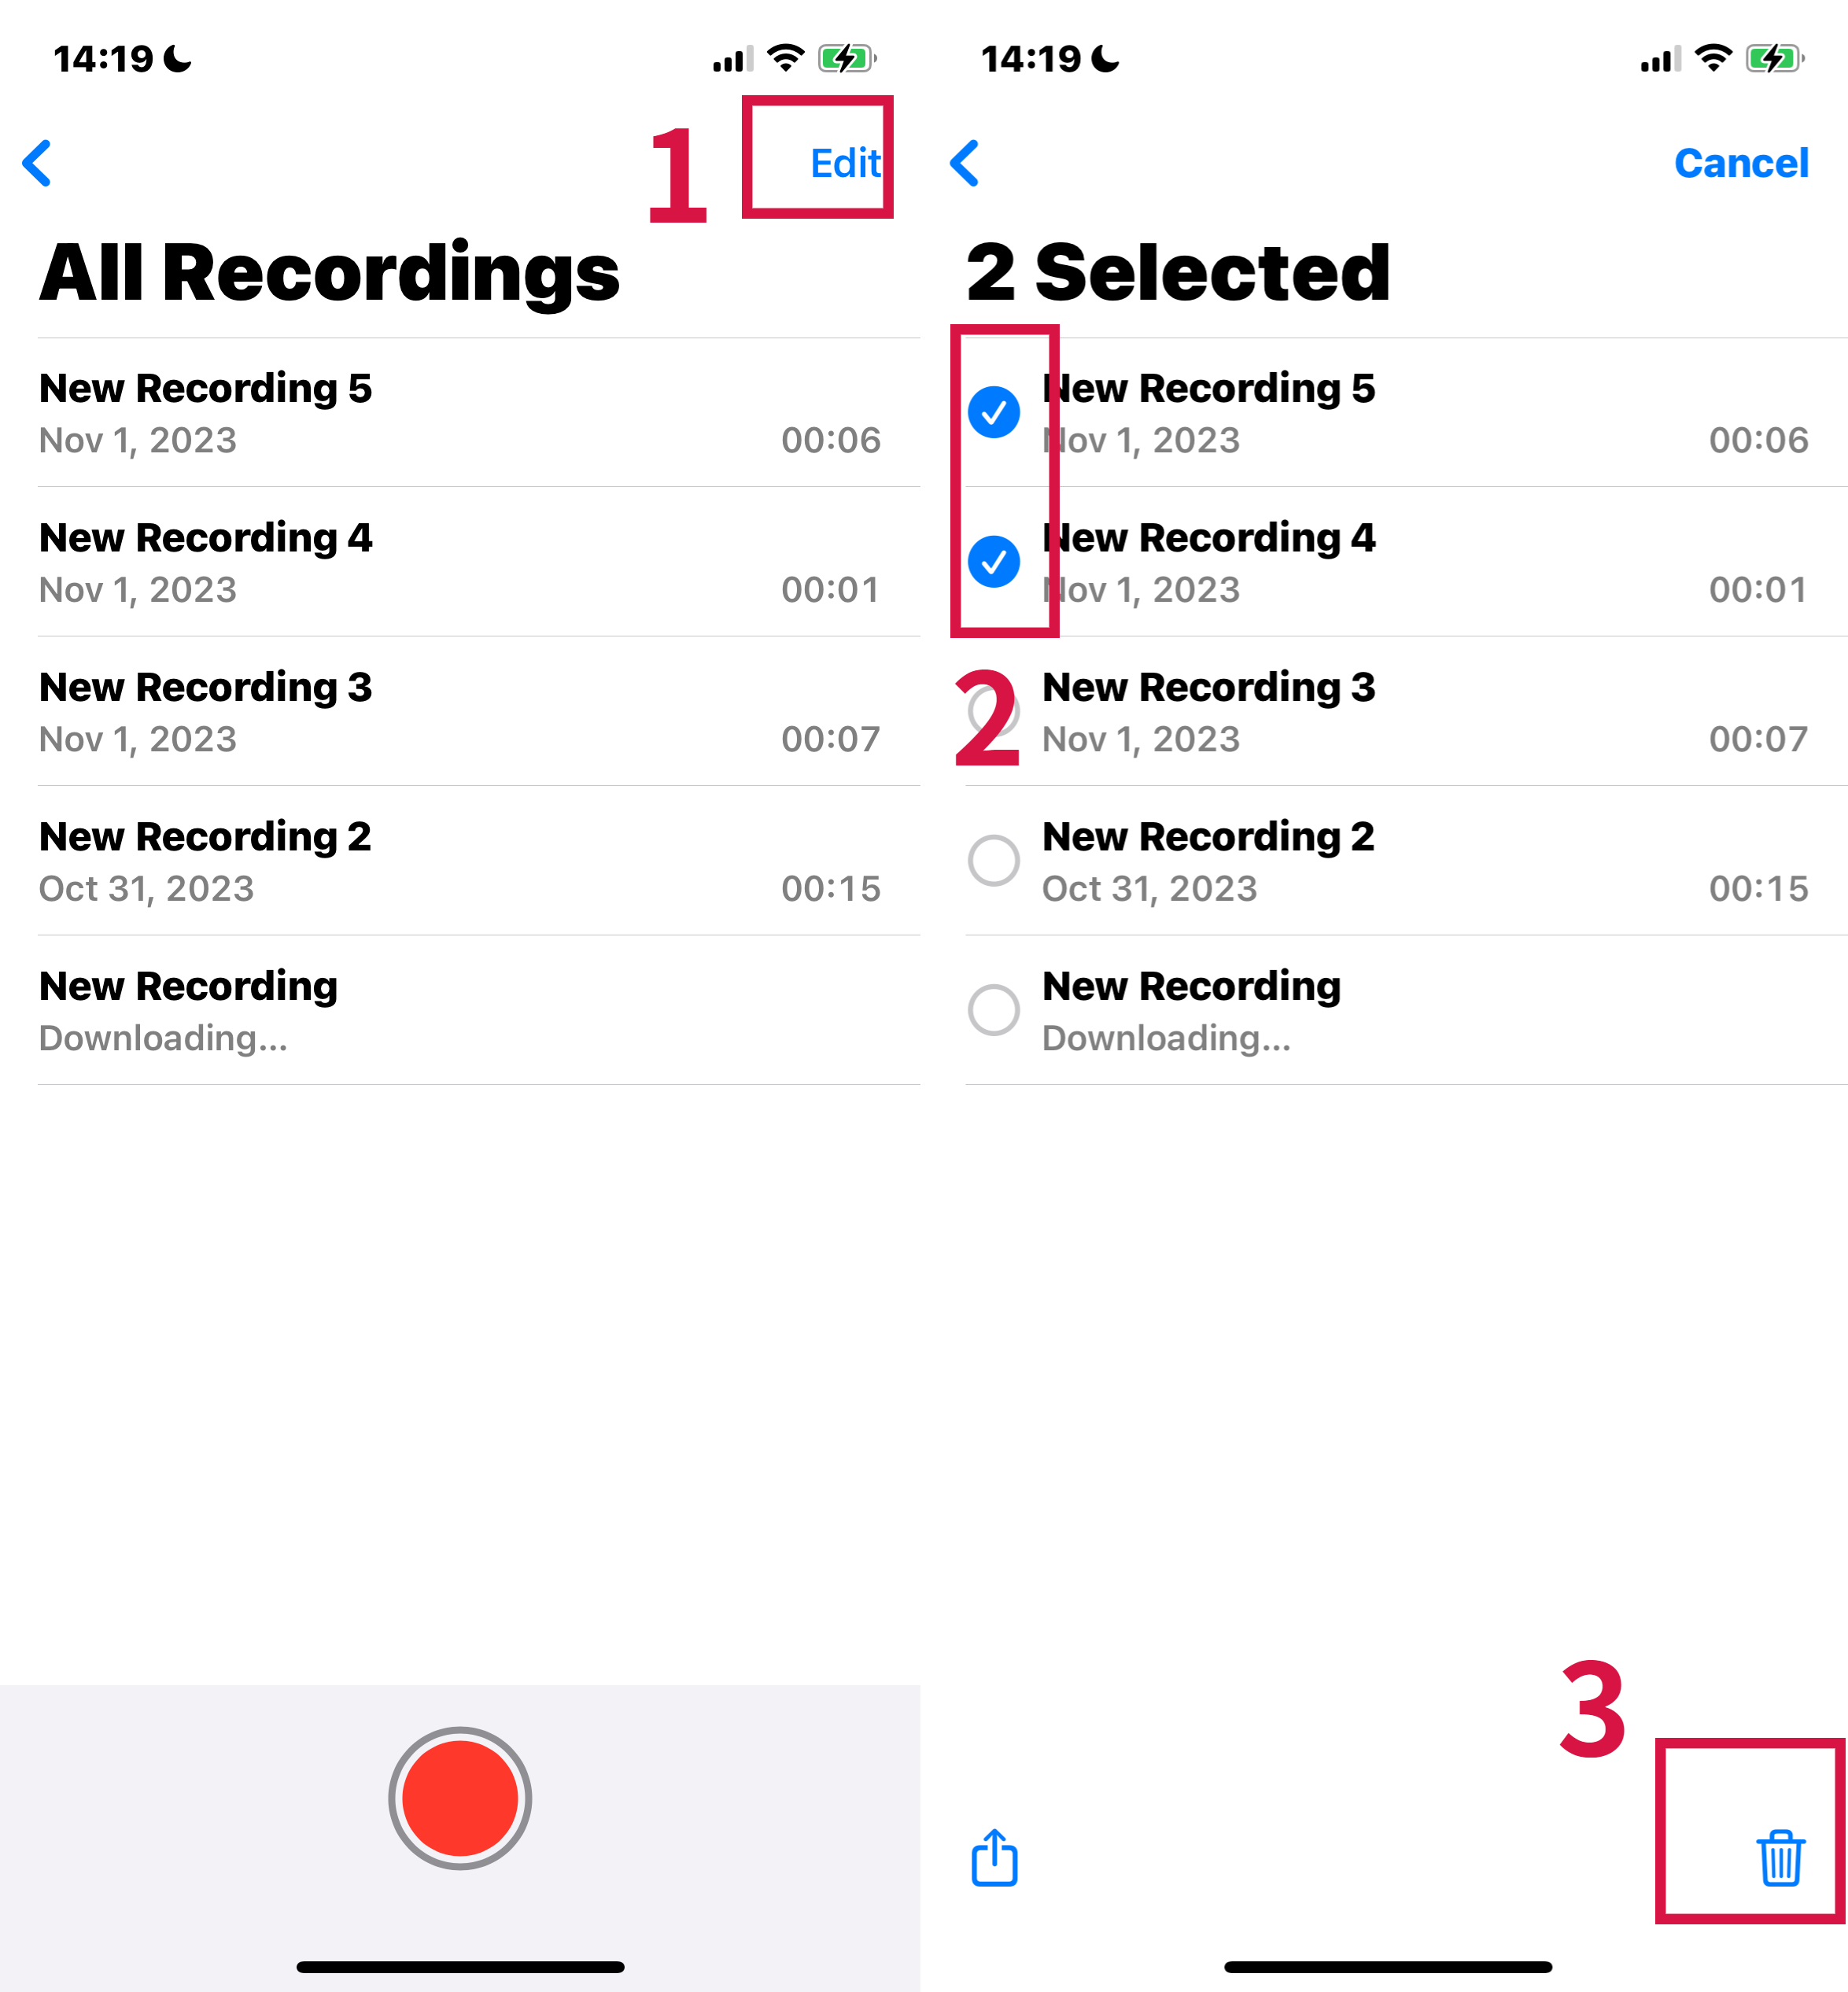
On iPhone or iPad:
Open the Voice Memos app.
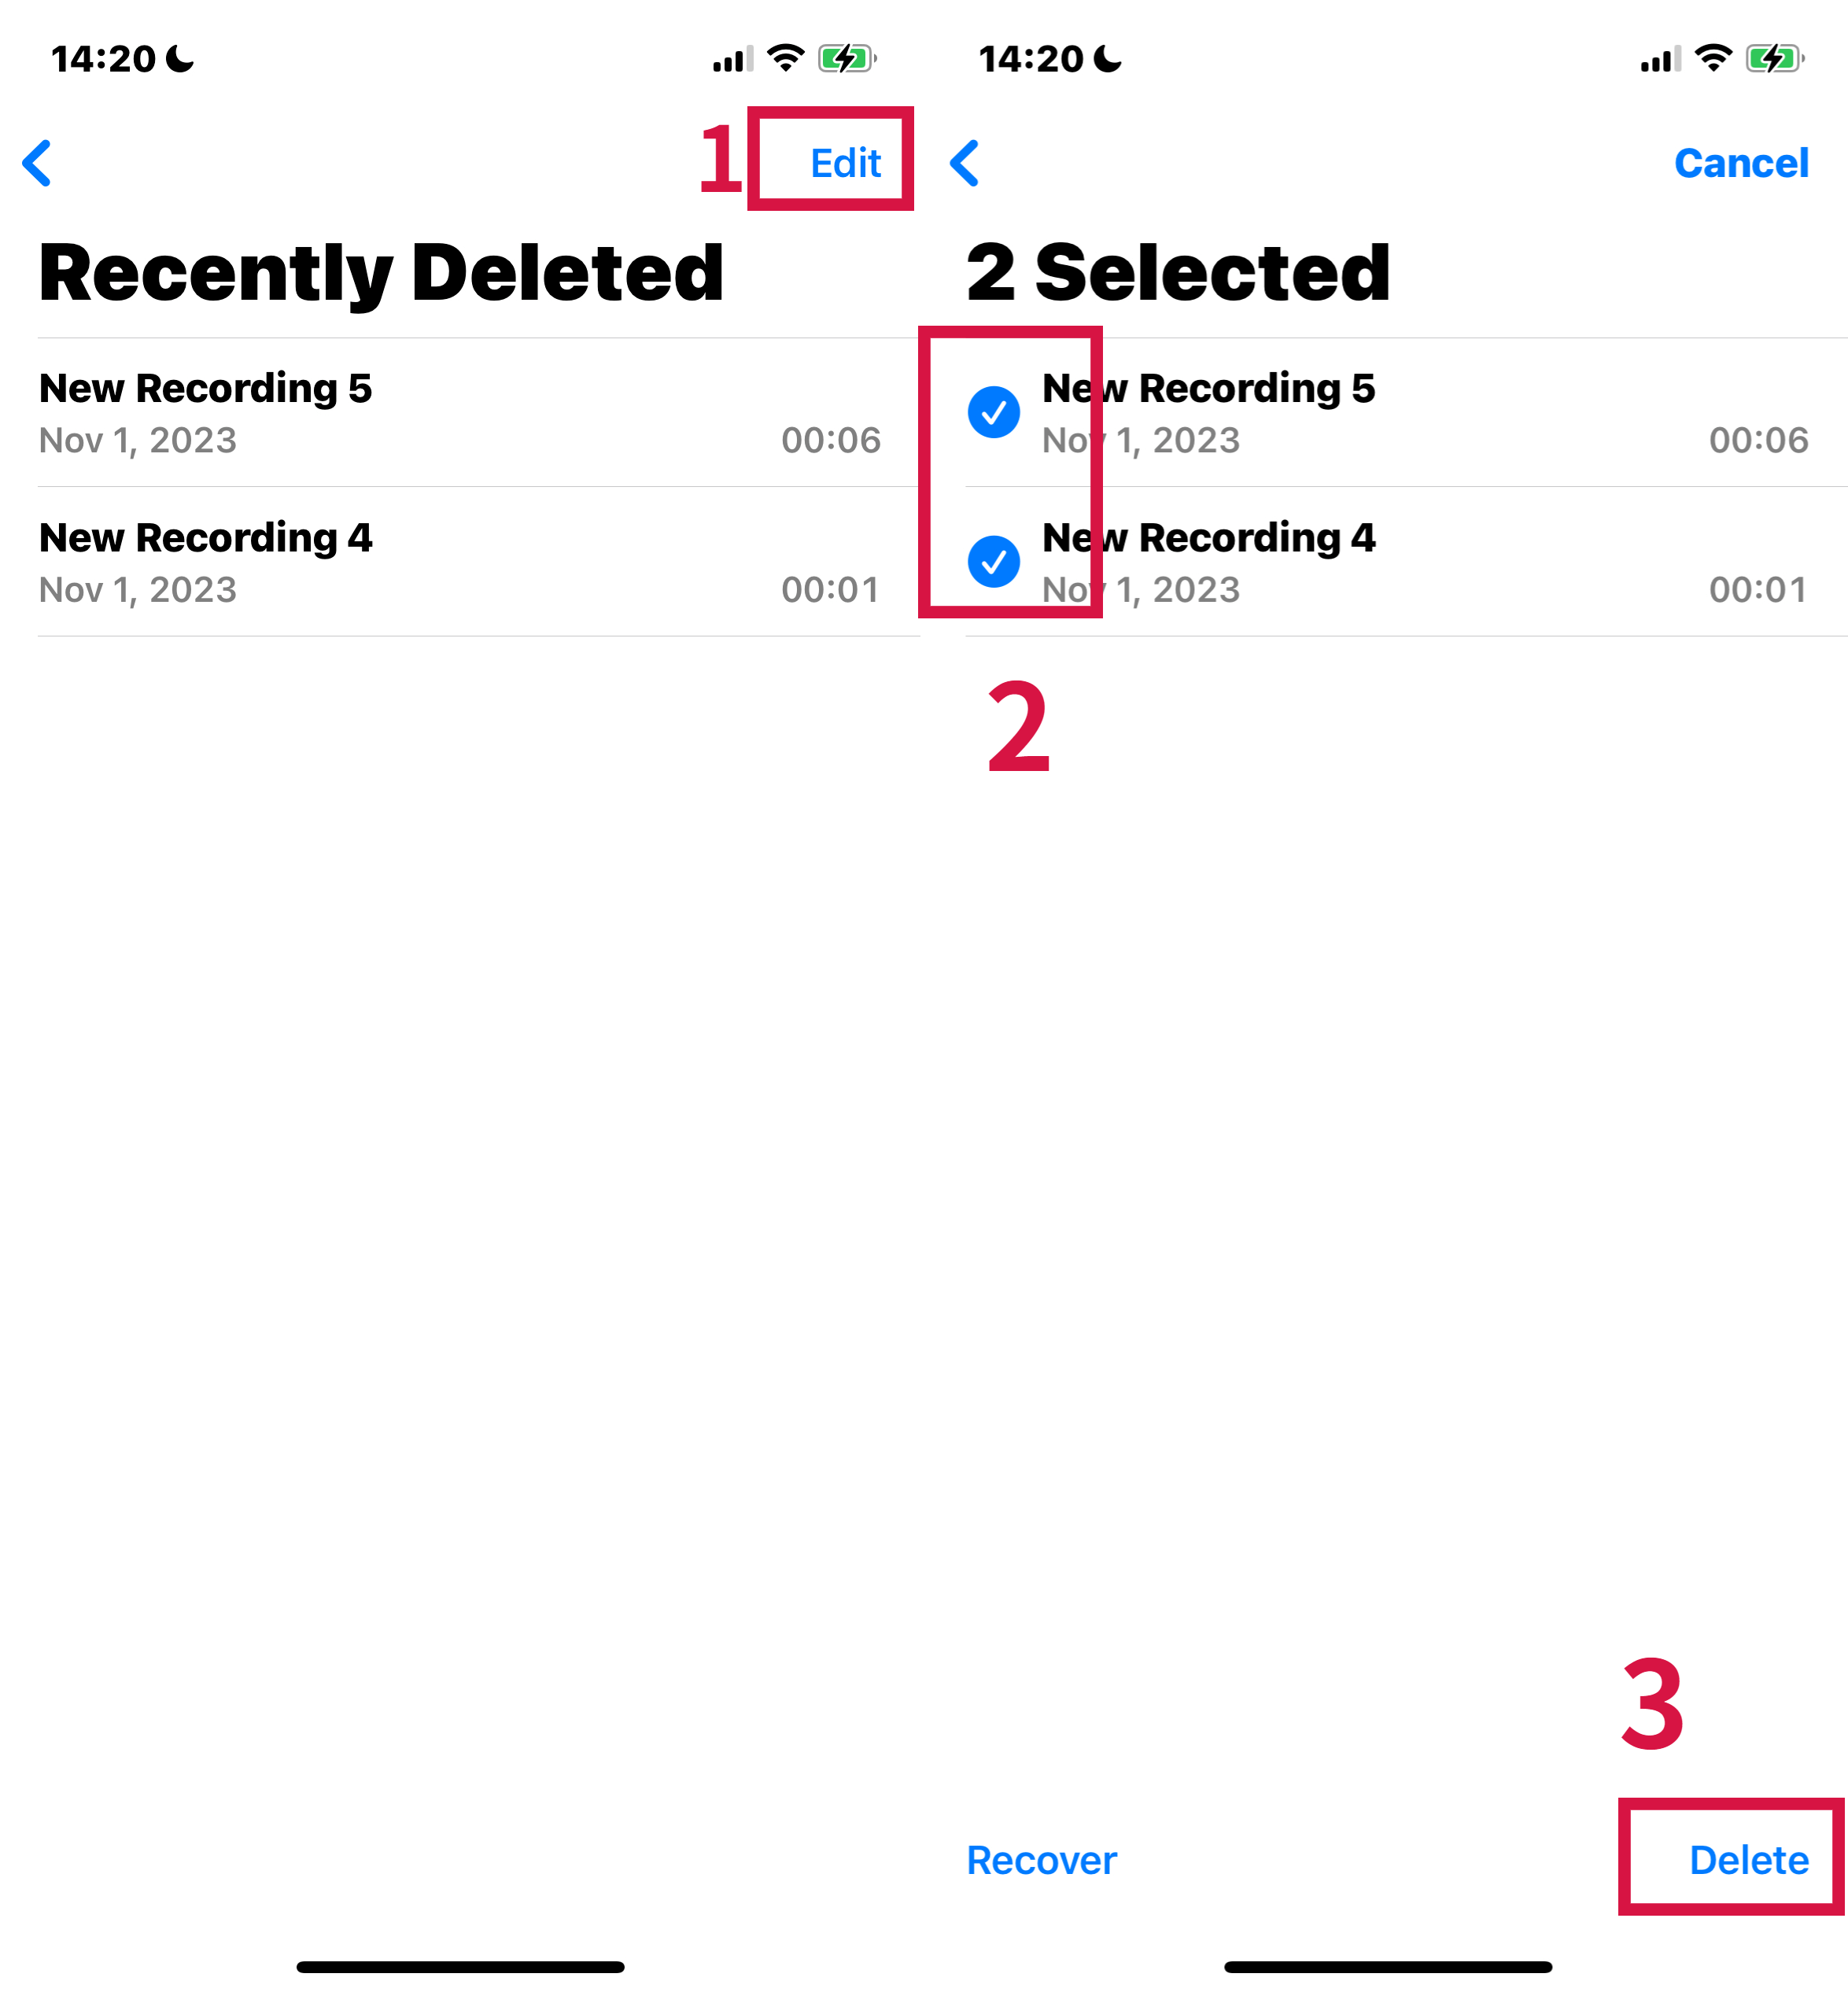
Tap Edit, then select the voice memos you want to delete.
Tap the Delete button.
To permanently delete them, go to Recently Deleted, then tap Edit.
Choose Delete All, or select specific voice memos and then tap Delete.
On Mac:
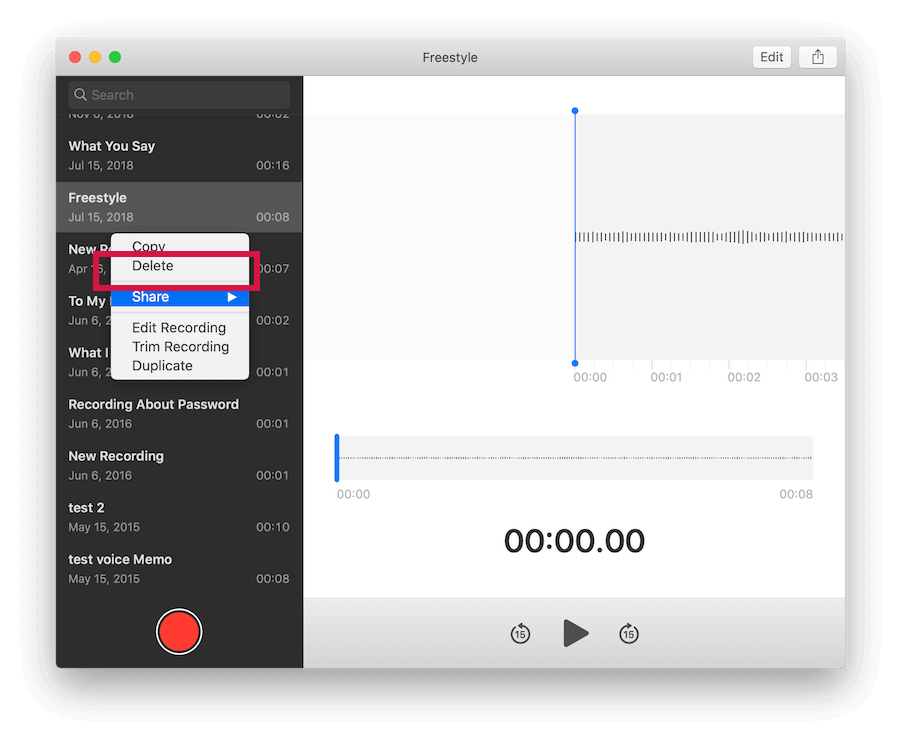
Select the voice memos you wish to delete in the Voice Memos app.
Click the Delete button.
To permanently remove them, open Recently Deleted, then click Delete All or select specific memos and Delete.
Click Delete Forever to confirm the deletion.
Remember that deleting voice memos from iCloud will remove them from all devices where you're signed in with the same Apple ID.
How to Buy More iCloud Storage
Purchasing iCloud storage is a practical option if you need more space and are willing to pay a monthly fee.
Pros:
Instant Extra Space: Quick solution for storage issues.
Various Plans: Ranges from 50 GB to 12 TB.
Cons:
Monthly Costs: Continuous expense.
Risk of Data Loss: Missing payments can lead to issues like data loss.
How to Upgrade
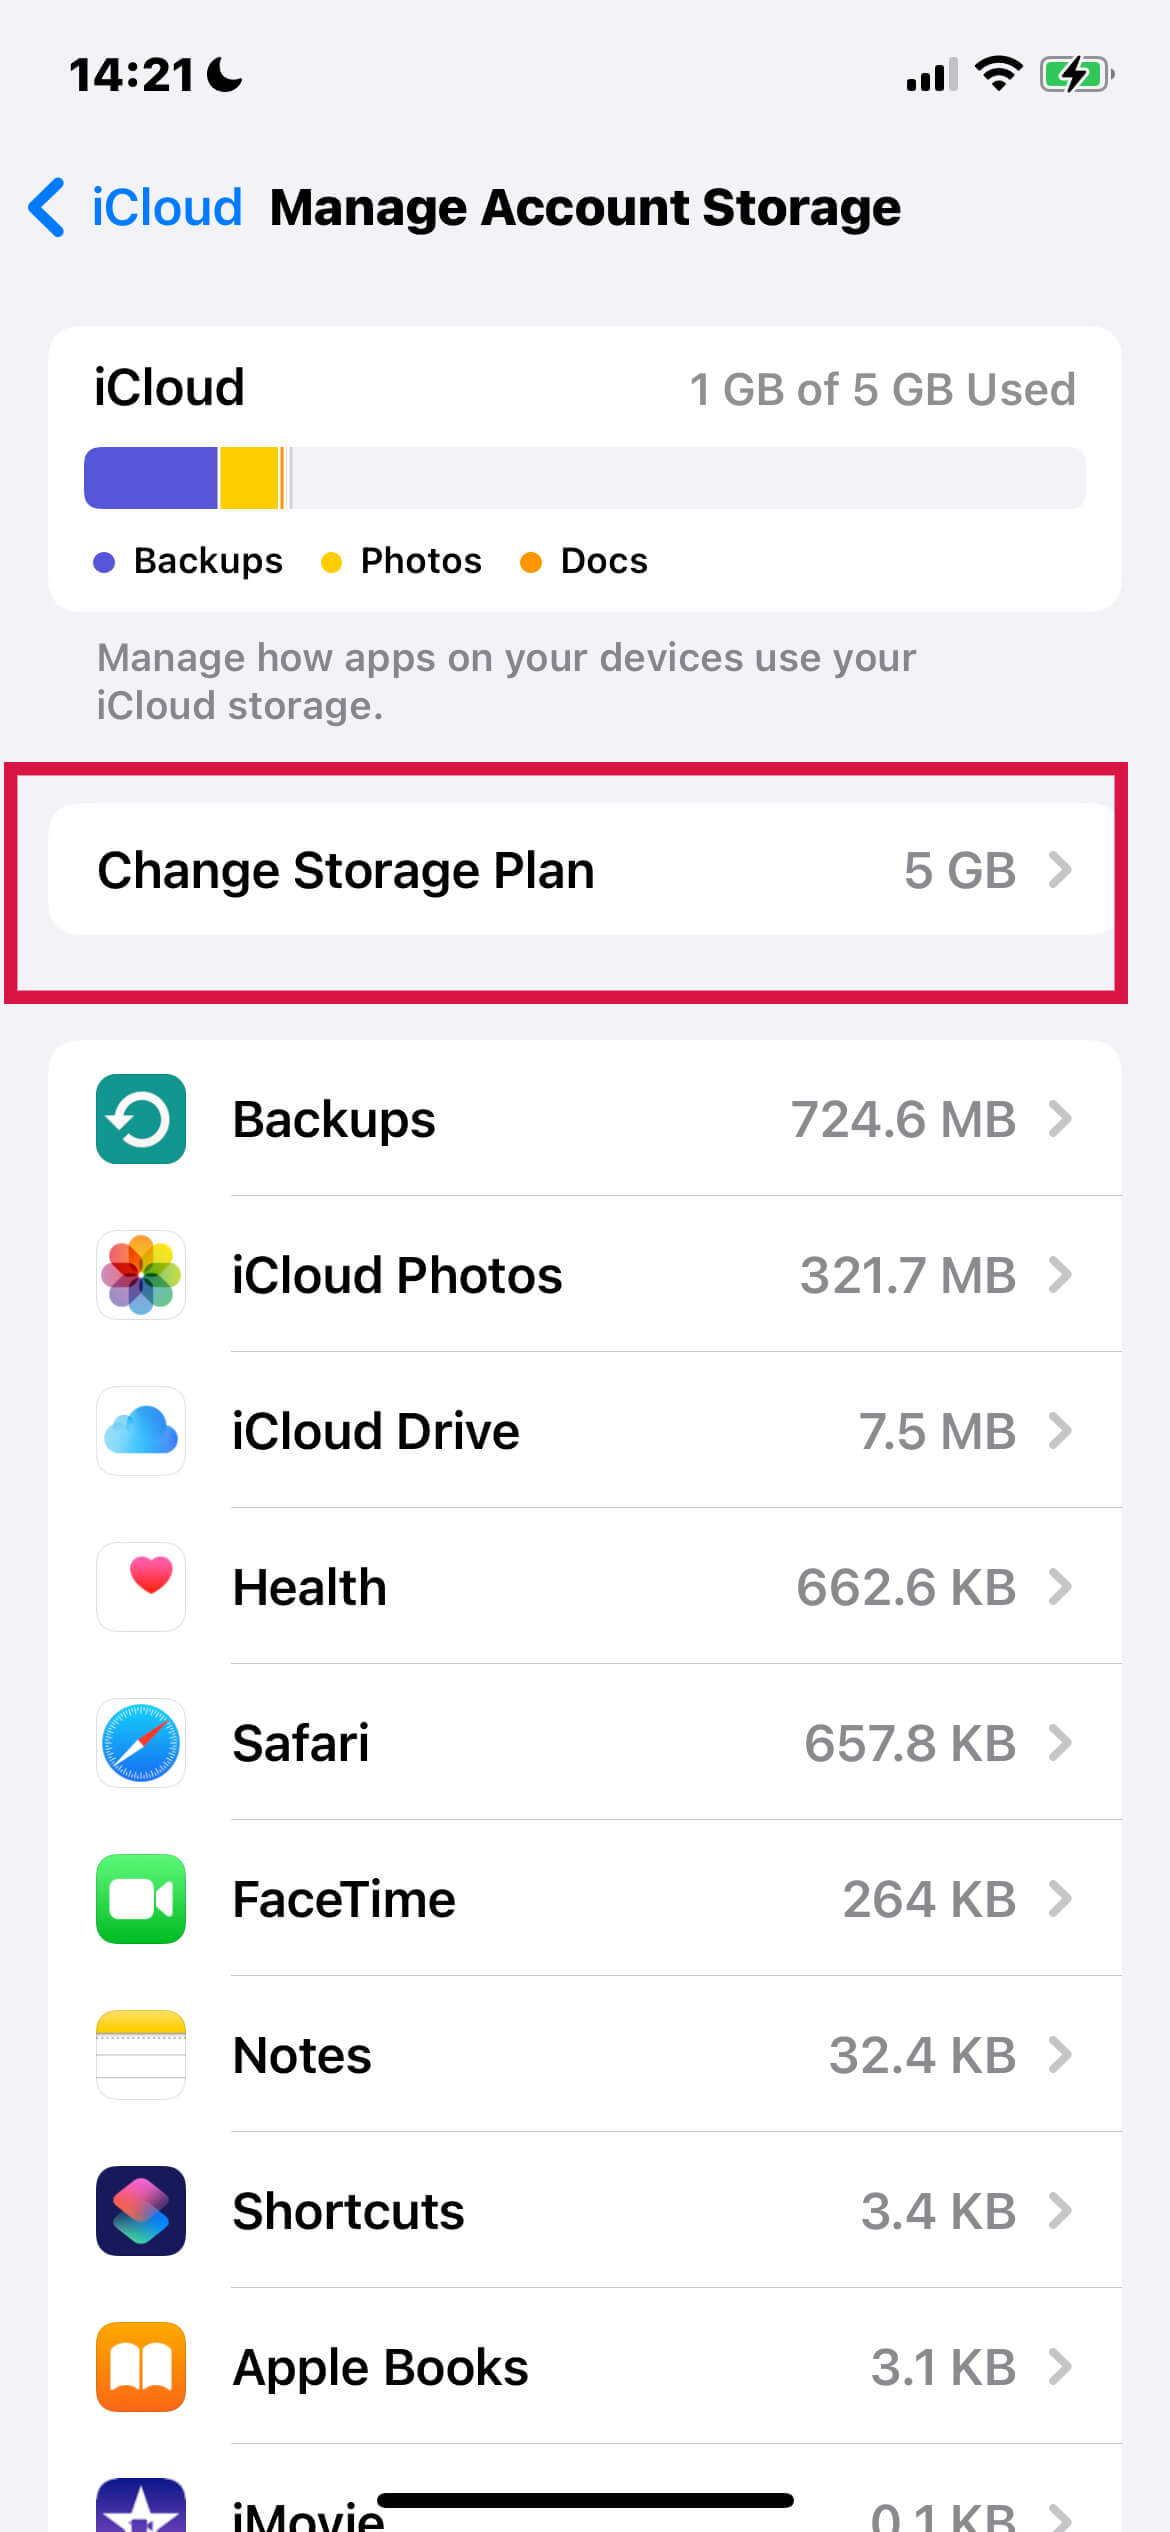
On Mac: Settings > Apple ID > iCloud > Manage > Change Storage Plan.
On iPhone: Settings > Apple ID > iCloud > Manage Account Storage > Change Storage Plan.
Costs vary based on location and chosen plan. Remember, this is a recurring payment, so keep your payment method updated to avoid service interruptions.
Conclusion
As we've seen, full iCloud storage is not a dead end but a prompt to tidy up your digital space.
With the simple fixes outlined in this guide, you're now equipped to manage your iCloud storage efficiently. Regularly applying these tips will ensure your iCloud remains spacious and organized for your important files and memories.
Thanks for reading!

